The Potted Garden

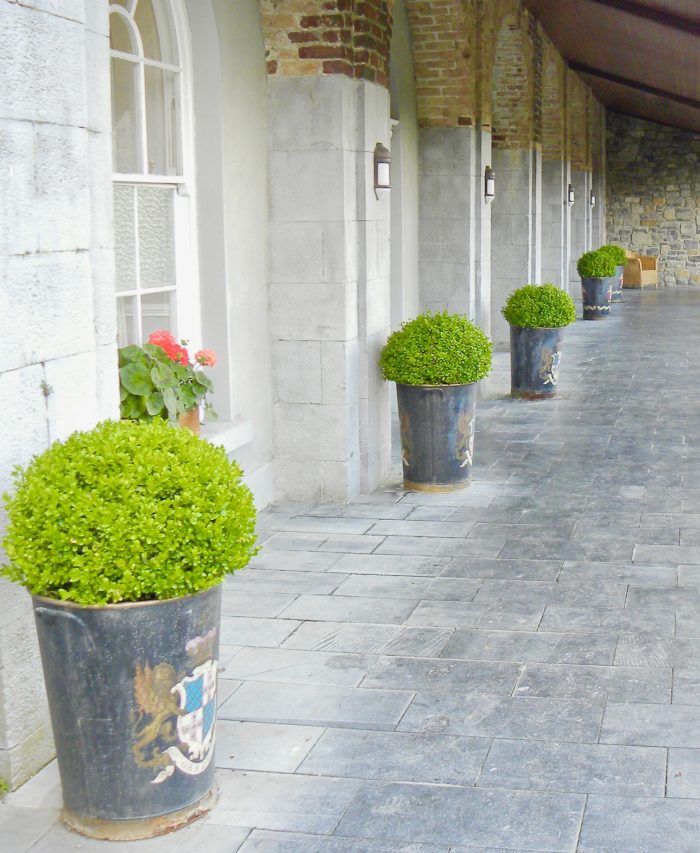
So many European landscapes feature beautiful potted gardens. The picture above is from a trip I took to Ireland years ago. All those potted boxwoods in gorgeous antique flower pots made a lasting impression on me.

Early March has me eagerly awaiting all those spring flowers. As the snow melts, I am already planning new projects for my garden including creating a larger potted kitchen garden inspired by some of my favorite European container plantings.

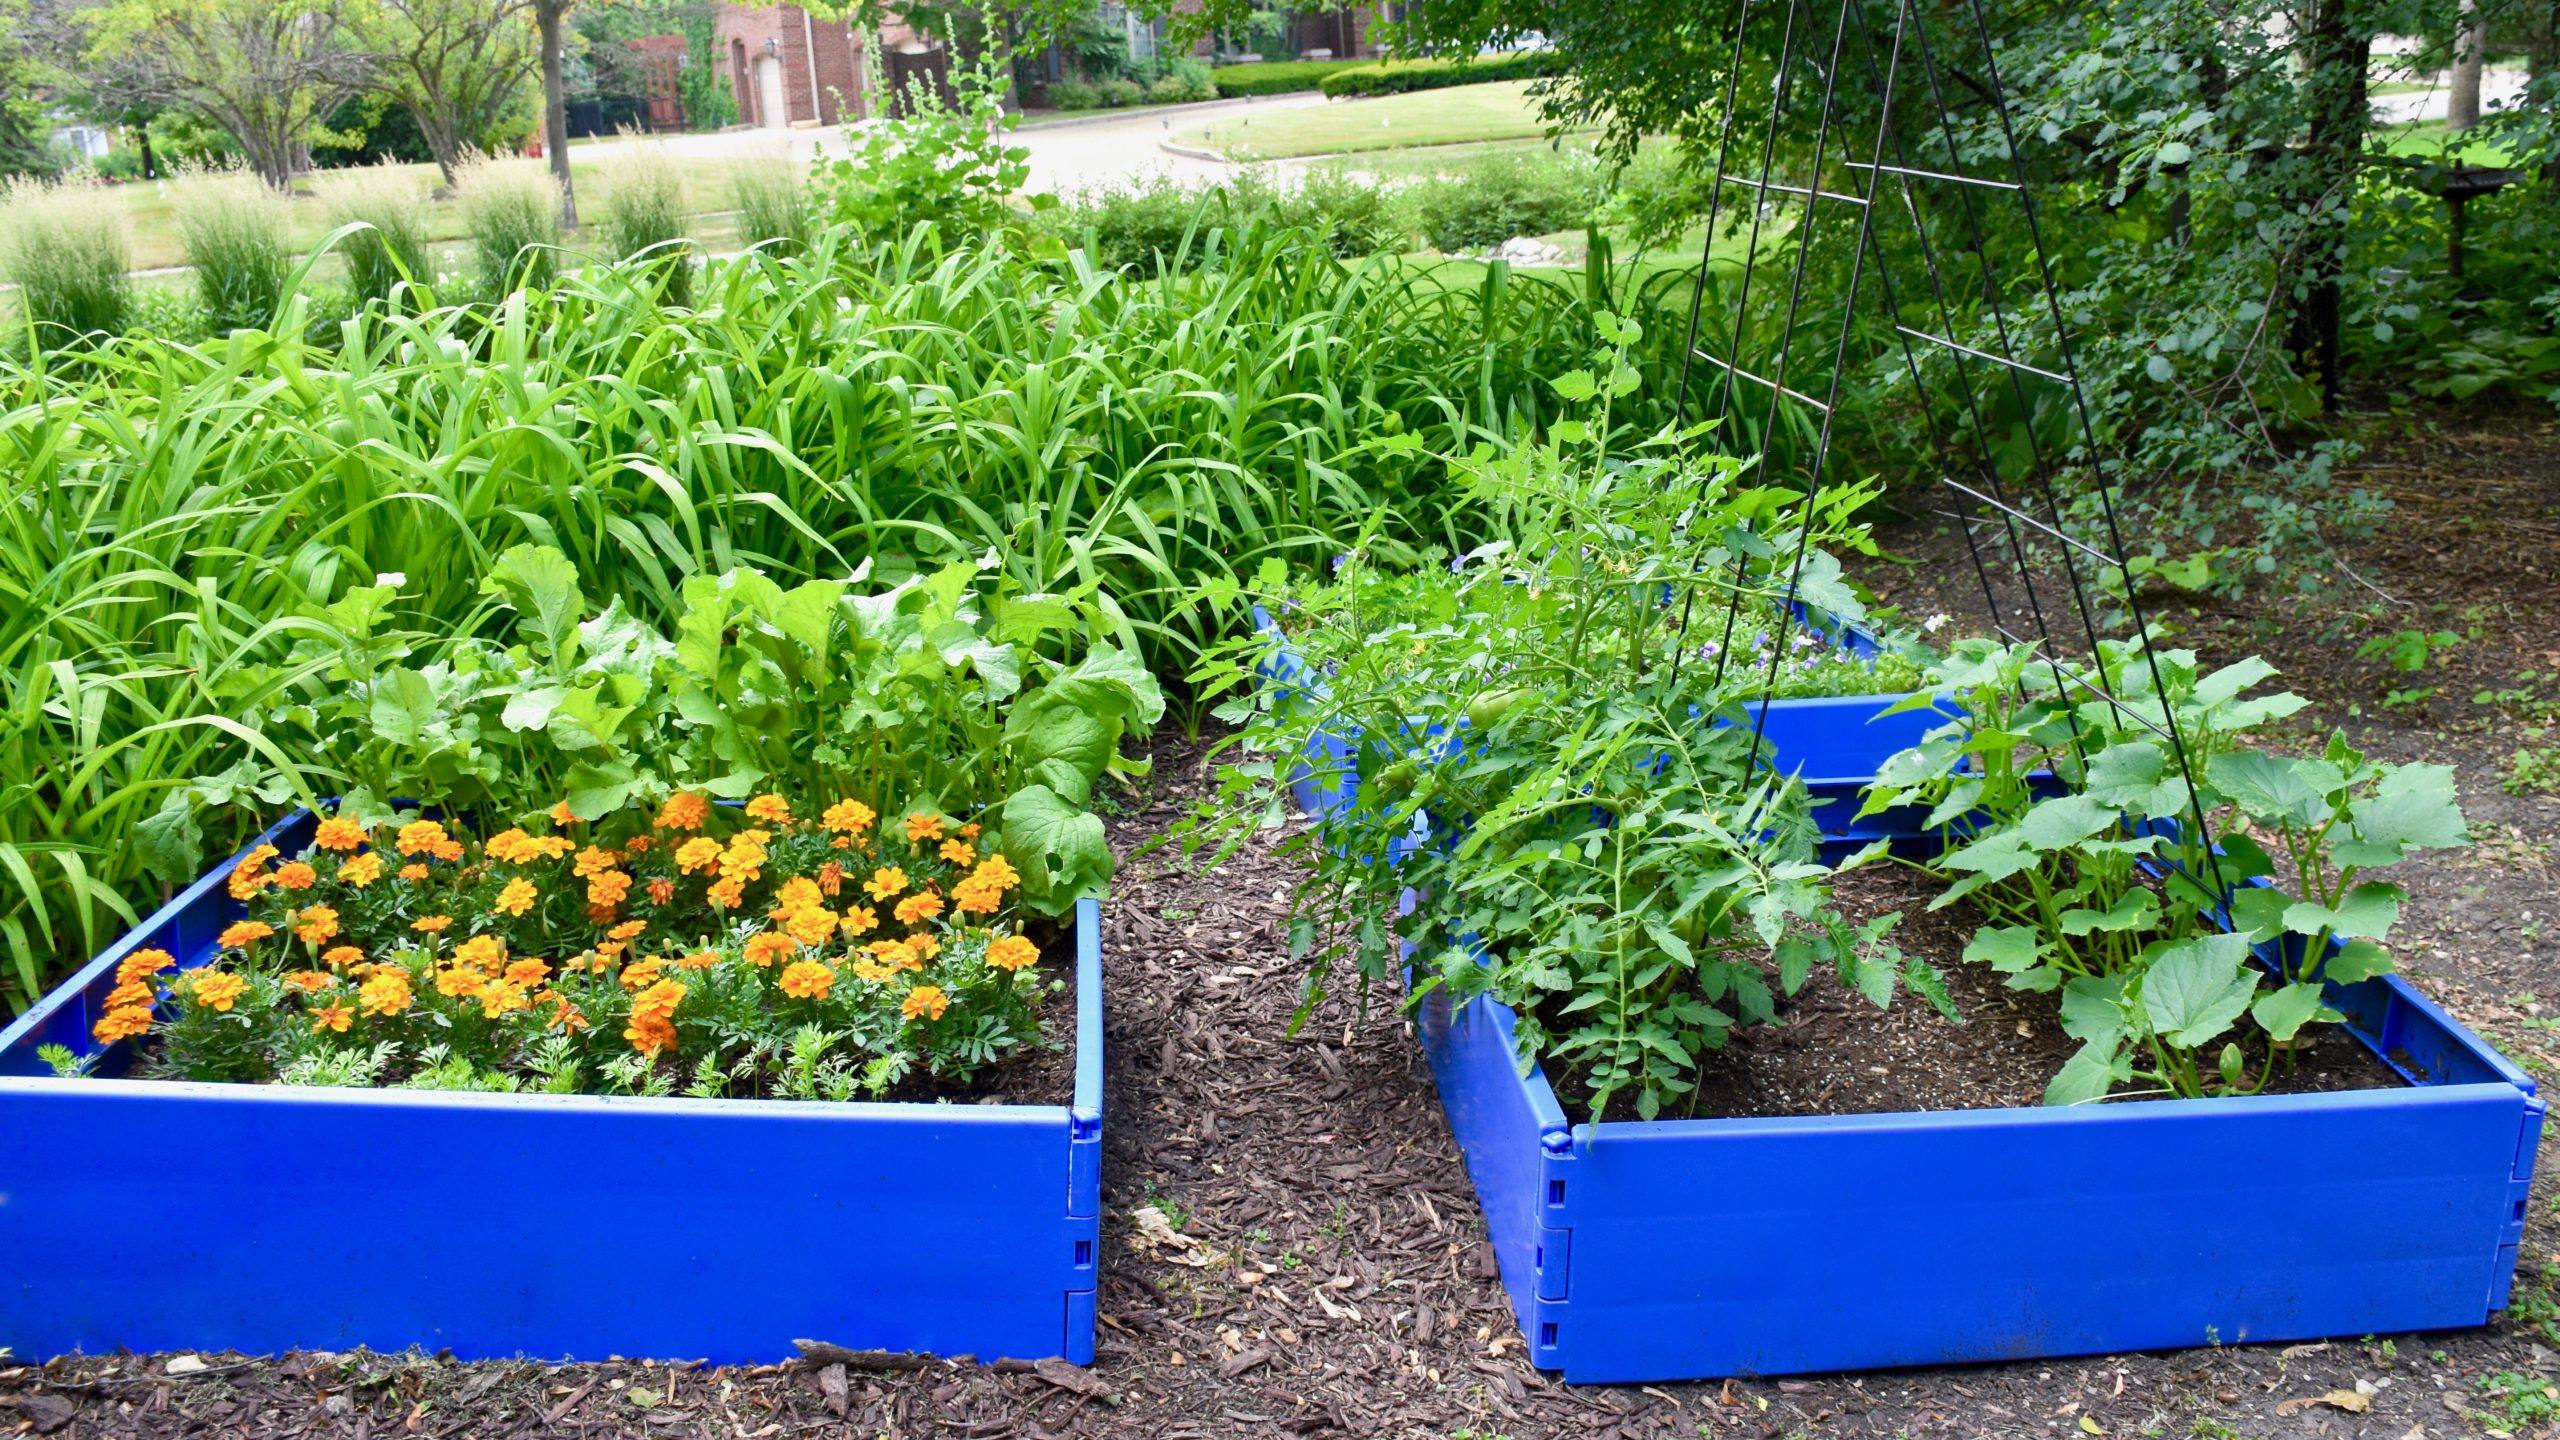
Last spring I created three large raised garden beds for herbs and vegetables. The flowerbed that they are in can have drainage issues. So I need the raised flowerbeds protected my plants and allowed me to reclaim this formerly washed out garden space.

My small kitchen garden produced an amazing amount of herbs and vegetables, but it could definitely use a garden style upgrade.

Inspired by British designer David Hicks’ book My Kind of Garden, I want to expand my vegetable and herb garden with other pots that add height and interest. My Kind of Garden was Hicks’ last book and in it he shares pictures of his favorite landscapes that he designed and others that inspired him. I love his book because it gives you a glimpse of so many interesting gardens from around the world. This gorgeous potted garden below is one that Hicks designed for his own home in England.

I like how he used lots of different styles of pots all in a similar shade of green. So while looking for new containers from my own potted garden project, I thought I would share a few of the beautiful gardens and planters that have inspired me.

Formal English Garden Styled Planters


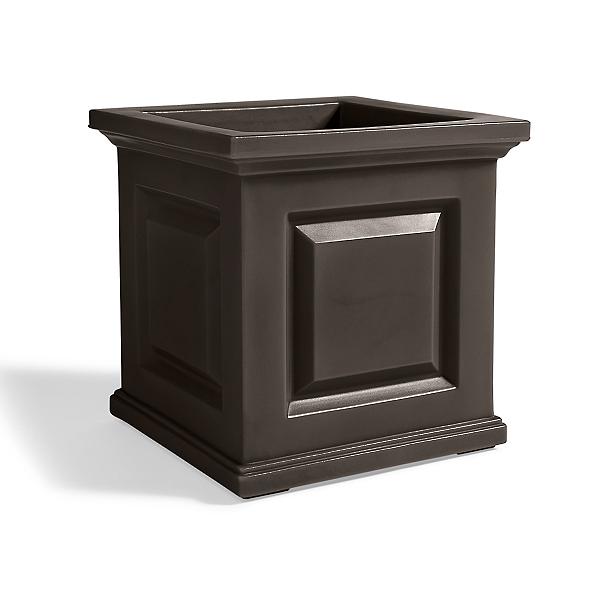
The Nantucket Planter from Grandin Road comes in several colors and heights the price is  reasonable.

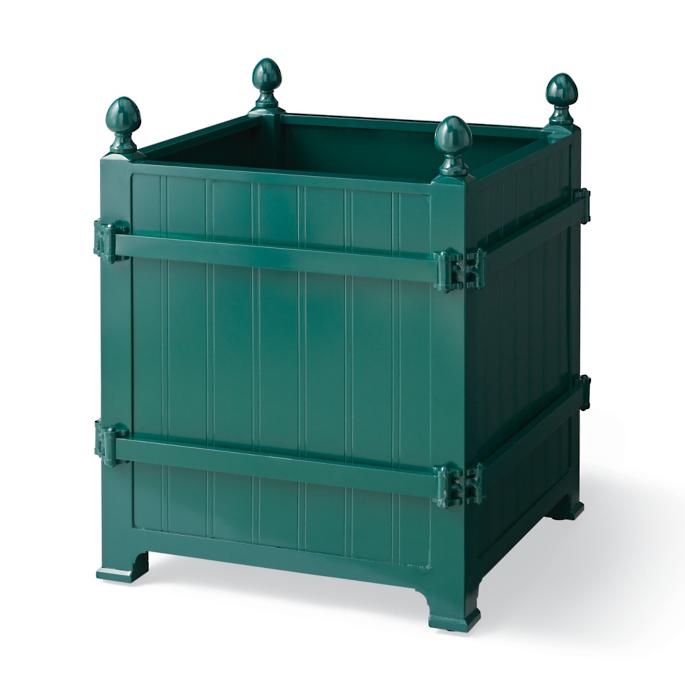
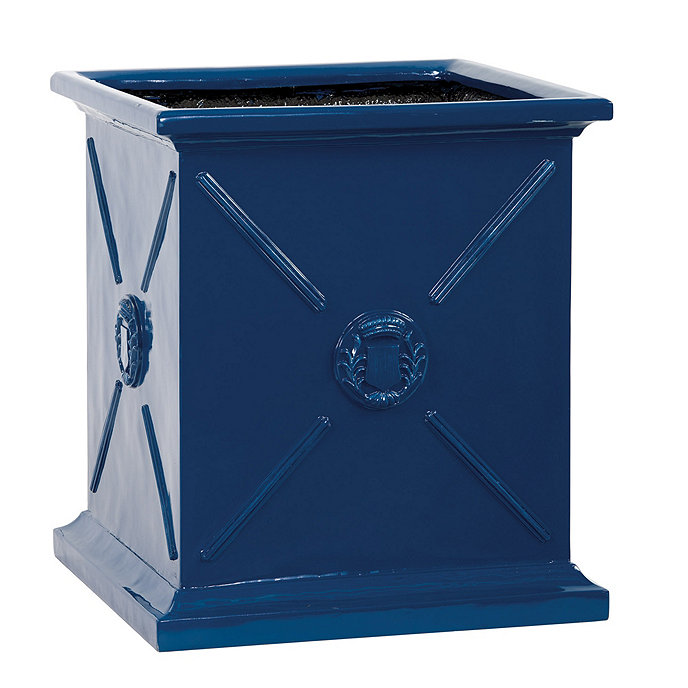
This second pot called the Versailles Planter. It comes with a fairly royal price tag, but it has a wonderful formal garden feeling and it comes some beautiful colors including this deep green as well as a pretty British blue.

Ballard Designs also has a lovely collection of stately planter boxes including this collection of Beauclaire Planters.

Another one of my favorite gardens is in Denmark. It’s one that I follow on Instagram. Have you seen Gina’s lovely garden at GNC Garden? It’s certainly a memorable one and I am looking forward to seeing more pictures this spring.  Gina’s garden features a beautiful collection of woven basket planters and darker pots,  which makes a real statement  in her mostly green and white garden.

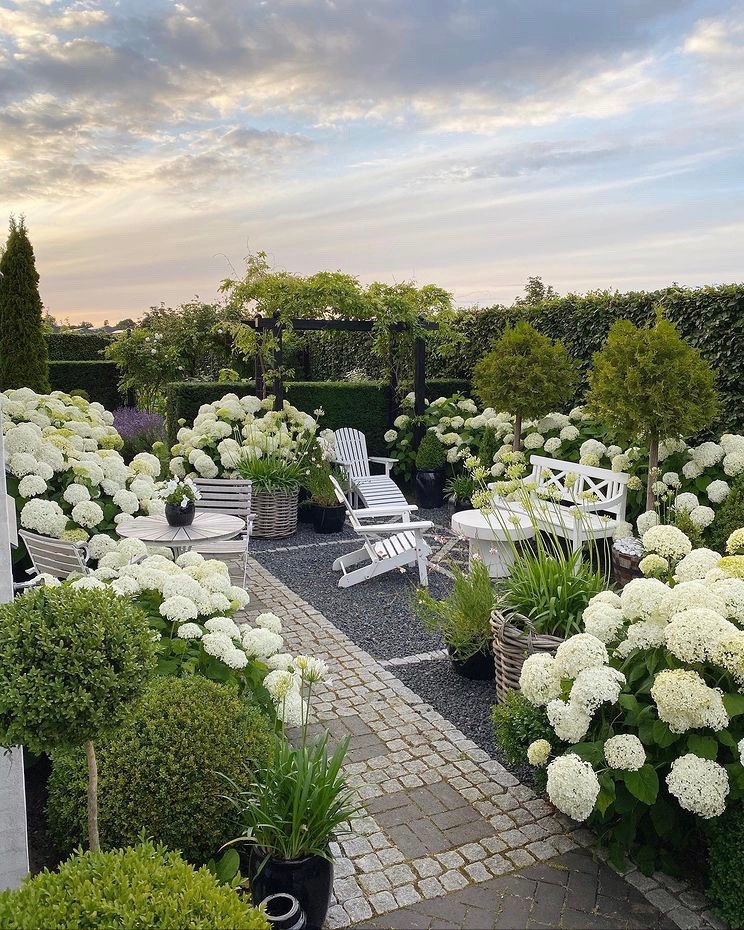
Danish GNC Garden Inspired Woven Flower Pots:

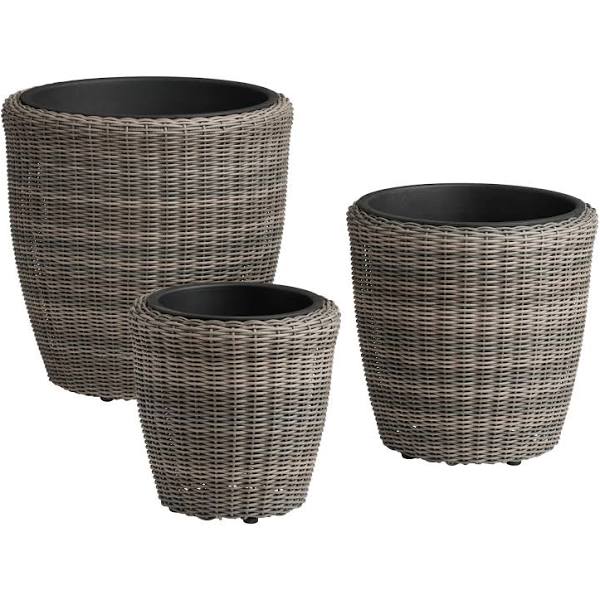
These All Weather Wicker Pots are from Cost Plus World Market. They have a wonderful basket like texture that would look beautiful in any potted garden.

Another flower pot that I loved for this look is called the Foxcroft Planter from White Flower Farm. I particularly like the weathered gray finish.

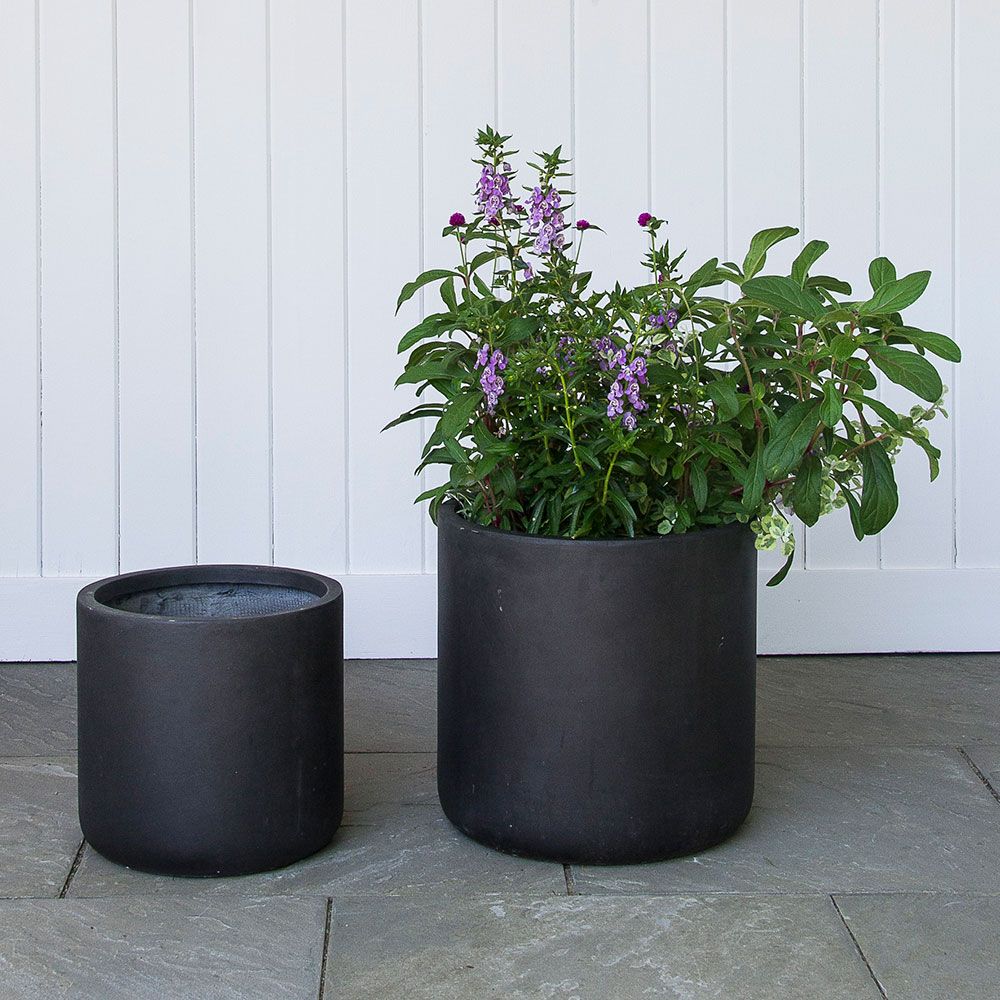
White Flower Farm also has these smaller Urban Accent Black flower pots that would look great on a table or in mixed in with all the woven basket planters like GNC Garden.

Finally, a very colorful potted garden from Danish gardener, writer and photographer Claus Dalby. His gardens and Instagram account always make me smile. I particularly love this spring collection of pots in front of his garden gate. It changes over the seasons, but it is always beautiful. Following his Instagram account is such a joy.

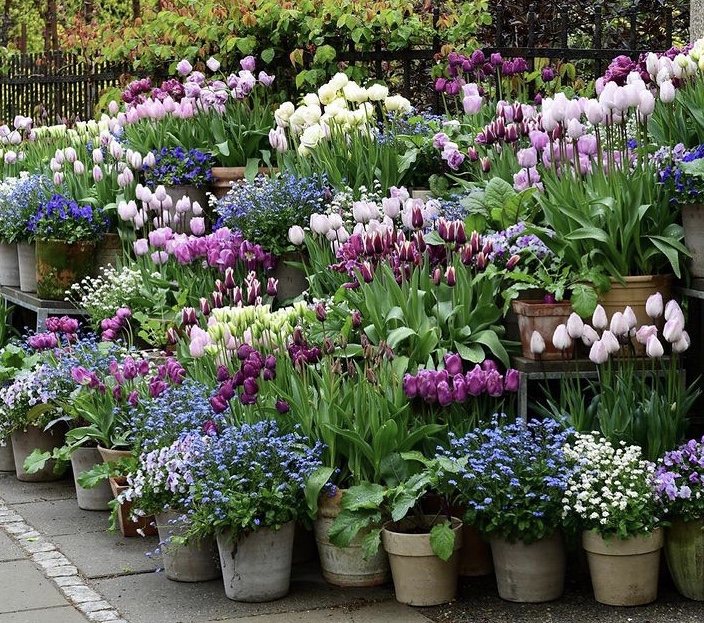
Claus Dalby Inspired Pottery Garden

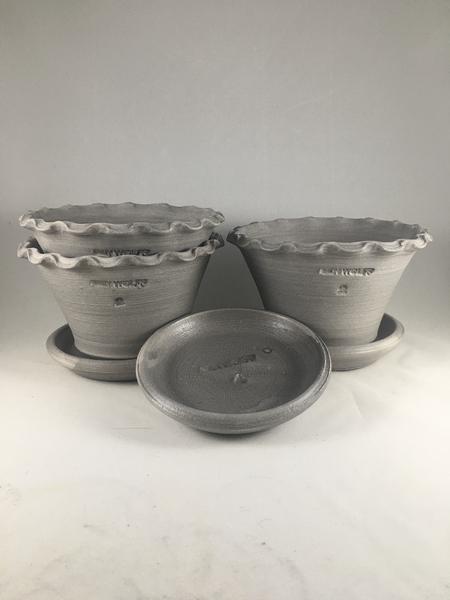
Dalby’s collected pots have a pretty washed out gray color to them that remind me of the flower pots made by Ben Wolff Pottery. I like the lettuce leaf edge on these pots, but Wolff has lots of other designs as well.

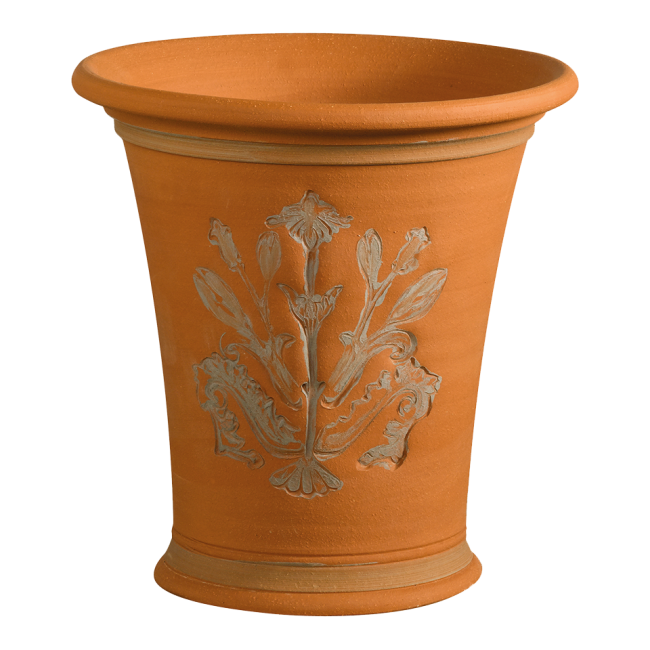
Next for a more traditional terra cotta collection look that these beautiful flowerpots that were made for the British Horticultural Society by Whichford Pottery their RHS Flowerpot would make a lovely statement surrounded by other smaller pots.

Lastly, for an Italian inspired potted garden check out the Alto Pot from Seibert Rice. Their potted gardens are breathtakingly beautiful. Here is a link to a project they completed at the New York Botanical Gardens.

So as spring draws near, looking at all these potted gardens has me inspired and ready to plant my own.

Reading and Eating: Alex Guarnaschelli’s Steak Diane

Alex Guarnaschelli's Rib Eye Diane

My love of cookbooks has shaped me as a cook and a writer. I have spent countless hours reading and pursuing my library’s large collection of cookbooks.  I love exploring new types of cuisine and I am always looking for a new culinary adventure or a great new recipe. However, every once in a while I come across a cookbook that is transformative. A book whose recipes and ideas about food becomes a small part of who I am as a cook. I have been cooking my way through iron chef Alex Guarnaschelli new cookbook Cook with Me for the last few weeks and it has truly inspired me.

I have loved it because it tells the story of Guarnaschelli’s journey to find a sense of home. As she describes it, “This book is who I am now as a home cook- the dishes are a roadmap to who I am today as a cook, parent, and daughter.” This French trained chef and food television star takes you into her home kitchen. She shares stories of cooking with her daughter and family recipes. Her mother Maria Guarnaschelli was a noted cookbook editor, so perhaps it should come as no surprise that this is not your ordinary celebrity chef’s cookbook. Her recipes and ingredient lists are surprisingly approachable and her techniques will have you thinking differently about how to get the most flavor out of any ingredient.

I have especially loved her approach to vegetables and salads. Her spicy roasted Brussel sprouts were amazingly delicious, as was her carrot salad with miso dressing and I loved her new take on the classic Waldorf salad. However, when I asked my family what their favorite dish was they all agreed-Steak Diane. I made it for our Valentine’s Day dinner and it was mouth-wateringly delicious.

This French inspired recipe derives its name “Diane” from the Roman goddess of the hunt. The seared steaks are simple but flavorful and the sauce is indeed divinely good. I served mine with her apple Waldorf salad and my husband’s favorite twice baked potatoes.

Alex Guarnaschelli’s Steak Diane -serves 4

  • 4 New York strips steaks or rib-eye steaks
  • kosher salt and freshly ground black pepper
  • 2 tablespoons unsalted butter
  • 3 medium sized shallots, minced
  • 1/4 cup Brandy (I like cooking with a French brandy, cognac)
  • 2 tablespoons Dijon mustard
  • grated zest and juice of 1 small lemon
  • 2 tablespoons Worcestershire sauce
  • 1/2 cup beek stock
  • 1/4 cup heavy cream
  • leaves from 6 springs of flat leaf parsley, coarsely chopped
  • 1/4 cup fresh chives, coarsely chopped

First, season the steaks generously with kosher salt and pepper on each side. Heat your pan at medium high heat and add 1 tablespoon of butter. After the butter’s bubbling has stopped add the steaks. If you have a smaller skillet you could cook all the steaks at once using two skillets.

Next, sear the first side of the steak for 6 to 8 minutes resisting to temptation to move or flip it too soon. Once the steaks are browned on the first side, turn them over and brown the second side for another 5 to 7 minutes. Cook the steaks to your desired doneness. If you are using a meat thermometer then rare is 125 degrees F to 130 and medium is 135 degrees F to 140 degrees. Take the steaks from the pan and allow them to rest while you make the sauce.

Finally, make the pan sauce. Melt 1 tablespoon of butter in the pan then add the chopped shallots and cook them for 3 to 5 minutes until they are translucent. Next, pour the brandy in the pan to deglaze it. Allow the brandy to reduce by half scraping up all the brown bits from the pan as it cooks. Whisk in the mustard, lemon juice, Worcestershire and beef stock. Allow the sauce to reduce and become thick enough to coat the meat about 3 to 5 minutes. Stir in the cream, parsley, lemon zest and chives. Taste for seasoning. Place the steaks on plates for serving and generously spoon the sauce of the top of each steak.

Cooking as my eight year old daughter so wisely proclaimed this week is all about “community.” There is something special about cooking with others and sharing a meal with the ones you love. Guarnaschelli’s Cook with Me is all about community. Guarnaschelli weaves together a delicious collection of stories about her life and recipes for the dishes she loves. I enjoyed her cookbook so much that I am sure that I will be cooking things like her steak Diane for many years to come.

Chicken Saltimbocca

Prosciutto Chicken

What I love about Italian cooking is how it can take a small number of ingredients and celebrate or bringing out the best in each one. Italian cooking creates these seemingly simple but wonderfully flavorful dishes. Chicken Saltimbocca in Italian means “jump in the mouth” chicken. One bite and you will see why this chicken is so appropriately named. My version of this classic chicken dish makes a deliciously simple dinner. Everyone in my house loves this chicken. It comes together quickly which makes it a great weeknight meal. I love to serve it with fresh pasta or if I have a little more time, lemon risotto and an Italian salad.

Chicken Saltimbocca -Serves 4

  • 2 boneless skinless chicken breasts, sliced in half to make 4 cutlets
  • 4 fresh sage leaves
  • 8 slices prosciutto di parma
  • 1/2 cup flour
  • 4 tablespoons of butter
  • 1 tablespoon olive oil
  • 1/2 cup dry white wine
  • 1 tablespoon lemon juice
  • lemon wedges

First, make your chicken cutlets. Take two chicken breasts and if it has any rib meat on the bottom cut it off so you have an even chicken breast. Carefully place your hand on top of the chicken and cut or split the chicken breasts in half horizontally like you are butterflying them. Each chicken breast should be cut into two cutlets.

Cover the top of the cutlets with a sheet of plastic wrap and pound them to an even thickness.

Take the cutlets and place one sage leaf on top each piece of chicken. Then wrap each cutlet all the way around in two pieces of prosciutto.

Next, place the flour in a shallow bowl or large plate. Dredge the prosciutto covered chicken in the flour shaking off any excess.

Melt the 2 tablespoons of butter in a large skillet over medium heat until the bubbling subsides. Then add a tablespoon of olive oil. Cook the chicken for 5 to 6 minutes a side until the prosciutto is crispy and the chicken is cooked through.

Place the cooked chicken on a plate or platter. Then create your pan sauce. Pour the white wine in the pan and bring it to a boil. I have also used dry sherry if I don’t have white wine and it is also delicious. Whisk or stir the wine to pick up the browned bits on the bottom of the pan. Then whisk in 2 tablespoons of butter. Finally, once the butter is fully incorperated, add one tablespoon of lemon juice .

Return the cutlets to the pan to make sure they are warm. Then serve the chicken with the white wine sauce.

A delicious Italian dinner in 20 minutes. I think we all need a few more recipes like this one.

It has been a busy week around our house and winter it seems is getting the best of me. I know it’s been an especially tough week for our friends and family in Texas. So, as we all thaw out here is a great dinner to share with the ones you love.

The view from my front porch. I have never shoveled so much snow!  So hopefully we get a little break from all of this winter craziness. Stay warm my friends!

Color Me Happy

“Everyone wants to talk about the color that is hot right now, but for me color is never just another trend. It’s ebullient, endless boundless. When you walk into a colorful room you smile.”

Ruthie Sommers

It seems like all the color and fun has just suddenly vanished from home stores everywhere. I am working on some new projects around our house. So, last week I braved the cold and snow to go looking for a few new fabrics and pillows. I went to all of my favorite stores and I came away feeling very underwhelmed. Where has all the color gone?

Perhaps the pandemic has us all feeling drained. So this week I decided to dedicate a post to coloring your house happy. Fabric and pillow ideas that that could give any room in your house a vibrant boost.

First, up two vintage patterns by Schumacher called Citrus Garden and Exotic Butterfly. Both of these patterns were hand drawn by Viennese architect and furniture designer Josef Frank. Frank’s story is inspirational to me. He was of Jewish decent, so he had to flee his home in Vienna by emigrating to Sweden before World War II. In the late 1940s he created these colorful nature inspired drawings. While the world was unraveling, he was finding a new way to thrive by drawing these vibrant and hopeful new patterns. Which goes to show that color’s ability to lift us up and great design is timeless. When I was researching this pattern I found that his design company in Svenskt Tenn still carries many of his fabrics here.

Citrus Garden Lime and Blue

This lime tree pattern has so many beautiful colors to pull from. A happy lime green, a bold blue, and preppy pink. Just one pillow could inspire an entire room.

Schumacher Josef Frank Citrus Garden Lime Tree

Schumacher Zimba Lawn

Lacefield Designs Indigo Blue Ikat Sahara Ovals

Exotic Butterfly and Patterned Pink

Next, Exotic Butterfly is one of my favorite prints.  It comes is several color ways including an all blue and all green version. This particular pattern is called Spring. I especially love the juxtaposition of the red and pink. So, I had fun finding a few bright pink patterns that would make a smashing addition. I love the bright peony pink spots by British designer Anna French. I also liked this trellis like pattern by Quadrille. Nothing says happy like bright pink!


Schumacher Exotic Butterfly Spring Pillow

Thibaut Sarah Spot in Peony By Anna French

Quadrille Saya Gata in Magenta by Alan Campbell

Equestrian Orange and Brown

Then I found this happy French inspired orange fabric called Faubourg. It also comes in a very pretty celadon blue color as well as a brown. This shade of orange made me think of a bright Hermes orange. I paired it with two brown and white fabrics by Kelly Wearstler. These brown and taupe fabrics have a modern equestrian like feel to them.

Schumacher Faubourg Orange Horse

Groundworks Channels Taupe by Kelly Wearstler

Schumacher Imperial Trellis Java by Kelly Wearstler

Chinoiserie Red, White and Blue

Perhaps a little blue and white. I love this Thibaut pattern because it adds a pop of cheery lacquer box red. Picking up on the blue and navy colors in the flowers I found a couple different pillows that might pair nicely with this gorgeous fabric.

Thibaut Honshu Red and Blue Chinoiserie

Schumacher Octavia Navy Blue

Thibaut Nexus Navy Indigo

Coastal Aqua and Lilac

Finally, a sunny coastal inspired fabric. A pretty aqua and lilac ikat from Alan Campbell’s collection at Quadrille. Thibaut has a dotted print called Marathon that picks up on that pretty lilac color and this fabric pattern also comes in aqua as well. I could also see pairing this aqua ikat with a brush stroke print like Schumacher’s light dove colored Queen of Spain. Turquoise and white have a happy beach house feel that instantly lifts my spirits.

Quadrille Kazak in Aqua and Lilac

Thibaut Lilac Marathon

Schumacher Queen of Spain Dove

Never underestimate the power of color. Neutrals certainly have their place, but there is nothing like a gorgeous green, a brilliant blue, a pretty pink, or a radiant red  to inspire you. I believe that color in a way speaks to our soul. Clinton Smith, former editor of Veranda Magazine once said that “color is a declaration of intention: It sets the tone for how you want to live. It’s the embodiment of what you are and what you find beautiful.” In times like these, we could all use a little color in our lives. So add a colorful pillow or two to your home or just wear a little more color, because we all need more reasons to smile.

Let Them Eat Biscuits: Cake Flour Biscuits

Maison McCauley Biscuit Recipe

What makes the perfect biscuit?

There is lots of debate about this topic and so many recipes that claim to have the answer. Is there a secret to making a better biscuit? What about the type of flour you use? Do you have to have the much talked about White Lily Flour to make a good biscuit?

These are the questions I have been pondering since April when lo and behold the pandemic flour shortage caused my suburban Chicago grocery store to miraculously have a bag of White Lily Flour. Although the traditionally Southern White Lilly flour has been milled in the midwest since 2008, it is rare to see it up North. I was thrilled! I was so excited to be able to bake a batch of biscuits and taste the difference for myself.

That Sunday morning I pulled out my favorite recipe and made a batch. The biscuits were tender and I liked the taste. However, they didn’t have quite the height that I was hoping for. So, I began to read everything I could find about the science of making a great biscuit. It turns there is something special about White Lily flour. The protein content in White Lily Flour is much less than other all purpose flour brands. White Lily is made from a softer wheat which gives it a lower protein content. I have found that this lower protein flour does have a more tender taste. However less protein can mean less rise when it comes to bread, which is why most all purpose flours have a higher protein content.

The Great Biscuit Flour Debate

This flour protein table information comes from testing by Cooks Illustrated and Swans Down Cake Flour.

I then began to wonder how do I get the taste of the low protein flour without loosing the rise? Furthermore, how could I regularly recreate this recipe up North where White Lily Flour is scarcely seen? The answer came to me as I was reading Thomas Keller’s Ad Hoc at Home cookbook: cake flour. Cake flour has a low protein content, which with the right baking techniques makes an amazing biscuit.

After lots of batches and testing I created a delicious southern styled biscuit: light, fluffy and sweet. I added just enough buttermilk to give an added rise, but not so much that it overwhelms you with its tangy taste.

The Real Secret to Baking Biscuits

However, the most important part of baking a good biscuit is how you handle the dough. Using the food processor keeps it from getting overworked and folding the dough over itself adds the layers. These small details are the sometimes unspoken secrets of great biscuit bakers. No one wants to go to all the effort of making homemade biscuits only to have them turn out like hard little hockey pucks. So, here is my recipe for my light as air, melt in your mouth southern biscuits.

Cake Flour Biscuits

  • 3 ¼ cups cake flour (or White Lily Flour if you can find it), plus more for rolling
  • 1 teaspoon sugar
  • 1 tablespoon plus 1 teaspoon baking powder
  • 1 teaspoon baking soda
  • 1 teaspoon salt
  • 1½ sticks (12 tablespoons) cold butter
  • 3/4 cup milk
  • 1/2 cup buttermilk

Egg Wash

  • 1 egg
  • 1 teaspoon water

Preheat the oven to 400 degrees

In a large food processor pulse together the dry ingredients: flour, sugar, baking powder, baking soda and salt.

Next, Cut the butter into small cubes. Pulse it until it is cut into small pea like pieces. This will ensure that the butter is evenly distributed and dough is not overworked.

Next, add the milk and buttermilk and blend in food processor until the biscuit dough begins to form. Note the dough will be slightly sticky. This is what makes it tender and what allows it to be fold it over to form the layers.

Roll the biscuit dough lightly on a floured surface. Using a lightly floured rolling pin roll out the dough out to about ½ inch thick rectangle. Then fold the dough over to make a double thickness. Roll the dough out until it is 1 inch thick. This double layered dough will allow you to get a taller biscuit. Cut the biscuits out using a 2½ inch circular cutter (you could also use a lightly floured drinking glass end if your don’t have a cutter). Push the cutter straight down, but do not twist it or it will pinch the rise of the dough. Make as many biscuits as you can out of each roll out of the dough. Then repeat the steps with the remaining dough until you have 8 to 10 biscuits depending on the size of cutter used.

If you look closely you can see the two layers. This technique is a little like laminating dough, without adding any extra butter. The layers and cutting at least 1/2 thick biscuits are the key to creating a taller biscuit with a lower protein content flour.

Now make an egg wash by whisking together the egg and water together in small bowl. Brush the tops of the biscuits with the egg wash right before baking them. This is what gives them a shiny golden top.

Bake for 10 to 12 minutes until light, fluffy and golden on top.

Cake flour makes all the difference when it comes to the tenderness. Look at that flakey buttery texture. I found that higher protein content flours just can’t compare when it comes to tenderness.

These biscuits are great with a little butter and jam. However, if you are looking for brunch or breakfast for dinner ideas then I have a couple of biscuit sandwiches that I love to make. In our house, I like to set up a biscuit sandwich bar so everyone can create theirs own perfect biscuit sandwich. Make a side of berry and yogurt parfaits or a fruit salad and you have a fun breakfast for dinner night that everyone will enjoy.

The Classic All American Egg and Cheese Biscuit Sandwich

Split your biscuit in half and fill it with scrambled eggs, grated cheese and bacon, Canadian bacon or ham.

The Biscuit Sandwich with A Chicago Twist

Want a delicious Chicago Italian style sandwich? Then try one of our favorite biscuit combinations: fig jam (I like the Divina brand,) prosciutto and Burrata cheese. So ridiculously good!

The famous Marie Antoinette quote may have been talking about cake or brioche, but cake flour has a way of making delicious biscuits too. So cake flour biscuits for everyone! Because no matter how you serve them, these rise and shine cake flour biscuits are everything a good biscuit should be: light, fluffy and melt in your mouth good.

Fish and Chips

Instant Potato Fried Fish

There are some childhood rules that just beg to broken, like “don’t play with your food.” The first person who uttered that phrase was surely not a cook. Over the years I have found being creative and playing with ingredients is one of the most exciting parts of cooking.

I love reading about what other cooks and chefs are thinking when they create a new dish. A while back I read a cookbook by Chicago chef Stephanie Izard. She was talking about how playing with certain ingredients had inspired new dishes. A pineapple panna cotta that she had dreamed up had flopped, but it got her thinking about pineapple juice. Which lead her to create an even better signature chili recipe. It turns out that the acidic juice that hadn’t worked in her dessert, was perfect for creating more tender chili meat. It’s amazing what a great chef can dream up from unexpected ingredients.

Recently, I decided to have a little fun in my own kitchen with an unlikely new ingredient-instant mashed potatoes. I had heard of cooks adding them to chicken fried steak or other breading mixtures. I decided that it might be fun to use them in a new recipe. As I thought about their light flakey texture, I began to wonder what they would taste like if I paired them with fish.

So, with a couple of cod fillets and my box of instant mashed potatoes I got to work. The end result was one of the lightest and crispiest pieces of fish I have ever eaten. It was so good that I decided they didn’t need a fancy sauce. They were remarkably crispy and so much simpler to pan fry than your ordinary battered fish that it made me rethink my old traditional fish and chips recipe. My family agreed the new fish was delicious. Even my pickiest eater and toughest critic was back in the kitchen looking for seconds. Which goes to show you sometimes it pays to play with your food.

Fish and Chips -serves 4

Fish

  • 2 pounds cod fillets (about 2 medium sized fillets)
  • 1 teaspoon kosher salt
  • 1/8 teaspoon ground black pepper
  • 1½ cups flour
  • 3 eggs
  • 1 teaspoon dijon mustard
  • 2 cups instant mashed potato flakes (I used Betty Crocker)
  • 1½ cup canola or vegetable oil

Baked Chips

  • 5 large red potatoes
  • 4 tablespoons olive oil
  • 1 tsp kosher salt
  • 1/4 tsp garlic powder
  • 1/8 tsp pepper
  • 1 small sprig of fresh rosemary or 1 teaspoon dried rosemary
  • 2 teaspoons chopped parsley (optional garnish)

First prepare and the chips and get them baking in the oven.

Preheat the oven to 375 degrees.

Slice the potatoes in half lengthwise and then cut each half into 6 thin wedges.

I like my chips to be crispy so I made fairly thin wedges. I cut each potato half into six slices.

Then in a medium sized bowl mix together the olive oil, salt pepper, garlic powder and rosemary. Add the potato slices and stir them to coat them in the seasoned olive oil. Place the potatoes on a large baking sheet lined with parchment paper or aluminum foil making sure that they are spread out in a single layer with one cut side down.

Bake the potatoes for 35 minutes. After 20 minutes flip the potatoes over to the other side so they brown and crisp up evenly.

Next while the chips are cooking get your fish prepared.

Place the cod on a cutting board and season both sides with the salt and pepper. Cut the fillets into smaller (about 2 x 4 inch) pieces.

Then prepare your breading bowls. In one bowl or on large plate place the flour. In a second bowl whisk together the dijon mustard and the eggs. Finally in a third bowl or plate have the potato flakes ready.

Dip the fish pieces into the flour and coat them evenly. Then dip the flour coated fish in the egg mixture allowing any excess to drip back into the bowl. Finally coat the fish evenly in the potato flakes. Repeat this process until all of the fish is breaded.

Then pour the canola or vegetable oil into a deep skillet. Heat the oil over medium heat until it begins to bubble. To test the heat take a wooden spoon or spatula handle and stick it in the pan. If the oil quickly bubbles or sizzles around it then the oil is hot enough to begin cooking the fish.

Carefully place half of the fish in the pan leaving space between the pieces of fish. Since the cod fillets thickness can vary, I like to cook all the thicker pieces together first and then cook a second batch with the thinner tail cuts.

Cook the fish until it is golden brown on each side and cooked through turning it several times to ensure it cooks evenly. Cook the fish for 12 minutes (about 6 minutes a side) if it’s on the thicker side or for a thinner pieces let it cook for for a total of 6 to 8 minutes (about 3 to 4 minutes a side.)

The potato flakes create an amazing golden crust which holds up well in the frying pan. Traditional beer battered fish is tougher to pan fry because it sticks to everything. That’s what makes this potato crusted fish so great. You don’t have to have a commercial kitchen fryer or lots of oil to make a wonderful piece of fish.

If you want to keep your first batch of fish warm place it on a sheet pan with a raised wire rack and place it in the oven with the potatoes for a short time.

Baked chips keep this dish healthier that your usual pub or restaurant versions but just as delicious.

Then you are ready for dinner. I like to serve mine with a traditional side of green peas. I also made a quick tartar sauce to serve on the side.

Tartar Sauce

  • 1 cup good mayonnaise (like Hellman’s or Duke’s)
  • 2 tablespoons sweet relish
  • 1 teaspoon fresh lemon juice

In a small bowl mix all the ingredient together and keep it chilled until serving.

These golden crispy fish and chips make a great dinner. If you are running short on time then substitute your favorite brand of oven fries and just make the fish. All rules aside, cooking and eating together should be delicious and fun.

W is for Wonderstruck: A Gardener’s Alphabet Part Two

Gardener's Alphabet

Wonderstruck is defined as suddenly being filled with wonder and delight. Looking at something so beautiful that you are left in awe. I often feel this way when I experience the presence of something bigger than myself. Nature in all of its splendor- autumn leaves, a starry sky, a summer garden in full bloom. The way a flower petal opens or seeing an iridescent humming bird in flight. The colors, the petals and the small creatures are what make gardening a sometimes spiritual experience.

I am an accidental gardener. I have always loved flowers and photography, but it wasn’t until I moved to Chicago that I really thought about gardening . After a long first winter I watched in wonder as suddenly everything began to wake from its snow covered slumber. The brilliant green buds and all the bulbs blooming. Everywhere I looked there were cheerful snowdrops and daffodils and lawns blanketed in blue glory of the snow. I watched in amazement as the symphony of spring color played before me.

One Chicago spring and I was smitten I had to find a way to plant my own spectacular garden. So after studying the flowers at the botanical gardens and in every beautiful yard I saw, I began to dream and plan. The next year I planted 150 bulbs mostly muscari and tulips but over the years that number has grown. Then came the dahlias, zinnias, hollyhocks and the vegetable garden. This year between my home and my daughters’ school I planted nearly 800 springs bulbs because I love the thrill of creating something beautiful.

As naturalist and botanist John Muir once said, “Everybody needs beauty as well as bread, places to play in and pray in where nature may heal and give strength to body and soul.” This year I have been especially grateful for the gift of gardening and its power to lift my spirits. So here’s to the gardens and moments in nature that connect us, take our breath away and leave us wonderstruck.

N is for the Norway Maple Tree whose chameleon like color change brightens the cool crisp days of fall.

O is for Orchids and their outrageously beautiful flowers.

P is for the Peony whose alluring perfume and glamourous ruffled petals are some of the gardens most beguiling blooms.

Q is for the Quarantine Vegetable Gardens that sustain and feed our soul.

R is for Roses that crown a garden with their regal beauty.

This picture is from a small castle garden that I visited in Ireland. The rolling green hills and the summer flowers were so breathtakingly beautiful.

S is for the delicate Snowflake flowers that bloom each spring.

And for the tall Sunflowers that revel in the summer sun.

T is for Tulips because the anticipation of their spring color brings such joy on a cold winter day.

Tulips are one of my very favorite flowers. Every year I find myself planting more bulbs and different varieties. One the the things I love about gardens is that each season offers a different view.

U is for the Urns and unique stone statues that grace a stately garden.

This cherub adorned a staircase entrance in a beautiful garden I visited in Vienna.

V is for Violas who seem to laugh with color as they spill out of pots and garden beds.

W is for water lilies whose reflections and color dance across the pond.

X is for xerophyte plants. The succulents, cacti and in my alphabet gorgeous glass yucca plants that take little water to thrive.

Y is for Yew and the evergreen bushes and topiaries that create the architecture of a garden.

Z is for Zinnias whose blooms explode with color like little summer fireworks.

Their bold blossoms invite the happiest garden visitors: humming birds, bees and butterflies. They all come to delight and share in their dazzling beauty.

G is for Garden and Gratitude

Flower Alphabet

“Je vois la vie en rose.” Edith Piaf

On a whim I picked up a couple of pairs of pink crystal studded glasses. It was my daughter’s birthday last week and I thought they might be fun for our little dinner party.  As we were decorating my daughters tried on the rose-colored glasses. Suddenly they were quiet as they looked out the window. “Mom, these are amazing you have got to try them.” Indeed, our snow-covered lawn looked more vibrant than ever. The branches on the trees shimmered with a lovely sort of purple and blue. What an unexpected and amazing gift it was to look out of those rose-colored glasses. A new year and a new perspective.

As I peered through those pink glasses, the melody of the timeless song, La Vie en Rose comes back to me. The song title when translated to English means “I see life through rose colored glasses.” My grandfather a Frenchman loved Edith Piaf. So, in a unique way her music became a part of the soundtrack of my childhood. Now with more life behind me I appreciate the power of that song even more because indeed love can color everyday words and places with unforeseen beauty and happiness.

Reflecting on the past year I realize that in many ways my garden and time outdoors with family has been the rose coloring to this year. It’s the place where I find beauty, joy and strength. All those flowers and amazing little creatures make me grateful. Thus, as I plan and think about the flowers to come, I thought I might share an A to Z garden of gratitude photography project that I worked on this past year. There may be snow on the ground now but the rose colored blooms will be here soon.

A is for Apple Blossoms whose lovely petals fall like the confetti of spring

These apple trees belong to my neighbors. I always stop a moment when I pass them in the spring because the robins love to fly in and and out of them.

B is for Butterflies who flit and fly about with their stunning colored wings

The monarchs, swallowtails and white cabbage butterflies put on quite the show this summer.

C is for the green and purple cabbages that dot the garden beds each spring and fall.

D is for Dahlias whose full petaled blooms dazzle all summer and into the fall

D is also for the delightful Daffodils that trumpet spring’s arrival.

E is for Elephant Ears whose leaves tower above the rest.

F is for Foxglove with their clever tower of colorful blooms.

G is for Gardena whose sweet scent fills the gardens they grace

H is for Hollyhocks whose flowers climb to great heights.

I is for Impatiens who add a vibrant color to a shady garden spot

J is for Juniper with their evergreen branches and festive bright blue berries.

K is for Katydids and all the small creatures that cause us to stop and wonder about the beauty of something so small.

L is for Lilies and their lovely colorful flowers.

These orange double bloom daylilies were a beautiful surprise to find in my yard after my first Winter in Chicago.

M is for Magnolia one of the most elegant trees.

The pink saucer magnolia that blooms in my yard each spring leaves me grateful for all of nature’s wondrous beauty. Come back for the rest of the garden alphabet next week.

Distance Can’t Dim the Light of a Christmas Queen

For as long as I can remember my mom has been the queen of Christmas. Perhaps your family has its own Christmas queen or king? Someone whose love for the holidays is so effervescent that it brings happiness to everyone around them.

Each year well before December, my mom is already thinking about Christmas. Her unbridled joy for the holiday season has her planning new decorations, recipes and special handmade gifts. She spends months on end hand-stitching beautiful needlepoint ornaments as presents for everyone in our family. However, the ornament tradition is only one small part of the Christmas love she shares each year.

The picture at the top of the post is my Mom’s beautiful tree with ornaments she and grandmother made. My Christmas tree is filled with star ornaments including so many pretty needlepoint ornaments that my mom has given me.

A couple of years ago on a November trip to Chicago my mom transformed our kitchen table into a mini-Christmas workshop. She had decided that it was time to share some Christmas creativity and decorating joy with her granddaughters. My mom had come prepared. She had packed an entire suitcase full of crafts supplies. Over the course of a day, she taught her young granddaughters how to create their own tree full of ornaments, angels and paper chains. Starting a new tradition of ornament making.

This year it was my youngest daughter, Alyssa who wanted to make sure that the ornament party continued. Concerned that her Abuela couldn’t travel to Chicago, she suggested that they set a date for a Facetime crafting party. My mom mailed us a big box of art supplies: pinecones, ribbons, wooden beads and colored sequins. They spent a couple of hours on the phone creating ornaments together. This tradition of decorating together felt more important than ever this year, because for the first time we won’t be traveling to Texas to spend Christmas with our family.

Handmade ornaments on my daughters’ Christmas tree. The new additions this year were cotton boll angels and clothes pin people

Right about the time of Abuela’s annual ornament party, Alyssa came to tell me about her “big Christmas problem.” I wondered what my six-year-old could be so concerned about. Could it be Santa or a tradition we couldn’t keep? She then explained, she was worried that with COVID she wouldn’t be able to go to the store. Furthermore, she wasn’t sure her piggy bank had enough money to cover the gifts she wanted to give. I then shared with her my mom’s great Christmas wisdom. Sometimes the best presents aren’t things that come from a store. It’s the gifts that are made and given with great love that people treasure most. So, she colored stained-glass bookmarks with ribbon tassels to share as gifts. She also made special Christmas pictures to help decorate her grandmother’s refrigerator.

The Christmas queens working on building a Lego tower together a few years ago.

As we packed Christmas boxes to mail to our family, there was a familiar twinkle of Christmas joy in my daughter’s eye. One that belongs to a Christmas queen, whose holiday spirit shines so brightly that it touches everyone around them. So, here’s to the Christmas queens and kings who fill our hearts with an extra measure of holiday sparkle, light and love that even distance and a global pandemic can’t dim.

The Sweet Smell of Gingerbread

Homemade Gingerbread Cottage

The smell of ginger, cinnamon and cloves fills the air as I opened the door. My girls quickly drop their school bags and coats as they scrambled in the house. Joyful grins spread across their faces as they get a whiff of the sweet smells from the kitchen. “It’s gingerbread day!” My daughters have been begging to bake our annual gingerbread houses for days.

Homemade gingerbread houses have become quite a tradition in our house, but this year I had thought for a moment that there might not be enough time for it all. Hybrid school lessons and holiday deadlines had me behind and wondering how I was going to get it all done. However, their insistence and enthusiasm made me realize how important this tradition has become to our family. A baking project I took up on a whim when I was in high school has now become one of the things that my daughters look forward to most each year.

So while they were at school I roll and cut the dough. I bake batch after batch of gingerbread. Then when my daughters come home they eagerly watch as my red mixer whirs forming stiff peaks of royal icing. They cut open bags of candy as they excitedly make decorating plans. They can’t wait to get a pastry bag in their hands to start creating their own houses.

Our gingerbread village nestled safely amongst my cookbook collection.

After she finishes hers, my youngest daughter watches as I began to create one of my own. She helps me cut gelatin sheet windows and looks on as the little house begins to come together. This year I decided to create a smaller gardener’s cottage with cereal treat boxwoods and sugar cone Christmas trees.

If you look closely you can see a little Christmas tree inside my gardener’s cottage.

As I pipe and create each detail a familiar feeling of joy comes rushing back and I remember once again why I love doing this each year.

Even the back of the house gets some piped window details and gingerbread wreaths. You can see the cord from the little battery powered lights that I place inside the house.

Every surface of my kitchen might be dusted with powdered sugar but there is something magical about baking little gingerbread houses that always makes it worth it. The smell, the feel of the piping bag in my hands, and the sweet sounds of my daughters in the kitchen remind me why I love it so.

For Recipes and Tips see my post on Baking Gingerbread Houses with Kids

Contact Us