Oatmeal Raisin Spice Cookies

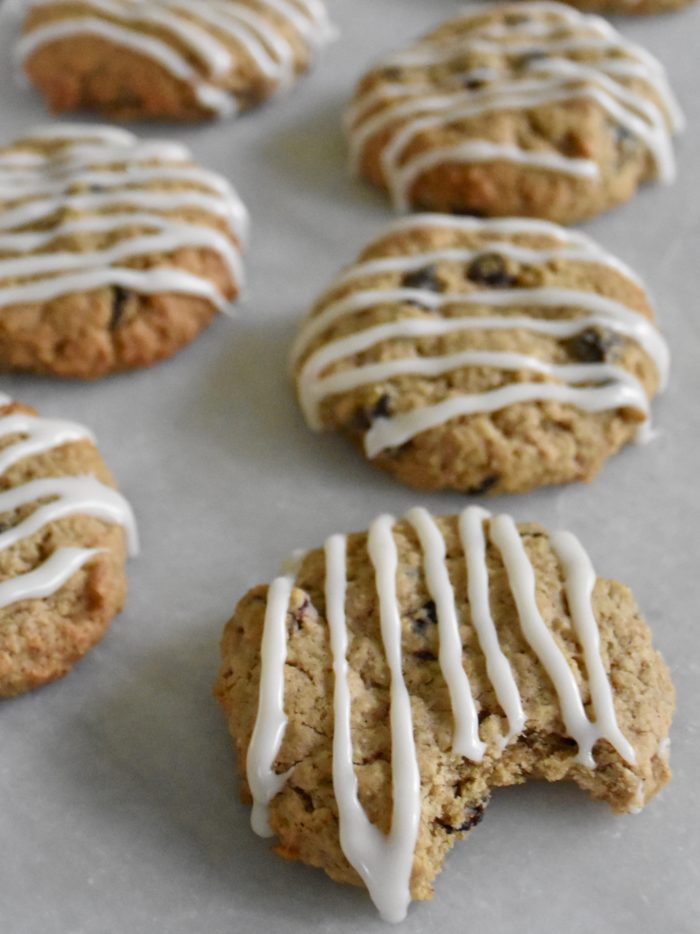
These oatmeal raisin spice cookies will have your house smelling like fall and the holidays as they bake and once you taste them it will be nearly impossible to eat just one. The cinnamon, allspice and applesauce gives them a delicious spicy flavor and the butter and brown sugar create a chewy, but moist cookie. My husband had to ask me to hide the leftover cookies, because they are so good that you will want one for breakfast or just because you walked in the kitchen. I have been working on perfecting this oatmeal cookie for the past year and countless batches later I think I have just the right recipe that will be a family favorite for years to come.

Oatmeal Raisin Spice Cookies (Makes 14 Cookies)

  • 1/2 cup (1 stick) butter, leave out at room temprature for at least an hour
  • 1 cup brown sugar
  • 1 large egg
  • 1/4 cup applesauce
  • 1 teaspoon vanilla
  • 1 teaspoon cinnamon
  • 1/4 teaspoon allspice
  • 1/4 teaspoon nutmeg
  • 1/2 teaspoon baking powder
  • 1/2 teaspoon baking soda
  • 1/4 teaspoon of salt
  • 1 3/4 cup of flour
  • 1 cup quick cook oatmeal
  • 1 cup of raisins (not a raisin fan then I have tried these cookies without the raisins and they were were still good oatmeal cookies)

Preheat your oven to 350 degrees

First in the bowl of your mixer mix together or cream your butter and sugar at a medium high speed until they are well blended and the texture is light and fluffy. Next mix in your egg, applesauce and vanilla. Then add in your dry ingredients including your spices, baking powder, baking soda, salt oatmeal and flour. Blend on low speed until just incorporated. Finally add in your raisins.

Then I like to use a cookie or cream scoop to make sure my cookies are all even in size. For these cookies I used a larger scoop that holds three tablespoons of cookie dough. Then take your ball of dough and flatten it slightly so it looks like a little disc or mini hockey puck.

Bake your cookies for 12 minutes or adjust as needed because every oven is a little different. You will know they are done when you see the tops of the cookies crackle evenly and they will just barely turn golden on the edges. I find cookies bake better when I bake just one pan at a time in my oven.

Leave them on your pans to cool and then once they are cool you can drizzle them with the vanilla icing.

Vanilla Drizzle Icing

  • 1 cup powder sugar
  • 1 teaspoon of vanilla
  • 1 tablespoon water

In a small bowl mix together your powdered sugar, vanilla and water. Then place your icing in a pastry bag and cut a small hole to evenly drizzle your icing on the cookies or if you don’t have a pastry bag then use a ziplock bag and cut a small hole in the corner to make your own pastry bag.

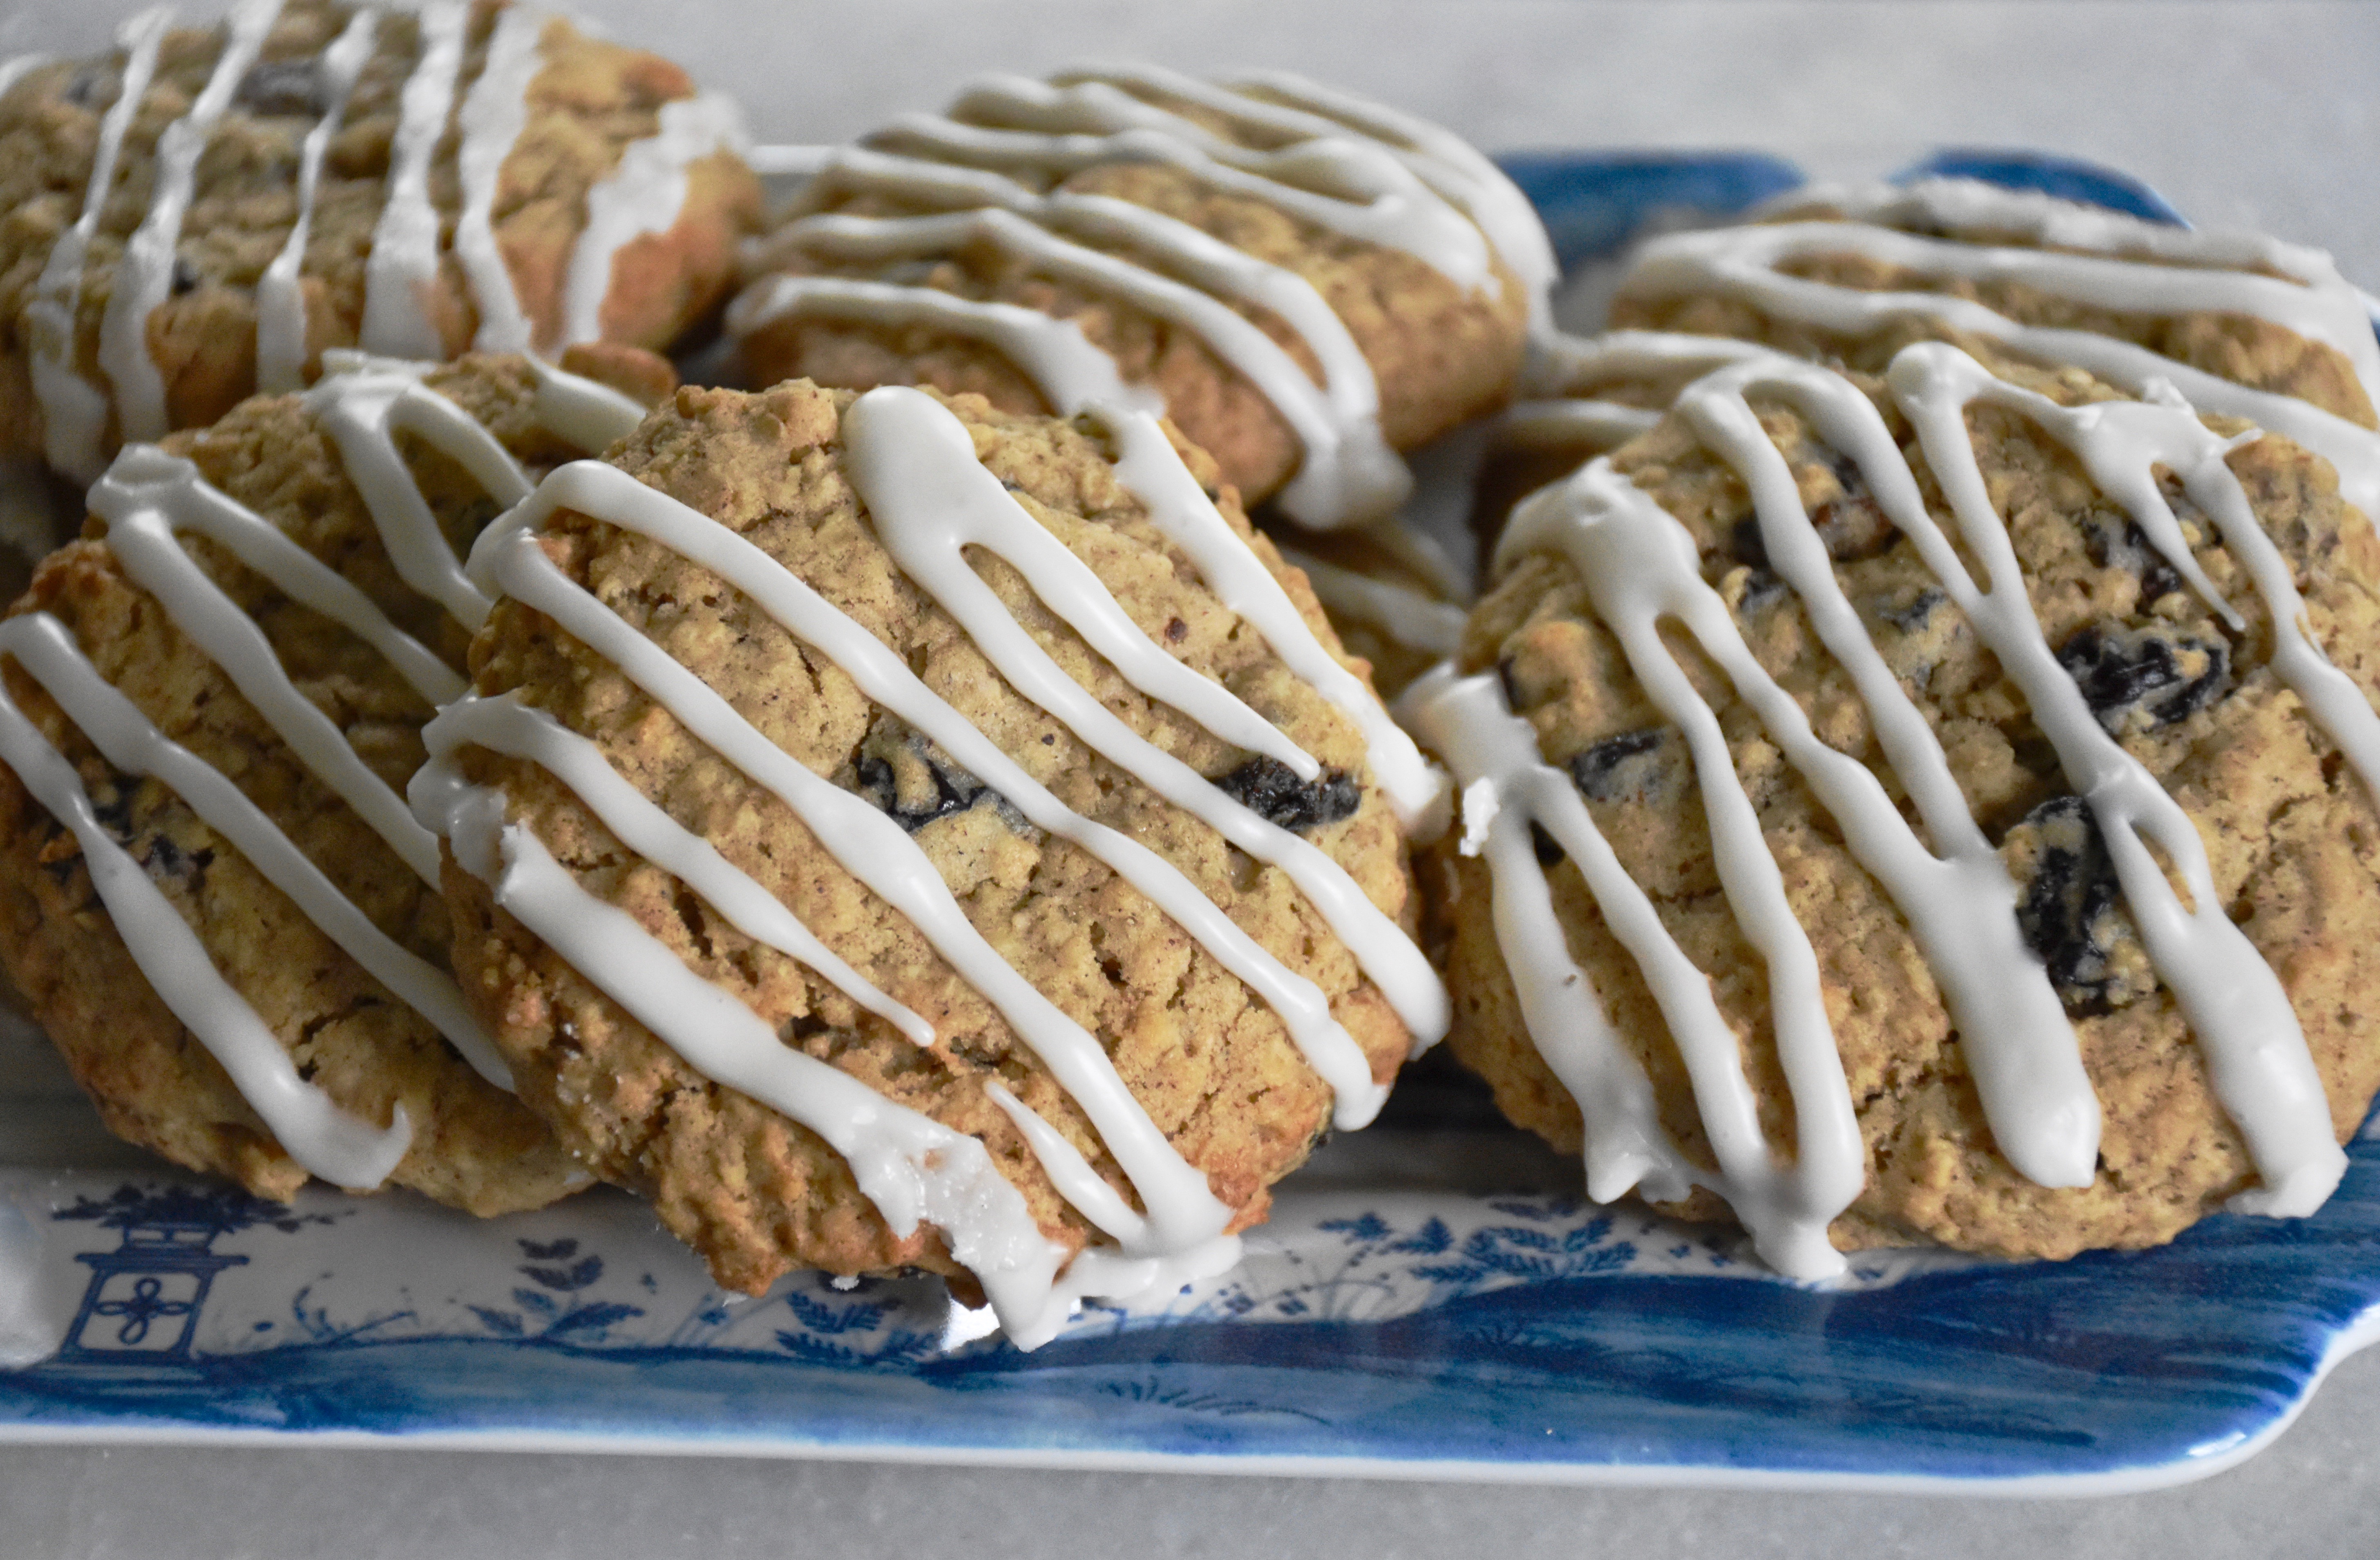
The best part about this recipe is that it is easy to bake, which makes it a great recipe to make with kids. Crisp on the outside but chewy and soft in the center these cookies will have you at first bite.

The Best Cook In the World And A Southern Styled Blackberry Cobbler

Blackberry Cobbler Recipe

I just finished Rick Bragg’s new memoir about his momma, Margaret Bragg called The Best Cook In The World: Tales From My Momma’s Table. Bragg is a masterful storyteller who will make you feel like you have pulled up a chair to his momma’s kitchen table to hear all the best family stories and recipes. A story that begins with an unexpected heroine his grandmother Ava, a woman who at first hated cooking so much that she nearly starved her husband. Each tale will have you loving his momma and her family more as you discover her life’s great truth that “There are few hard times on this earth…that cannot be eased with good savory food.” Margaret believes good food can feed the soul and a home cooked meal is as she tells it is “life’s greatest luxury.”

In this day and age of of restaurants and gourmet takeout she reminds you that there is something about being in the kitchen: hearing a skillet sizzle, watching a biscuit rise, tasting a warm pecan pie and talking around the table. There is more to an oral family history than just words. Her culinary legacy isn’t filled with fancy ingredients, but love and memories shared. As she likes to say, “things just taste better with a story on the side.” This is one of the best books that I have read in a long time. As good books do, it will leave you thinking about your own family history and wanting a second helping.

So to give you a taste of this great book, I thought I would share her recipe for a Southern styled blackberry cobbler. The ingredients are simple and it takes just a little time to let the blackberries create their own “likker” or sauce but the results are worth it.

Blackberry Cobbler With A Drop Biscuit Crust 

  • 2 1/2 cups blackberries (Note: I used 3 1/2 cups because I like my cobbler to be filled with berries and it took that many berries to really fill the bottom of my 8 inch pan)
  • 1 cup of sugar
  • 1 stick of butter, melted
  • 2 cups self rising flour
  • 1 cup whole milk
  • 1/4 teaspoon salt

In a medium sized covered dish or bowl combine your berries and sugar. Then place the berries in the fridge overnight or for 6 to 8 hours till they create their own sugary sauce.

Next preheat your oven to 350 degrees. Then in a medium sized bowl mix together your melted butter, flour, milk and salt to create a biscuit like topping.

I found it helpful to let my batter sit a few minutes, because the self rising flour thickened up a bit.

Then pour your berries and all the juice into a greased 8 inch square baking pan.

Then pour and spread the biscuit batter on top with a separated spatula or or drop rounded tablespoons on top.

Then bake till bubbly and golden brown on top. (About 40 to 45 minutes)

Margaret notes that this cobbler is good all on it’s own, but as cobblers go I have found few that aren’t even better with a scoop of vanilla ice cream on top.

Summer Flowers

“Happy are those… who find joy in the sky, the trees, the flowers. [For] there are always flowers for those who want to see them.”

-Henri Matisse

There is wisdom in those words, for those who look for beauty and joy in this world will surely find it. I am not a master gardener. Truthfully, I am just beginning to understand how to plant and tend a garden up North. However, it’s my love of flowers that keeps me in the garden trying new things. This year the day lilies I spent an entire weekend moving to a sunnier spot and for the record nearly gave up on, surprised me with an outrageous mid-summer show of seemly endless orange blooms.

There were more pink lilies this year. Some of my favorites, but they got a bit upstaged by all the orange lilies, so I will find a new place for them next year.

I have learned that caladiums, which are easy to grow in shady southern gardens are best not started as bulbs up North. It takes too long for the ground to get warm. I used to take that for granted, but sometimes when spring is cold you need a little head start from a greenhouse or nursery.

This year I discovered these polka dot plants that are originally from Madagascar, but they seem to like summer here in Chicago, who knew. Their spotted foliage has added some color and pattern to my shady back patio.

Annabelle hydrangeas whose blooms last all summer long and fade to a lovely green in the late summer and fall are definitely one of my Northern favorites.

There were surprise flowers that popped up all on their own and I must say I like these little purple flowers, even if I cannot tell you their name.

However my favorites have to be the dahlias I planted this spring. After the success of my tulips I decided I would try planting Dahlia bulbs. I have long loved these colorful show-stopping summer flowers, but it was too hot on the gulf coast for me to try growing them before. So when we lost a tree out front and I had an open sunny spot I decided to plant a mix of vibrant mix of pink, fuchsia, and coral.

A ‘Lake Tahoe’ Dahlia whose layers upon layers of coral petals are gorgeous. What a gift they are to see in bloom.

They have begun to bloom and oh the happiness of seeing them out my front window.

A   fuchsia “le baron” dahlia covered in early morning dew.

The best gardeners I am learning are the ones who love and celebrate each brilliant bloom, and patterned leaf, because each season and garden has a story to tell. How grateful I am for the summer sun and the flowers that continue to surprise me and bring me joy.


Mini Strawberry Cream Cheese Cakes

This year for my youngest daughter’s birthday I decided to make something a little different that your usual tiered birthday cake. I needed to work with our temporary mini fridge situation so I decided to make mini cakes. A little more special and fun to decorate than a cupcake, but as easy to make as a standard sheet cake. My daughter was thrilled with the idea of having her own little cake to herself and I have to agree with her these petite cakes are just a little more fun. No need to trim or spend extra time covering the sides of these pink cakes, because the best part about these mini cakes is how easy much easier they are to frost and serve than a large layer cake. Summer strawberry season here and these cakes would make a fun dessert to serve and share.

The birthday girl with her absolute favorite pink balloons.

Strawberry Cake (Makes one 9x 13 sheet cake or 6 mini cakes) 

  • 2 cups of sugar
  • 4 eggs
  • 2  1/2 cups cake flour
  • 3/4 cup milk
  • 2  1/4 tsp baking powder
  • 1 tsp vanilla
  • 3/4 cup vegetable oil
  • 1/4 cup sour cream
  • 1 (3oz) box of strawberry jello
  • 1 cup of fresh strawberries pureed

Preheat your oven to 350 degrees

First, I like to prepare my strawberries by removing the stems and then chopping the berries in half. Then I put my berries in my mini food processor, but you could also use a blender. I then pulsed the berries till they were like a thick jam with some tiny even bits of berry. Then set the berries aside to mix in the batter later

Next using your mixer beat together the sugar and eggs on medium speed for about a minute. Then add the flour, milk, oil, baking powder, sour cream and vanilla and mix until just incorporated.

Line the bottom of a standard 9×13 inch cake pan with parchment paper and spray the sides of your pan with baker’s joy or cooking spray. The pour your cake batter into your prepared pan. Give your pan a few taps on your kitchen counter to ensure you don’t get any air bubbles as it bakes.

Bake the cake for 30 minutes. Keep a close eye on the cake because you don’t want to over bake it. You can check the doneness by testing the cake with a toothpick. If the toothpick comes out clean the cake is done. Let your cake cool in the pan for 15 minutes then turn it out of the pan to finish cooling on a wire rack. You want your cakes to be completely cool before cut and frost them.

Cream Cheese Icing

  • 1 Stick of Softened Butter (I usually let it sit out of the fridge for an hour)
  • 1 (8oz) Softened Brick of Cream Cheese (I let it sit out with the butter)
  • 1 Tsp Vanilla
  • 4 Cups of Powdered Sugar
  • 1 Teaspoon of Milk

In the bowl of a mixer cream the cream cheese and butter. Add the powdered sugar vanilla and milk. Mix on high speed until the icing is smooth and fluffy.

Now once you have your frosting ready you can ice your sheet cake and cut it into squares or you could do something a little more fun and cut out six circle cakes. I used a three inch diameter glass that I lightly sprayed with butter flavored cooking spray to cut out my cakes.

These are my cut mini cakes. I was able to make six with a 3 inch diameter but you could make at least two more if you cut your circles slightly smaller.

Now split your mini cakes in half like a biscuit and place some frosting in the middle to create a cake like sandwich. Then place a smooth layer of frosting on top using a separated spatula or butter knife.

Cream cheese icing is just the best with fresh strawberry cake.

Then because our cakes were for a celebration I made some fondant strawberry decorations using three 4 ounce mini container of pink, green and white fondant. I have instructions on how to make these fondant strawberries and flowers here.

Here you can see where I was deciding on the pattern for my design.

If you are short on time or you want to skip the fondant decorations then just place a fanned out strawberry on the top.

No matter how you decorate it these, it’s a fun take on a classic family favorite and a great mini birthday cake. So think outside the box a bit on your standard sheet cake and try making a mini cake instead.


Our Refrigerator’s Last Cry

Picture from Abt Appliances

When we returned from vacation last week at eleven o’clock at night, my husband opens the door and calls out “Amy, you need to come hear this.” “Hear what?” I was unloading my tired, but still very awake daughters from their car seats. Maybe it was the excitement of being home or a few too many M&Ms and gummy bears from the airplane that had them still going, but getting out of the car had been tough. Then when I finally stepped in the kitchen I heard it: the last cries of our refrigerator.

As I was investigating what happened, I opened up the freezer and discovered half melted popsicles. A sure sign that something was wrong. Hoping a power outage was to blame I looked over at the oven clock, but the numbers weren’t flashing and everything else in the kitchen seemed to be running fine. Too tired to deal with it all, we hauled in the luggage and went to bed.

The next morning the sound was gone and now all we heard was this faint whimpering buzz. Hoping this meant good things, I opened the freezer and found the ice cubes were melting and now leaking out of the ice and water dispenser. Upon inspection the fridge was what I would call lukewarm. We had just paid to have an unrelated problem with the fridge repaired two weeks before this. Surely this was not a good sign.

Oh the sadness of having to clean everything out of my fridge and freezer.

We went out to Best Buy to purchase a mini fridge. Frustrated with our old fridge we also took some time to look at new refrigerators. We optimistically took home print outs of new counter depth refrigerators we thought would fit our space. Then just when we had decided to move on and purchase a new fridge I made a terrible discovery while measuring: all the new models were at least three inches taller than our old cabinetry allowed. So I called the repairman out again. The same gentleman who had helped repair it before was back, but unfortunately the outlook on fixing the fridge looked bleak. The sound we had heard was the end of our compressor. So now we have a new challenge finding a fridge.

The only models that fit our existing space are the tall skinny refrigerators made for small lofts or studio apartments. Sure those svelte chrome beverage fridges look pretty, but what about room for all those condiments I love to cook with and there certainly isn’t room for a big soup pot in there. These models might have worked in my single years, but now it would be a problem. There is no room for the four gallons of milk we go through a week. Somehow in the last five years the standard refrigerator has grown taller. Gone are the slightly shorter models that worked with our now vintage cabinetry. So we are going to have to get creative with the existing cabinet above the fridge and find a way to wedge a new refrigerator in that space. I am crossing my fingers and saying a few prayers that the smallest model out there works, but in the meanwhile I feel like I am back to college living out of a mini fridge. Serving what I affectionately call market to table meals served fresh from the grocery store each day.

I am reading Rick Bragg’s memoire about his mother called The Best Cook in the World and there is a part in the book where he talks about how many stoves his mother has cooked out, burned out or used to the last spark. His mother lives in the country so she has kept all thirteen of them as a reminder. I am sure my neighbors and husband would object to keeping our fridge as a memento, so I will just have to document it here. I have officially cooked or frozen my way through one refrigerator. After this let’s just hope it’s a while before we need a new one. Meanwhile, my new mini fridge is inspiring renewed creativity with cooking and blog posts. I have a few things that I planned that will have to go on the back burner for a bit, but I am back from vacation and hungry to write and cook more.

A picture from our vacation in New Mexico. I am trying to remember the pretty views and not think about the two to three weeks it’s going to take to get our new fridge.

Picnic Penne Pasta Salad

Summertime in Chicago is definitely our family’s favorite time of the year. There are all kinds of festivals, concerts and events and everywhere you look everything is green and the flowers are blooming. Our neighborhood sponsors a summer concert series in the park. There is live music every week and my girls love to go and listen to the music and dance. We like to bring a picnic dinner with us when we go. So this pasta salad was something I created recently for one of our picnic dinners. The roasted potatoes and the pasta made it hearty enough for a one dish dinner and I can make it a few hours ahead of time and have it all ready to go. My husband said he thought the salad “tasted like summer.” The fresh basil dressing and the mustard roasted potatoes make this delicious pasta just a little different than your ordinary pasta salad.

Picnic Penne Pasta Salad (Serves 4 to 6 as a main course) 

  • 2 cups of roasted new potatoes
  • 1 teaspoon Dijon mustard
  • 2 tablespoons olive oil
  • 1/2 teaspoon kosher salt
  • 1/8 teaspoon pepper
  • 2 celery stalks, diced
  • 2 carrots, diced
  • 2 cups dried penne pasta, boiled and drained
  • 2 cups of baby spinach leaves
  • 1/3 cup grated parmesan cheese
  • 3 slices of bacon, cooked and crumbled (optional)

French Bread Croutons

  • 2 1/2 cups cubed french bread
  • 2 tablespoons olive oil
  • 1 tablespoon butter
  • 1 teaspoon dried oregano
  • 1 teaspoon garlic powder
  • 1/2 teaspoon kosher salt

Salad Dressing

  • 1/4 cup fresh basil leaves, rolled and sliced into thin ribbons
  • 1/4 cup olive oil
  • 1/4 cup canola or vegetable oil
  • 2 cloves of garlic, minced
  • 3 tablespoons red wine vinegar
  • 1/2 tsp kosher salt
  • 1/8 teaspoon pepper

First preheat your oven to 350 degrees

Then slice your new potatoes in half or in quarters if they are larger. Then in a medium-sized bowl whisk together your 2 tablespoons olive oil , 1 teaspoon Dijon mustard and salt and pepper. Toss your cut new potatoes in the bowl and stir then to coat them in the olive oil mixture. Then place your potatoes cut side down on a sheet pan lined with aluminum foil or parchment paper. Then roast your potatoes in your oven for 30 minutes until they are golden brown.

Meanwhile, slice your french bread cubes and place a medium-sized skillet on your stove at medium heat. Melt 1 tablespoon of butter in the pan and add two tablespoons of olive oil. Add in your garlic powder, died oregano, salt and pepper. Then toss your bread cubes in your skillet and stir them to evenly coat them in the seasoned olive oil and butter. Then reduce your heat to medium low and let your croutons get toasted and golden brown stirring occasionally so they cook evenly.

Then cook your penne pasta according to the package directions and chops your celery and carrots.

Now your are ready to make your salad dressing in a small food processor or blender mix together your salad dressing ingredients and blend until the oil is fully incorporated and emulsified.

Finally, you are ready to assemble your pasta salad. In a large bowl toss together your pasta, roasted potatoes, carrots, celery, spinach, croutons, bacon and parmesan cheese. Add in your salad dressing and mix well.

There you have it a summer pasta salad that makes a great one dish dinner or a side to take to any picnic or barbecue.  It also makes a great vegetarian dish if you leave out the optional bacon. So no matter how you serve it, this summertime pasta salad is filled with layers of delicious flavors that are sure to be hit.

Painting A Room With Personality

There is a certain cheerful confidence in the bright pinks, oranges and blues that my youngest daughter loves. So when I was working on giving her new “big girl” room  design, I wanted it to reflect her bright and happy personality. The first piece I bought for her room was this colorful flower garden patterned quilt I found at a little antique store. I had stumbled into the store with my mom while buying chalk paint for another project.

The store was closing in days, so on a whim I decided to go for it and get the quilt. The bright happy colors and hot pink trim on the edges made me think of my daughter. There is something uniquely special about handmade quilts. The details and colors add a certain one of a kind character to a room that I love.

This Ikea Jennylund chair gets a custom look with new brightly colored pillows. The picture is by artist Sarah Jane Wright and it has a little girl and her bunny taking an adventure with balloons in the sky.

However to keep this room feeling youthful and fun, I decided to add some modern fabrics in complementary colors that brought out the pink and orange colors in the quilt. When I was looking for additional fabrics for pillows I found these tulip patterned fabrics designed by Sarah Jane for Michael Miller. I thought they added just the right touch of whimsy for a little girl’s room. Then to ground out those smaller scale patterns I chose a larger buffalo check in shades of pink and orange from Calico Corners.

The headboard is from Ballard Designs and the pick stitch quilt from Pottery Barn Kids has pink, purple, yellow and blue threads that pickup additional colors from the quilt.

A favorite stuffed bunny is right at home on her new bed. I added some white lace trim to the pillow from an old summer dress that my daughter had loved but outgrown. Small touches like that and the hot pink pom-pom trim make these pillows one of a kind.

This dresser was  something my mom and I painted years ago for my old bedroom. I tied in the blue and white dresser with touches of blue in the quilt and rug.

Then I made a few small changes by adding new lampshades and I added other touches of pink to the dresser with some flowers and her little pink jewelry box.

The little bird was something small I found at Hobby Lobby. It was originally green, but a little white paint made it just the right touch.

The nightlight on the corner of the dresser was formerly a more contemporary lamp from Target, but some chalk paint and a new custom lamp shade from an old swiss dot dress gave this lamp a completely different look.

In the corner is a bookshelf that makes the most of the tight space by the door. I added a new print from a children’s book called Lola Dutch that had a little girl heading home from the library with a wagon full of books. Which is sometimes what I think we need to carry home all books my daughters love to check out from our library.

Then even her bedroom door got a pop of color with a ribbon flower wreath I made with pink and orange poppies and roses.

The nightstand is an old piece I got for free from an old coworker. When we moved I repainted it for my daughter’s room, because it has great storage for all those precious stuffed animals and bedtime stories.

Finally, the two major pieces that I added to this room were the new headboard and the watercolor tulip painting. The headboard has a gorgeous curvy lines and the white washed finish will be able to grow with her. Even if she decides she wants a slightly different look when she is older. I also loved little carved bird detail on it because it reminds me of my daughter’s favorite blanket. She has a pink fleece blanket with little birds on it that she got as a baby gift from our adoption agency and she sleeps with that “bird blanket” every night. So there are small bird details around her room that come from that beloved blanket. The tulips picture was also a favorite find because I love the bright happy colors that remind me of a garden on a pretty summer day.

Here she is in her signature colors: pink and hot pink. Why settle for just one shade of such a fabulous color?

This joyful little girl can light a room up with a her smile. She has an amazing sense of humor that keeps us all laughing and smiling right along with her. She has a bright and fun personality and now she has a new room that reflects her own colorful style.

Magnolia Table and JoJo’s Biscuits

I love cookbooks and I tend to read them like novels. I like reading all the thoughts and notes behind a dish. It gives you a sense of the history of the recipes and creative thoughts of the author. My mother in law gave me a copy of Magnolia Table, the new cookbook by Joanna Gaines for my birthday and I have had enjoyed reading about the Gaines family and learning about their family’s favorite recipes. I must admit it was fun to see all the Texas styled dishes that our family loves, like King Ranch Chicken, Fish Tacos, Sour Cream Enchiladas, and Grilled Peaches. Are you hungry yet? Then there are some special family recipes like Joanna’s mom’s Bulgogi (Korean beef) with a Cucumber Kimchi Salad. This isn’t a fancy cookbook, but it’s one that clearly has lots of heart. It’s filled with memories and stories of great meals and times together at the dinner table.

So this week I thought I would share JoJo’s Biscuits. Joanna says these biscuits are her family’s favorite. It’s a recipe she worked on “for a year of Saturdays” to get the biscuits just right. They are on the menu at their restaurant and the first recipe she knew she wanted to include in her cookbook.

JoJo’s Biscuits (Makes 24)

  • 4 cups self rising flour (see this link to King Arthur Flour on how to make your own if you don’t happen to have some in your pantry)
  • 2 tablespoons baking powder
  • 1 teaspoon baking soda
  • 3/4 pound (3 sticks) salted butter cold cut into small 1/2 inch pieces or grated
  • 2 large eggs beaten, plus 1 additional egg for creating an egg wash
  • 1 1/2 cups buttermilk, plus an additional 1 tablespoon for the egg wash

Preheat your oven to 400 degrees.

In a large bowl whisk together your flour, baking powder and baking soda.

Then Joanna calls for using a pastry blender to blend the grated butter into the flour mixture until the butter pieces are about the size of small peas. This was a large recipe so I went for my favorite method of cutting in butter into flour. I used my food processor, which happens to do a great job of cutting the butter in very quickly and evenly.

Then in a large bowl stir your beaten eggs into the flour mixture. Then stir in your buttermilk until the dough comes together into a sticky ball. Then cover your bowl and refrigerate for at least 30 minutes or overnight in you are making these biscuits ahead of time.

Line a baking sheet with parchment paper (these biscuits are soft and you need the parchment paper to keep them from sticking.) Joanna doesn’t specify a baking sheet size but I used a medium-sized baking pan that was 10 x 16 inches and the full batch of  biscuits fit perfectly.

Next on a well floured surface roll or press your biscuits out to 1/2 inch thickness. Then cut your biscuits using a 2 3/4 inch round cutter or if you don’t have a cutter you can use a similarly sized glass. Once you cut a your first round of biscuits you will need to press or roll the scraps together to cut the remaining biscuits.

Now place your biscuits on the baking sheet arranging them so they are close and the sides are touching each other.

In a small bowl whisk together your remaining egg an 1 tablespoon of buttermilk. Then brush that wash on top of your biscuits.

Bake for 15 to 20 minutes until golden.

NOTE: This makes a large batch of biscuits so if you are cooking for a smaller number of people, then you can freeze some of your cut biscuit dough by arranging them 1/2 inch apart on a parchment lined baking sheet and then once they are frozen you can place them in a ziplock bag and bake them later. There is no need to thaw your frozen biscuits before baking. They may take a few minutes longer to bake, but frozen biscuit dough does bake well.  Joanna recommends using your frozen biscuits with in two weeks of making them.

Now all you need is a little, butter, jam, honey, gravy or whatever you love to serve with your biscuits. I made these biscuits for dinner and then we had leftovers the next morning that were perfect for making little scrambled egg sandwiches (my husband’s favorite.) So no matter how you serve yours, these soft southern style biscuits were good and fun to make with my daughters.

Red White and Blue Curb Appeal

The Fourth of July next to Christmas is one of my very favorite holidays. This week as our family looks forward to the fireworks and festivities I am reminded of why we have so much to be grateful for. So I thought I would share a few patriotic homes whose decor made me stop and smile.

I love the blue-green paint and the cranberry door. It puts just a twist on the classic red white and blue.

The bunting against the dark shutters and that pretty boxwood wreath make this classic home stand out from the curb.

The bright cherry red door really makes a statement and I love the crisp black porch light and house numbers. This house just feels like it belongs on a parade route.

This white farmhouse has one of my favorite garden gates. I love that even the fence is swagged in red, white and blue.

Finally, here is one of my favorite patriotic houses from Texas. I have always liked this classic red brick house and how they wrapped their columns and the bunting on the balcony. I hope you enjoyed a few of my favorite red, white and blue homes and that you all have happy 4th of July!

Red, White and Blue Velvet Cupcakes

4th of July Cupcakes

I love red velvet cake and my favorite recipe is from pastry chef Rebecca Rather. She has a Christmas red velvet cake with peppermint which I adore, but I thought it might be festive to make a Fourth of July version. I have changed the icing and adapted her recipe to create my own star studded red velvet cupcakes. A few months ago I shared the recipe with a good friend of mine and the text I got back was, “OMG!! This mascarpone business is magic.” I couldn’t have said it better. These cupcakes are delicious and the berries, sprinkles and stars make it fun to bake and decorate too.

Red Velvet Cupcakes (Makes 15 cupcakes)

  • 2 tablespoons red food coloring
  • 2 tablespoons cocoa powder
  • 1/2 cup (1 stick) butter, room temperature (let it sit out at least an hour)
  • 3/4 cup sugar
  • 1 egg
  • 1 cup cake flour
  • 3/4 cup all purpose flour
  • 1/2 tsp kosher salt
  • 1/2 teaspoon baking soda
  • 1 teaspoon vanilla extract
  • 1/2 cup buttermilk
  • 1/2 cup sour cream
  • 1 1/2 teaspoons distilled white vinegar

Preheat your oven to 350 degrees and prepare your cupcake tins by lining them with baking papers or cups.

Next cream your butter and sugar on medium speed of your electric or stand mixer for about two minutes. Next add in your egg and beat until it is incorporated. Then add in your cocoa power and red food coloring and mix at medium speed for four minutes. This will allow the distinctive red food coloring to get fully incorporated.

Meanwhile sift together your flours, baking soda and salt in a medium-sized bowl. Then in a measuring cup measure you buttermilk and add in your vanilla.

Now add half of the flour and half of the buttermilk mixtures to your butter and cocoa powder. Mix them in on low-speed until just mixed in then add your remaining flour and buttermilk.

Finally add in your sour cream and vinegar being careful to not over mix your cake batter.

Now fill each cupcake liner about 3/4 of the way full with batter. I use a large ice cream scoop that holds 2 approximately tablespoons so that each cupcake has an even amount of batter.

Then bake your cupcakes for 20 minutes and let them cool before your frost them.

Mascarpone and Cream Cheese Icing

  • 1 cup (2 sticks) butter, room temperature
  • 8 ounces cream cheese, room temperature
  • 6 cups of powdered sugar
  • 1/2 teaspoon kosher salt
  • 2 teaspoons vanilla extract
  • 3 Tablespoons of milk
  • 8 ounces of mascarpone cheese
  • Sprinkles for decorating
  • Blueberries, raspberries, blackberries or your favorite berries for decorating

At medium speed beat together your butter and cream cheese for a minute. Then add in your powdered sugar, vanilla, kosher salt and milk and beat it a low-speed until your powdered sugar is fully blended in and your icing looks light and fluffy.

Finally add in your mascarpone cheese and beat it until it is just incorporated because  mascarpone cheese is more delicate and over beating it could cause your icing to curdle.

Now the best part frosting and decorating your cupcakes, I like to pipe my icing on with a large star tip. If you are new to cake decorating or would like to see how I frost my cupcakes then here is a link to my carrot cupcake video that uses some of the same techniques.

White Chocolate Stars

  • 8 ounces (1 bar) of white baking chocolate

Then because I wanted to add something special for the Fourth of July I decided to add some white chocolate stars. These stars are easy to make if you have a silicone or plastic mold. I think my mold was originally made for ice cubes, but it makes a great chocolate mold too. You can also find inexpensive plastic molds in the baking section of your craft store.

Melt your white chocolate in a microwave safe bowl for one minute then stir and heat it for an additional 20 seconds and stir until it is smooth and fully melted. Then I poured my chocolate into a small pastry bag and I cut off the tip and evenly filled my mold. Then I placed my mold in the freezer for 15 minutes to allow my chocolate to fully cool and become firm. Then I turned my mold over and popped out my stars.

Add a few red and blue berries to your cupcakes. Then top it off with a white chocolate star and some festive sprinkles.  It’s a red white and blue cupcake that is every bit as delicious as it is festive.

Looking for something to share with family and friends this Fourth of July? Then these red velvet cupcakes are definitely fun and would add something special to any celebration. They  so delicious that they are sure to disappear like “magic.”

This recipe was a featured recipe on Tasty Kitchen get a printer friendly version here.

Contact Us