Italian “Eye Love You” Heart Cookies

In Italian they have a saying “Anche l’occhio vuole la sua parte” which means the “eye needs to be well fed.” Have you ever looked at a pastry or bakery display case that looked so beautiful it was a feast for the eyes? While traveling in Italy, France and Austria I was taken with how beautiful the bakeries were. The pastries that looked like little works of art. I could feel my eyes widen and twinkle just taking in the rows of the small tarts, cream puffs and cookies.

I had a similar feeling when I went to Eataly in downtown Chicago. This Italian specialty market has a wonderful bakery. We went after friends of ours had raved about it. However, nothing they told us prepared me for just how astounding the selection was. They had a beautiful array of Italian cookies and cannolis.

Inspired by their round Occhi Di Bue or “bullseye” cookies I decided to make my own heart shaped Italian cookies. These cookies are different than you’re your ordinary sugar or sandwich cookies because they have a distinctive crisp and buttery texture with a hint of lemon. These cookies are exceptionally good when sandwiched between a layer of strawberry or your favorite berry jam.

Italian Valentine’s Day Cookies-Makes 16 to 18 three-inch cookies

  • 1 stick butter, cool room temperature
  • 1 cup sugar
  • 3 egg yolks,
  • 1 tablespoon vanilla extract
  • 1 teaspoon lemon zest
  • ½ teaspoon kosher salt
  • 2 cups flour
  • ¾ cup good quality strawberry jam (I like Stonewall Kitchen Jams)
  • 1 cup powdered sugar

Preheat your oven to 325 degrees

Let your butter sit out at room temperature for 45 minute to an hour. This cool room temperature butter is the trick that gives these cookies a flakiness without having to chill your dough.

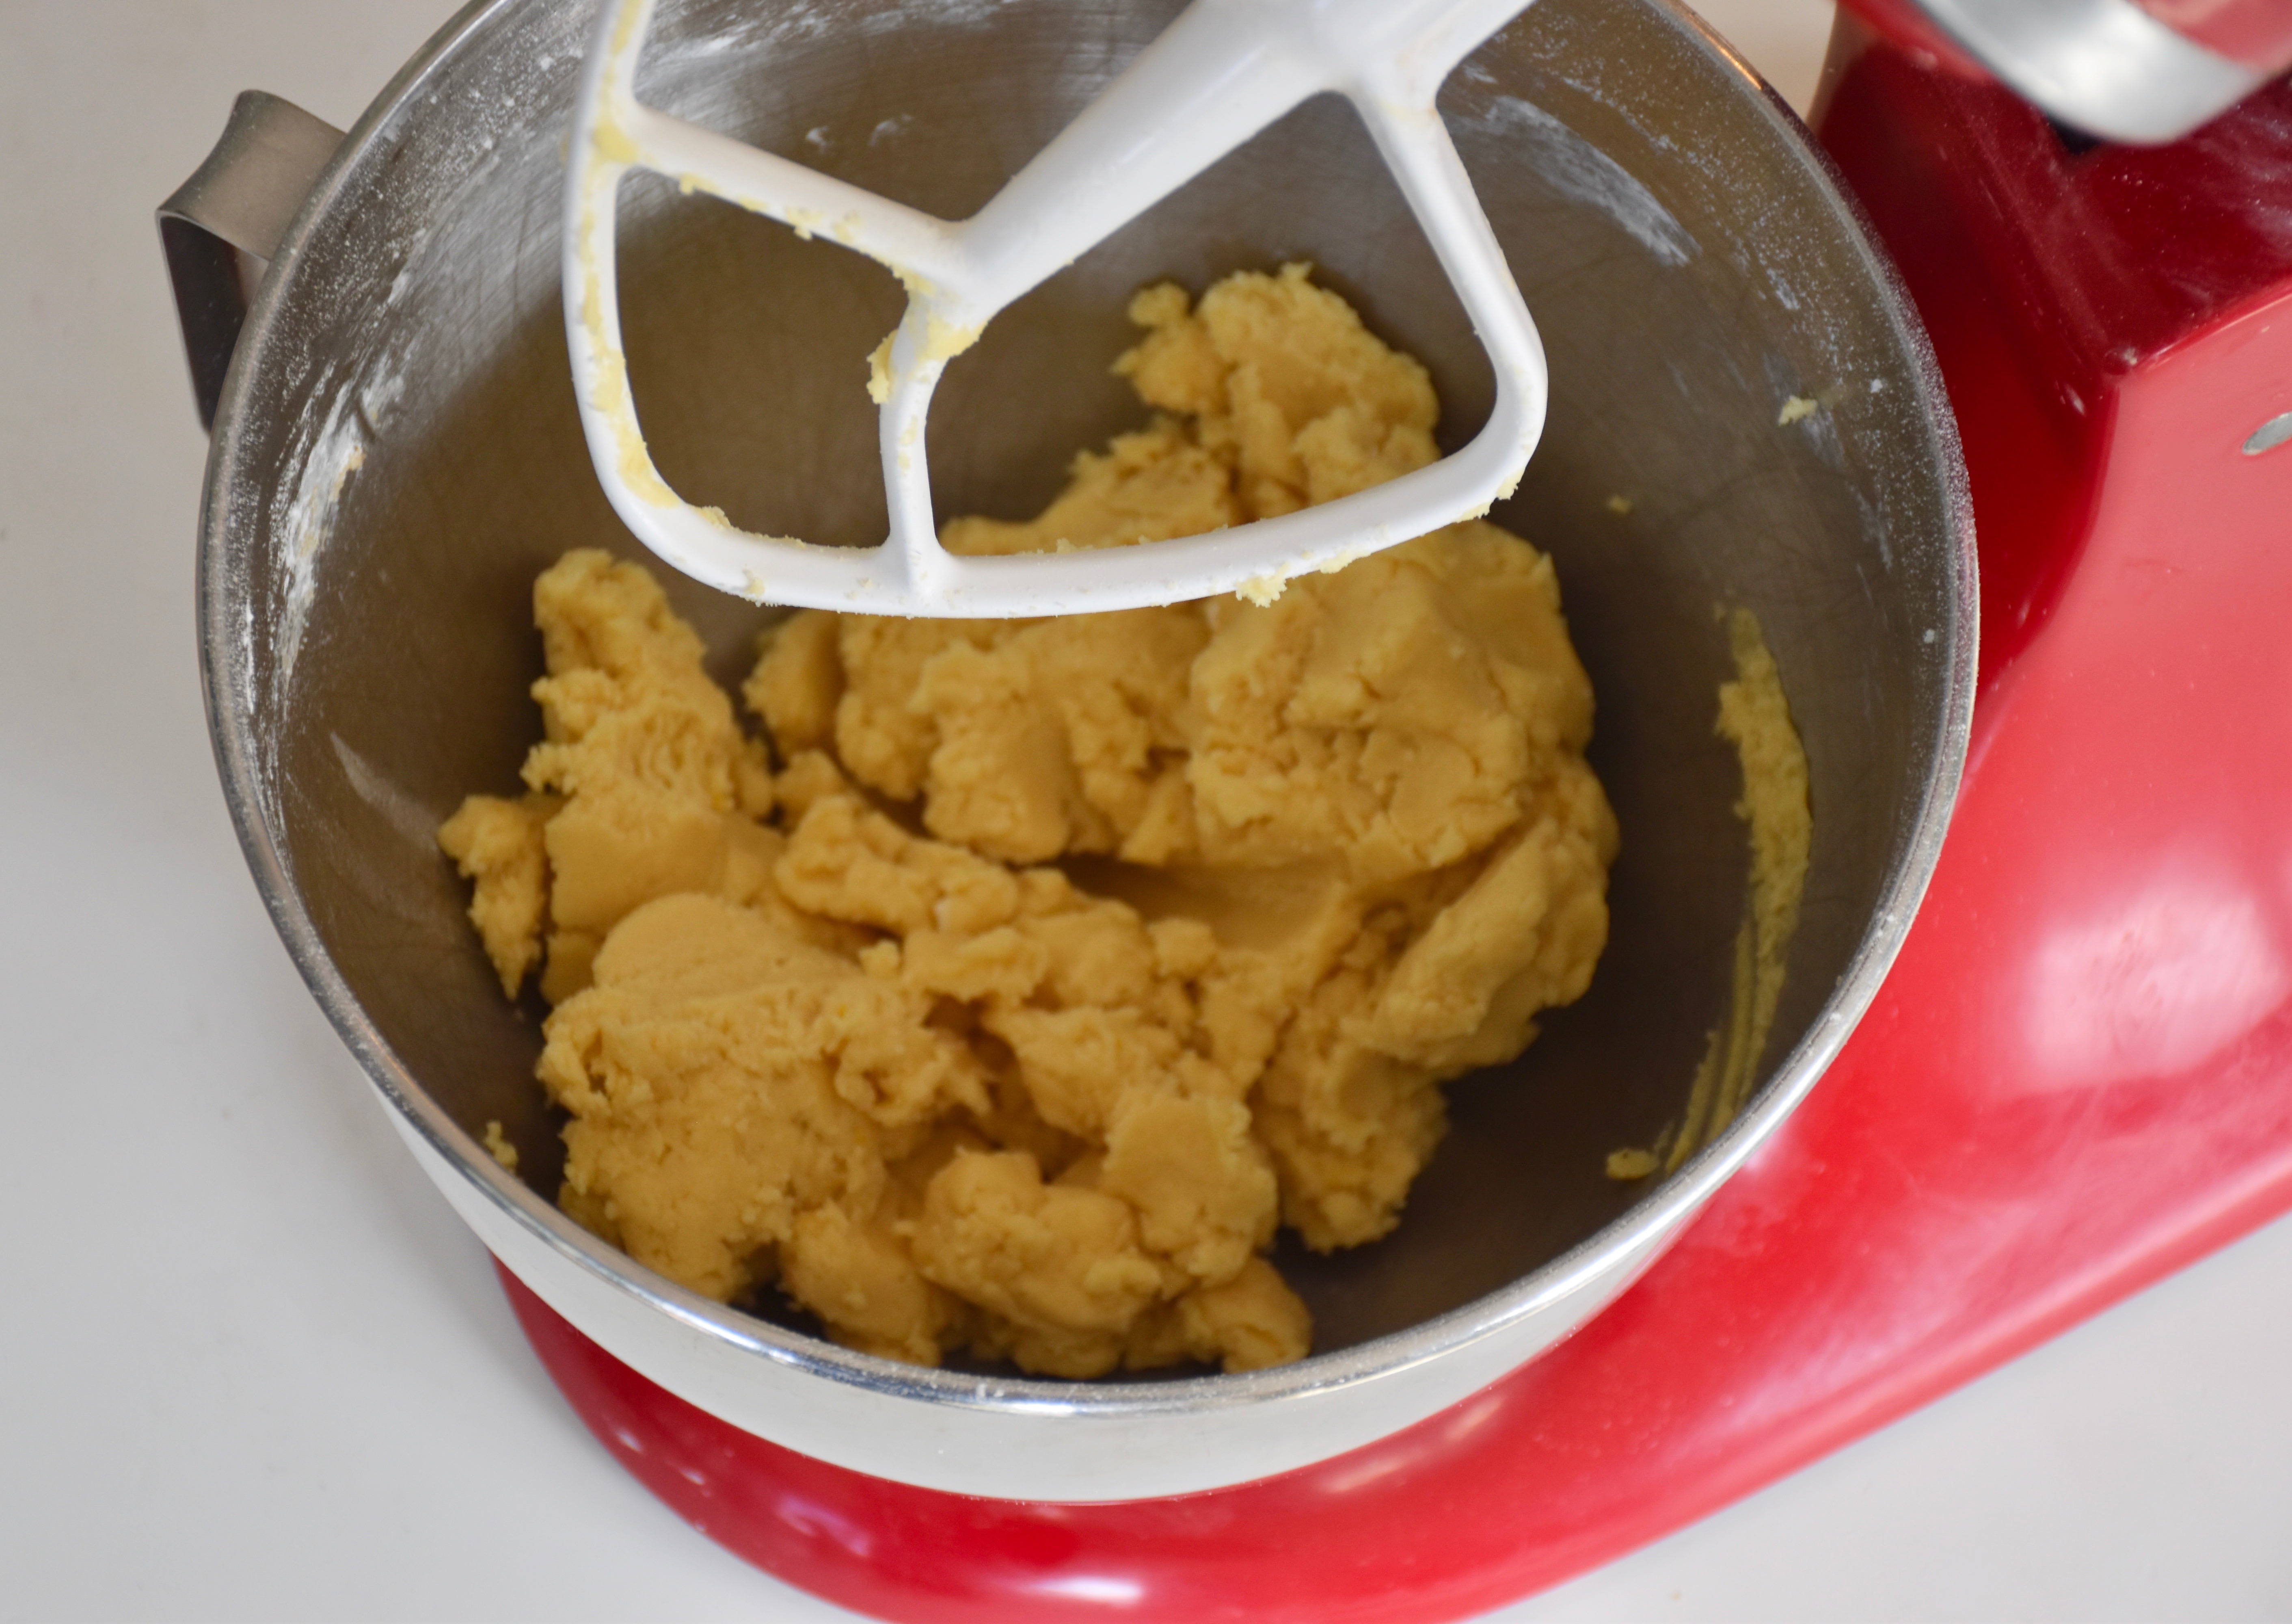
Then using a stand or hand mixer cream or mix together the butter and sugar on medium speed until light and fluffy about 3 minutes.

Then on a lower speed mix in your egg yolks, vanilla and salt. Gradually mix in your flour until your dough comes together.

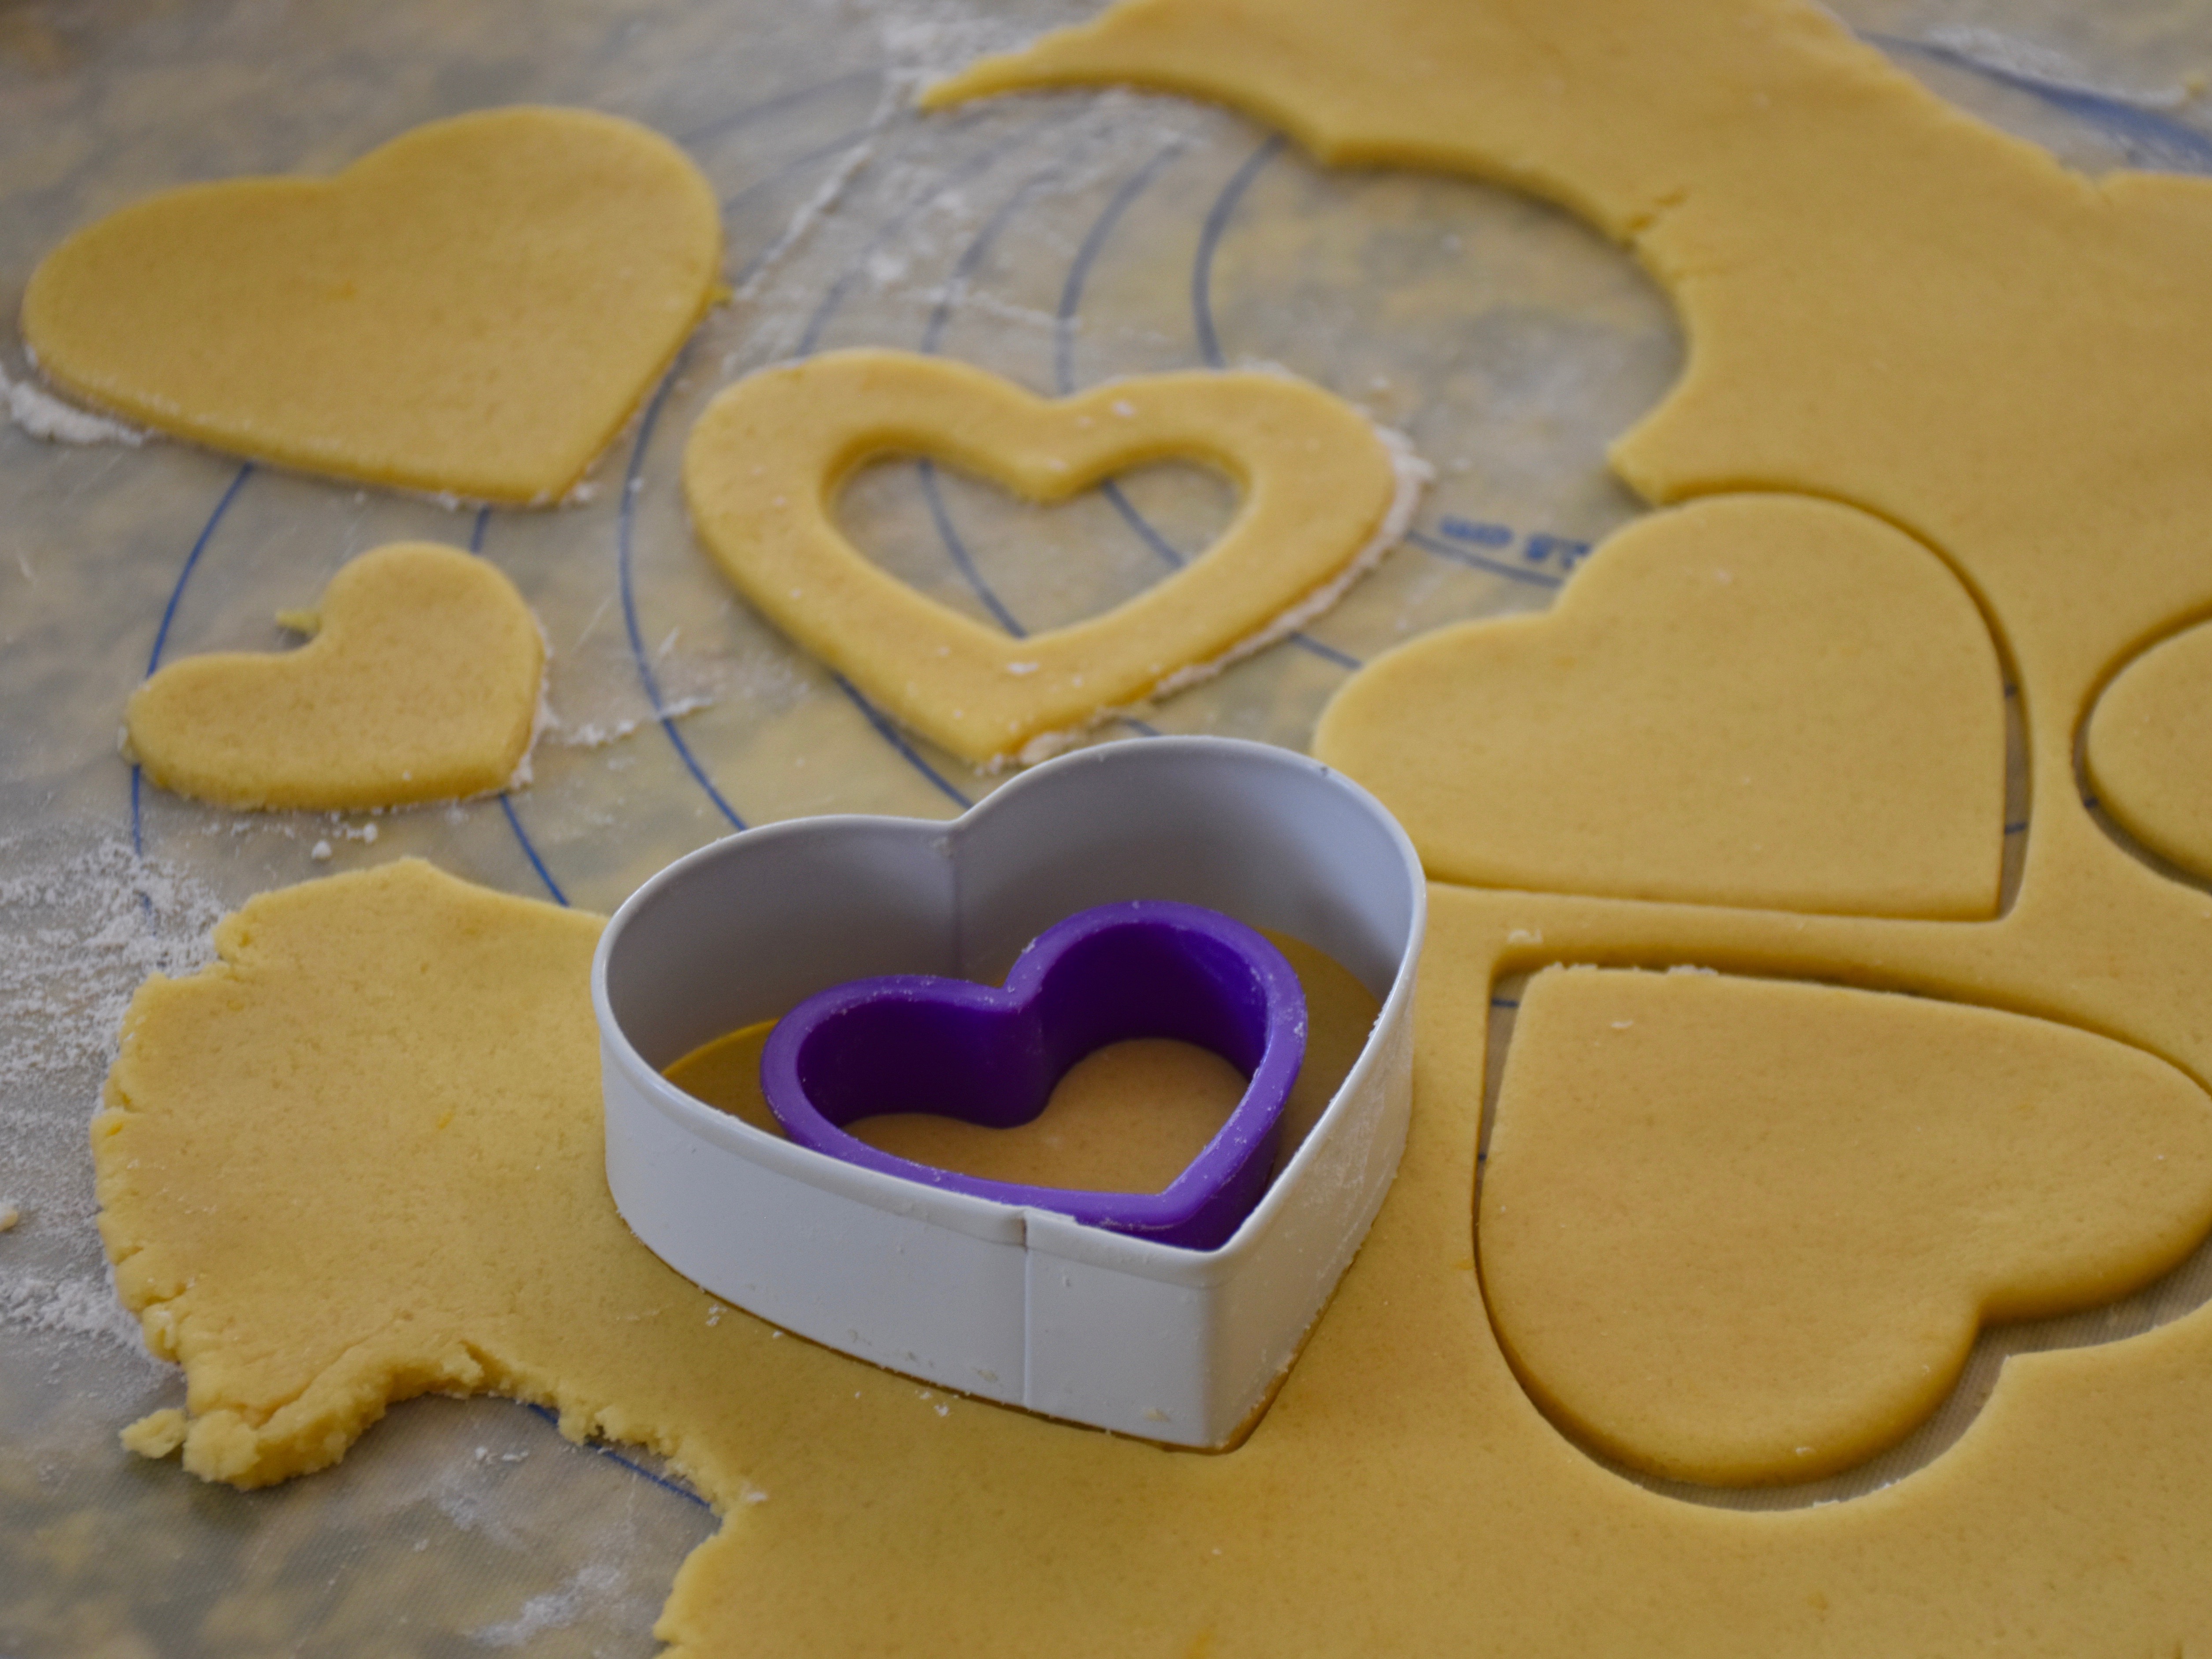
Flour your counter or a silicon baking mat and then roll your cookie dough to a ¼ of an inch thickness. Then cut as many three-inch hearts out as you can. Since these are sandwich cookies you will want to make sure that you have an even number so each cookie has a top and bottom.  Then use a smaller heart shaped cookie cutter to create the window on the top cookies.

Since these cookies are delicate, I like to bake them on parchment paper lined cookie sheets so that nothing sticks to the pan.

Then bake your cookies for about 10 minutes until the edges just barely turn golden.

When they are cool enough to handle take a spoon full of jam and spread it evenly on the bottom part of the cookie. Then before you place the top on your cookie dust it with some powdered sugar. Keep assembling your cookies till you get them all filled and dusted with powdered sugar.

These cookies can keep at room temperature for a while, but If you have cookies left then I do recommend placing them in the fridge.

Since these traditionally circular cookies are called “bullseye” cookies I thought I would name my Italian heart shaped cookies  “eye love you” cookies. Because these pretty little cookies are definitely a feast for the eyes and something delicious to share with the ones you love.

Snowflakes

The winter season runs long here in the midwest. We still have snow on the ground as I am writing, so while others are already talking about spring I am still thinking about snow. I know I am not the only Southerner who marvels at it beauty. The Wall Street Journal recently had an article about South Texans from the Rio Grande Valley who were still saving snow balls in their freezers. A few years ago when the area got its first snow in over 100 years people rushed to save a bit of its magic. One women they interviewed said she was saving her snowball to give to her grandchildren. It was so important to her that she had it listed in her will.

Growing up on the Texas coast snow is still quite a novelty to me. The handful of times it snowed growing up it melted so quickly that I never saw a real snowflake. Seasoned Chicagoans would no doubt get a good chuckle out of what us South Texans consider snow: any frozen precipitation no matter the amount counts, even if it melts in the air.

When our family moved to Chicago, I remember the wonder of watching the snow fall. It was November and we had been in our new home for just a week. We were just beginning to talk about our winter game plan. We needed boots, pants and a snow blower, but before we could sort it all out the snow arrived. I remember us rushing out to Home Depot to get our first snow shovel. The forecast was for more than just a dusting so my girls and I waited in the car and watched the snow begin to fall. Then when my husband came out with a new fur lined bomber hat and shovel, I had to laugh. Let the new Northern adventure begin! Our girls who were toddlers at the time had never seen snow so we all had fun making snow angels and playing together on our front lawn. We got advice from neighbors and friends who were kind to help me because I was definitely clueless when it came to serious winter apparel.

My younger daughter and I love building snowmen and sometimes even snow penguins together.

Then a few weeks later when it snowed again, I remember seeing a snowflake fall on my daughter’s dark hair. I looked down and for the first time, I saw an actual six-sided snowflake. The shape I had only seen in Christmas ornaments and school crafts. Real snowflakes are beautiful. I stopped and marveled at its fleeting beauty.

I have now lived here long enough to become more acquainted with the sometimes-bitter cold of January. Last year when record breaking temperatures plunged down to a negative twenty-two, I got a text message from a friend about how for that one day the wind chill temperature difference between Houston and Chicago was 100 degrees different. It seemed a bit surreal. I had never been in temperatures even close to that before, but as we hunkered by the fireplace as a family keeping warm, I was grateful. I looked out my front window to see the snow piled up high. The view was like a Hallmark Christmas card.

This was our house a year ago this week when the Polar Vortex had us covered in snow.

Admittedly, the snow can present some challenges when it comes with wind and ice. Last Christmas when we were returning home from spending time with our family, we got quite the shock. We were exiting the airport parking lot when our car window froze open. So, to keep warm as we made the drive home, we sang to the holiday music on the radio. Just then the snow began to fall fat flakes and my husband and I exchanged a knowing smile. What a beautiful sight as we drove home that night in this winter wonderland.

Here is Olaf  another one of our recent snow creations. We made him a week ago and he is  still looking fairly frozen. When I pull into my driveway and see him out on the lawn I can’t help but smile.

Classic Blue

Each year I look forward to hearing about the new “color of the year.” Design is always changing and that is one of the reasons I love reading about color projections. I am not one to change everything in my home to suddenly fit the latest trend, but I do like to think that my decor slowly evolves. I am one of those people who likes to every so often give a room a mini update or remix. One of my favorite ways to do that is to think about accessories and new ways to update the feel of a room using color.

This year grey the reigning neutral of choice for the last decade seems to be warming up a bit as I am seeing more shades of greige (grey-browns and taupes). Now shades of white and deeper tones of charcoal and indigo seem to be everywhere. Sherwin Williams paint color of the year is a deep blue called naval. There are also light light pinks and deep greens that you are seeing in new fabrics and designs.

Pantone, a color matching company used by graphic designers, fashion designers and, printing and manufacturing companies is another design influencer that also releases its own “color of the year.” I happen to like their projections because they tend to be looking at color across a whole range of industries. Often their color of the year is a good indicator of where you are going to see things like accessories going. You might not rush out to paint your whole house their color, but you will see things like lamps, fabrics, rugs and home goods headed that direction.

This year Pantone’s color is Classic Blue. I like this bright shade of blue because it pairs well with many of the other paint color trends. Pantone says that their choice of Classic Blue highlights their “desire for a dependable and stable foundation on which to build as we cross the threshold into a new era.”

Every new year I think about what new projects I want to take on. So if you are like me and have a few New Years goals for making a few updates then here are some  small ways to add a little splash of this dependable and classic blue.


Sister Parish Pillow

This classic small pattern by Sister Parish is called Burmese. It comes in many other colors as well, but I like it because it’s small scale works well with other patterns. The modern leaf pattern adds just a touch of whimsy.

Rebecca Atwood Blue Pillow

This more modern crescent dot pattern is by Rebecca Atwood. Atwood is an artist, textile designer and author. She had a new book come out this past year called Living with Color. I like her philosophy toward choosing colors that speak to you and her book has lots of pictures and tips on how to strike the right balance.

Les Indiennes Pillow

This small scaled French floral pattern would be great in a more traditional styled room. I love the pleated ruffle edge. This company has other beautiful block printed bedding and table linens.

Aerin Lauder Plates

Style icon Aerin Lauder launched a gorgeous line of home accessories and dishes with William Sonoma. These plates are an inexpensive way to add a touch of blue to your wall or table.


Juliska Country Estate Plates

The china company Juliska has lots of beautiful plates, vases and glassware that come in the most gorgeous shades of one of my favorite flowers, delphiniums.

Vietri Santorini Plates

Want a more modern look, these bold graphic patterns by the Italian pottery company Vietri Santorini would be a fun way to add a little blue. This line of dishes was inspired by the deep blue mosaic tiles found on the Greek Isles. I found one of the serving pieces to this set at Marshals and I love it.

Caitlin Wilson Floral Tea Towel

Designer Caitlin Wilson’s home in Dallas was featured in the January issue of House Beautiful.  It is a delightfully sunny home filled with many shades of blues, lavender and pink. I especially love her kitchen and her amazing French blue stove. She has a line of pillows, fabrics and even some small items like these floral tea towels that would add a lovely touch of blue to any kitchen or bathroom.

Caitlin Wilson French Stripe Towel

I love the the scalloped edge and small scaled stripes. These decorative towels would be great in the kitchen or used as a napkin on a pretty table.

Serena and Lily Blue Checked Napkins

Always a classic blue checked napkins with a mini pom pom fringe from Serena and Lily.

Kate Spade Lamp

This Matisse inspired lamp would make a fun statement on a small table or desk.

Dana Gibson Lamp

Artist Dana Gibson has some gorgeous and unique hand painted lamps. I love this classic stripe, but she has other blue and white and green and white patterns as well.

Jonathan Y Lamp

Finally, Bunny Williams has a striking brushstroke lamp that she designed and I have long loved its design. However the price tag of  $750  for one lamp has always been too much for me. So this lamp is a seventh of the the cost and still has all the classic blue and white look that I love.

The director of the Pantone Color Institute, Latrice Eiseman says that to her classic blue “encourages us to look beyond… and think more deeply” So in this new year and decade, I am loving and thinking about adding a little more of this bright and optimistic blue to my life.

Celebrating the Everyday With Peach Pancakes

My husband’s best friend, Ben, is a mathematician and economist. As an economist he often sees life with a refreshingly different viewpoint. He has a way of valuing time that has inspired me to think a bit differently about the world. As he would explain time unlike money and other resources is something that you can never get back. So, it’s to be spent wisely and celebrated. Ben is the only person I know who counts and celebrates minutes and days. Years ago, he celebrated his 10,000th day of being alive, and so to mark the occasion I created and sent him the recipe for a 10,000 days’ chocolate cake. I am not quite as good a counting the days, but a little over a year ago, I got an email from Ben:

Amy-

I notice your 14,000th day is right around the corner. If you’re looking for a blog entry about your K-day chocolate cake recipe, it might be a nice excuse!

~BEN

I had taken a short break from writing and here was his encouraging email reminding me of the importance each day. Although I never managed to make a 14K day cake, the thought stayed with me. So when I was taking dinner and cake requests for my daughter’s birthday a few weeks ago I thought about his email.

Our family’s favorite way to celebrate is with pancakes. It’s what my daughters beg me to make and what my now 2,570-day old daughter wanted for her birthday dinner.

My girls on their first day of school this year. We celebrated the day and most of that week with their favorite pancakes for breakfast.

The McCauley’s Celebrating Every Minute Peach Pancakes (no occasion too small)  

Makes 14 to 16 medium sized pancakes

  • 3 cups of all purpose flour
  • 1 teaspoon salt
  • 2 tablespoons sugar
  • 2 tablespoons baking powder
  • 3 cups of milk
  • 2 eggs
  • 6 tablespoons melted butter

First preheat your nonstick skillet on medium heat or if using a griddle set it to 350 degrees.

Then in a medium to large sized mixing bowl combine the flour, salt sugar and baking powder. Whisk in your milk and eggs and then your melted butter. Take care to not over mix your batter. A few small lumps are fine, because you want your pancakes to be light and fluffy.

Then pour or ladle about 1/4 cup of batter for each pancake. Then watch the middle of your pancake. You will know that it is time to flip your pancake when you see the center begin to bubble.

My favorite pancake pan is actually a large omelet pan. It doesn’t require greasing or butter and it cooks very evenly.

Flip your pancake and then cook it for an additional 3 to 4 minutes until you feel that the center is springy to touch and cooked through.

The key to cooking pancakes is to watch the center!

Then if you are wanting to add a more festive touch top your pancakes with a little peach syrup or substitute your own favorite fruit and jam combination.

Peach Syrup

  • 1 cup maple syrup
  • 1/4 cup peach jam (my favorite is Stonewall Kitchen’s Peach Amaretto Jam, but it can sometimes be hard to find so I have also used Bonne Maman Peach Preserves)
  • 1/2 fresh or frozen peach slices, thawed

In a small sauce pan over medium low heat mix together the syrup and jam. Stir until the jam has melted and the syrup is heated thought. Then top each serving of pancakes with a few peaches and drizzle with the peach syrup.

So, here’s to counting and being grateful for each day, because sometimes a stack of peach pancakes is the most delicious way to celebrate .

It’s All Relative: The Joy of a Little Creative Clutter

I have a small office in my basement and this is what my desk looks like on a really good day. The truth is that I love all kinds of creative messes. This room has a closet filled with ribbons, vases, beads, fabric, paints, paper and cake supplies. Then I have shelves filled with books, magazines and baskets of table linens and dishes. I was doing a little basement cleaning this holiday season which had me thinking is a little creative clutter all that bad? So my January column is for anyone else who has struggled to find the balance.

Each January after the holidays are over, there seems to be a renewed obligation or duty to reorganize. Everywhere you look there are articles, books and news stories that promise to help you tidy up and embrace your inner minimalist.

However, for those of us who despite our best efforts can’t fully commit to the minimalist movement, there may scientific validation. If you too have a beloved collection of books or a permanent stack of paperwork on the corner of your desk then take heart. That mess just might be the right environment to spark creative thought and inspiration.

“If a cluttered desk is the sign of a cluttered mind, of what then is an empty desk a sign of?” quipped Albert Einstein in defense of his notoriously messy office. Would it surprise you to learn that a scientific study might prove that Einstein was right?

Dr. Kathleen Voh, a social psychologist and professor at the University of Minnesota School of Management sought to study just that question. She published her findings in the journal Psychological Science. In her study, she found that although tidy work environments promoted healthful eating and generosity, they tended to stifle creativity. Her study found that working in a “messy room” actually encourages novel thinking. So, if you too think best with a little creative mess then you are in good company, as Voh notes that other innovators who had notably messy desks include: Mark Twain, Frida Kahlo, Thomas Edison, Martin Luther King Jr. and Steve Jobs.

In case you were wondering, I am not a hoarder and my house is not a terrible mess. But I doubt my office would meet the lofty standards set by all those organizational experts. My house has its own colorful and charming eccentricities. I have collections of things I love- books, magazines and an oversized closet full of art supplies. When inspiration strikes, I have been known to make quite a creative mess. This may from time to time cause my neatnik husband to shake his head and question my sanity. However, he has learned it is best to just walk away. We have an understanding that it will all get cleaned up.

Is there some middle ground? Can happiness and a little clutter really coexist? Experience has taught me that there is such a thing as a happy mess. A little paint and glitter on the kitchen table and a dish or two in the sink are the spontaneous creative moments that fuel me.

Along the way, I have made peace with the reality that young children come with a certain amount of mess. As a mother I would rather spend my time imagining new adventures than always having an impeccably clean house. So, here’s to a new year filled with more creativity and less worry. In the end, it’s all relative. Every drawer in my house might not be perfectly organized, but my home will be artsy and above all joyful.

Here is the creative reality. A photo of what my office usually looks like: kids art, a sewing machine and plenty of paperwork, but oh the possibilities it holds.

My Gingerbread Tradition

My love of cooking began at the age of seven when I cooked my first meal. Alone in the kitchen with my mother’s Joy of Cooking I made dinner: vegetable soup with a side of Pillsbury refrigerator biscuits. My mom was out of town and my father, who wasn’t much of a cook, was left in charge of dinner. So, after a few nights of his cooking I decided to take matters into my own hands. I don’t remember the soup being an overwhelming success, possibly because I added iceberg lettuce as a substitute for cabbage. However, the spark was lit and from then on, I began cooking on my own.

This was well before the internet or the Food Network. So, I used Irma Rombauer’s Joy of Cooking to teach me everything. I tried cookies, small cakes and I worked my way up. Then one Christmas break I was looking for something to do. Feeling festive I decided I would take on a classic, making my own gingerbread house. The Joy of Cooking doesn’t have a recipe for gingerbread houses, but there was a recipe for gingerbread cookies. I worked to adapt the recipe to make a house. It took a few batches to get it right, but it worked. Pleased with my small gingerbread house, I began to bake more. Looking back, they were what made me fall in love with baking.

Put a pastry bag with royal icing in my hand and there is a deep sense of joy that comes over me. It doesn’t matter how messy my kitchen looks or how many things I have left to do on my holiday list. Every year I make time to bake another gingerbread house.

My daughters are now old enough to be a part of the fun. So this year we decided to try something new: a gingerbread church.  My favorite part was the Jolly Rancher stained glass windows, which shine when you turn on the mini lights I placed inside.

I recently found an older baking book called The Gingerbread Architect, which had lots of clever ideas about windows. They used melted candies like butterscotch and even attached sheet gelatin to make clear window panes.  I also loved their tip for using sour belts to cut out shingles and decorations. So I took some of their ideas and used it for our house.

The windows were fairly simple. I just crushed my Jolly Ranchers and then placed them inside my baked gingerbread wall. The candy will bake right into the window frame.

This is what my windows looked like when I first took them out of the oven and added the cross pieces..

Then I baked it at 350 degrees until the candy melted which was about 5 minutes. The key is to bake it on parchment paper, once the candy cools it is easy to peel back the paper. If you want to add a detail like the cross I made, I found it helps to melt the background color first. Then right after you take your gingerbread out of the oven add the additional featured candy pieces. The candy pieces will melt in and not spread if you wait to add them after baking the window base.

This is the back side of my church and bell tower.

It’s been a busy baking week in our house as my girls added their own creativity to the gingerbread village we made. I love displaying them on cake stands in my kitchen. It makes my cookbook collection look so festive!  If you want the recipe and a few more decorating tips for baking your own house then check out my post on Gingerbread with Kids.

So the tradition continues with a new generation of gingerbread bakers. Let holiday baking fun begin! Wishing you all a happy holiday season!

City Sidewalks Dressed in Holiday Style

The city sidewalks and houses are all dressed up in holiday style. Winter weather arrived a little early in Chicago this year, so I have been out early adding some evergreens to my front porch pots. I love this time of year all the garlands and twinkling lights. So, if you too are out holiday decorating, I thought I would share a little winter porch inspiration.

This classic colonial I passed had a lovely topiary trimmed with evergreens and berries. The snow and ice can make traditional gardening a little challenging this time of year, but these evergreen planters look beautiful.

This cute little southern home has a porch trimmed with beautiful poinsettias, cyclamens, and pansies. Evergreens aren’t well suited to some parts the south, but that just means you can add a few flowers. These planters have all the colors of the season and these plants will continue look good all winter long.

A more northern styled arrangement with birch and willow branches. The branches add some height to these elegant planters.


Want a more modern look? This layered planter that adds a festive, but not too over the top touch to this porch.

A walk downtown had more Christmas inspiration. Phillips Florist had the sidewalk lined with some lovely birch branch and evergreen pots. The florists usually plant their pots in rice hulls, which are great for cut branch arrangements since they can hold more water than traditional soil. However they lack the nutrients that live plants need, so I only recommend using rice hulls for cut branches.

Then Jane’s Blue Iris, another local florist, had a gorgeous mix of greenery with boxwood, magnolia, juniper, cedar and pine. Adding a wide variety of greenery allows you to add some color and texture. This arrangement is particularly eye catching because of the balanced asymmetric arrangement with the the spruce top on one side and staggered branches on the other.

So after admiring all these pretty planter, I took a little creative inspiration to create my own. I moved my small boxwoods indoors for the winter. I found some small Japanese cedar trees that I trimmed to look like mini spruce tops. I thought these cedars would look festive and I liked their silvery blue tinged needles. These cedar trees should tolerate the cold, but to keep my pots looking green a little longer I created some faux evergreen bases.  The great part about this project is that even if southern temperatures keep you from using real evergreens outdoors, you could still make an arrangement like this without worrying about it wilting in the sun. So here are a few tips for creating your own evergreen topiary bases.


First select a a large grapevine wreath to use as a base. Then purchased some faux greenery and pine cones from your local craft or floral supply store.

Here is a mix of greenery that I found at Michaels. I have also seen some pretty greenery from Magnolia home at Target.

Separated and cut your branches and berries into smaller pieces that you can arrange around your wreath.

It helps to place your largest greenery first. Make sure that you securely place the wired end into the grapevine.  Then add in your pinecones and berries. I arranged my branches so that they pointed up and out since it would be sitting in my pot.

Then one they were place around my topiary I added a few branches and additional pinecones to give it a more realistic look. You could also add a few extra pieces of greenery to trail down the pot a bit. I think these evergreen topiary wreaths would work well with any small tree or topiary.

Now that December is nearly here it’s time to embrace the joy of Christmas. Adding some greenery to your front door is easy way to welcome the winter season. So, no matter how frosty it gets where you live you can still add a little holiday style to your porch and planters.

Tales from the Table and Thanksgiving Traditions

Thanksgiving celebrates gratitude, family and food and in our house plenty of nostalgia. I love hearing about people’s holiday traditions. What kind of turkey do you cook? Or do you skip the turkey and make a more adventurous and less traditional main course?

My mom makes an excellent herb roasted turkey while my husbands’ family has a unique but equally delicious tradition of a breaded turkey fricassee. Then there are of course the side dishes. In our house the general rule is the more the merrier from my grandmother’s cheese onions and black cherry Jell-O salad to my great grandmother’s cornbread stuffing, my mom’s sweet potatoes, cranberry sauce and green beans. Finally, there is dessert where there are usually three to four different pies and sometimes even a cake. When we are all together our family puts together quite a meal.

In all families change happens, so making new traditions is important too. Moving has meant that some years we can’t always make the grand event. I now have few new dishes of my own like turkey schnitzel with a beurre blanc and mashed potatoes. The four of us can only eat so much so I have edited the side dish list just a bit, but it’s still delicious.

However, the one tradition that I haven’t trimmed is setting the Thanksgiving table. I come from a long line of gracious hostesses, so even for a table of just four I will still pull out all the pretty dishes and create something beautiful. I can remember Thanksgiving at my grandmother’s house. The table would be set with her brown and rust Spode dishes and a pretty flower arrangement. Flowers and just a few small touches can make any table holiday ready.

We tried something new last year, sharing what we were thankful for. My 5 year old daughter’s answer took us all by surprise  “robot unicorns.” It was too funny!

As I look back, I thought I might share a few of my favorite flowers. A bowl, a wooden box or even a hollowed-out pumpkin with a little floral foam and a grocery store bouquet can make a quick and pretty centerpiece. I have found that the way to instantly make any bouquet better is to buy extra greenery. Add in some small kale or some interesting leaves.

Add some boxwood clipping, cedar leaves or foliage from your garden to add interest and texture to your arrangement . I carved out this little pumpkin so it could fit a small jelly jar and then circled the base  of the arrangement with Dahlia leaves from my garden.

Use some pears, apples or mini pumpkins as place card holders and you have an inexpensive way to add something special to each place setting.

Grocery store blooms arranged in a simple wooden dough bowl from the craft store. I just lined the inside with small plastic containers that held my oasis or floral foam. An easy arrangement that only looks like it came from a fancy florist.

I am looking forward to setting my own table this week and sharing a meal with some of my favorite people. My girls and I will cook together while my husband periodically checks in to do a little “taste testing.”

Over the years, I have learned that the key ingredient for any holiday meal is laughter and a good sense of humor. I just remember the Thanksgiving when my grandmother the grand entertainer tried using multicolor mini marshmallows on the sweet potato casserole. The dish was a tutti fruitti mess but I still remember us all laughing about it. Those stories keep me grateful for blessings of family and time together. So even if all the togetherness and holiday stress have their moments, I will still love the happy chaos of it all. Happy Thanksgiving my friends!

My tiny kitchen helpers making their favorite chocolate pie a few years ago. This was our first Thanksgiving in Chicago. These are the moments that I love!

Reading and Eating: Julia Reed’s New Orleans Seafood Gumbo

Julia Reed's Seafood Gumbo Recipe

The cold winter weather is here and I am already feeling the chaos of the holidays. How is it that Thanksgiving is already right around the corner?  But as I stand at my stove the worries of the day simply melt away. I take in the sizzle of okra and the smell of roux toasting in my soup pot. I taste the soup and when I do the flavors of the gulf coast come flooding back.

New Orleans has a rich culinary history. If you have ever had the pleasure of visiting the Big Easy then you know just how celebrated a meal can be. This week I have been reading and eating from Julia Reed’s New Orleans Food, Fun and Field Trips for Letting the Good Times Roll. Reed is quite the story teller and her book is a feast for the eyes. It is filled with gorgeous photography, tales of parties and  introductions to the cooks and restaurateurs who make New Orleans so delicious.

The city has a a tradition of making some distinctive and amazingly flavorful soups, including my favorite seafood gumbo. So as I soon as I saw Reed’s recipe for Gumbo I knew that I had to try it. Gumbo is one of those dishes that you don’t see too often in the Midwest so this was definitely a treat. If you too want a taste of Reed’s beloved, New Orleans then try her Gumbo. It took me a little over an hour to make, but you just can’t rush flavors this good. Reed’s recipe is party sized to serve 10 to 12 so I adapted it for a smaller party of 4 to 6. I like to serve my gumbo with a side of rice and some garlic bread.

Julia Reed’s Seafood Gumbo (Serves 4 to 6)

  • 1 pound medium shrimp, deveined and peeled
  • 1 1/2 teaspoons kosher salt
  • 4 tablespoons vegetable oil, divided
  • 1 pound okra sliced
  • 1/2 pound andouille sausage, thinly sliced
  • 1 tablespoon flour
  • 1 medium yellow onion, chopped
  • 2 celery stalks, chopped
  • 1/2 cup green bell pepper chopped
  • 4 green onions chopped, with tender green parts
  • 2 garlic cloves, minced
  • 1 tablespoon tomato paste
  • 3 cups seafood stock
  • 2 bay leaves
  • 1/2 teaspoon dried thyme
  • 1/8 teaspoon cayenne pepper
  • 1/4 teaspoon freshly ground pepper
  • 2 teaspoons Lea and Perrins Worcestershire sauce
  • 1 cup whole tomatoes, roughly chopped and 1/3 cup of their juice reserved
  • 1/2 pound lump crabmeat (I made mine with just shrimp and sausage but when I can find it crab is always good)
  • 3 finely chopped green onions as garnish and topping
  • 4 to 6 cups cooked white rice

In a large skillet heat 2 tablespoons of oil over medium heat add okra and sprinkle with 1/4 teaspoon of salt and sauté stirring often for about 10 minutes

Then place your okra in a bowl to add back to your gumbo later. Next sauté your andouille sausage until browned and then set it aside to add in later.

In a large stock pot heat 2 tablespoon of oil over high heat. Add flour, lower the heat to medium and stir constantly. You want your roux to cook till it turns a medium brown. Add your onion, celery and bell pepper and sauté. Continue to stir and cook until you’re vegetables soften, 4 to 5 minutes. Add in your garlic and green onions and cook an additional 3 minutes.

Next stir in your tomato paste, tomatoes and and 1/3 cup of their reserved liquid, thyme, bayleaves, pepper, Worcestershire, and 1 teaspoon kosher salt. Then gradually stir in your seafood stock. Add the sausage and okra. Bring to a boil over high heat and cover. Reduce heat to low and simmer for 30 minutes.

Then remove and discard your bayleaves. Stir in your shrimp and simmer for 2 minutes. Stir in your crab meat and simmer for 1 minute more. Remove from heat and serve in bowls over rice.

Reed notes that this recipe can be made up to two days ahead of time, but she recommends leaving out the seafood. Heat the gumbo up to a boil and then add your seafood right before you serve it, according to the last step in the recipe.

So Laissez bon temps rouler, Julia Reed’s New Orleans has been hard to put down. I have loved seeing the city with her writing as my guide. I know this book is one that  I will continue to cook from in the years to come. I am already eyeing other recipes like her scalloped “Christmas Potatoes,” Strawberry Salsa and Rum Pecan Pie. So if you are already thinking about holiday gifts then this cookbook would make a wonderful present for the entertainer or cook in your family.

When Love Writes The Story

I am sharing the story I wrote for my column with The Hinsdalean. When I showed the article to my dad his comment was “that’s it” and he is right 500 words cannot begin to tell the whole story. However, I knew that I wanted to share just a part of this love story so that I might give others on the same path hope. Adoption is a long journey, and we are forever grateful for those who helped and loved us along the way. 


No matter how much you prepare or plan for it, parenthood has a way of writing its own story.

Its love has a strength that is greater than I could have ever known. My own journey to become a mother looks nothing like I thought it would, but looking back I am grateful for that.

My struggle with infertility meant that having a family the way I had imagined needed to change. Determined that my diagnosis would not be the end of my dream for a family, we immediately began to think about adoption.

It was a long journey that took nearly two years, but we were overjoyed and nervous when we finally got the call that our first daughter was going to be born. We weren’t sure what to expect as we packed my husband’s Ford Explorer and we made the four-hour drive to the town were my daughter was born. We met her birthmother in the hospital waiting room. We felt small and barely equipped to handle the enormity of this gift. However, we did our best to help as she labored to bring our little girl into the world. When our daughter, Gabriella, was born the doctor handed the baby to her birthmother and then she turned to me and said “do you want to hold her?” When I picked her up and looked at her, I said “Hello sweetheart, I’m your mommy.” Then suddenly my tiny daughter opened her eyes and looked straight at me. Her birthmother turned to me and said, “I think she knows.” That wide-eyed moment brought us both peace. The room was filled with love for this little girl. Even though her birthmother handed her to me with tears in her eyes, she truly believed that placing her baby with our family would be her way of giving her daughter everything she wanted for her.

Eighteen months later, when we got the unexpected phone call about our second daughter, we were surprised to learn that she had already been born. It was amazing how swiftly our family worked to help welcome Alyssa. Although we didn’t have the opportunity to meet her birthmother, everything we learned about her showed us how much she loved our daughter.

November is national adoption month. There are many amazing families who have been touched by adoption. For our family, November is a time to reflect on the journey and give thanks for their birthmothers and everyone who helped us find and welcome our daughters. It’s also a time to recognize the gift of family. As we talk about adoption to our daughters, we remind them that family is ultimately as big as your love allows.

Our journey to parenthood may have taken a different path than expected, but I wouldn’t want to change it. Somewhere along the way we learned to trust that when the details get difficult it’s best to let love write the ending, because family is a miraculous gift no matter how it finds you.


Contact Us