Reading and Eating: Save Me The Plumbs

Ruth Reichl’s latest memoir, Save Me The Plumbs, is filled with all the delicious details that readers have come to expect from her writing. It tells the story of her time as the editor of Gourmet magazine; from the first moment she was mesmerized by its tales of exotic dishes at the age of eight to the unexpected twist of fate that years later lead her to become its editor. It’s a story about how she and her staff shaped the food writing world, but most importantly it’s a tale of creativity, courage and resilience in the face of change. Reichl’s humorous and honest reflections will have you feeling like you are right there living it all with her and it will have you savoring every page.

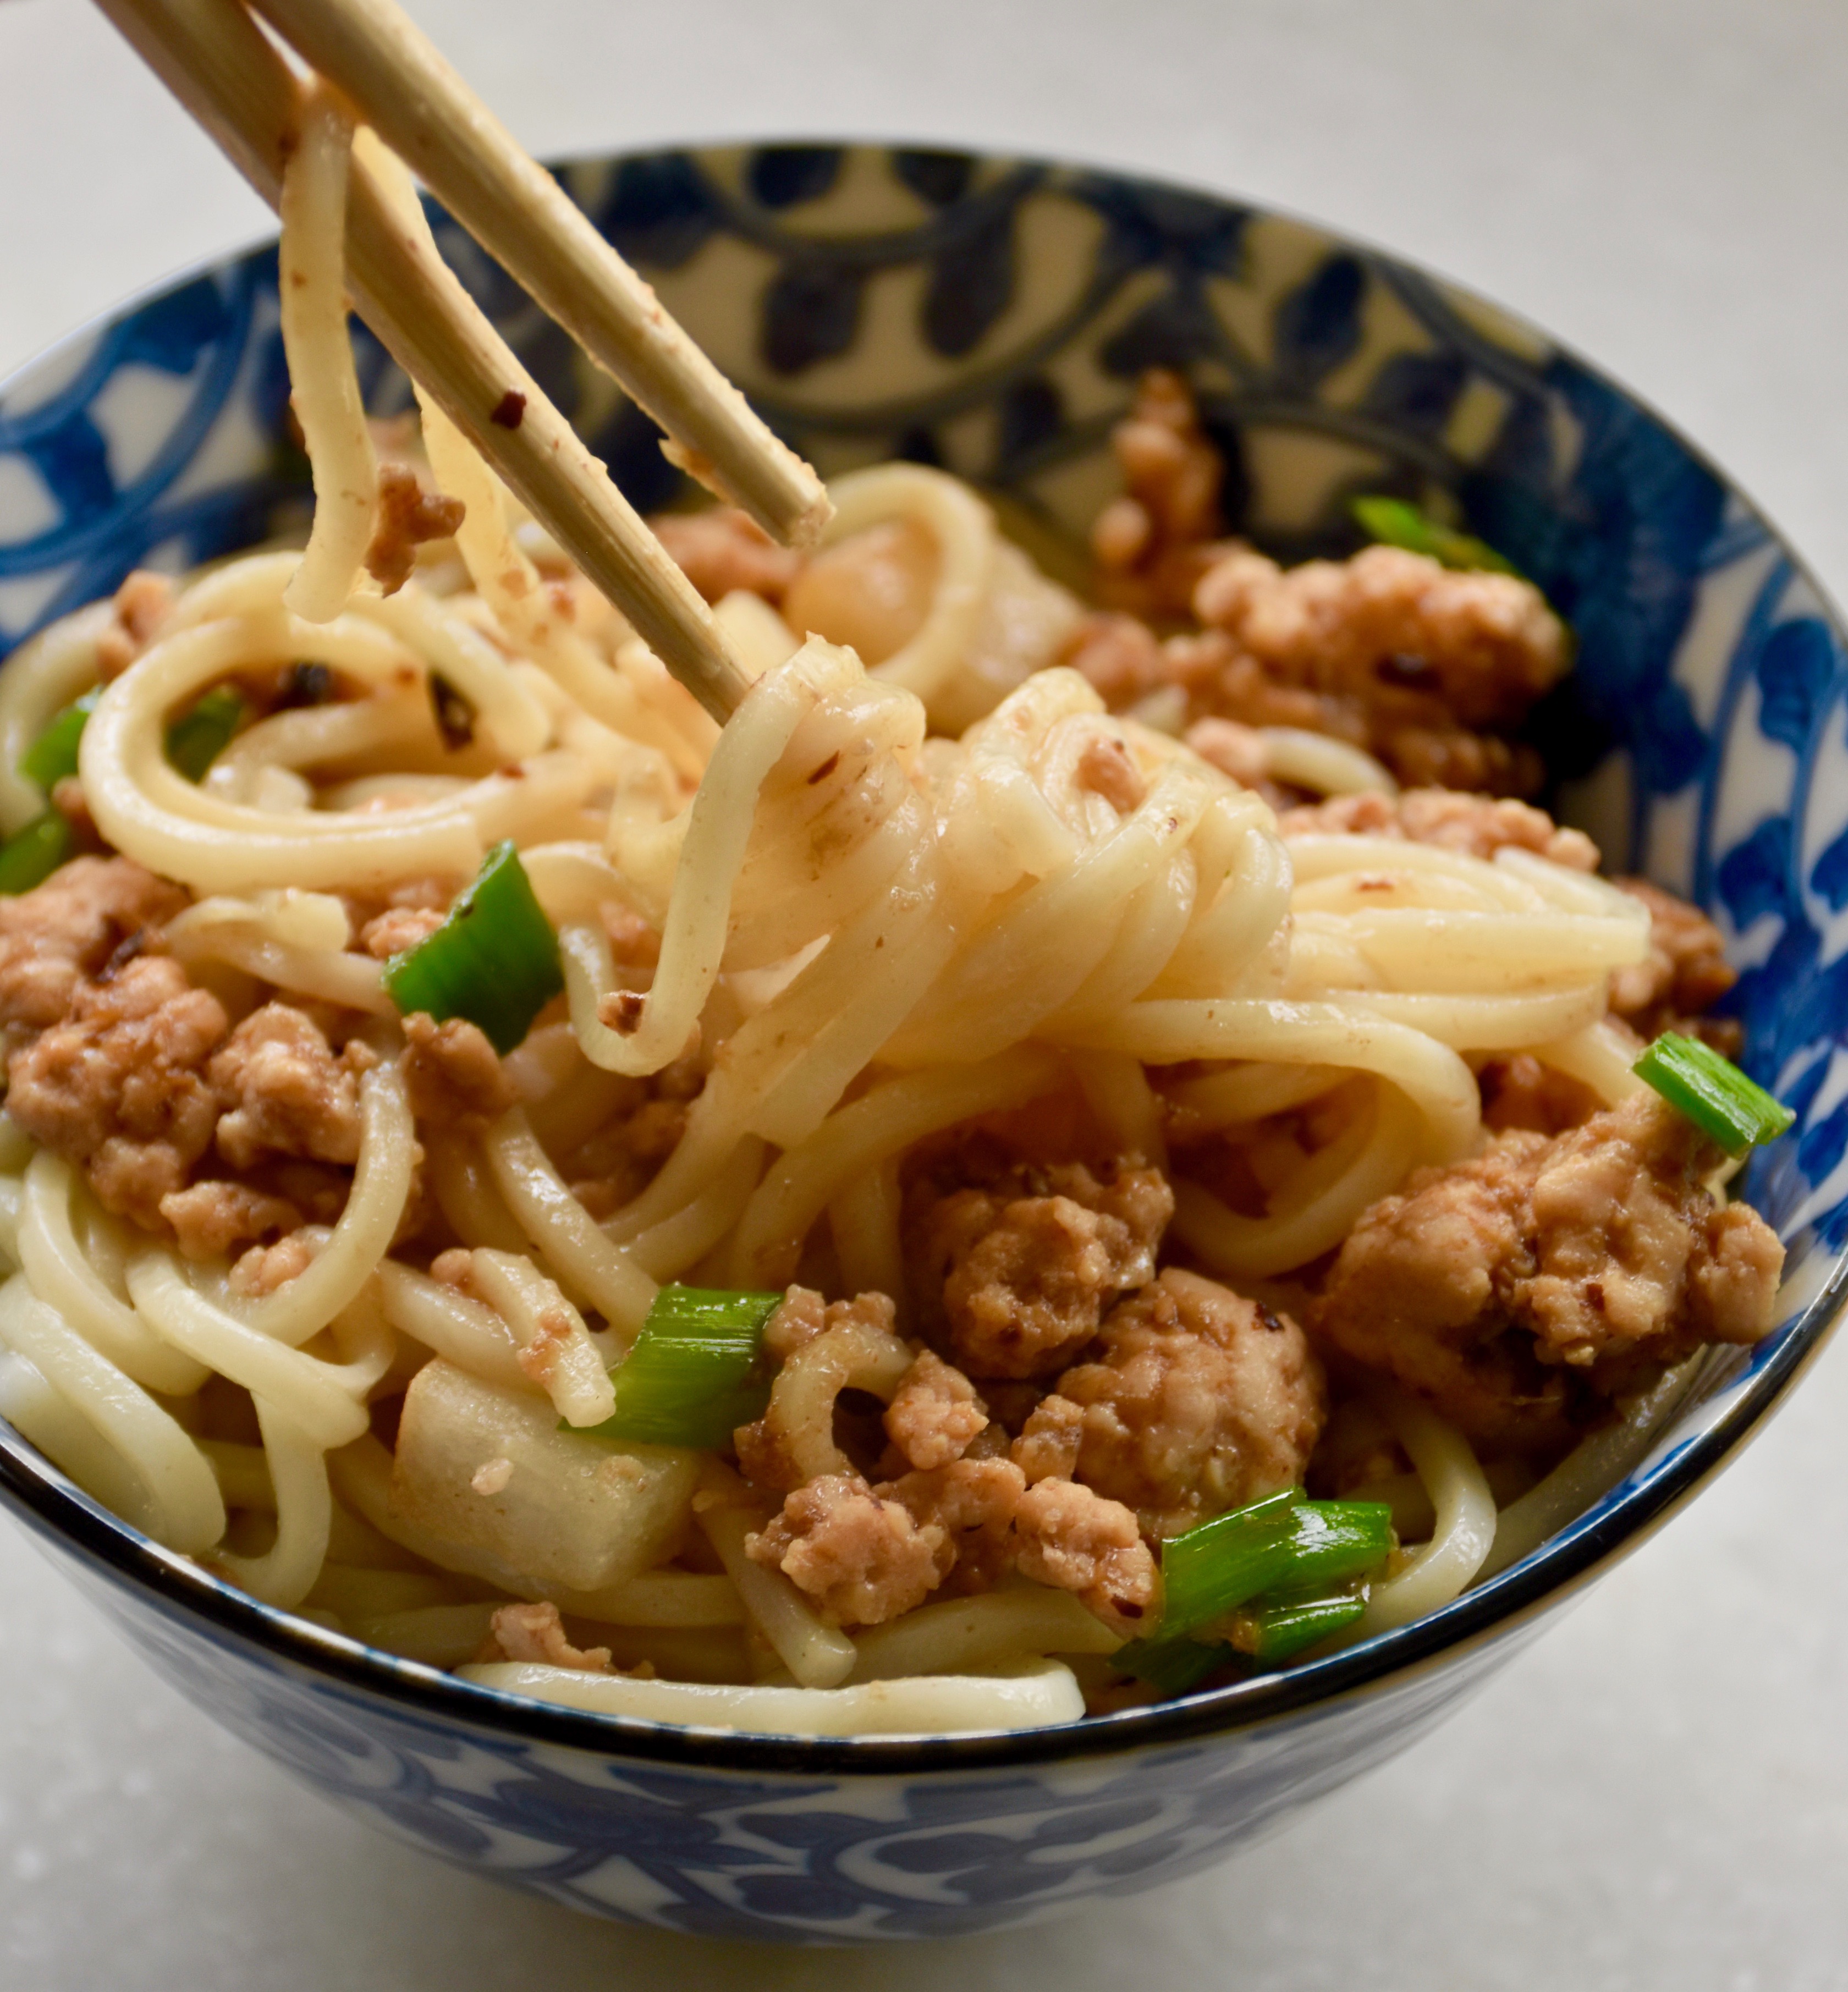
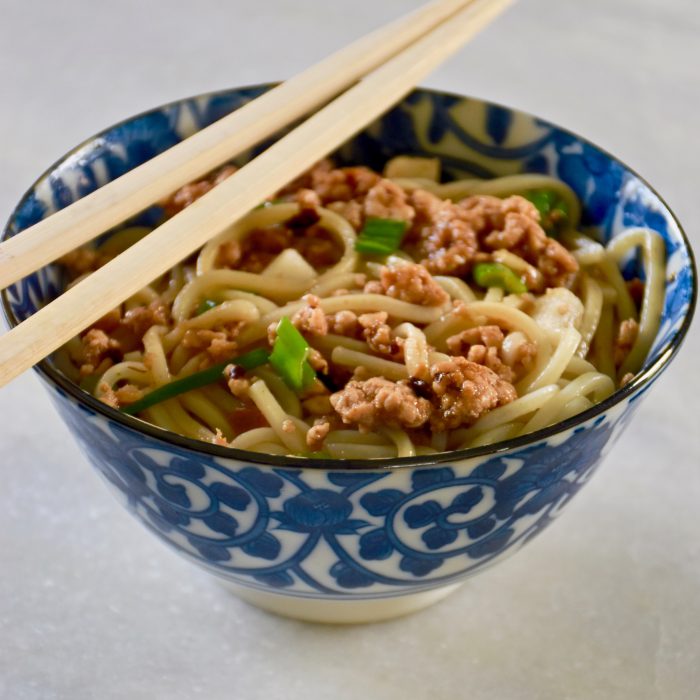
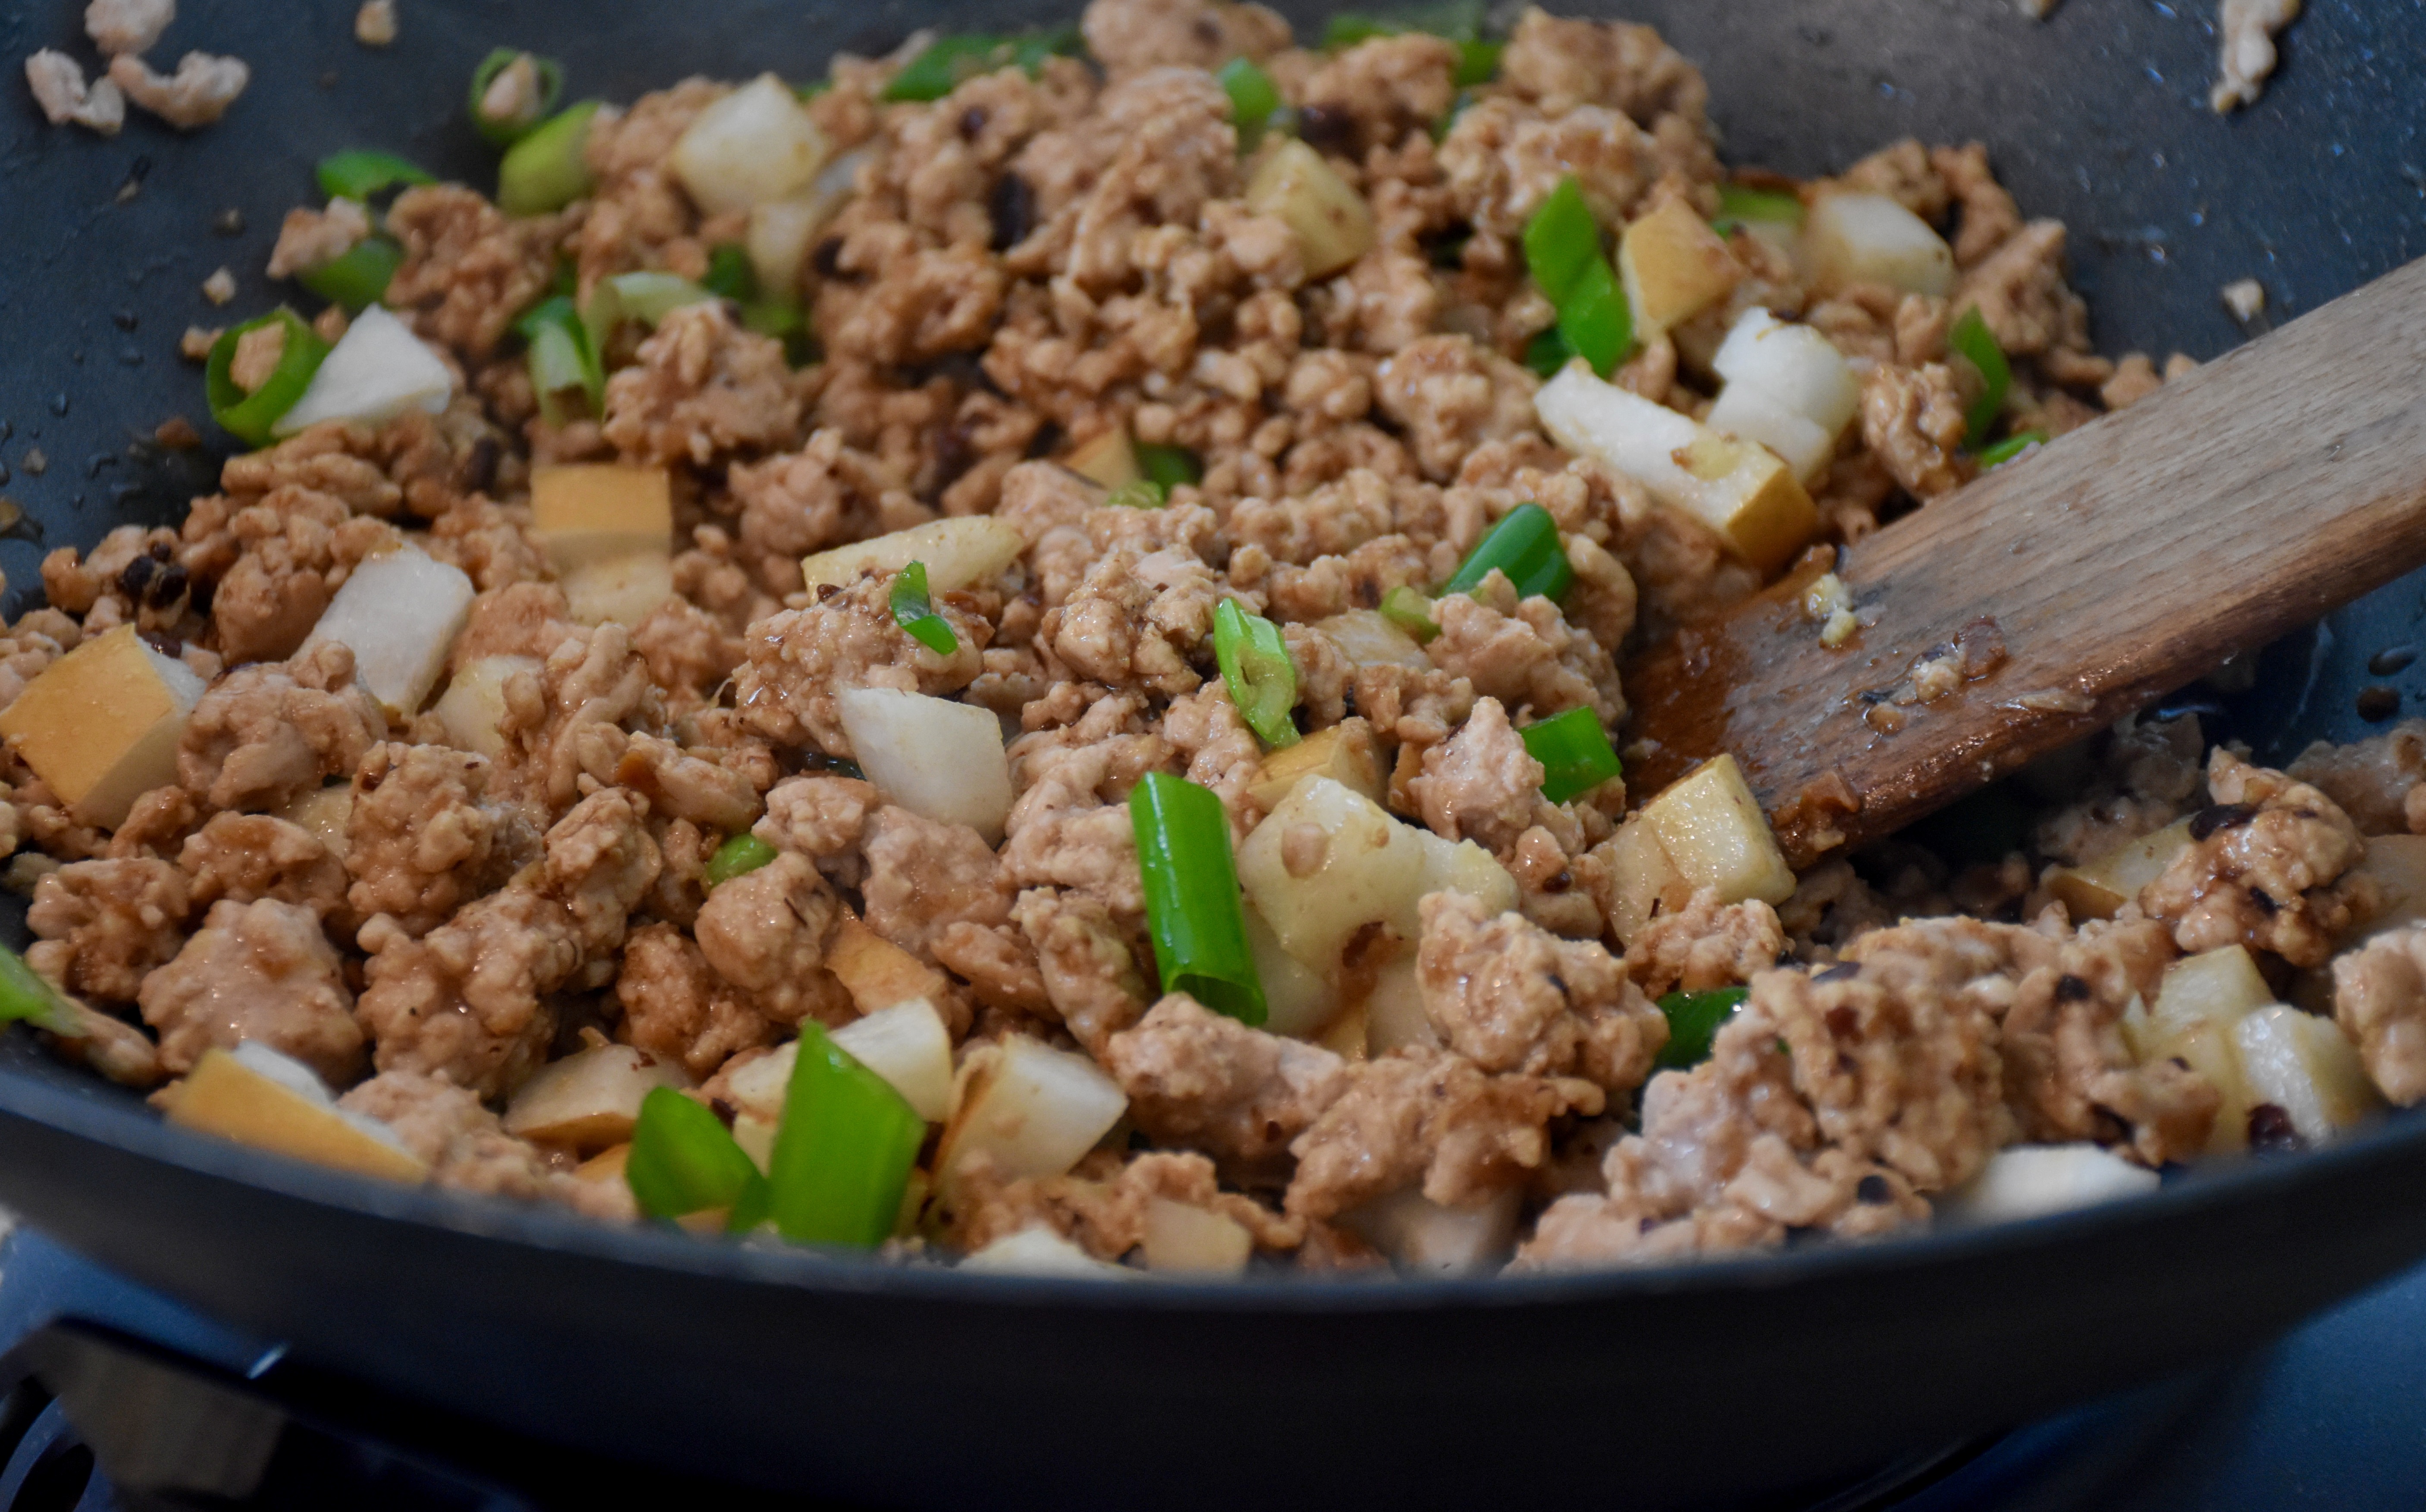
As always Reichl, ever the foodie, shares recipes for memorable meals along the journey. My favorite was a late night dinner that she shared with her son, Nick. The worry and stress of her new job fades as she steps into her apartment to cook Spicy Chinese Noodles. This recipe is delicious, full of flavor and simple to make. It’s the kind of meal that will have you slurping and loving every bite. After making this recipe several times I have made a few adaptations so it can feed a family of four. I also decided to added some Asian pear. I find the crisp texture and slightly sweet flavor adds a nice balance to the spicy noodles.

Spicy Chinese Noodles-Serves 4

  • 1 (10 oz) package of Lo Mein noodles or spaghetti
  • 2 tablespoons finely grated or minced fresh ginger
  • 3 scallions, sliced thinly
  • 1/2 cup of finely diced Asian pear (Optional)
  • 1 teaspoon sugar
  • 3 tablespoons Chinese black bean paste with garlic
  • 1 tablespoons Chinese black bean paste with chili  (Note: if you have young children or someone who is sensitive to spicy foods then just use 4 tablespoons of the garlic bean paste instead)
  • 1 pound ground pork
  • 1 tablespoon of peanut oil or canola oil
  • 1 teaspoon sesame oil

Cook the noodles in boiling water until al dente (every noodle brand is slightly different so check your package for the cooking time) and drain and set aside

Meanwhile as your noodles are cooking, peel and then mince or grate your ginger and chop your scallions and pear.

This is an Asian pear. It looks a bit like a cross between an apple and a pear, but it has a distinct flavor that goes well with pork and beef dishes.

Then in a small bowl mix together your bean pastes and sugar.

Heat your wok making sure it is hot. I use an electric wok since I have an electric stove that doesn’t get as hot as I would like, so I set my wok to 375 degrees. If you have a gas range you can heat your wok or skillet until water skitters across the surface. Add a tablespoon of peanut oil or canola oil if you prefer. Peanut oil is often used often in high heat cooking because of its high smoke point at 440 degrees, but canola oil still has a fairly high smoke point of 400 degrees so it is still a good choice. Especially if you have any concerns about allergies.

Add the ginger to the wok for about 30 seconds. Then add in your pork and cook while stirring until your pork is no longer pink. Add the bean sauce and cook and stir for about two minutes.

Finally, add in your noodles, green scallions, pears and 1 teaspoon of sesame oil and quickly toss them and serve.

Quicker than takeout, this recipe is unbelievably good and quick. A one bowl meal for any busy night that will have you savoring each bite. Reichl knows food and this recipe and every tale in her book will leave you hungry for more.

Defining Details: Patterns That Add a Designer Drapery Look

Sometimes even a dreaded stomach bug can in its own way bring good things. In my case being quarantined in my bedroom for two days is what gave me the time to think and get inspired to do something new. As I lay there and watched the snow fall outside of my bedroom windows, began to think about those almond beige draperies I had purchased so many years ago as a newlywed. Their design appeal had certainly faded, but other projects had been a high priority when we moved. So after staring at them for two days, I decided it was finally time for a change.

Once I was on the mend I made my way to the Pottery Barn  to purchase some new white draperies. The fact that there was a “friends and family sale” made it feel like design kismet; these new drapes were meant to be. I had planned to add a custom trim to them, but when I saw this Instagram photograph from Sarah Richardson I knew exactly what I wanted to do. That crisp blue and white trim added a pop of color and pattern. It struck the right balance between pretty, but not so feminine that my husband would object.

Photo from Sarah Richardson Instagram Starlight Farm

So I got online and ordered three yards of sea breeze buffalo check fabric and then began to think about how I could create my own custom fabric trim.

P Kaufmann Buffalo Check

I then summoned the courage to cut the fabric, because admittedly my sewing skills are in the category of enough to get the job done. The checks made the cutting and matching of the patterns on my four panels fairly straight forward. I folded and ironed the rough edges over and then folded each fabric strip in the center to create a blanket like binding for the edge of each panel.

Here is the fabric trim I created by cutting and matching strips and then pressing the raw fabric edges under.

I pinned my fabric trim to my panels and sewed a single stitch on the inside edge.

Voila, the finished trim took my ordinary store bought drapes and made them look like high end custom draperies

The checked trim is colorful and adds just the right bit of pattern to the otherwise plain white draperies, so now I smile every time I walk in the room and see them.

I have other plans to update things a bit further but the the draperies were a big step in the right direction.

This fabric trim is one of my favorite projects. It now has me looking at some of my other draperies thinking about the design possibilities. Fabrics with vertical repeats are perfect for a project like this because the repeated patterns often means you need less yardage. Because of this fabric trims are generally much less expensive than woven tapes. It’s also a way to add a beautiful designer touch to your home. A fabric that may have been far too expensive to make multiple custom drapery panels from could still add just the right touch as a trim on a store bought drapery.

So with my mind a buzz with all the possibilities, I thought I would share a few favorite fabrics that I think would make gorgeous trims for any design project.

Schumacher Acanthus Stripe by Celerie Kemble

Celerie Kemble has some of the the most elegant and sophisticated fabrics. I have seen this Acanthus pattern used in wallpaper in a number of projects that I love, but I also think this botanical inspired pattern would look fabulous as a trim on the edge of a drapery.

Duralee Alfama Emerald by Tilton and Finwick

Want a more worldly inspired design? This Persian block print by Tilton and Fenwick would add a layer of color and pattern to any room. If emerald green isn’t your color it also comes in several other colors including a classic blue and white and an eye catching poppy red and blue.

Kravet Brookhaven by Sarah Richardson

Want some more inspiration from the ever talented Sarah Richardson? I like the soft chambray color and the diamond pattern of her Brookhaven fabric. I have seen this fabric used as a trim with white linen draperies and I loved the finished look.

Stroheim Madagascar by Dana Gibson

This crisp and cheery blue by Dana Gibson would add a touch of whimsy and color. I could see this fabric in a less formal dining room or a bedroom. The pattern repeat also appears large enough to be able to do a lot with just a few yards.

Izmar Stripe in Indigo from Schumacher

I love this gorgeous Schumacher Ikat pattern and have thought about using it as a trim on my dining room draperies.

Madcap Cottage Mill Reef Palm

This green and white pattern reminds me of the more a more expensive fabric by Brunschwig and Fils called Les Touches. This smaller scaled pattern by Madcap Cottage also come in turquoise and coral. I like smaller abstract prints like this when used as thin trims on either roman shades or curtain panels.

Kate Spade Leokat in Maraschino

Finally because I love a touch of red in a room, here is a vibrant and pretty pattern from Kate Spade that would add a touch of drama and style.

Draperies frame the view in any room, so they give you the opportunity to define your style and can add a much needed touch of color and pattern. However I believe that good design shouldn’t feel out of reach. There are great solid curtain panels out there from places like Pottery Barn, West Elm, Ballard Designs, Crate and Barrel and even Ikea that would be nothing short of amazing with just a few yards of a gorgeous and defining pattern. This project took a few hours of my time, but the finished look was worth it. It’s those small details that sometimes make all the difference.

Mini Cheddar and Chive Scones

Cheddar Chive Scone Recipe

When you walk past the gray weathered siding, through the vine covered gable and in the bright red doors at Ouisie’s Table you instantly feel like you are dining in a gracious southern home. The dining room might be a little larger, but the lace café curtains, twinkling candles and wooden tables make it feel like you are dining with old friends. This Houston restaurant is one of my favorites. The menu is filled with well loved Texas dishes like chicken fried chicken or steak, grilled quail and Louisiana seafood. I know I am not the only one who loves this charming little restaurant it’s been a Houston favorite for over 40 years. My parents had a neighbor who at one time dined there multiple times each week. He was not one to cook so while his wife was away taking care of their old house in California, he made Ouisie’s Table his home. It’s just that kind of a place.

One of my favorite things that they serve isn’t even on the menu per se. It’s the amazing breads that come with the meal: cheese biscuits, gingerbread and cornbread muffins. This trilogy of bite-sized breads is so delicious, that it would be a mistake to waive this breadbasket away. These petite breads are wonderful because you can have a taste without getting too much. Since I don’t get home to Texas often enough, I have created my own version of the mini cheddar chive scones that I love. Light and flakey with little bites of cheese and a whisper of a savory onion flavor from the chives, if I close my eyes, a bite can take me there. So this week I am sharing these mini scones that would be perfect for any brunch or dinner.

Cheddar and Chive Scones – Make 35 mini scones

  • 2 cups flour
  • 1 tablespoon baking powder
  • 1/2 teaspoon salt
  • 1 1/2 sticks of cold unsalted butter,cut into small pieces
  • 2 eggs, lightly beaten
  • 1/2 cup heavy cream
  • 1 cup (4oz) cheddar cheese diced into small squares
  • 2 tablespoons fresh chives, thinly chopped
  • 1 egg mixed with a tablespoon of water for an egg wash

Preheat your oven to 375 degrees

In the bowl of your food processor mix together your flour, baking powder and salt. If you don’t have a food processor then you can use a large bowl and then cut your butter in using a pastry blender or your fingers, but the food processor make it much quicker.

Cut your butter into small pieces. Then on a high-speed pulse your food processor until the butter is cut into tiny crumbs. It took me less than 30 seconds. You don’t want to over do it because you want to have little bits of butter evenly distributed in your dough.

Here you can see the small bits or crumbs of butter

Then lightly whisk together your egg and cream and slowly pour them through the chute of your food processor while you mix it into the flour. Be careful not to over mix. As soon as your dough comes together stop mixing.

The dough once it just comes together.

Then on a lightly floured silicone mat or counter evenly kneed in your diced cheddar cheese and chives. Then your pat it with the palm of your hand or roll your dough to a thickness of 3/4 of an inch to an inch thick. Cut your scones using a small 1 1/2 inch cutter. (I have a whole set of inexpensive round cookie cutters that I love for things like this.) Cut out as many rounds as you can then bring your dough together in a ball and pat or roll it out it out again until you use up all of the dough.

Finally in a small bowl whisk together one egg and one tablespoon of water to make an egg wash. Then brush the tops of your scones so they get a pretty golden finish when they bake. The protein in the egg helps the scones turn golden while the fat from the egg yolk will give your scones a slight shine on top.

If you are entertaining: you could make your scone dough ahead of time and even have them cut and sitting in the fridge. Just wait to brush them with the egg wash until right before you bake them.

Bake your scones for about 12 minutes if you are making this mini version. If you want to  make a larger more traditional 3 inch size then bake for about 15 to 20 minutes.

Don’t worry if a little cheese finds its way on your baking pan just trim off any extra crispy cheese bits. The little pockets of cheddar cheese make these scones delicious.

These cheddar chive scones would be a welcome addition to any meal, but I find the mini size works perfectly for holiday meals or brunch. In the winter I make a slightly larger sized scone and serve it with my potato soup. These versatile little scones are fairly quick to make and unlike traditional rolls they don’t have yeast that needs time to rise. A basket or plate full of these cheddar chive scones will definitely have your family and friends talking. They might be the side that you make a little extra room for because they are that delicious.

Southern Sides: Mandarin Orange Salad

Mandarine orange and almond salad

I love a recipe that has been shared so many times that one doesn’t even know where it originally came from. Those recipes are wonderful because you know they have to be good to be made and shared between family and friends. This mandarin orange salad is a holiday favorite in our house. My aunt was the one who first shared this salad with us, after she got the recipe from a friend. I have made a few changes to make it my own, like  using butter lettuce and tweaking the salad dressing just a touch. The canned mandarin oranges may be a bit retro but they are delicious and they make the recipe quick to assemble. Sometimes when you are putting a holiday meal together you need some dishes to be simple. The salad dressing is something you can make ahead and have in your fridge and the candied almonds can also be made the day before and stored in a Ziploc bag or airtight container. This salad is a classic in our house and it finds it’s way on the menu for many special occasions, so now I am sharing it with you:

Mandarin Orange Salad (Serves 4 to 6, but can easily be doubled)

  • 1 large head of butter lettuce, washed, dried and torn into bite sized pieces
  • ½ cup chopped celery
  • 4 green onions, thinly sliced on the diagonal
  • 1 (11oz) can of mandarin oranges, well drained
  • ½ cup sliced almonds (optional if you have an allergy then this salad is still good without the almonds)
  • 2 tablespoons of granulated sugar

Salad Dressing:

  • 4 tablespoons champagne vinegar
  • 4 tablespoons of granulated sugar
  • 1 teaspoon kosher salt
  • 1/8 teaspoon ground pepper
  • 1 tablespoon of Fine Herbs (a French herb mix that you can find in the spice aisle that has parsley, tarragon, chervil and chives)
  • ½ cup canola oil

First, you want to prepare your candied almonds. Place a small to medium sized nonstick skillet over medium heat and then add 2 tablespoons of sugar and your almonds. Stir with a rubber spatula until the sugar melts and just begins to turn golden. Make sure your almonds are evenly coated in the melted sugar. While your nuts are toasting, keep a close eye on them, because once the sugar starts to melt it can burn very quickly.

If you look closely you can see the sugar is just beginning to melt and turn golden. This is the part where you need to stir and look closely so the sugar doesn’t burn.

Have a plate or piece of aluminum foil ready to put the nuts on to cool. Once the almonds are cool they are ready to break apart and sprinkle on top of the salad.

Then in a large bowl assemble your salad by tossing together your lettuce, celery, green onions, mandarin oranges and almonds.

Finally, make your salad dressing by whisking together your vinegar, sugar, salt, pepper and fine herbs. Then once they are well mixed slowly drizzle in your oil while whisking. You want to keep whisking your dressing until it fully emulsifies and thickens. Sometimes I make this dressing in my mini food processer, which makes it even quicker. If you make you salad dressing ahead you may need to whisk it again if the herbs and ingredients have settled a bit. Add your salad dressing to your salad to taste and wait to toss it with your salad until right before your serve it.

I like serving this salad in a shallow bowl or on a platter because the oranges and almonds don’t sink to the bottom.
The bright oranges and spring green leaves make this a gorgeous salad.

A little sweetness from the oranges balanced with the slight tang of the dressing makes it a delicious side. The mix of crispy textures and colors make it a pretty dish too. It’s a side that is sure to brighten any buffet or dining table. So I hope you love and share this recipe too!

Southern Sides: Scalloped Potatoes

Spring gatherings like Easter and Mother’s Day are on their way, so I am creating a new series of southern inspired side dish recipes that would go well with the traditional holiday ham or your family’s favorite. So whether you just need a single side to share or if you want inspiration for a whole meal these recipes are some of my favorites.

Potatoes are always a well loved side, but bake them in a cream sauce with cheese and you have a holiday worthy crowd pleaser. My husband loves scalloped potatoes so for Valentine’s Day I created these white cheddar potatoes to go with a rosemary steak, but I think they would also pair well with ham or lamb as well. I like baking mine in a large tart or pie plate because the pie shaped wedges make for an easy and elegant way to serve these potatoes.

White Cheddar Scalloped Potatoes –Serves 6 to 8

  • 3 medium russet potatoes, peeled and thinly sliced
  • 1/2 cup (1 medium) shallot diced
  • 4 tablespoons butter
  • 1/4 cup flour
  • 2 cups cream, room temperature
  • 1 teaspoon kosher salt
  • 1/8 teaspoon ground pepper
  • 8 oz (2 cups) shredded white cheddar cheese
  • 2 tablespoons chives, finely chopped

Preheat your oven to 375 degrees

Then prepare your potatoes by slicing them thinly. You could use a sharp knife or I use a mandolin which makes it quick to cut even slices. Then finely dice your shallots.

Use caution when slicing on a mandolin and use your food holder at all times!

Next, make your béchamel or cream sauce by melting your butter over medium heat in a large sauce pot or deep skillet. Then once your butter is melted add in your shallots and sauté them until they begin to turn translucent. Then sprinkle in the flour in and whisk it until it is smooth.

The butter and flour are fully whisked together and they have turned a golden color.

Then slowly pour in your cream about 1/4 cup at a time while whisking well. I recommend having your cream sit out a short while because adding cold cream to a hot sauce can make it much harder to whisk your sauce together. Continue adding your cream a little at a time until it is smoothly whisked in.

Then let your cream sauce thicken by continuing to cook it over medium heat for 4 to 5 minutes whisking it occasionally. Season to taste with the salt and pepper.

Here you can see the sauce has thicken. You will know it is thick enough when it will hold a line you draw in it with a spoon for a short time.

Once the sauce has thickened remove it from the heat and start layering your potatoes. I used a 10 1/2 inch diameter tart pan, but you could a pie plate or another Pyrex dish and make similar layers. Spray your pan with cooking spray and make one layer of potatoes on the bottom. I overlapped my slices slightly and place them in overlapping rings that covered the entire base of the pan. Then pour a third of your cream sauce on top and spread it evenly. Then sprinkle on 1/2 cup of your cheese. Repeat this layering process until you have three layers of potatoes and top the final layer with the last third of the sauce and cover the top layer with the last cup of the cheese.

Here are the finished layers before baking.

Cover your dish with aluminum foil and place your dish on a jelly roll pan in case any sauce bubbles during baking. Then bake covered for 1 hour. After an hour take the foil off and continue to bake your potatoes for another 15 to 20 minutes until the cheese and potatoes are gold and bubbly. Then garnish with some chopped chives before serving.

One slice of these tender and scalloped potatoes is worth the time it takes. These cheddar potatoes are a classic comfort food that will definitely have your guests coming back for seconds. These potatoes could even become a main course or a way to use leftover ham. Just finely dice some ham and add that ham to the cheese layers. Add a side salad like this one and your side dish becomes a delicious dinner.

A Bistro In Your Backyard

The warm sun is flickering down through the canopy of trees and the sky is a brilliant blue. The patio and flowers beds are filled with greenery and the navy and white wicker chairs and table feel like a garden bistro. Even if it’s just a folding table set on my patio, these are the moments I am looking forward to as spring is drawing near.

Chicago winters are long and tough on uncovered outdoor furniture, so for our small back patio I decided to go with a folding bistro table set. Easy to store in the garage during the winter snow and ice. It also leaves room, so I can make way for the scooters, bikes and sidewalk chalk murals that happen here too.

Last spring I spotted these navy and white folding bistro chairs at Target and it was love at first sight. They looked like more expensive wicker chair sets, like those at Serena and Lily. However at just a fraction of the price, these chairs were perfect for our yard. They are solid to sit on but they can be easily folded away to make room for my girls to play. I decided to pair them with a folding table I already had and it made for a wonderful garden bistro set.

Larger scale outdoor furniture certainly has it’s place, but if you need a little flexibility or have just a small spot on a patio or porch then a pretty bistro chair set might be just what your yard needs.

Target’s Threshold line has folding wicker chairs in navy and white and gray and white, but Frontgate has their own colorful outdoor line including this capri blue set.

Frontgate Paris Bistro Side Chair 

I also liked these white bistro chairs from Grandinroad. This Claire set is very pretty. The chairs have a great shape to them and it’s hard to go wrong with a classic white. The chairs are light weight and stackable and the table folds so they could easily be stored when needed.

Grandinroad Claire Bistro Table and Chairs

Want add a pop of color to your yard? Then cheek out this small patio set from Home Depot. I love this bright orange, but it also comes in spring green, navy and a turquoise too. They get great reviews online and would work well in a small place or corner of your yard.

Home Depot Home Decorator’s Collection Patio Bistro

Finally if you want to customize the look of your table set then Ballard designs has a classic bistro set. You can add Sunbrella seat cushions in a wide array of colors and patterns to make it your own.

Ballard Design Cafe Three Piece Folding Table

So with spring on it’s way I am already thinking about our garden. It will still be a couple of months before we can enjoy dining outdoors once again, but it will be here soon and I plan on celebrating every moment.

Lemon Madeleines

Crisp and buttery with a delicate center, these lemon madeleines are delicious. There is a reason these light as air cakes are still beloved nearly two hundred years after they first became popular at the palace of Versailles. It’s thought that King Louis XV named these tiny cakes after his father in law’s cook Madeleine Paulmier. So now after getting a madeleine pan for Christmas, I am wondering why it took me so long to discover the joy of baking these little cake like cookies? I have been happily lost in the world of madeleine baking this week. I tested and tried a number of recipes and flavors until I created these lemon and honey madeleine which were my favorite.

There are lots of traditional French recipes that use a Genoese cake with melted or browned butter, but those recipes require more steps and usually call for you to chill your batter for an hour before you bake them in order to ensure that they rise well. However after trying a recipe from the Culinary Institute of America, that used a butter cake technique, where you creamed the butter and sugar. I found I liked that better. The cake is still light and buttery, but you don’t have to chill your batter to get that signature rise. I also tested techniques for greasing my pans and found that using slightly browned butter not only kept the cakes from sticking, but it also gave them a gorgeous golden finish. Cooking spray and greasing and flouring my pans just didn’t produce that same deep golden color. So after all that testing I am sharing my favorite recipe that has elements of all of the best flavors and techniques I tried.

Lemon Madeleines – Makes 24 shells

  • 1/2 cup (1 stick) butter at room temperature, let it sit out of the fridge for 1 hour plus an additional 3 tablespoons of butter to brush your pans
  • 2/3 cup sugar
  • 3 eggs, at room temperature
  • 2 teaspoons vanilla
  • 1 teaspoon honey
  • 1 teaspoon lemon zest
  • 1 tablespoon milk
  • 1/2 teaspoon baking powder
  • 1/4 teaspoon kosher salt
  • 1 cup flour
  • 3/4 cup of white chocolate chips (optional)
  • Note: You will need a Madeleine Pan but they are easy to find at a kitchen or baking supply store

Preheat your oven to 375 degrees

Then prepare your brown butter to grease your tins. In a small skillet over medium heat melt 3 tablespoons of butter and then after it starts bubbling keep a close eye on your pan as the milk solids in the butter begin to cook and your butter turns a light golden brown. Take your golden butter and pour it into a small bowl to stop it from cooking further.

Then using a small basting or pastry brush evenly brush your pan with the browned butter being careful to coat all the ridges in your shells.

Now to make the madeleines, in the large bowl of your mixer cream or beat together your butter and sugar at medium speed for about 2 to 3 minutes. Add in your eggs one at a time beating them at medium speed until they are incorporated in your butter mixture.

Then add in your vanilla, honey and lemon zest and milk. Finally add in your baking powder, kosher salt and flour at low-speed. Mix just until your flour is just blended in.

Place 1 tablespoon of batter into each greased Madeleine shell.

The batter will spread and fill your shells once they are in the oven.

Bake your lemon madeleines for 10 to 12 minutes until the edges are golden brown. I found that 11 minutes was just right in my oven. You can take your madeleines out of the pan while they are still warm and if you are like me and only have one madeleine pan then you can wipe out the pan with a paper towel to get the crumbs out and brush them with some additional butter and bake your second batch.

Right out of the oven these cakes taste unbelievably good. You can let them cool a bit and dip them in chocolate or just dust them in powdered sugar.

Then in a small microwave proof bowl melt your chocolate by heating it at 30 second intervals in your microwave and stirring well in-between.

Dip your madeleines in the melted chocolate and then place them on a tray or sheet pan lined with parchment or wax paper.

Let your chocolate set, by placing the madeleines in the fridge for 20 to 30 minutes.

Want to add a little festive touch? Then you could melt 1/3 cup of pink candy melts or color some of your white chocolate with an oil based food coloring (used to color candy)  to pipe and create some little bunny madeleines. These little bunnies were inspired by Kim Joy on the Great British Baking Show. I admire her creativity and my girls absolutely loved these pink bunnies.

So no matter how you decorate these lemon madeleines, they are fun and easy to bake. This recipe may put an American twist on a French classic, but the result is a light and delicious little lemon cake. They would be wonderful with tea or coffee as a sweet treat.

Spaghetti Carbonara

Sometimes it feels like there is always something crazy going on in our house. I had to take a little break from blogging because we had a family wide stomach bug, followed by a little one with a double ear infection. Then to top it all off this weekend our puppy, oblivious to the laws of gravity, took a flying leap towards the coffee table and sadly ended up with a broken leg. So life and cooking have not been normal around our house. Now with my family on the mend, I am sharing one more weeknight meal. Spaghetti Carbonara, my ultimate last minute dinner. Delicious and easy to cook in just 10 minutes. It’s one of my go to dishes when life gets too crazy to cook.

Spaghetti Carbonara (serves 4-6)

  • 1 pound of spaghetti
  • 2 tablespoons of kosher salt
  • 1 (3oz) package of prosciutto, sliced into thin strips
  • 1/3 cup reserved pasta cooking water
  • 4 eggs
  • 1 1/2 cup grated Parmigiano Reggiano
  • ground pepper to taste
  • 1/2 cup frozen peas (optional)

First fill a large stock pot with water and place it on high heat. Add the salt to season the water and bring the water to a boil. Then add your spaghetti and cook it for the time specified on your pasta box as thicknesses and cooking times can vary slightly.

While your spaghetti is cooking slice your prosciutto into bite sized pieces. Then in a medium-sized bowl whisk your eggs together.

These three simple ingredients transform spaghetti into something wonderful.

Then before you drain your pasta take out and reserve 1/3 cup of pasta water. The starchy pasta water will help cook your eggs and create a thicker and more flavorful sauce.  Drain your pasta and then return it to your stock pot, but take the pot off the heat.

Then take about an 1/8 of a cup of your reserved pasta water and whisk it into your eggs so you temper them slightly. This will help keep your eggs from scrambling when you add them to your pasta. Then pour the egg mixture and the remaining pasta water in with your spaghetti and stir them together. Then quickly add in your parmesan cheese. Finally add in your prosciutto and if you want peas. I like to add green peas if I am making a one bowl meal, but if you want a more traditional Spaghetti Carbonara then you can certainly leave them out. Finally season with some freshly cracked pepper.

I love this classic dish because it takes less time to cook then it does to get take out. It’s easy to assemble and uses lots of staples that I tend to have in my fridge and pantry so it’s the perfect meal for a hectic or busy night.

Dreaming of Garden Gates and Spring

Our trees are dressed in crystals that shimmer with a silver glean. The sunlight makes the branches sparkle like tinsel. The ground is covered in bits of crunchy snow now turned to ice. Winter’s icy beauty is still here. However when mid-February comes my heart begins to yearn for spring.

The patio is not as inviting when covered in snow, but the turquoise chairs remind me of glorious summer days to come.

So for now I will do a little garden dreaming of garden gates and sunny days that invite you to come in and stay a while.

The gray quatrefoil detail on this gate I spotted is just perfection. The patinaed hose pot and boxwood hedge leave me wondering what lies beyond the garden gate.

Another gorgeous Mediterranean styled gate with a limestone wall and cascading greenery.

A more traditional home with this majestic garden gate. I love walking by these cherub topped pillars and the garden inside looks just as elegant with breathtaking iron pots, archways and plantings.

This garden gate is flanked with pear espalier trees. The diamond pattern and that archway are a showstopper.

A wooden trellis on this seemingly standard fence makes it anything but ordinary. What a pretty pattern and focal point for a garden.

A Southwestern garden I got to see while traveling this summer. The adobe walls and arched gate frame a colorful mountain garden.

The crane sculptures add a sense of movement and whimsy in this flower garden. An oasis in a rocky mountain landscape.

These vintage styled metal gates and picket fence add to the curb appeal of this Texas hill country home. I can just imagine the pots of cascading flowers that could trim these porch steps in the summertime.

The iron sunflower gate creates a uniquely welcoming entrance to this classic old farmhouse.

Finally one of my favorites, neatly clipped boxwood, planters and silver orb make this small alcove feel like an inviting and elegant garden.

So as the view out my window is still a little cold and gray, I am dreaming and looking forward to the flower filled days to come.

Shortbread Sweeties

Sometimes I daydream about ingredients and these cookies were something I had been dreaming about for a little while. I wanted to use a pretty poured fondant icing, like you use on petit fours, but I wanted it to be simpler. Something that would be much easier to make and share, so then cookies came to mind. However, not any cookie would do. I needed something that would pair well with this sweet icing.  So then shortbread cookies came to mind because they are light, buttery and flakey, but not too sweet. So I set out researching shortbread recipes and then began to pen one of my own.

Then the moment of truth; it was time to get in the kitchen and bake. Sometimes it can take a few rounds before I get everything just right, but these cookies were as amazing as I had imagined. The shortbread was divinely crisp and the pretty pink frosting set beautifully. My girls were in the kitchen with me as we were baking these and they squealed with delight over the pink frosting. They instantly loved them too. Sprinkles were flying everywhere and we were having fun together. They are quick to decorate and you don’t need a pastry bag or any special frosting skills. This poured fondant icing was easy to spread and it creates a beautiful shiny finish that will make you feel like a frosting genius. So as Valentine’s Day nears I thought I would take a quick break from weeknight meals to share this now favorite cookie recipe.

Shortbread Sweeties– Makes approximately 36 three inch heart cookies

  • 2 1/4 cups flour
  • 1/2 cup sugar
  • 1/4 teaspoon kosher salt
  • 1 cup (2 sticks) butter, at room temperature for at least 1 hour
  • 1 teaspoons vanilla extract

Poured Fondant Icing

  • 3 1/2 cups powdered sugar
  • 1/4 cup plus 1 tablespoon water
  • 1 teaspoon vanilla extract
  • 2 tablespoons corn syrup
  • 2 drops gel food coloring
  • Sprinkles or colored sanding sugar

First preheat your oven to 375 degrees.

In the large bowl of you mixer combine your flour, sugar and salt. Then cut your butter into small pieces, like you would for pie dough or biscuits. Then add your butter pieces  into your flour mixture and blend on low to start so the flour doesn’t come spilling out.

Then as your butter begins to get cut in your flour increase your mixer speed to medium and add in your vanilla. Continue mixing your dough until it just comes together.

Now roll your dough out on a floured silicone baking mat or use a lightly floured piece of parchment paper. I rolled mine out to 1/4 inch thickness and cut them into three inch heart shapes.

Then I placed them on my baking pans, which I lined with parchment paper. These cookies are flakey and slightly delicate so the parchment paper makes them very easy to handle. It will keep them from sticking to your pan and make them easy to lift up to cool. Bake your cookies for 8 to 10 minutes until the edges begin to turn golden.

Then once your cookies are cool it is time to make your frosting. In a medium sized sauce pan combine your powdered sugar, water, corn syrup and vanilla. Heat them over medium low heat whisking the sugar mixture until it melts and comes together. Then remove your frosting from the heat. Next add in your food coloring. I find it’t easier to control the color if you take a few tablespoons of the white icing out and place them in a small bowl. Then add a drop or two of your desired food coloring.  Once you get this concentrated color add a little of that concentrated icing back to your main mixture until you get the shade you want. Gel food coloring is wonderful but it’s very concentrated so I find it easier to see the true color if I mix it into icings this way.

I hold my cookie over the pan so any excess frosting falls back in the pan.

Then once you get your icing mixed it’s time to frost your cookies. Take your cookie and hold it over your pan and spoon a little icing on top. Then tilt your cookie slightly to allow the icing to evenly cover the top. Once it is covered well the take the edge of a rubber spatula or table knife and push any drips or excess icing off the sides for a smooth finish.

Then immediately add your sprinkles or sanding sugar on top. If you wait then the icing will set and the sprinkles won’t stick. So frost and sprinkle one cookie at a time. Stir your icing from time to time and if it starts to cool in the pan you can heat it slightly on low. I used sprinkles on some and hot pink sanding sugar on others. So get creative with your own decorations. The icing will cool and set on your cookies in about 20 to 30 minutes. Once they are set you can stack them and they keep well at room temperature, which makes them great for sharing.

These dreamy cookies are so delicious that they didn’t last long in our house. The flakey shortbread will melt in your mouth. So if you are looking for something fun to bake this Valentine’s Day these cookies would be wonderful.

Contact Us