A Twist On The Traditional Blue and White

I am back from vacation and happy to be writing again. I took a little break from writing about decor with my series on entertaining, but I have been working on a few projects of my own so I thought I would share a few ideas and sources I have found along the way.

It’s no secret, I love blue and white. It’s a classic color combination that in one shade or another has found its way into just about every room in my house. However, I’m not one to shy away from color and the best part about having some blue and white in my decor is that when I get a little tired of my current look I can energize and remix the whole room by just adding a few accessories in another bold shade.

Blue and white is wonderful, but on its own it can sometimes feel a little too predictable and traditional so I like to change things up a bit by pairing it with a dash of another color. One of my favorite ways to make a quick change in any room is to think about updating or adding new pillows. Pillows can be a relatively inexpensive way to add some color and pattern to your room. I know you all love pillows too, because my pattern play with pillow post was a popular one. So I thought I would share more pillows in some favorite blue and white patterns with a few ideas on how to add a designer touch by adding another more vibrant color to the mix.

You can find this green pillow at Ballard Designs. or try this green linen one from Wisteria The Bali Hai Pillow is available at West End Accents.

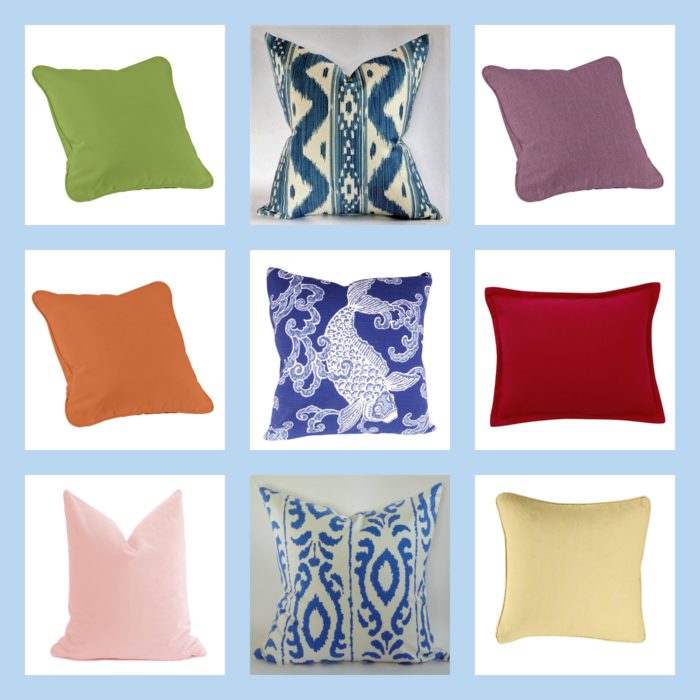
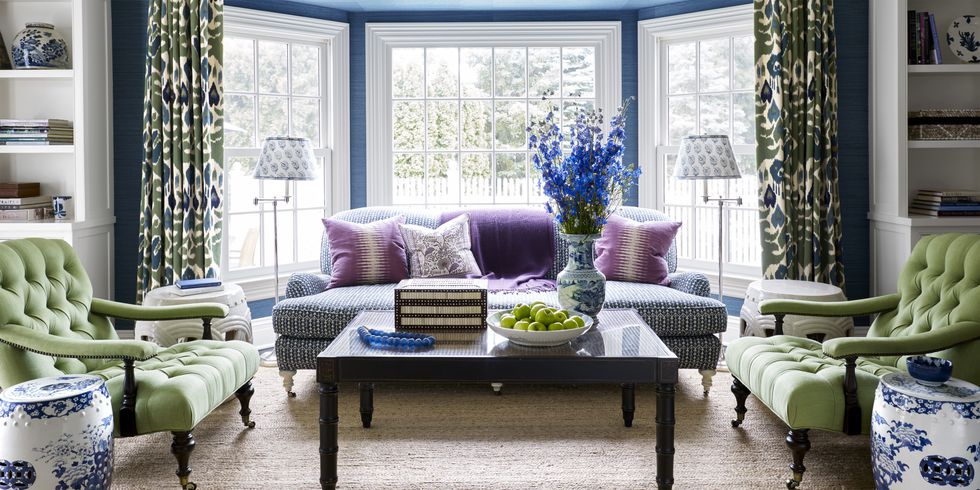
A cheery apple green pillow mixes well with a classic blue and white room. This color combination is certainly a designer favorite. Want to add a touch of this designer look to your home then check out this apple green pillow is from Ballard Designs paired with a pillow from Etsy in Quadrile’s classic Bali Hai pattern. The green adds balance to this busy pattern and just a pop of color.

See more than just a thumbnail by clicking on this link to the full article and pictures from House Beautiful.

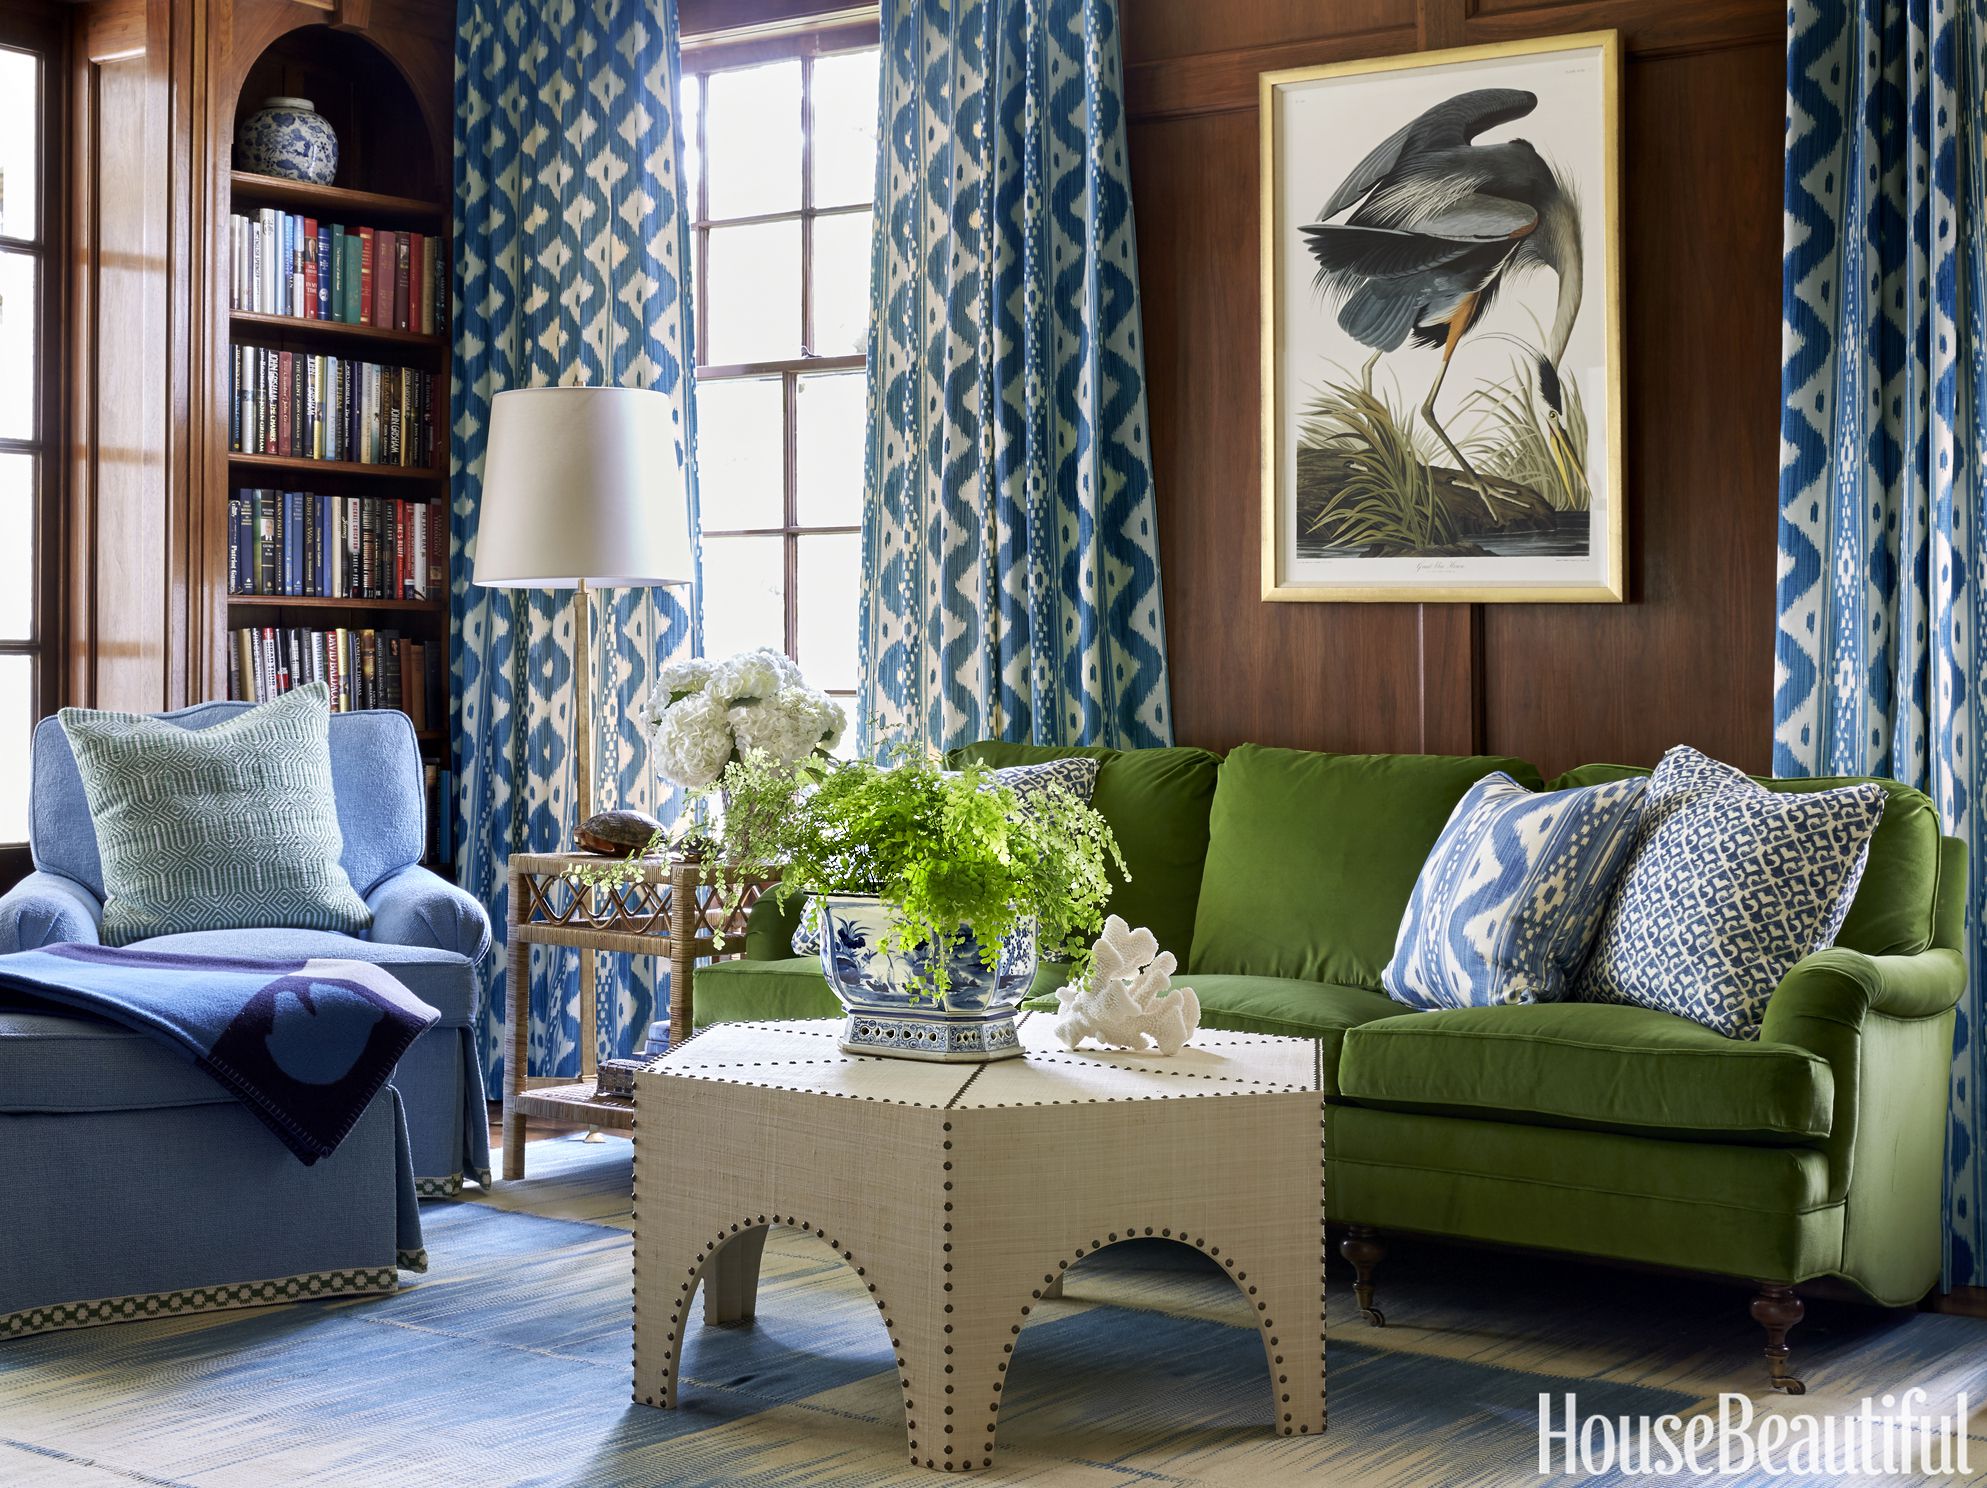
Want to see it in a a gorgeous design then check out this link to this home designed by Sarah Bartholomew that was featured recently in House Beautiful.

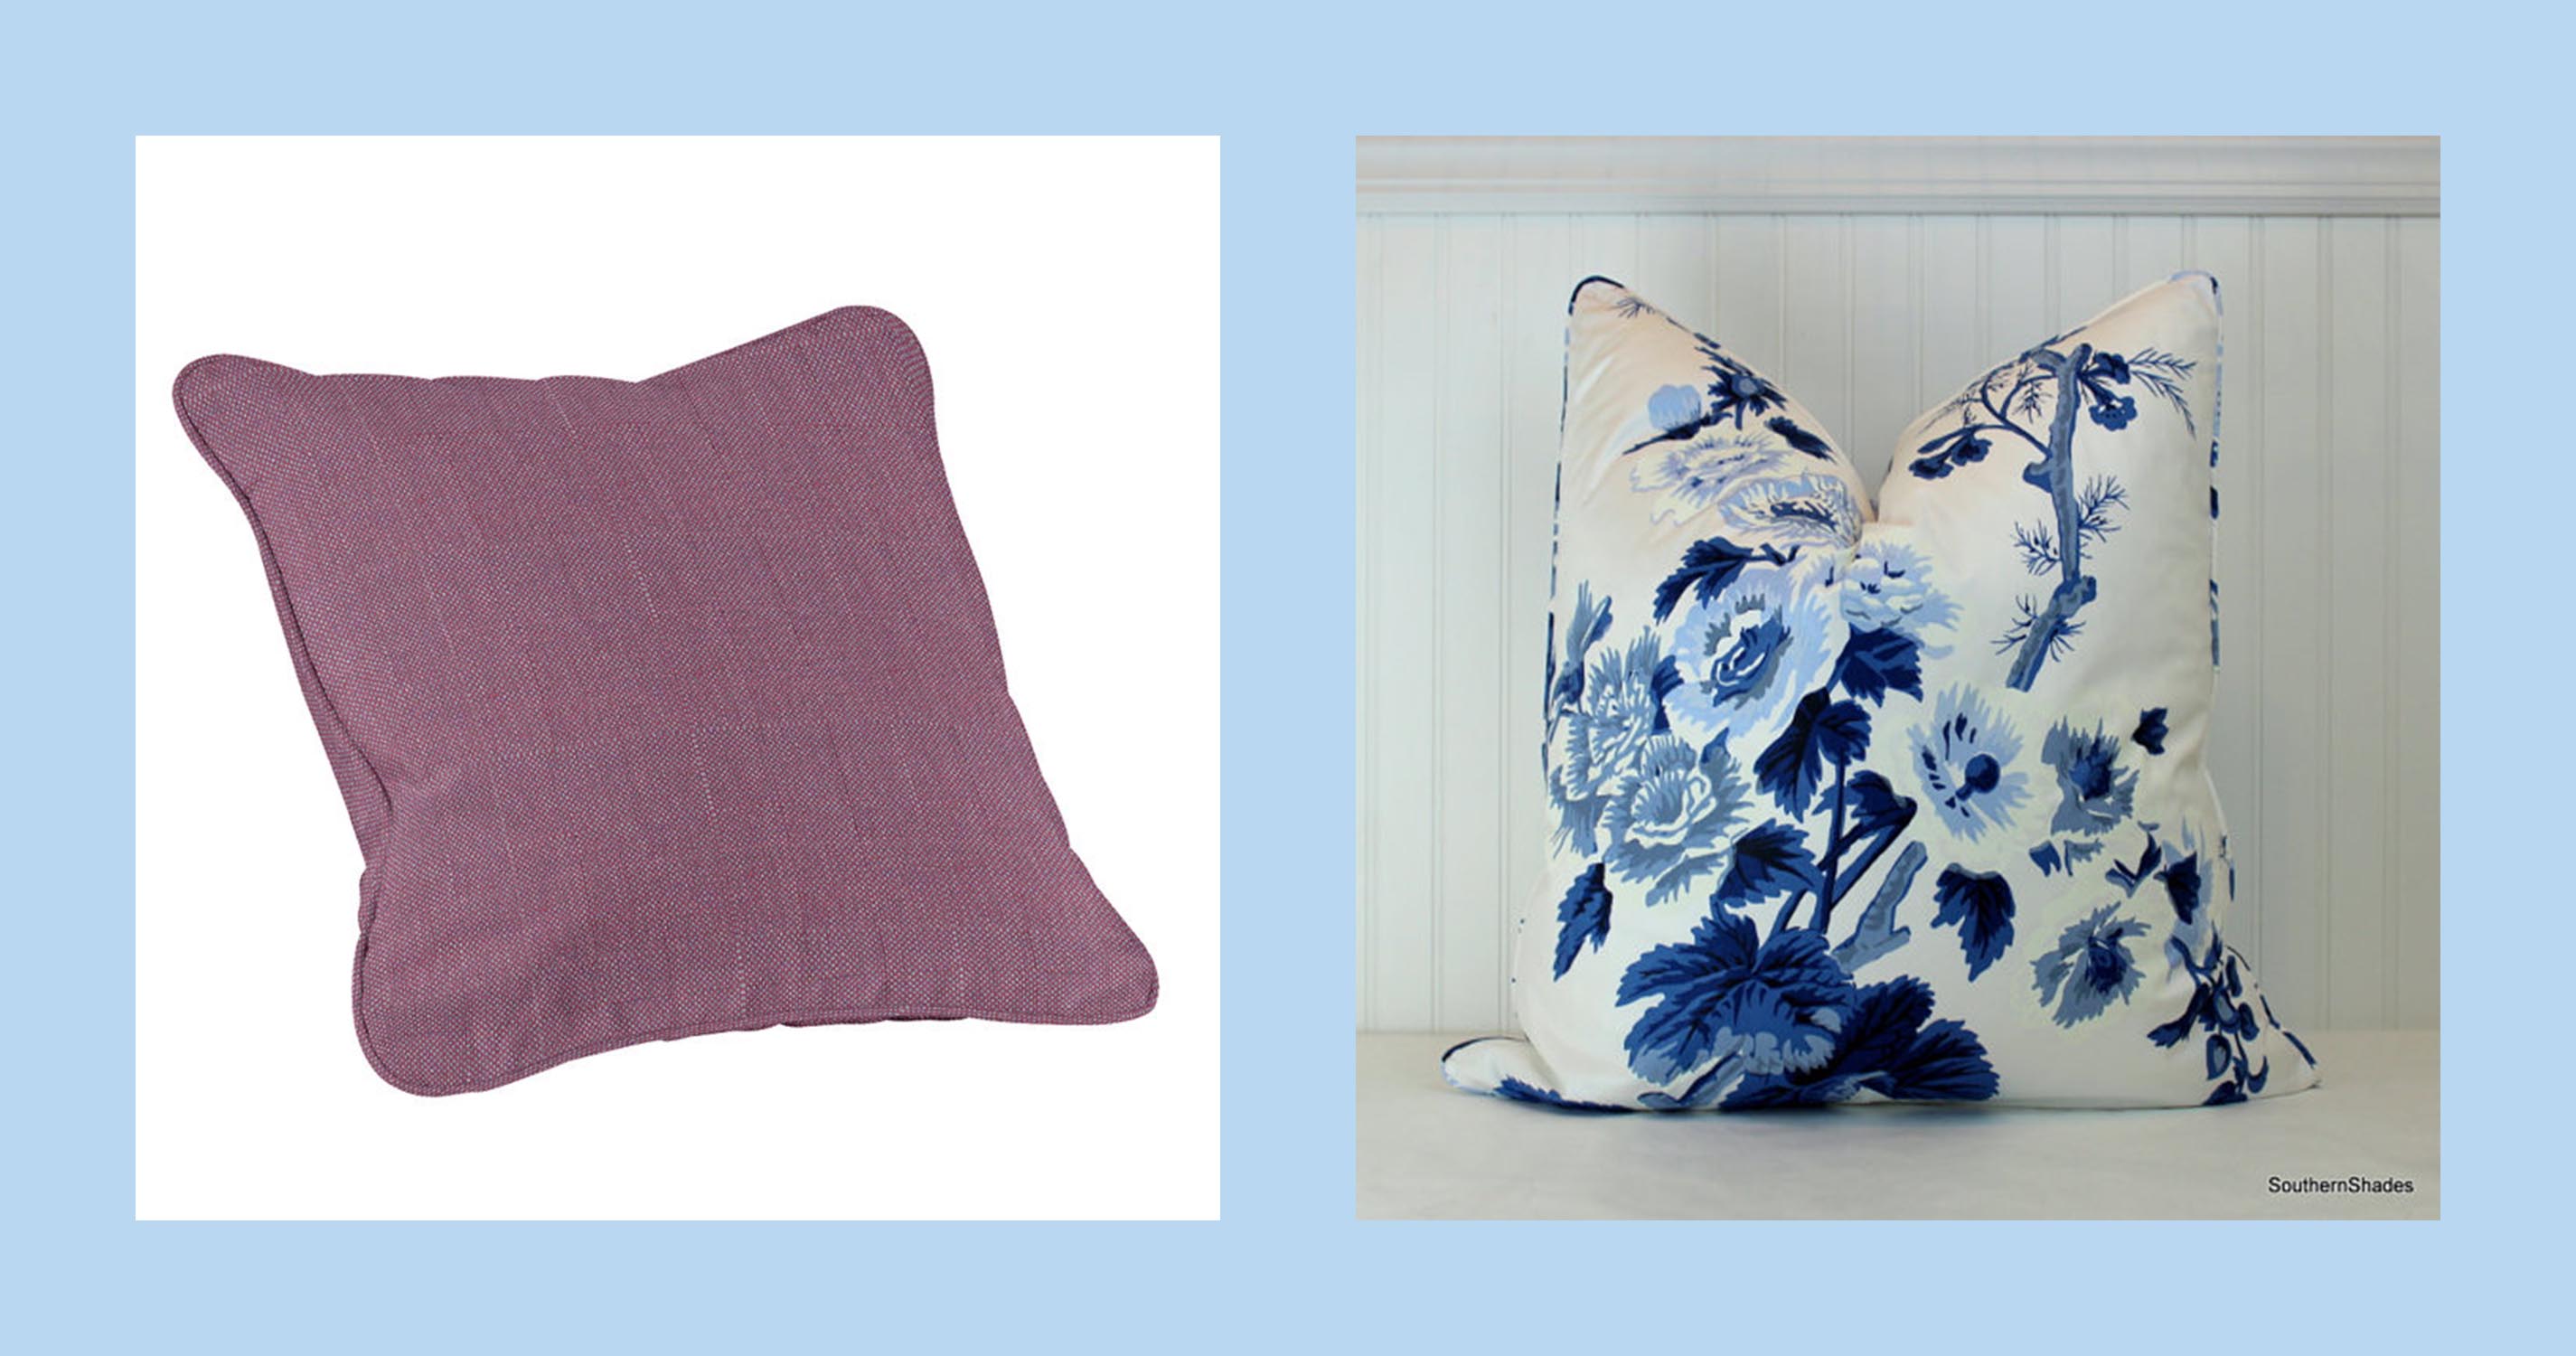
Pantone’s color of the year for 2018 is ultra violet and although I happen to like purple, I suspect that not everyone is going to paint a room in their house this deep of a shade. However, using it as an accent color on a pillow is less of a commitment and I absolutely love it when paired with blue and white. I mixed a popular chintz by Schumacher called Pyne Hollyhock with an a softer shade of violet to give this blue and white a more modern and feminine accent.

This solid violet pillow is available at Ballard Designs. or try this purple linen pillow that I like even better from Wisteria. The Blue Pyne Hollyhock pillow is available at Southern Shades

However, this purple would still look stunning with another geometric or block print pattern. Want to see a lovely blue and white home with touches of both violet and apple green then follow this link to House Beautiful to see this lovely new traditional home  designed by Lee Ann Thornton.

See the full project and gorgeous photographs at this link to House Beautiful.

Now on to one of my all time favorite accent colors with blue and white, a bright cherry red. Red is a powerful color, so sometimes people shy away from pairing it with blue thinking it’s best left for coastal design or the Fourth of July. However a touch of red with this pillow from Pottery Barn paired with a modern blue geometric pattern by Quadrile China Seas Sigourney can create a vibrant and modern mix.

You can find this red pillow at Pottery Barn  or try this red one at Annie Selke and the Navy China Seas Sigourney pillow is available st Sew Susie.

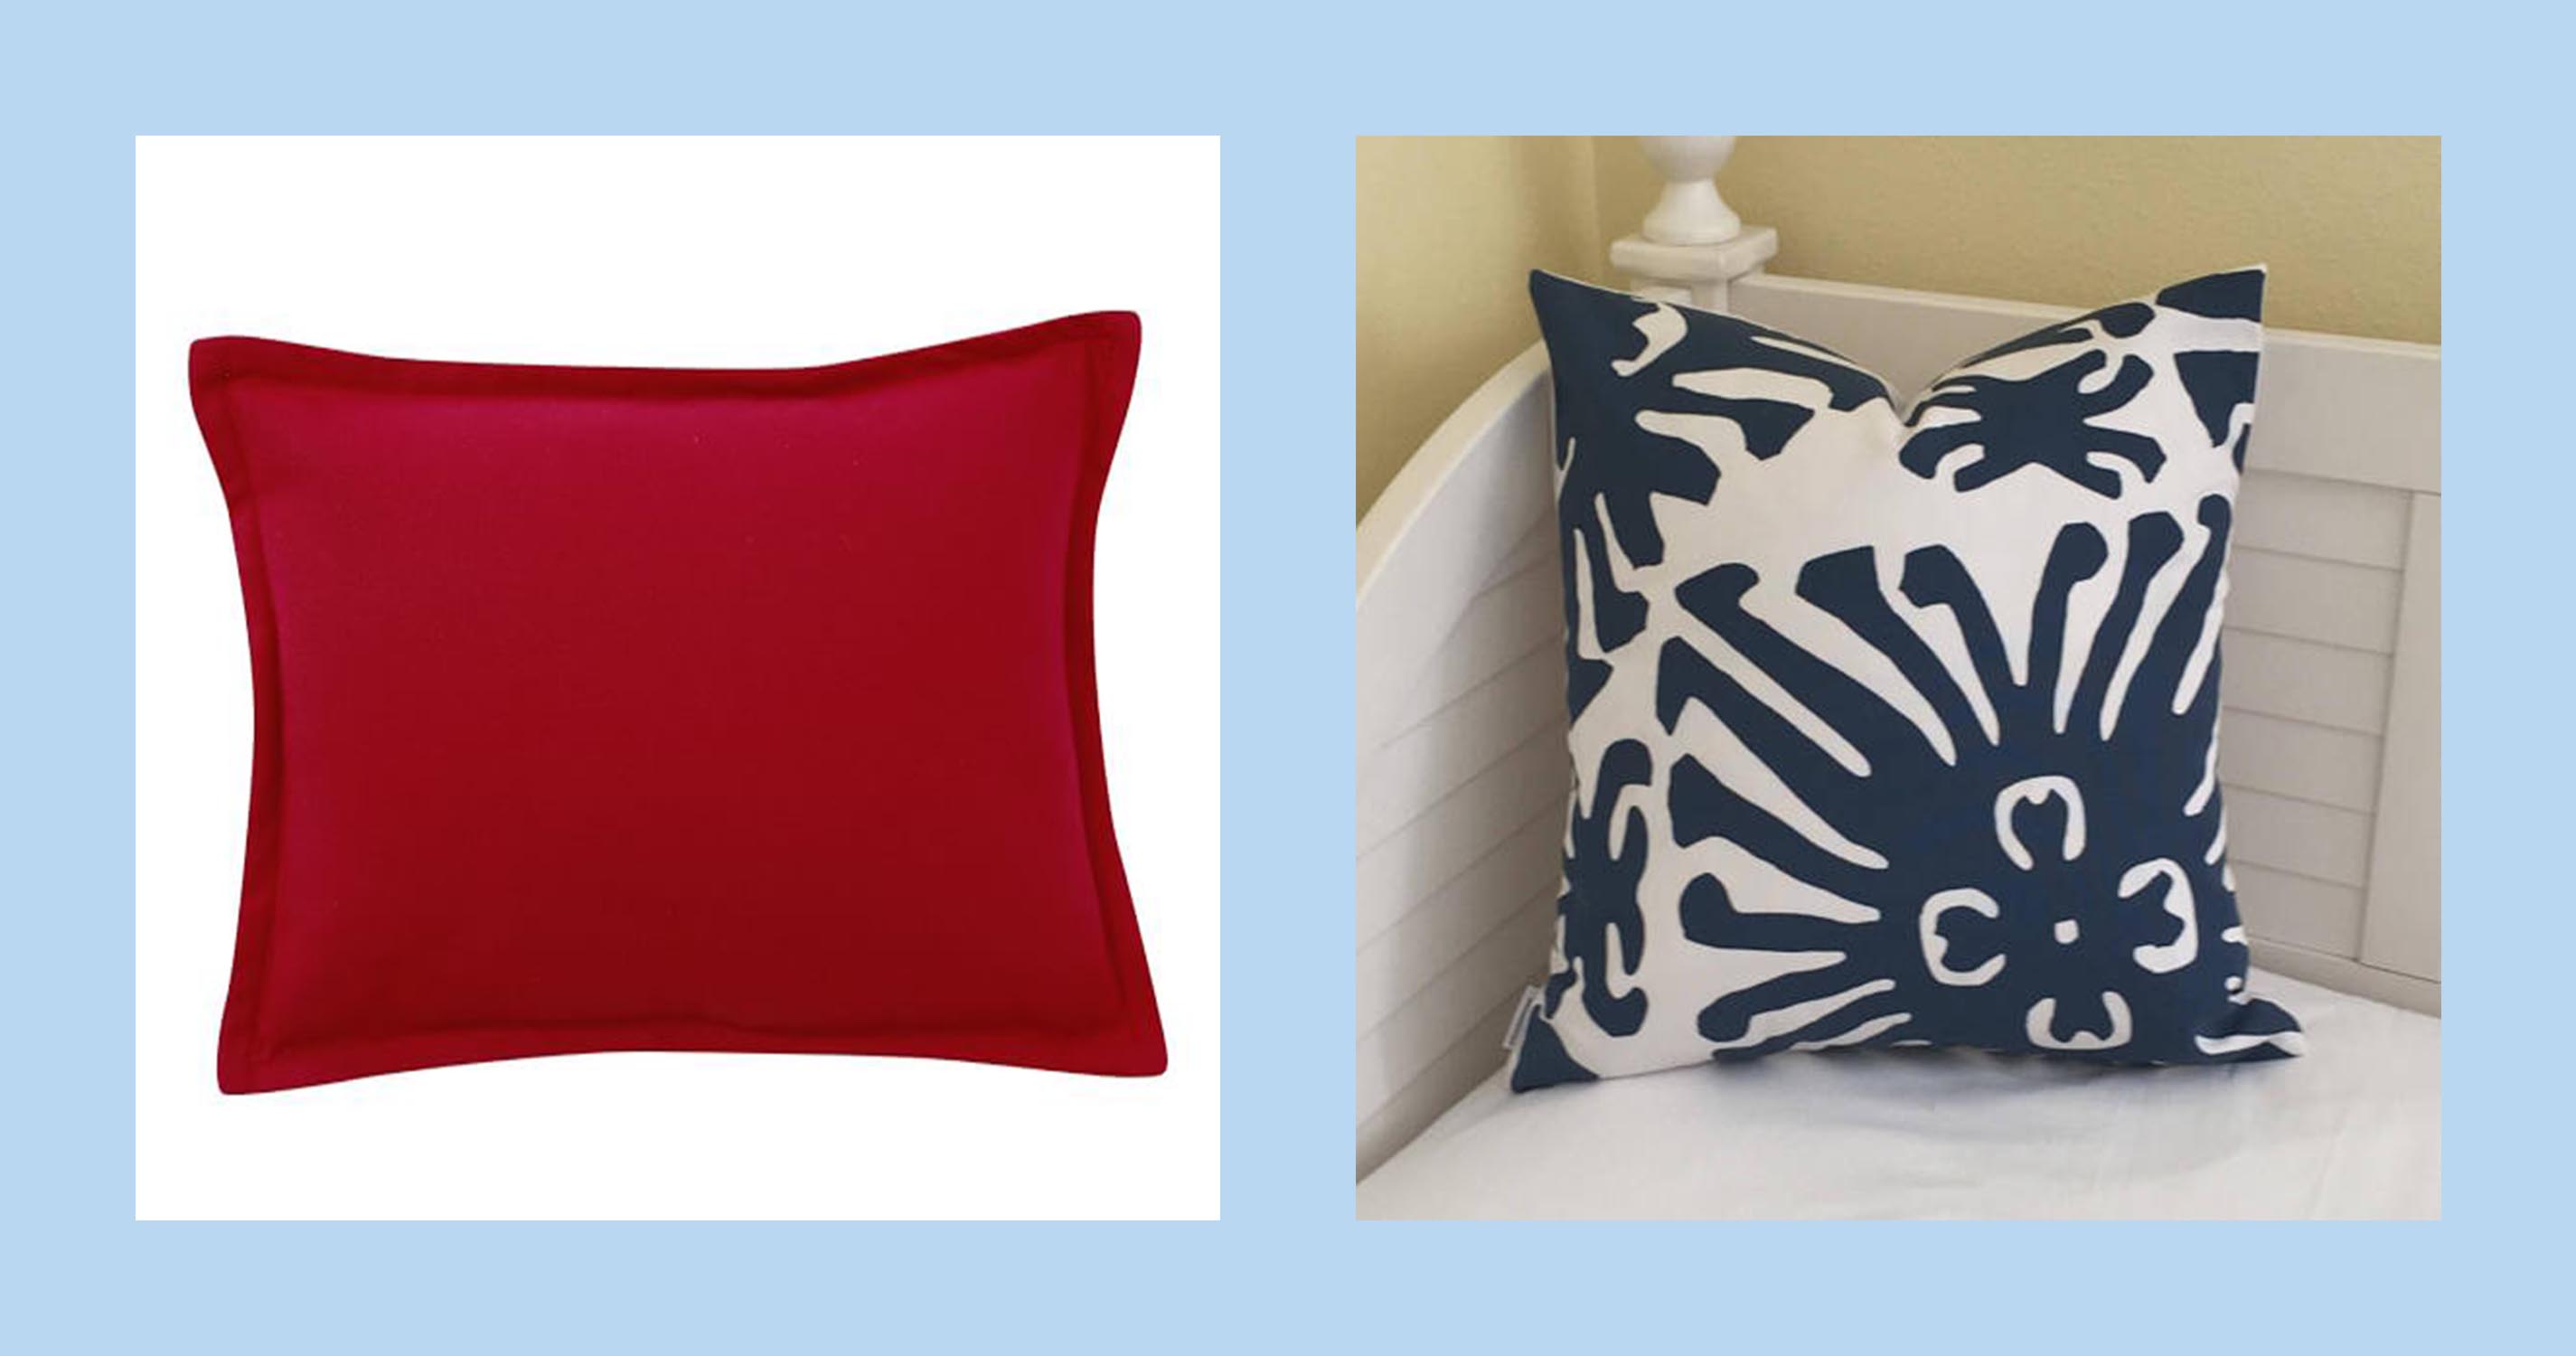
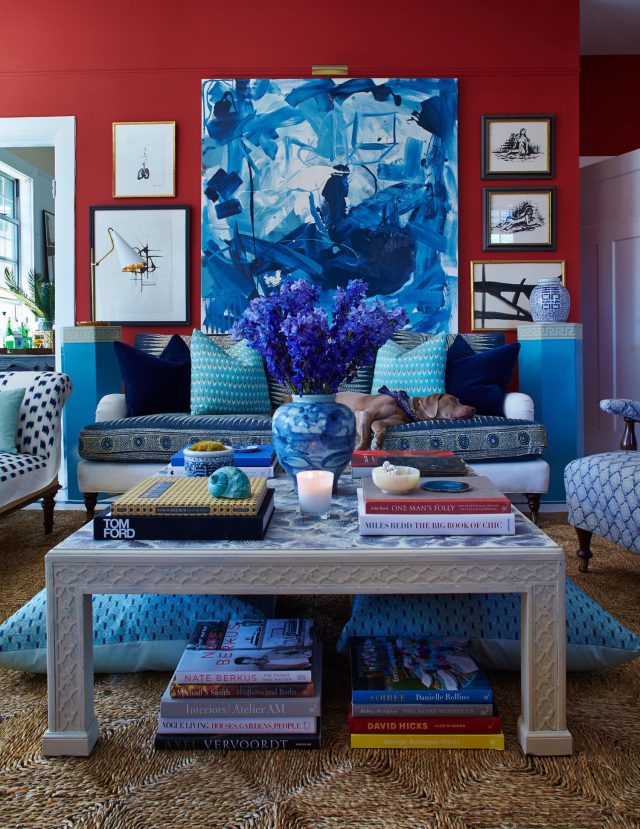
Have you seen the pictures of architect and artist, William McLure’s apartment? This modern mix of blue and white with that bright Chinese lacquer box red had all the design blogs talking and for good reason. I love how McLure mixed in several shades of blue from a deep navy to a bright turquoise. You can see more about this living room by clicking on this link to Emily Clark’s blog post that featured his work or check out McLure’s Instagram account that has more of his inspiring projects and paintings.

See Designer William McLure’s room at Emily A. Clark’s blog and read her full blog post here.

If red isn’t your color then think about adding a bright touch of orange to your room. Orange and blue is another designer combination that adds energy and excitement to a room. Here I paired an bright Mandarin orange pillow from Ballard Designs with a Chinoiserie inspired print by Kravet called Banku Fish. Add in some touches of blue and white pottery and you have a timeless look that is anything but boring.

The solid orange pillow is available at Ballard Designs or try this orange pillow at Wisteria and the Blue Banku Fish Pillow is available at Pillow Time Girls.

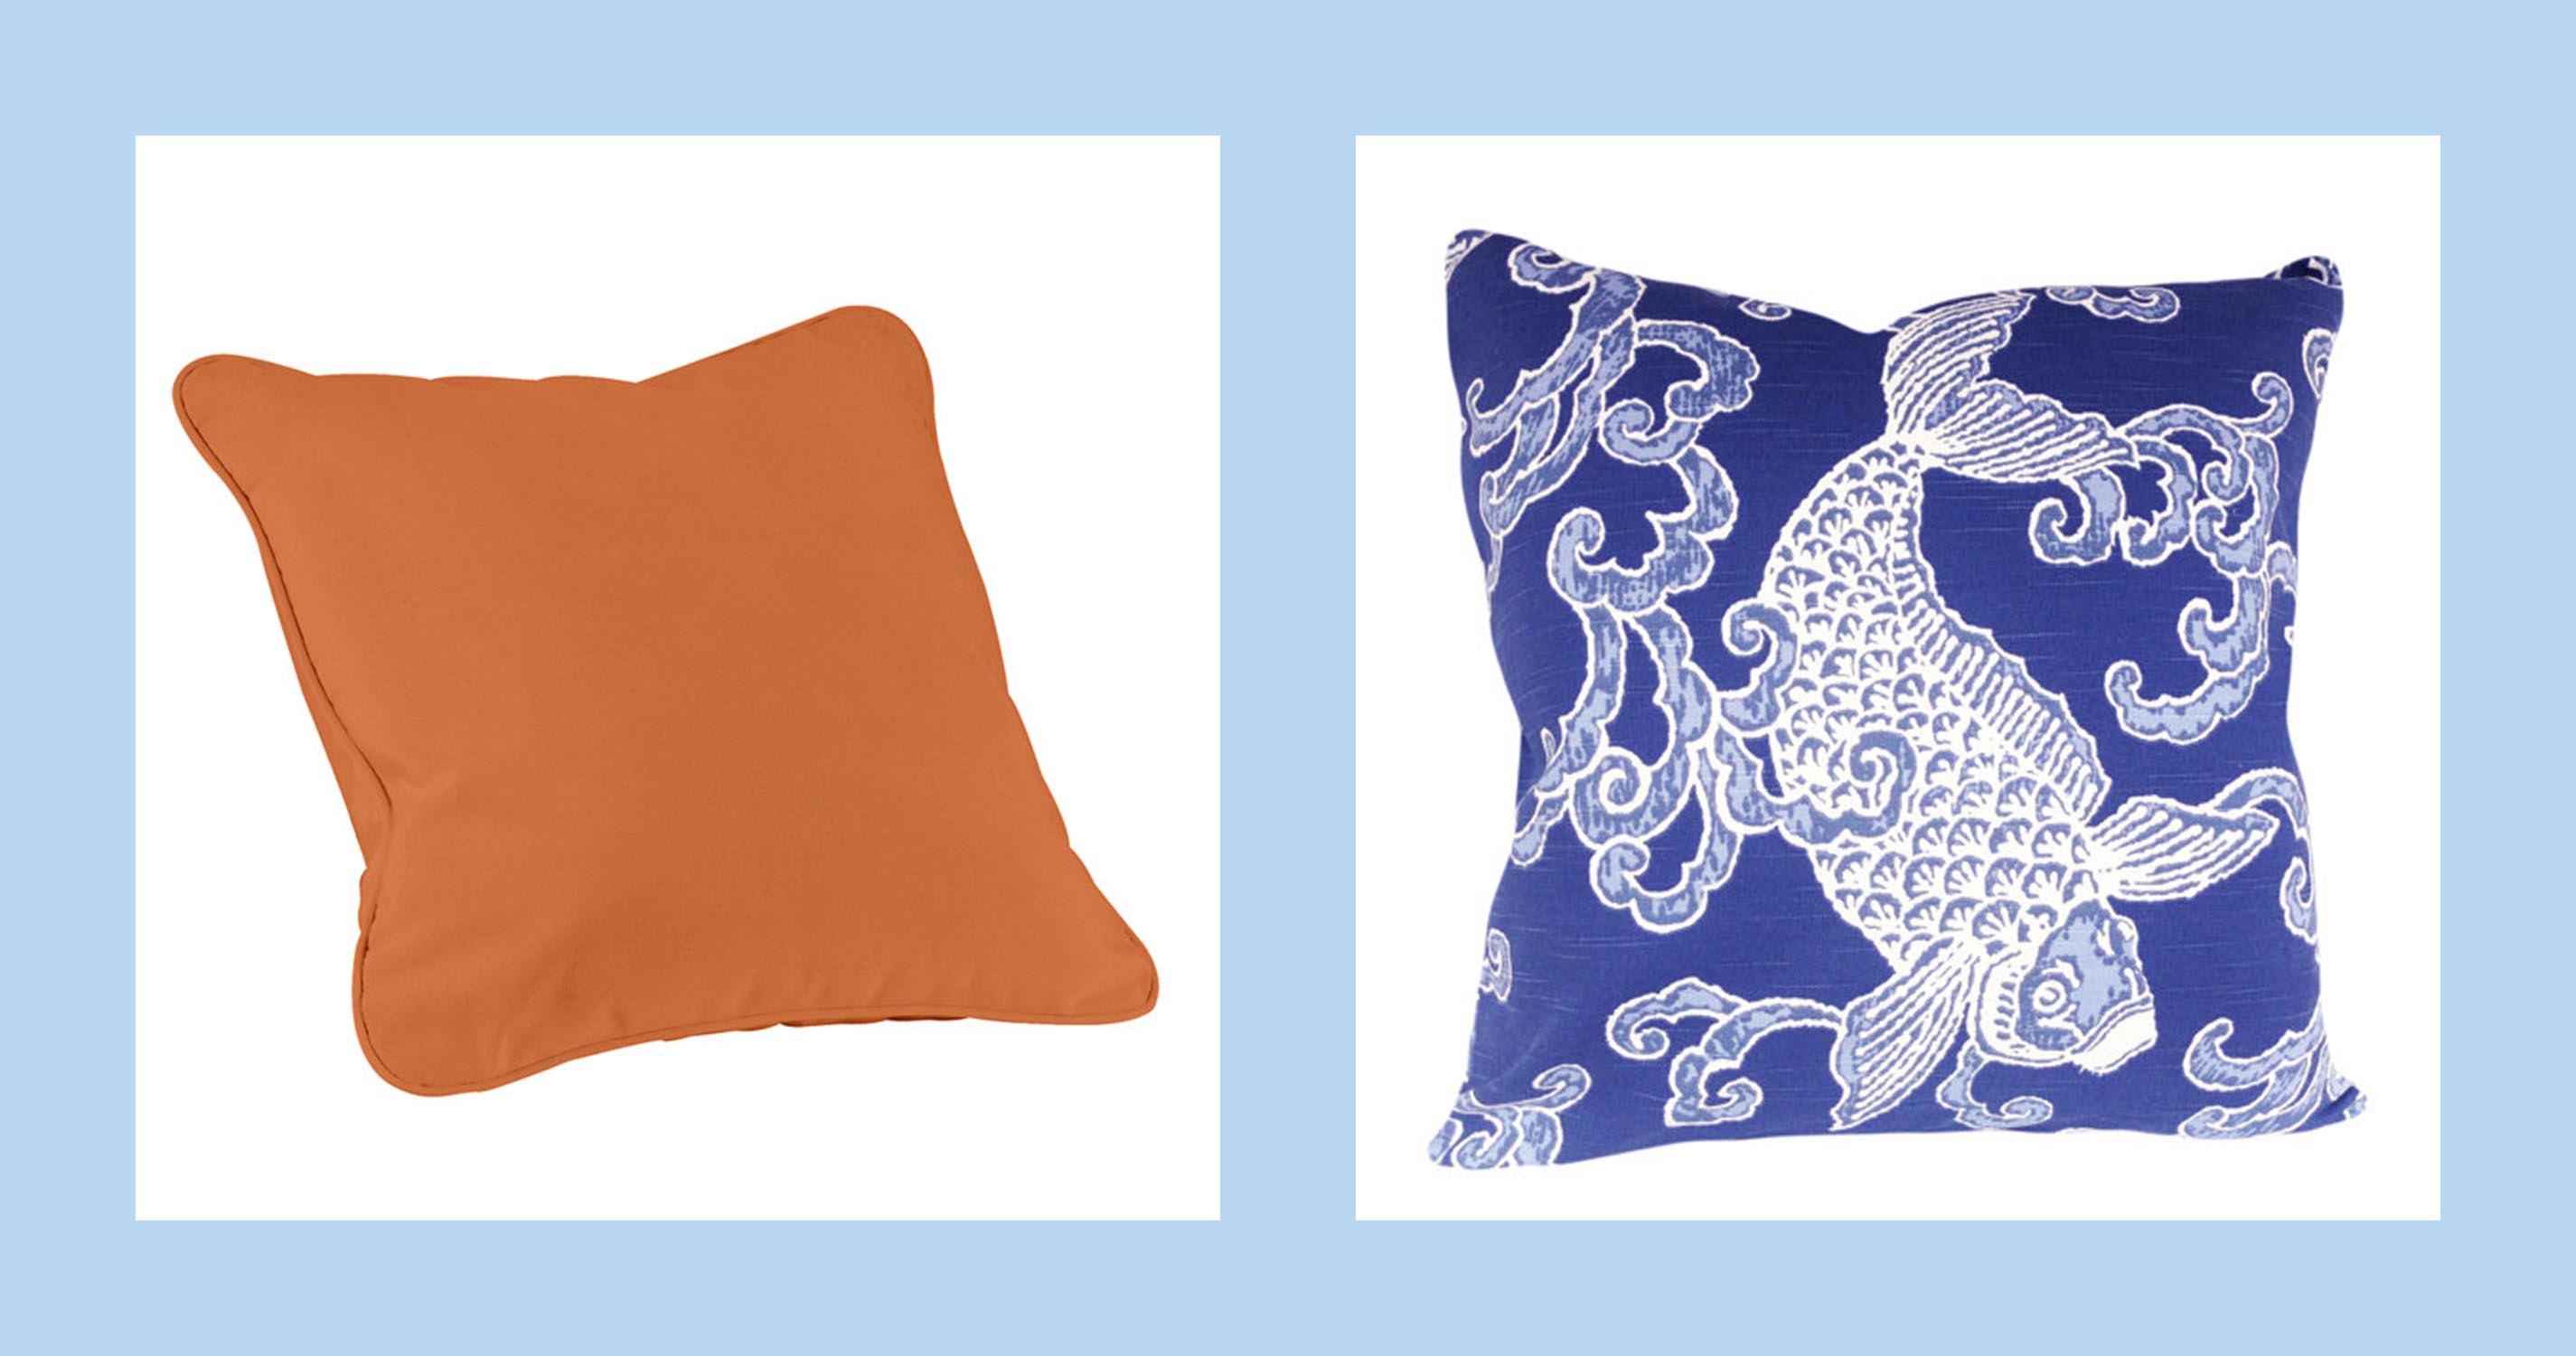
Want a master class in blue white and orange? Then check out the work of designer Mary McDonald who has some of my very favorite rooms using this color combination. She has gone bold with orange walls and blue fabrics or sometimes like this room below she uses just touches of orange in pillows and accessories.

See an Interview with McDonald’s and this inspiring living room  featured in House Beautiful.

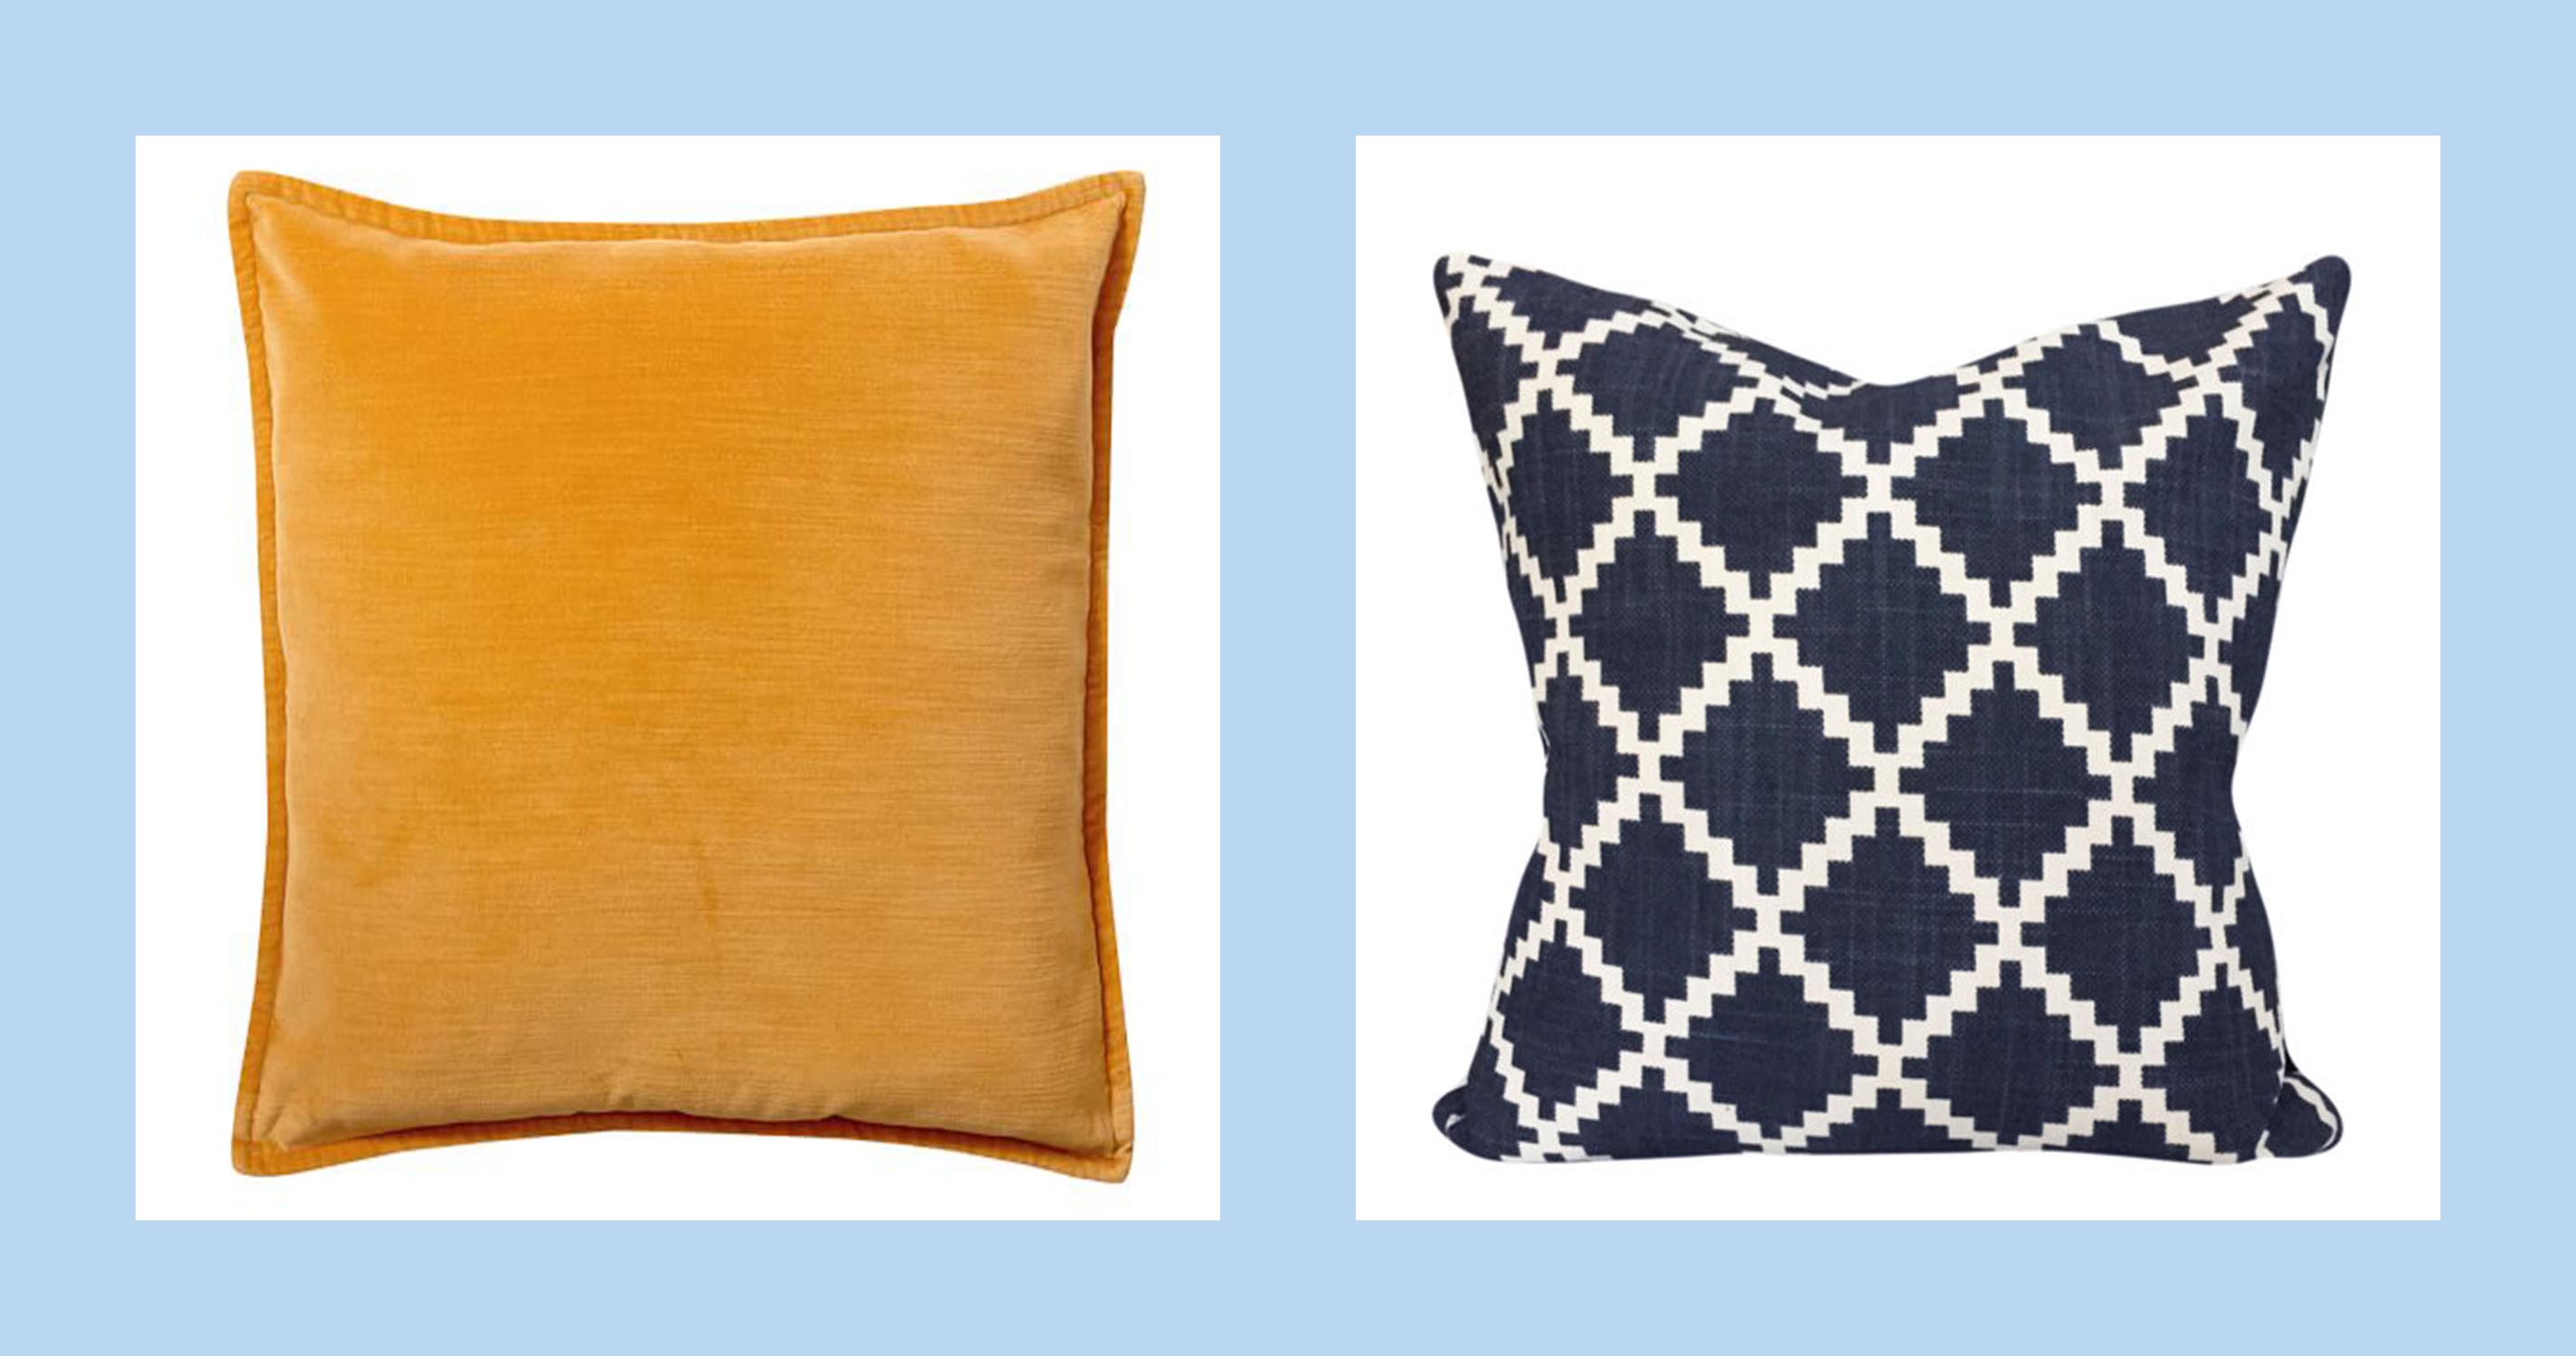
Another more current color that I am seeing more of is ochre yellow, my husband who helped me get my images together for this post wasn’t so sold on the shade, but I think it could add just the right touch when paired navy or deep inky blue. This ochre velvet pillow is from Pottery Barn and I paired it with a geometric print by Lulu DK for Duralee in Lapis.

The ochre yellow pillow is from Pottery Barn and the Lulu DK pillow is available at Pillow Time Girls.

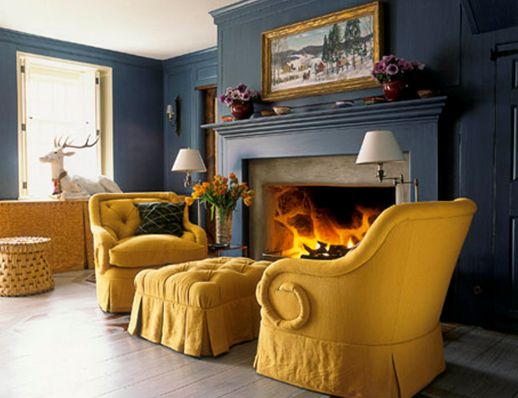
Want to see more of this moody and striking color combination? Then click on the link below to see more of designer Jeffery Bilhuber’s work featured in House Beautiful. He is truly a master of color and I am always inspired, by his new projects and design.

See the article and photographs from House Beautiful.

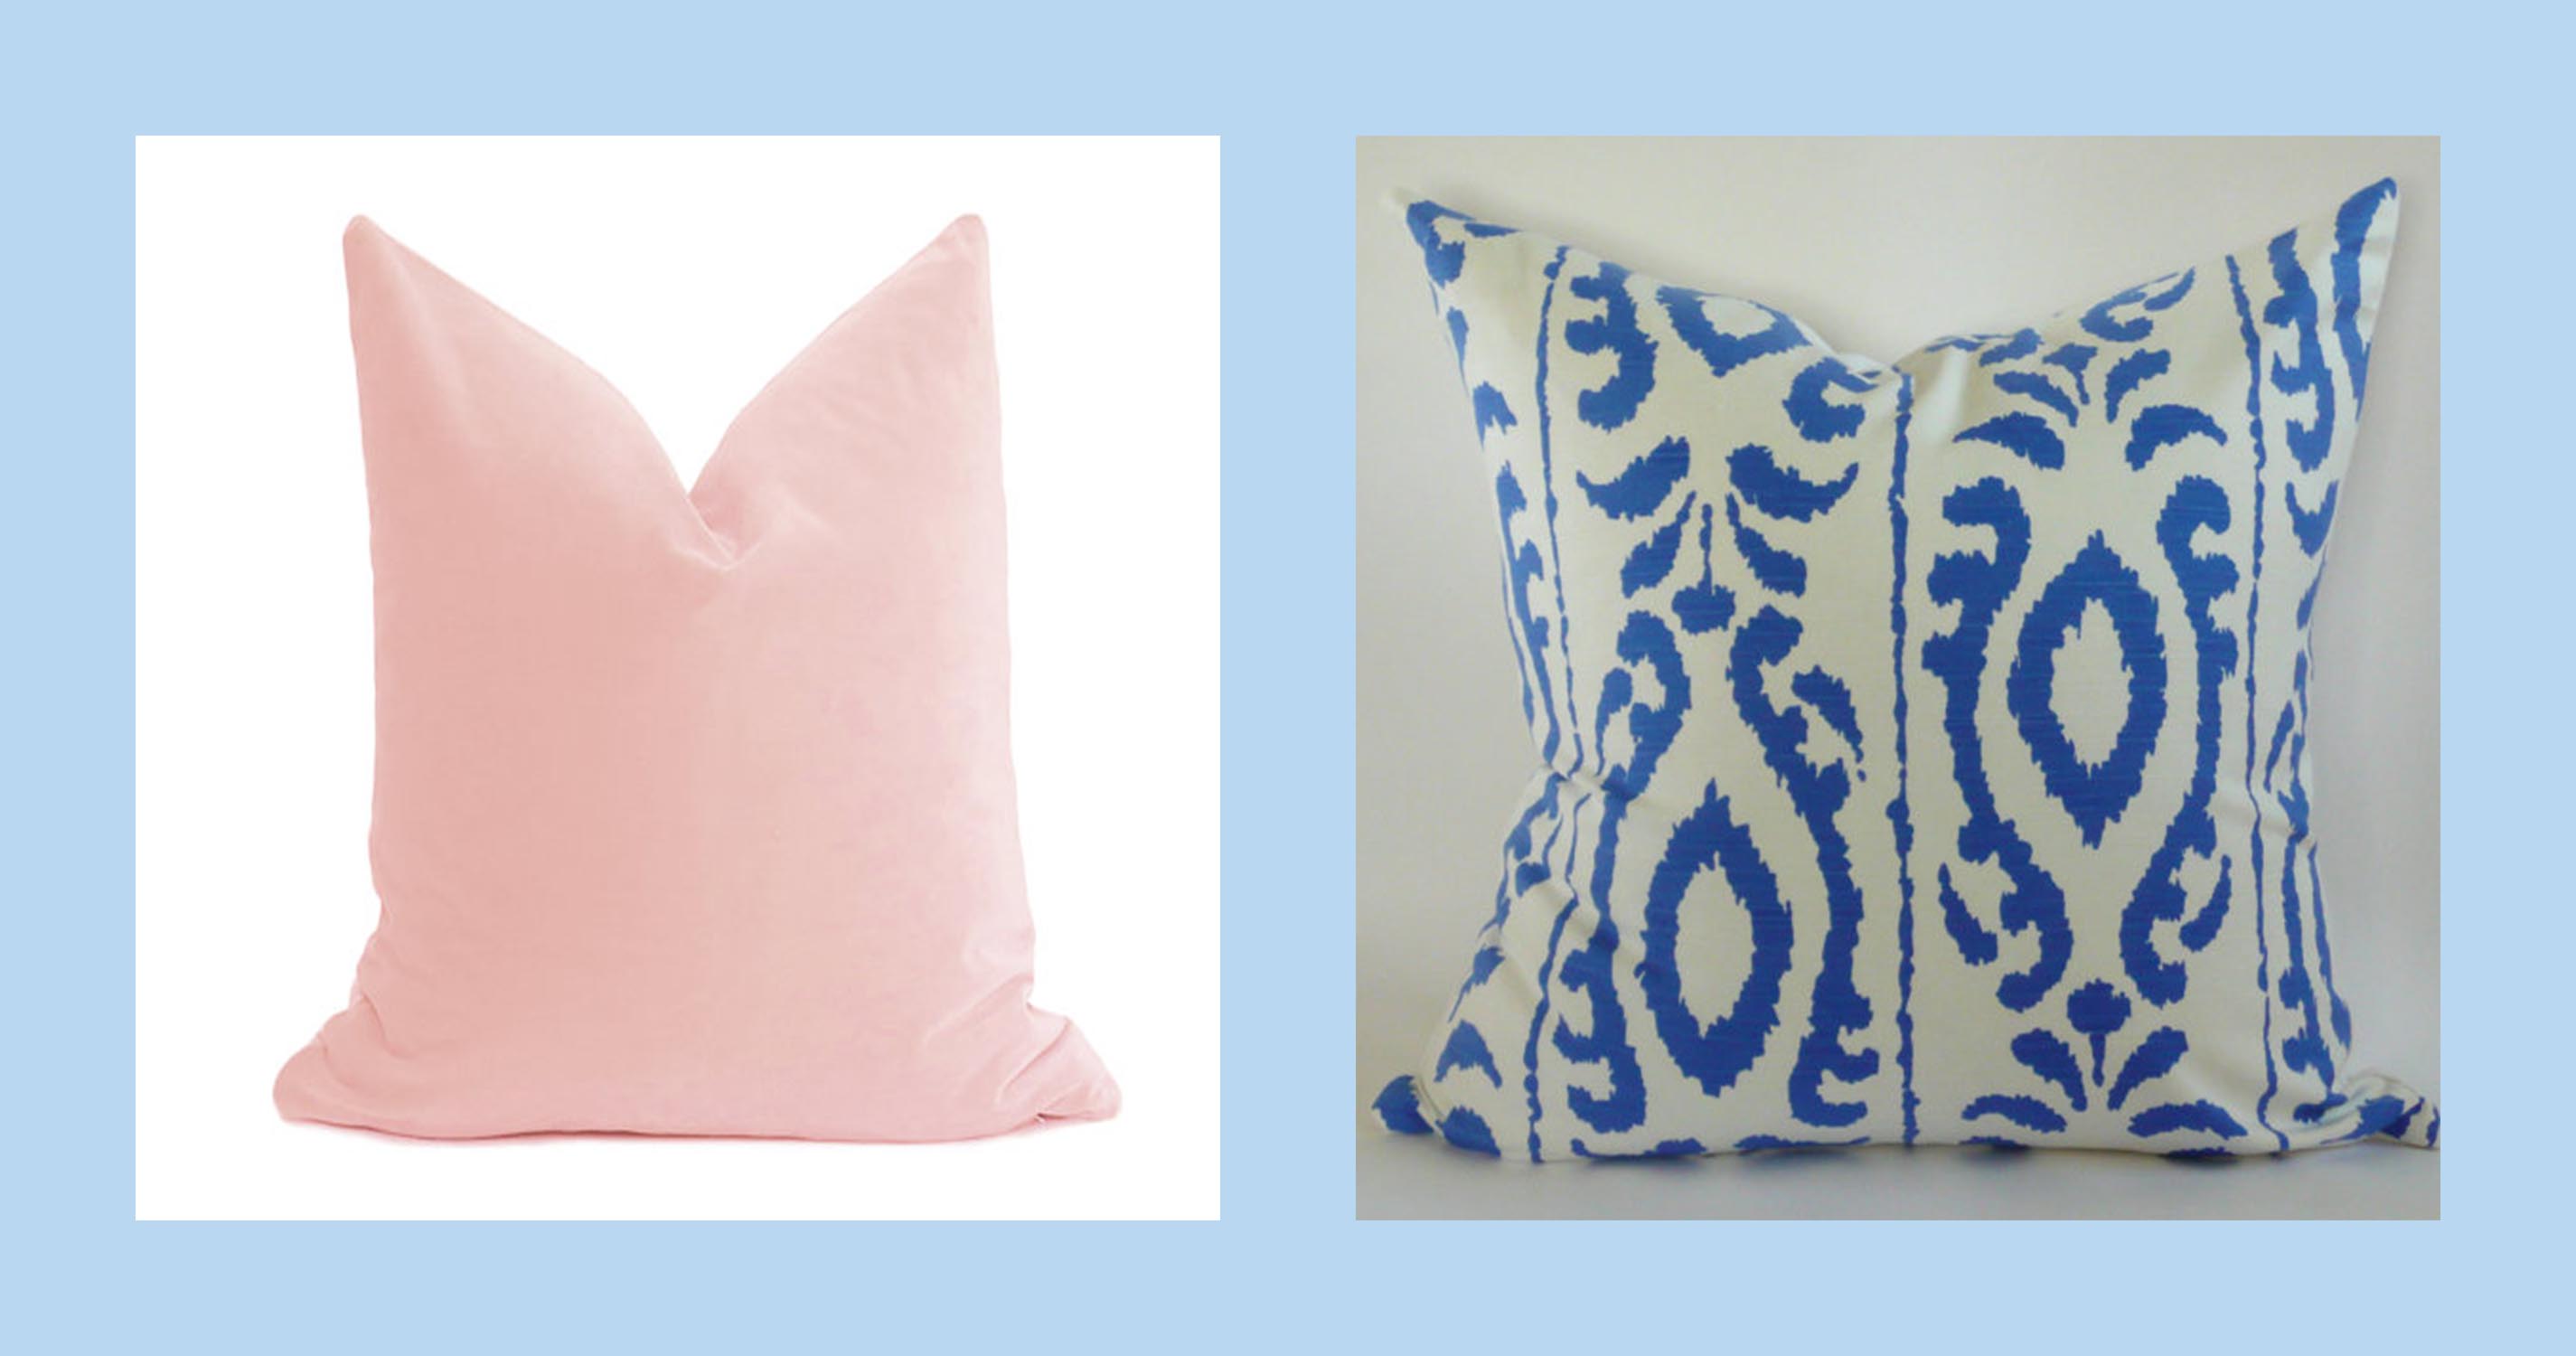
Then finally the color combination that had me started on this whole blue and white pillow post: blush pink with a light blue and white. I am looking to update my youngest daughters room and I want to keep the existing blue and white color scheme and dresser. She adores the color pink, so I am thinking that a soft pink pillow or two might be just the right touch.  Here I paired a velvet pink pillow from Etsy with a blue and white pattern by Dana Gibson.

The pink pillow is from Willa Skye Home and the Dana Gibson Madagascar print pillow is available at West End Accents.

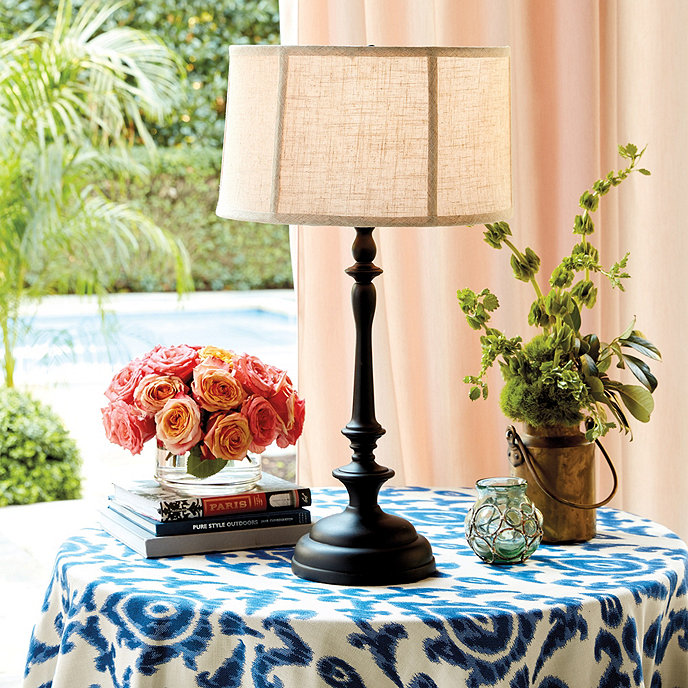
Want more pink and blue inspiration then check out Ballard Designs new fabrics in this pretty color combination.

See more about these fabrics at Ballard Designs.

Do you have a favorite? I would love to know because it helps me keep up with what you like to read and see. Etsy has made it easier than ever to source designer fabrics that can sometimes be difficult to order outside of the trade, so I always love sharing great sources and ways that you can give your house a designer look at a fraction of the cost. So add a little a little color with a pillow or a throw blanket and put your own modern twist on the traditional look of blue and white.

Cooking for Friends

Food is our common ground, a universal experience. – James Beard

In this often fast paced, head buried in your phone world is there still a place for a home cooked meal? This is the question was raised and debated at our family’s Thanksgiving gathering this year and this question has lingered in my mind and caused me to really ponder why at my core I believe it still matters so much. Why am I saddened by the thought that cooking and sharing meals together might be seen as irrelevant? The pressures of busy schedules, practices and events can make it a challenge, but I can’t help but feel like there has to be a way to slow down and connect.

I was in in the middle of writing my series on entertaining when the Wall Street Journal had an interesting article discussing a new crop of books on dinner parties. The writer Sherrie Flick asked herself this question as she prepared a meal for friends. In the end Flick came to the conclusion that a “dinner party might be just what we need…six people making eye contact around a table in someone’s home? It might be world changing.” So in this frenetic world with busy schedules and take out, slowing down and dining in might just be what we need. I have come to believe that cooking for friends may be rare these days but that doesn’t mean it isn’t important.

So what is it that I get from cooking for family and friends? It’s more than just the food, because as much as I like to write and share recipes it’s the sense of community that really matters. It’s the invitation and the opportunity to gather and to share in the universal experience of food and friendship. Cooking, like few other things allows you to share who you are and to give something to others. Over the years, I have cooked big meals with pretty tables and last minute dinners for friends we ran into at the airport and they have all been good and memorable. Sometimes with Pinterest and Instagram it’s easy to play the comparison game and think that what you have to give just isn’t enough. Even a girl who writes a cooking blog can from time to time wonder was that dish good enough to photograph and share? Will they really like it?

Now more than ever, it’s important to remember that burgers and chocolate chip cookies are just as good as roasted chicken and a fancy berry cake. In the end, I have come to understand that there is nothing that can take the place of opening your home and table to others. So whether you try one of these dishes or share one of your own, I believe that there is still a deep need and hunger for the connection and community that come with sharing a meal with friends. Cooking for others  matters because when we slow down and share what we have to give it has a way of feeding the soul.

After all of this cooking, Maison McCauley is going to take a short one week vacation as I spend a little time with my girls who have spring week next week, but I will be back soon with more stories, decorating projects and recipes to share.

Heavenly Angel Food Cake

My grandfather was French and he loved a good meal, but he would often remind us to “know what we were saving room for” because to him there was nothing better than a delicious dessert. We don’t serve dessert every night in our house, but I do love to bake so usually once a week I make something sweet. This spring meal had me thinking about making a gorgeous dessert that would be easier to decorate than your traditional cake but every bit as impressive.

So I decided to go with a lighter angel food cake that is filled with lemon cream and fresh berries. You don’t have to be a cake decorator to make this pretty cake because the berries, lemon slices and fresh mint make such a pretty top . If you are running short on time you could even buy an angel food cake from the store and just follow my instructions for the lemon cream.

Heavenly Angel Food Cake (Serves 12) Cake Recipe Adapted From Martha Stewart’s Menus For Entertaining

  • 1 1/4 cup cake flour (Usually you can find it in a box on the top shelf of the baking aisle)
  • 1 1/2 cup superfine sugar, divided
  • 14 egg whites, at room temperature
  • 1 1/2 teaspoons cream of tartar (You can find it in the spice aisle)
  • 2 tablespoons lemon zest

Preheat your oven to 350 degrees.

Here is a look inside the test kitchen. My girls who were excited to help with the cake. I don’t own a sifter because I just use a fine metal strainer with a spoon.

Then in a medium sized bowl sift together your flour and 3/4 cup of your sugar and then zest your lemon in a small bowl.

Then in the large bowl of your electric mixer beat your egg whites and medium speed until they are foamy about a minute and a half.

Then add in your cream of tartar and increase your mixed speed to high and beat the egg whites until they become thicker and nearly triple in volume.

Then sprinkle on the remaining 3/4 cup of your sugar and continue to beat your egg whites on high until they can form stiff peaks and have a glossy sheen.

Finally you want to fold in your flour mixture and your lemon zest. Folding is a way of carefully incorporating your flour mixture into your egg whites so they don’t loose their fluffy texture. Sprinkle 1/2 cup of the flour mixture on top of your egg whites then use a rubber spatula or large spoon to fold or in a circular motion the egg whites from the bottom of your bowl on top of the flour. Keep folding by scraping down the side of the bowl and then folding the mixture on top. I usually turn my bowl as I go. Sprinkle in the remaining flour mixture until it is all folded in.

Here is my mixture after I folded in my flour mixture and lemon zest.

Then you need to evenly spoon your cake into your 10 inch angel food pan. They key to angel food cake is to NOT grease your pan (the special angel food pan with its removable bottom makes this work). Then when your cake batter is in your pan you can run a table knife through your mixture to make sure there are no air pockets.

Bake you cake for 45 minutes until your cake is golden and springs back to the touch.

Then turn your cake pan upside down to cool. This is key because gravity will begin to work on the sides of your cake and the cake will keep its light texture. Keep your cake upside-down  until it cools usually it take at least an hour. Then my trick for getting it out of the pan is to use a serrated knife to careful cut around the edge and inside around the center to help loosen it. Then take you pan and place the center on a bottle so the bottle supports the bottom of the pan while you lift off the side piece.

Then take your serrated knife and hold it flat to free the top of your cake.

Then you are going to want to make your lemon cream and get your berries ready. If you are entertaining you can make the cake the day before and keep it out on your counter wrapped in plastic wrap.

Lemon Cream

  • 4 cups (or 2 pints) of heavy whipping cream
  • 1/2 cup of powdered sugar
  • 2 tablespoons of lemon curd (I used the Bonne Maman brand but if you can find it I also like Stonewall Kitchen’s lemon curd as well. I can usually find it on the jelly aisle)
  • 1 teaspoon of vanilla extract
  • 1 pint of blueberries
  • 1 pint of blackberries
  • 1 package of mint
  • 2 lemons, cut into thin round slices

In the bowl of your stand mixer mix together your cream and sugar and beat them on hight with your balloon whisk attachment. Then when you cream becomes thick and can hold a firm peak add in your lemon curd and vanilla and whisk until they are just incorporated.

Now you are ready to decorate your cake. Take your serrated knife and with a sawing motion cut your cake in half. Then spread an even layer of whipping cream on your bottom layer and place enough berries on top so they evenly cover the cake layer.

Then take the top of your cake and layer it on your base layer. Then you are ready to decorate the top. I uses a large star tip to pipe some stars on the top of my cake and then I placed my berries on in groups of threes. If you don’t have a piping bag you could just neatly spread some of the lemon cream on top. I like to decorate with odd numbered groupings of berries because they are very pleasing to the eye.

Then I took my thin lemon slices and cut a small cut half way up the center (just like you would if you were going to cut a lemon for the side of a glass.) That half cut allows you to create a lemon twist.  I created five lemon twists and I spaced them evenly on top. Then as a final touch I added some mint sprigs. As long as your whipping cream is firm and you get your cake in the fridge immediately you can decorate your cake a half a day in advance so you won’t have to worry about having to put this together last minute.

There you have it a pretty cake that doesn’t take long to decorate. If I am making dessert for friends then I want it to be memorable and the berries and lemons give this cake an impressive look. I also like to follow a meal with heavier dishes like the herbed goat cheese chicken and mashed potatoes with something a bit lighter so this heavenly angel food cake is a great dessert to finish this menu and definitely something worth saving a little room for.

Spring Entertaining: Herbed Mashed Potatoes

Have you ever tasted potatoes that were so good that they stole the show? I must confess I have made many a resturant menu selection based more on the promise of a delicious sounding side of potatoes than the actual entree itself. So what’s the secret that makes restaurant mashed potatoes so good? Having thought about it, I think it comes down to two things: first restaurant potatoes tend to have a lighter texture because they rice or mill their potatoes and second they have a richer taste because they use cream and not milk. Mashed potatoes are a classic crowd pleasing side so for part three of my entertaining menu I serving up an easy recipe for a spring inspired herbed mashed potatoes that go well with the roasted chicken.

Herbed Mashed Potatoes (Serves 4 to 6)

  • 3 medium sized russet potatoes
  • 3 tablespoons of butter
  • 2 tablespoons of Alouette or Boursin garlic and herb cheese
  • 2/3 cups cream
  • 1/2 teaspoons of kosher salt
  • 1/4 teaspoon of pepper  

First, get your potatoes peeled and diced into even pieces. Then place them in a large stock pot and cover them with cold water so the water level is an inch above your potatoes. Then turn the heat up to high and boil your potatoes until they are tender and can be pierced easily with a fork about 20 minutes.

Then when your potatoes are soft drain them in a colander. I like to rice my potatoes because it makes for lighter and fluffier potatoes. A ricer resembles a big garlic press and it presses potatoes into small and even rice like pieces. The ricer  takes out any lumps and makes the potatoes easy to mix together with just a rubber spatula or spoon. When you overly whip or mix potatoes the starch in the potatoes can become glutinous so a ricer or food mill helps prevent that.

This is my potato ricer that I filled with my cooked potatoes.

Here you can see  how I work in small batches to rice my potatoes. The potatoes go in the ricer basket and you press them by bringing the handles together.

This is what the potatoes look like when they are riced.

Next add in your butter cut into small pats so it melts better and stir in your cream and cheese. Then finally season to taste with salt and pepper. You can make this recipe without a potato ricer or food mill, but I do think it makes a distinct difference in the texture of mashed potatoes.

Finally, one last tip if you are entertaining you can have your potatoes ready to go in the water and then turn them on to cook when your guests arrive or you could make them just before and have them warming in an oven safe bowl in your oven’s warming drawer or a at low temperature in your oven.

I have saved the best for last so come back this Sunday for the piece de resistance of this spring menu, dessert.

Spring Entertaining: Carrots Carolina

Side dishes are arguably not as seductive as a beautiful dessert, nor do they command the same attention as a roasted chicken coming out of the oven, but the are an important part of the fabric of meal and when done right the measure of a good cook. Fresh vegetables make some of the best sides and these sweet Southern styled carrots are easy, delicious, and sure to impress your guests.

Cooking is wonderful because in a way it can take you back in time and can bring back memories of family. This recipe is something I got from my grandmother’s recipe drawer. It was originally a 1950’s style dish that belonged to my dad’s mom. I am not one for the canned carrots the original recipe called for, but the orange juice and brown sugar based syrup sounded like a wonderful idea. So years ago I took to modernizing my grandmothers dish. It’s a quick side that takes five minutes to cook and you can have everything prepped ahead so it’s great for dinner parties and holidays. I used it as an Easter side dish in our house last year and my family loved it. The bright orange carrots and the green chives make a pretty plate that  can tempt even my tiny vegetable skeptics.

Carrots Carolina (Serves 4 to 6)

  • 6 carrots, peeled and julienned into thin four-inch strips
  • 1 tablespoon of butter
  • 1/4 cup fresh orange juice
  • 1/4 cup brown sugar
  • 1 teaspoon orange zest
  • 1/4 teaspoon kosher salt
  • 2 tablespoons of finely chopped chives
  • 1 orange to make orange peel curls (optional garnish)

First, get you carrots peeled then cut off the top and the very thin end piece. Then make a horizontal cut to cut the carrot into two approximately four-inch lengths. Then slice each half vertically and then cut each side in half or in thirds depending on how thick your carrot is to make thin baton like strips. You want the carrots to be fairly even in size so they cook evenly.

Stir your carrots as you sauté them so they cook evenly and the citrus syrup comes together.

Then place a medium sized skillet on medium high heat and add your butter, orange juice,  brown sugar, orange zest and salt. Then add in your carrots and sauté them for about five minutes until they become tender and the orange juice and brown sugar make a thick syrup. Then sprinkle on your chives and if you are feeling especially fancy some orange curls. The orange curls are easy to make you just need to use a channel knife, which will cut thin even strips you can curl up into a spiral.

This serving dish also belonged to my grandmother so it was fun to be able to photograph the dish she inspired in her serving bowl.

A sprinkle of bright green chives, a few curls of orange peel and a drizzle of sweet citrus syrup make these carrots more than just your ordinary vegetable dish. These carrots can hold their own when set on the table. If you are entertaining with this recipe then I would cut the carrots in advance and have all of the ingredients for the syrup ready to go in the skillet. Then all you have to do is add in your carrots and sauté them quickly before you serve them. So if you are looking for a good spring inspired side, then give these carrots a try.

Carrots Carolina is the second part of my series on spring entertaining so join me next week for more recipes and menu ideas to host your own delicious dinner party.

Spring Entertaining Made Easy With Herbed Goat Cheese Chicken

Spring brings a host of fun holidays and events from Easter to Mothers Day to graduation celebrations. So, I thought I would start a small series on great entertaining dishes. Usually, I share just one stand alone recipe a week, but this time I have decided to put together a series with a full spring inspired menu. So whether you are hosting the dinner party or just bringing a dish or dessert to share you have an entire meals worth of recipes that are easy to cook and share. Over the years I have found that one of the key to entertaining is to plan a menu you can prepare and assemble ahead of time. I like to have everything ready with dishes that are easy to assemble right as your guest arrive. If I am having company I want to enjoy my time and be a part of the festivities.

Today I am starting my spring entertaining series off with a classic French inspired dish that I love to entertain with Herbed Goat Cheese Chicken. This recipe is one my mom got from a friend years ago. I have modified it a bit over the years, but it is hands down one of my favorite main courses for entertaining, because chicken is something most guests enjoy and you can assemble your chicken before your dinner guests arrive.  Then the evening of the party all you have to do is pop them in the oven to roast and you are ready to go. The onions, cheese and herbs also happen to create a delicious aroma in your kitchen as your chicken roasts.

Herbed Goat Cheese Chicken (Serves 4 but the recipe can easily be doubled or tripled)

  • 4 medium sized bone in skin on chicken breasts
  • 4 ounces of goat cheese
  • 1/4 cup of finely chopped yellow onion
  • 2 finely minced garlic cloves
  • 1/2 cup grated parmesan cheese
  • 1 egg
  • 2 teaspoons of Herbs de Provence (There is something magical about this French spice blend of rosemary, thyme, tarragon and lavender.)
  • 1/2 teaspoon kosher salt
  • 1/4 teaspoon ground pepper

First prepare your ingredients to make the goat cheese stuffing. Finely chop your onion and mince your garlic. Then in a medium sized bowl mix together your, goat cheese, onion, garlic, parmesan cheese, egg, herbs, salt and pepper.

Then take your goat cheese and carefully stuff 2 to 3 tablespoons of cheese under the skin of your chicken breasts. You want to avoid tearing holes in the skin as it keeps your stuffing in as the chicken roasts.

You can pre-assemble your chicken breasts a few hours before your dinner and just have them covered and ready to go in the refrigerator.

Then before you are ready to roast them preheat your oven to 375 degrees. Place your chicken breasts on a roasting pan or a jelly roll pan that has sides. Then roast your chicken for 40 to 45 minutes if you have medium sized chicken breast or if all you can find are the larger variety then adjust you cooking time to 50 minutes. If you happen to live in the Western Chicago suburbs, Kramer’s Foods in Hinsdale has a great butcher and they regularly have these smaller bone in skin on chicken breasts that are great for roasting.

This chicken is easy so although I love to make it for friends, I also make it for week night dinners with my family. I served mine with some oven roasted potatoes, but I  also like it with mashed potatoes or wild rice. I am serving up some sides dishes next so come back for more spring entertaining recipes and tips.

Carrot Cake Cupcakes With Candied Carrot Curls

Carrot Cake Cupcakes

Cupcakes are big deal in our house. They are the most requested item that my young daughters routinely want to make. So when we were in the car last weekend and I mentioned making carrot cake cupcakes there was a chorus of “Yes! Yes! Yeeeesss!!!!” coming from the back seat of my car. This carrot cake recipe is one of my family’s absolute favorites. It’s a family recipe that I have tinkered with over the years to get just the right balance of sugar and spice. I also love it because the cake itself is particularly good. The oil and carrots make it a very tender and moist cake. Then top it off with some cream cheese icing and candied carrots curls and you have something wonderful.

I recently helped a friend with a special occasion cake she was making for her mother’s birthday. She wanted to follow some meaningful family traditions, but she also wanted her cake to have a bit of that wow factor since it was going to be a big part of their celebration. I love cakes and baking, so I was thrilled to help her. The only trouble was there was literally a thousand miles between us so I was going to have to coach her through this over the phone. What I found is that text messages and descriptions of what to do are good, but they are not nearly as helpful as videos. So I sent my friend some video clips so she could see the techniques I was describing. The videos helped her visualize what I was talking about and made her feel more confident about trying something new. In the end my friend’s cake looked gorgeous and I was so excited that she was able to confidently put it all together.

Helping my friend made me realize that it might be good to share a few video segments on the blog from time to time. So I am getting over my anxiety of seeing myself on video and sharing with you a few tips on how to give your cupcakes that wow factor that is sure to make them a hit with family and friends.

Carrot Cake Cupcakes (Makes 12 Cupcakes)

  • 1 cup of Sugar
  • 1 cup of Flour
  • 2 teaspoons Cinnamon
  • 1/4 teaspoon Nutmeg
  • 1/4 teaspoon Ground Ginger
  • 1/2 teaspoon Salt
  • 1 teaspoon Baking Soda
  • 1/2 cup Canola Oil
  • 2 Eggs
  • 1 1/2 cups Grated Carrots

Preheat your oven to 350 degrees. Prepare your cupcake tins by placing a cupcake liner or cupcake baking cup in each well and lightly spraying the insides with cooking spray.

Next peel and the grate the carrots. I use a food processor with a grating blade to make it faster.

Then in the large bowl of a mixer mix together the dry ingredients: the sugar, flour, cinnamon, nutmeg, ginger, salt and baking soda. Then mix in the oil and eggs till they are fully incorporated. Then add the carrots and mix. Place an even amount of the batter in each cupcake liner.

Bake for 20 to 25 minutes. In my oven they took 22 minutes. Allow the cupcakes to cool in the pan for  5 to 10 minutes, then take them out to cool and decorate.

When the cake is completely cooled they are ready to frost.

Cream Cheese Icing

  • 1 Stick of Softened Butter (I usually let it sit out of the fridge for an hour)
  • 1 (8oz) Softened Brick of Cream Cheese (I let it sit out with the butter)
  • 1 Tsp Vanilla
  • 5 Cups of Powdered Sugar
  • 2 Tablespoons of Milk

In the bowl of a mixer cream the cream cheese and butter. Add the powdered sugar vanilla and milk. Mix on high-speed until the icing is smooth and fluffy.

Candied Carrot Curls

  • 1 cup granulated sugar
  • 1 cup water
  • 2 to 3 carrots
  • Extra granulated sugar for sprinkling on carrots

Preheat the oven to 200 degrees

To make the carrot peel curls take a vegetable peeler and peel 15 to 20 carrot strips or ribbons.

Then bring the sugar and water to a boil in a small sauce pan. Add the carrots and turn the heat down to medium low and cook for 15 minutes. Remove the peels from the pan with a slotted spoon.

Then place the carrots ribbons out straight on a parchment paper lined baking sheet or jelly roll pan. Bake for 25 minutes. The carrots will begin to look translucent and be firm enough to hold a shape.

While the carrots are still warm work quickly to curl the carrot ribbons around a wooden spoon handle. You can adjust how tight you want the curls and sprinkle them with granulated sugar.

Now if you have never candied carrots before or you want to see how these cupcakes come together, then here is a short video clip that will make it easy for you to see how I decorated these cupcakes with a bakery styled finish.

So my hope is that when you cook or bake one of my recipes that you feel like you have a good friend in the kitchen cheering you on all along the way, whether you are an experienced baker looking for a new recipe or a new cook, who is wanting to learn baking techniques. I try to carefully write and photograph each recipe so you can confidently make any dish I share, but if you ever have a question just leave me a comment because I am always happy to hear from you and help you through any kitchen question.

I would also like to thank my Instagram friends, who helped me select the best picture to use this week. Sometimes a girl can get overwhelmed with too many photographs of cupcakes and it helps to get some outside perspective. Happy baking my friends!

You can find a printer friendly version of my cupcakes at this link to Tasty Kitchen.

An English Garden Inspired Table

My garden is still waking up from its brown winter slumber, but oh how I am looking forward to spring. This week the sun came out and gave us a taste of what is to come. Spring’s arrival brings one of the prettiest shows as bright green leaves appear and flowers begin to bloom. Longing for a little spring color, I saw a bouquet of bright pink ranunculus at the grocery store. Their layered petals and curvy stems brightened my day and made me think of a beautiful boxwood lined English garden, where these bulbs might grow.

The Chicago Botanical Garden’s English Garden in its full spring glory.

Easter is early this year so I thought I would share some spring grocery store blooms and an English garden inspired table. I let the colors of the flowers set the colors scheme. I have a double-sided table runner with two different blue and white patterns. I decided to use the side that has a chinoiserie garden toile. Then I set my table with blue and white dishes and then for a touch of spring I layered in some spring green napkins.

The spring green candles pick up on the green from my napkins and make a nice contrast to all the blue and white.

Next came the flower arrangements in green, white and pink. I decided to make five small arrangements that ran the length of my table like a long row of flowers in a garden.

The little ceramic bunnies are place card holder I found in the Target dollar bins last year and the eggs are from the decoupage project my girls and I made last week.

The arrangements may look fancy, but they were made with grocery store flowers. My local Jewel Osco has a pick three for twelve dollars section where you can mix and match your own bouquet. So I picked out some pink stock, ranunculus and Gerber daisies. Then I added in a small bunch of white hydrangea. I created five small arrangements in an assortment of vases I had in blue, white, and silver.

Here are the four flowers I selected and one taller bunch of greenery cut and ready for my arrangement.
I like to start my adding by hydrangea and taller central greenery first. Then I added my taller pink stock to balance that and then in front I added my Gerber daisies and ranunculus.
This is the finished larger arrangement that would work well in any vase with a tapered or more narrow neck.

Early spring may still be weeks away in Chicago, but if you are longing for a little color like me then a few grocery store blooms are sure to brighten your home and inspire a beautiful garden like table.

This Sunday I am sharing one of my favorite spring cake recipes along my first ever cooking video with some easy cake decorating tips so come back for all the fun.

Farmhouse Bread And The Joy Of Baking

Farmhouse Bread Recipe

There is nothing like the taste of homemade bread. The first time I tasted a slice was at my grandparent’s house. My grandmother’s friend Ernestine was a baker and when my family came in town to visit and she would stop by and bring us a loaf or two of homemade bread. Commercial grocery store bread can’t come close to the soft sweet taste of home baked bread. When I was in high school and learning to bake on my own I discovered a set of recipes in a little country farmhouse our family rented on a trip to Fredericksburg, Texas. The homeowners had a notebook that that was filled with wonderful family recipes. They looked promising so I copied down a number of them including this bread and the peach cobbler I have shared with you.

I had never made bread before I tried this recipe, but the recipe seemed simple enough, so one afternoon I decided to give it a try. I was amazed as the bread rose and turned a beautiful golden color in the oven. The recipe was wonderful and my first bread loaf came out every bit as good as I had imagined. This simple bread recipe was delicious and easy to make and that was all it took to get me hooked on baking bread. This first farmhouse bread recipe gave me to confidence to learn more and to try different and more elaborate bread recipes, but years later it is still one of my favorites.

Those of you who follow the blog know that my oven has had issues. So I am happy to report that after three weeks of trying to get parts for my discontinued oven and stove top the repairs have finally happened, hallelujah! So I am trying out my larger oven and making something I haven’t been able to successfully bake in it before, bread. I usually use a small convection oven I have for quick breads and muffins, but this yeast bread rises a bit higher than the capacity of that small oven so it has been a while since I have baked it. I decided there was no better way to give my newly repaired oven a test drive then with this reliable and favorite recipe.

Farmhouse Bread

  • 1 (1/4 oz) package of fast acting or rapid rise yeast
  • 1 1/2 cup warm water
  • 2 tablespoons granulated sugar
  • 3 tablespoons of Crisco vegetable shortening, cut into small pieces
  • 1 teaspoon of salt
  • 3 cups all purpose flour plus 1/4 to 1/2 cup of additional flour to dust and kneed into your dough

First, stir your sugar into your warm water in a small bowl or measuring cup. You want your water to be lukewarm (about 110 to 115 degrees). If your water is too hot it can kill the yeast.

Next empty your packet of yeast into your sugar water and stir it just slightly. Then let it sit for 5 minutes, so the yeast has time to begin to grow.

This is the yeast after sitting for 5 minutes.

Meanwhile in a large mixing bowl mix together 3 cups of flour and 1 teaspoon of salt. Then when the yeast has rested pour it in and add in your pats or pieces of shortening. Use a rubber spatula or spoon to bring your dough together.

Here is the bread dough’s it is coming together and ready to knead.

Then take your dough and place it on a lightly floured surface. Then lightly coat your hands in flour and begin kneading your dough for ten minutes. You will need to add in 1/4 to 1/2 a cup of flour as you work your dough to keep it from sticking to your cutting board or countertop.

Here you can see the extra flour I added early in the kneading process.

You will begin to feel the dough get firmer and more elastic as you knead it. Then after you have kneaded your dough shape it into a round ball.

This is the bread dough before it rises.

Then take a large mixing bowl and lightly spray the inside of the bowl with cooking spray.  Put your dough inside and then flip your dough over to coat the top with just a bit of cooking spray this will keep it from sticking to anything as it rises. Then cover the top of your bowl with plastic wrap or a clean kitchen towel.

You can see the dough has risen.

Let your dough rise in your kitchen for 30 minutes. If it is cold in your house or you live in Chicago in February like me, then preheat your oven to 350 degrees and put your dough on top of your stove. It will warm your kitchen and your yeast will happily rise.

Then knead your bread for another 2 to 3 minutes and then let it rise again for another 30 minutes.

After this second rise take your dough out and knead it slightly to shape your loaf. then place your loaf in a 9x5x3 inch pan that is sprayed with cooking spray.

When shaping your loaf fold the ends over so you have pretty smooth sides on your loaf.
This is a view of the top of the loaf before it has risen for the last time.

Then cover your loaf pan and let it rise for 20 minutes until your dough rises to fill the base of your pan.

You want your bread to rise till it just hits the top of your pan. then it is ready to bake.

Bake your bread at 350 degrees for 35 minutes until the top of your loaf is golden and the top sounds hollow when you tap on it.

This farmhouse bread is easy to make. It has just six ingredients and it requires no fancy equipment. It’s a simple loaf but the heavenly smell coming from your oven and the taste make it worth the little bit of time it takes. If you have never made bread before then this is your recipe and if you are feeling nervous the step by step pictures will help you all along the way. There is something so gratifying about kneading and baking your own loaf of bread. It’s one of those things to try because in a busy world of quick food it’s nice to slow down and make something home baked and delicious.

This recipe makes one loaf but you could easily make a second batch that you let rise and bake at the same time. This farmhouse bread would also make a great gift when wrapped in a pretty towel or placed in a basket with a good jar of jam.

Rainy Day Fun: Decoupage Easter Eggs

“Arts and crafts keep you sane.” Mary Engelbreit

There is nothing like getting lost in a great art project. We have had a bit of cabin fever in our house with all of the snow we had recently. However, this week brought some warmer temperatures and a little rain. It’s been weeks since we have seen our lawn and the rain helped thaw our yard. Seeing bits of green has me looking forward to spring. This past Monday was a school holiday so we put on our rain boots and headed out to the craft store to find a rainy day project.

My girls are getting old enough to notice that in our house we are always celebrating and looking forward to the next holiday or season. When Valentines Day was over this year my little one began asking what was next, so we talked about Easter. We were in the car on the way home from school and she wanted to start decorating for Easter immediately. She was excited as I pulled the box out of the basement because she wanted to help me hang the Easter garland. I have a set of vintage styled eggs I made a few years ago that look like a set my grandmother made.

If you want to try another Easter egg project then here is the link to this Easter garland project.

Since we have been decorating for Easter in our house, I thought my girls might have fun painting some eggs. While we were in Michaels I spotted these white plastic eggs and I began thinking that my girls might like to make some decoupaged eggs so we got a jar of Mod Podge glue as well.

The project was a huge hit in our house. My girls were so pleased with their eggs that I thought I would share some pictures and a few tips.

We used a matte finished Mod Podge and a small paint brush to create these eggs.

First, we painted our eggs with a water based milk paint that I had from a previous project, but you could use an acrylic craft paint as well. These plastic eggs were easy to paint, the only hard part for my girls was waiting for them to dry. Then I used a small scale floral wrapping paper I found at Marshals and we cut out some flowers and leaves. My girls needed a little help with the detailed cutting of the leaves, but my oldest would start the cutting out the roses and I would finish it.

We added our largest flower or flower group first and then cut out smaller leaves to fill in the other spaces.

Then the trick to attaching the flowers is to be generous with the Mod Podge. Use a paint brush to paint some glue on the back of the cut out. This will help soften the paper and make it easier to apply and bend the cut out to the shape of your egg. Then brush more Mod Podge on top and use your fingers if needed to smooth out any bumps or loose edges. Then keep layering on your flowers or pattern until you are happy with the look.

We used an egg crate to let them dry. Here is a close up of the different flower designs we made

Then when all your paper pieces are in place seal the entire egg with one last even coat of Mod Podge. The Mod Podge will be white in color when it goes on, but it will dry clear.

A close up of the final finished egg.

Finally, to finish off our floral eggs I added some gold dots with a paint pen once the eggs were dry.

Here you can see a dry egg and one that is still wet with a final coat of Mod Podge.

Then to add some variety we made some gold polka dot eggs using another wrapping paper I had from Target that had gold dots. We used the same technique to attach them to these eggs.

Here are our English garden inspired eggs, but if florals aren’t your favorite pick another small scale pattern to create your own.

These decoupage eggs were fun. My daughters were all smiles making these eggs and I love how they came out. This was one of those projects that I made up as we went along, but the end result was so pretty that I think I am going to use them to decorate our Easter table this year. So if you are looking for an easy spring art project then give these decoupaged eggs a try. You can use any wrapping paper, newsprint, sheet music or paper napkin design you want to embellish your own custom eggs.

Contact Us