Apple Cider Donut Cake with Mascarpone Buttercream

Apple cake with cream cheese frosting

You can’t live in the Midwest and not fall in love with fall.  The first crisp blue skied day of the season has me longing to be outdoors. I grew up in South Texas where changing leaves and apple trees were things I only experienced in glossy magazines, tv shows and movies.

It wasn’t until our family moved to Chicago that I really experienced fall in its full technicolor glory. A few years ago friends invited us to go apple picking. One trip to the orchard and I was smitten. Is there any better way to spend a day? Our family walked and talked as we navigated the seemingly endless rows of trees. We picked, sampled and marveled at the all the different types of apples. And for a moment it seemed as if all the noisiness and worries of the world just disappeared. When our sacks were heavy and filled to the brim we made our way back to the barn to pay for our apples and head home.

Our apple picking adventures this year.

Now every year no matter how busy or schedules get we clear a day to go out to our favorite orchard because we all love picking apples together. So this year I decided to create a nostalgic cake apple cider donut cake that has all the flavors of a midwest fall.

What a lovely way to spend an autumn day.

Apple Cider Donut Cake

  • 2 cups flour
  • 1½ cups sugar
  • 2 teaspoons baking powder
  • 1 teaspoon cinnamon
  • 1/2 teaspoon ground ginger
  • 1/4 teaspoon all spice
  • 1/2 teaspoon kosher salt
  • 1 large egg
  • 1¼ cup apple cider (Martinelli’s or another all juice based cider)
  • 2 tablespoons butter, melted
  • 2 teaspoons vanilla extract

Preheat the oven to 350 degrees.

Prepare two six inch cake pans by lining the bottom with a parchment paper circles and then spray the sides and bottom with Baker’s Joy, flour based cooking spray

In a large bowl whisk together the dry ingredients: flour, sugar, baking powder, cinnamon, ground ginger, allspice and salt. Then add in your apple cider, melted butter and egg. Whisk the cake bater with a fork until it is well combined.

Evenly split the batter between the two cake pans.

Bake the cakes in the center rack of the oven for 35 minutes. Let the cakes cool before making the cinnamon sugar topping.

Cinnamon Sugar Topping

  • 1/2 cup sugar
  • 1 teaspoon cinnamon
  • 3 tablespoons butter melted

In a shallow bowl or plate mix together the cinnamon and sugar. Then melt the butter in a small bowl. Using a pastry bush coat the flat bottoms of the cake and sides with the melted butter and then dip or sprinkle the buttered sides and tops with the cinnamon sugar mixture.

Next make the mascarpone buttercream.

Mascarpone Buttercream

  • 2 sticks of unsalted butter
  • 1/4 teaspoon of salt
  • 1 teaspoon vanilla extract
  • 4 cups powdered sugar
  • 3 tablespoons milk
  • 1/4 cup mascarpone cheese

Use a stand mixer or a large bowl and a hand mixer to beat the butter and salt together on medium for 2 minutes. Scrape down the sides of the bowl and add the vanilla, powdered sugar and milk. Beat the buttercream on medium speed for another two minutes and then scrape down the sides of the bowl. Add in the mascarpone cheese and mix it in on low speed for just under a minute. You don’t want to over beat the mascarpone cheese.

Prepare a pastry bag with a coupler and a large star tip. Put the bag in a large drinking glass to hold it open while you fill the bag with buttercream. Place the flat cinnamon sugared sides up and pipe stars on the top of one of the cakes. Then layer the second cake on top and place it on a plate or serving dish.

Finish the cake with tall swirls of buttercream and sprinkle with cinnamon sugar. This cake can sit out for a few hours but it does need to be refrigerated. When serving allow it to come to room temperature.

Apple Cake with Mascarpone Frosting

The only thing better than apple cider donuts is apple cider donut cake because the mascarpone buttercream takes it to a whole new level of deliciousness. My daughter Gabriella says that the buttercream is tastes like “it’s been kissed by angels.” So you don’t just have to take my word on this on. This spiced apple cider cake is one scrumptious cake.

When Lucullus Cooks for Lucullus: Parma Ham and Provolone Pastries

My grandfather was a Frenchman who instilled in me a deep appreciation for food. He wasn’t much of a cook, but he loved to eat. When you dined with him, food was something to be savored and talked about.

Thus, it’s fitting that the story I recall him telling time and again was about Lucius Lucullus a celebrated Roman general and bon vivant. Lucullus was known for his extravagant parties. However, on a rare night when he found himself dining alone, his staff assumed he would want a simple meal. So, his cooks were surprised when he asked for the finest food. They questioned him.

“Why would you want all of this if you are dining alone?”

“Alone?” Lucullus, declared. “Why tonight, Lucullus is dining with Lucullus.”

As a kid, I loved hearing the way my grandfather told it. At the time I took it to mean that dinner is an event to be celebrated. However over the years, I have found a deeper appreciation for why he shared it with us.

Recently, while reading a copy of M.F.K. Fisher’s An Alphabet for Gourmets. I was surprised when I saw the same tale of Lucullus mentioned in her chapter entitled “A is for Dining Alone.” Her perspective on the tale was about dining in restaurants. She originally wrote the piece in the late 1930s when women could be looked down upon for eating out alone. So I was thrilled to hear her thoughts about the story and its enduring message.

Nevertheless , I always remember my grandfather telling me the story when he was in his kitchen or talking about buying himself some wonderful French cheeses. So, I have always associated it with cooking. Because cooking for yourself is a powerful act of self-love. While it’s certainly wonderful to cook for others, there is a certain “je ne sais quoi” to making something you love just for yourself.

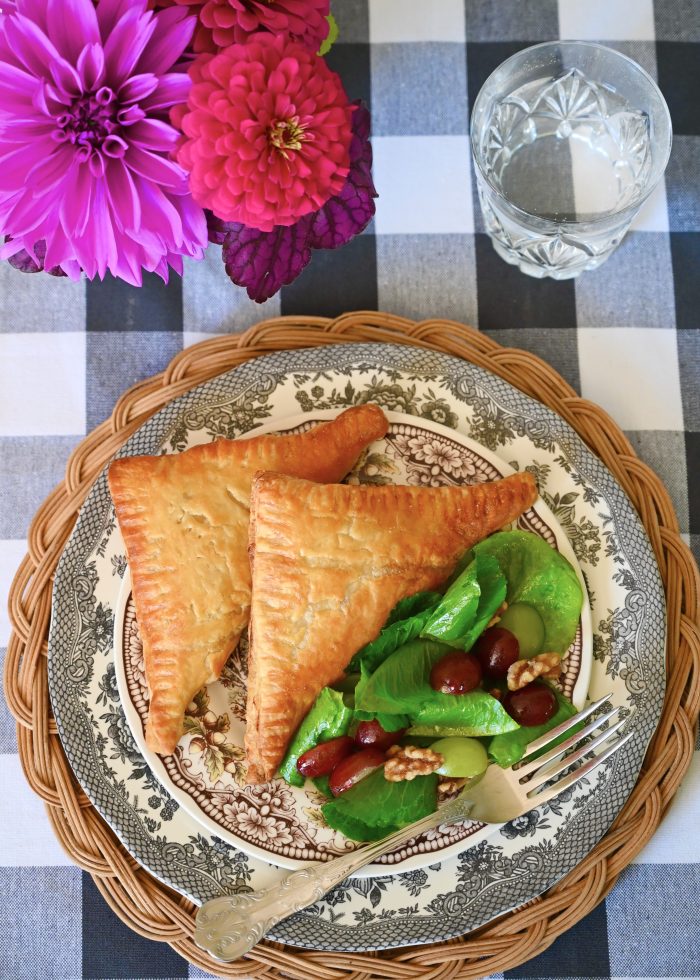
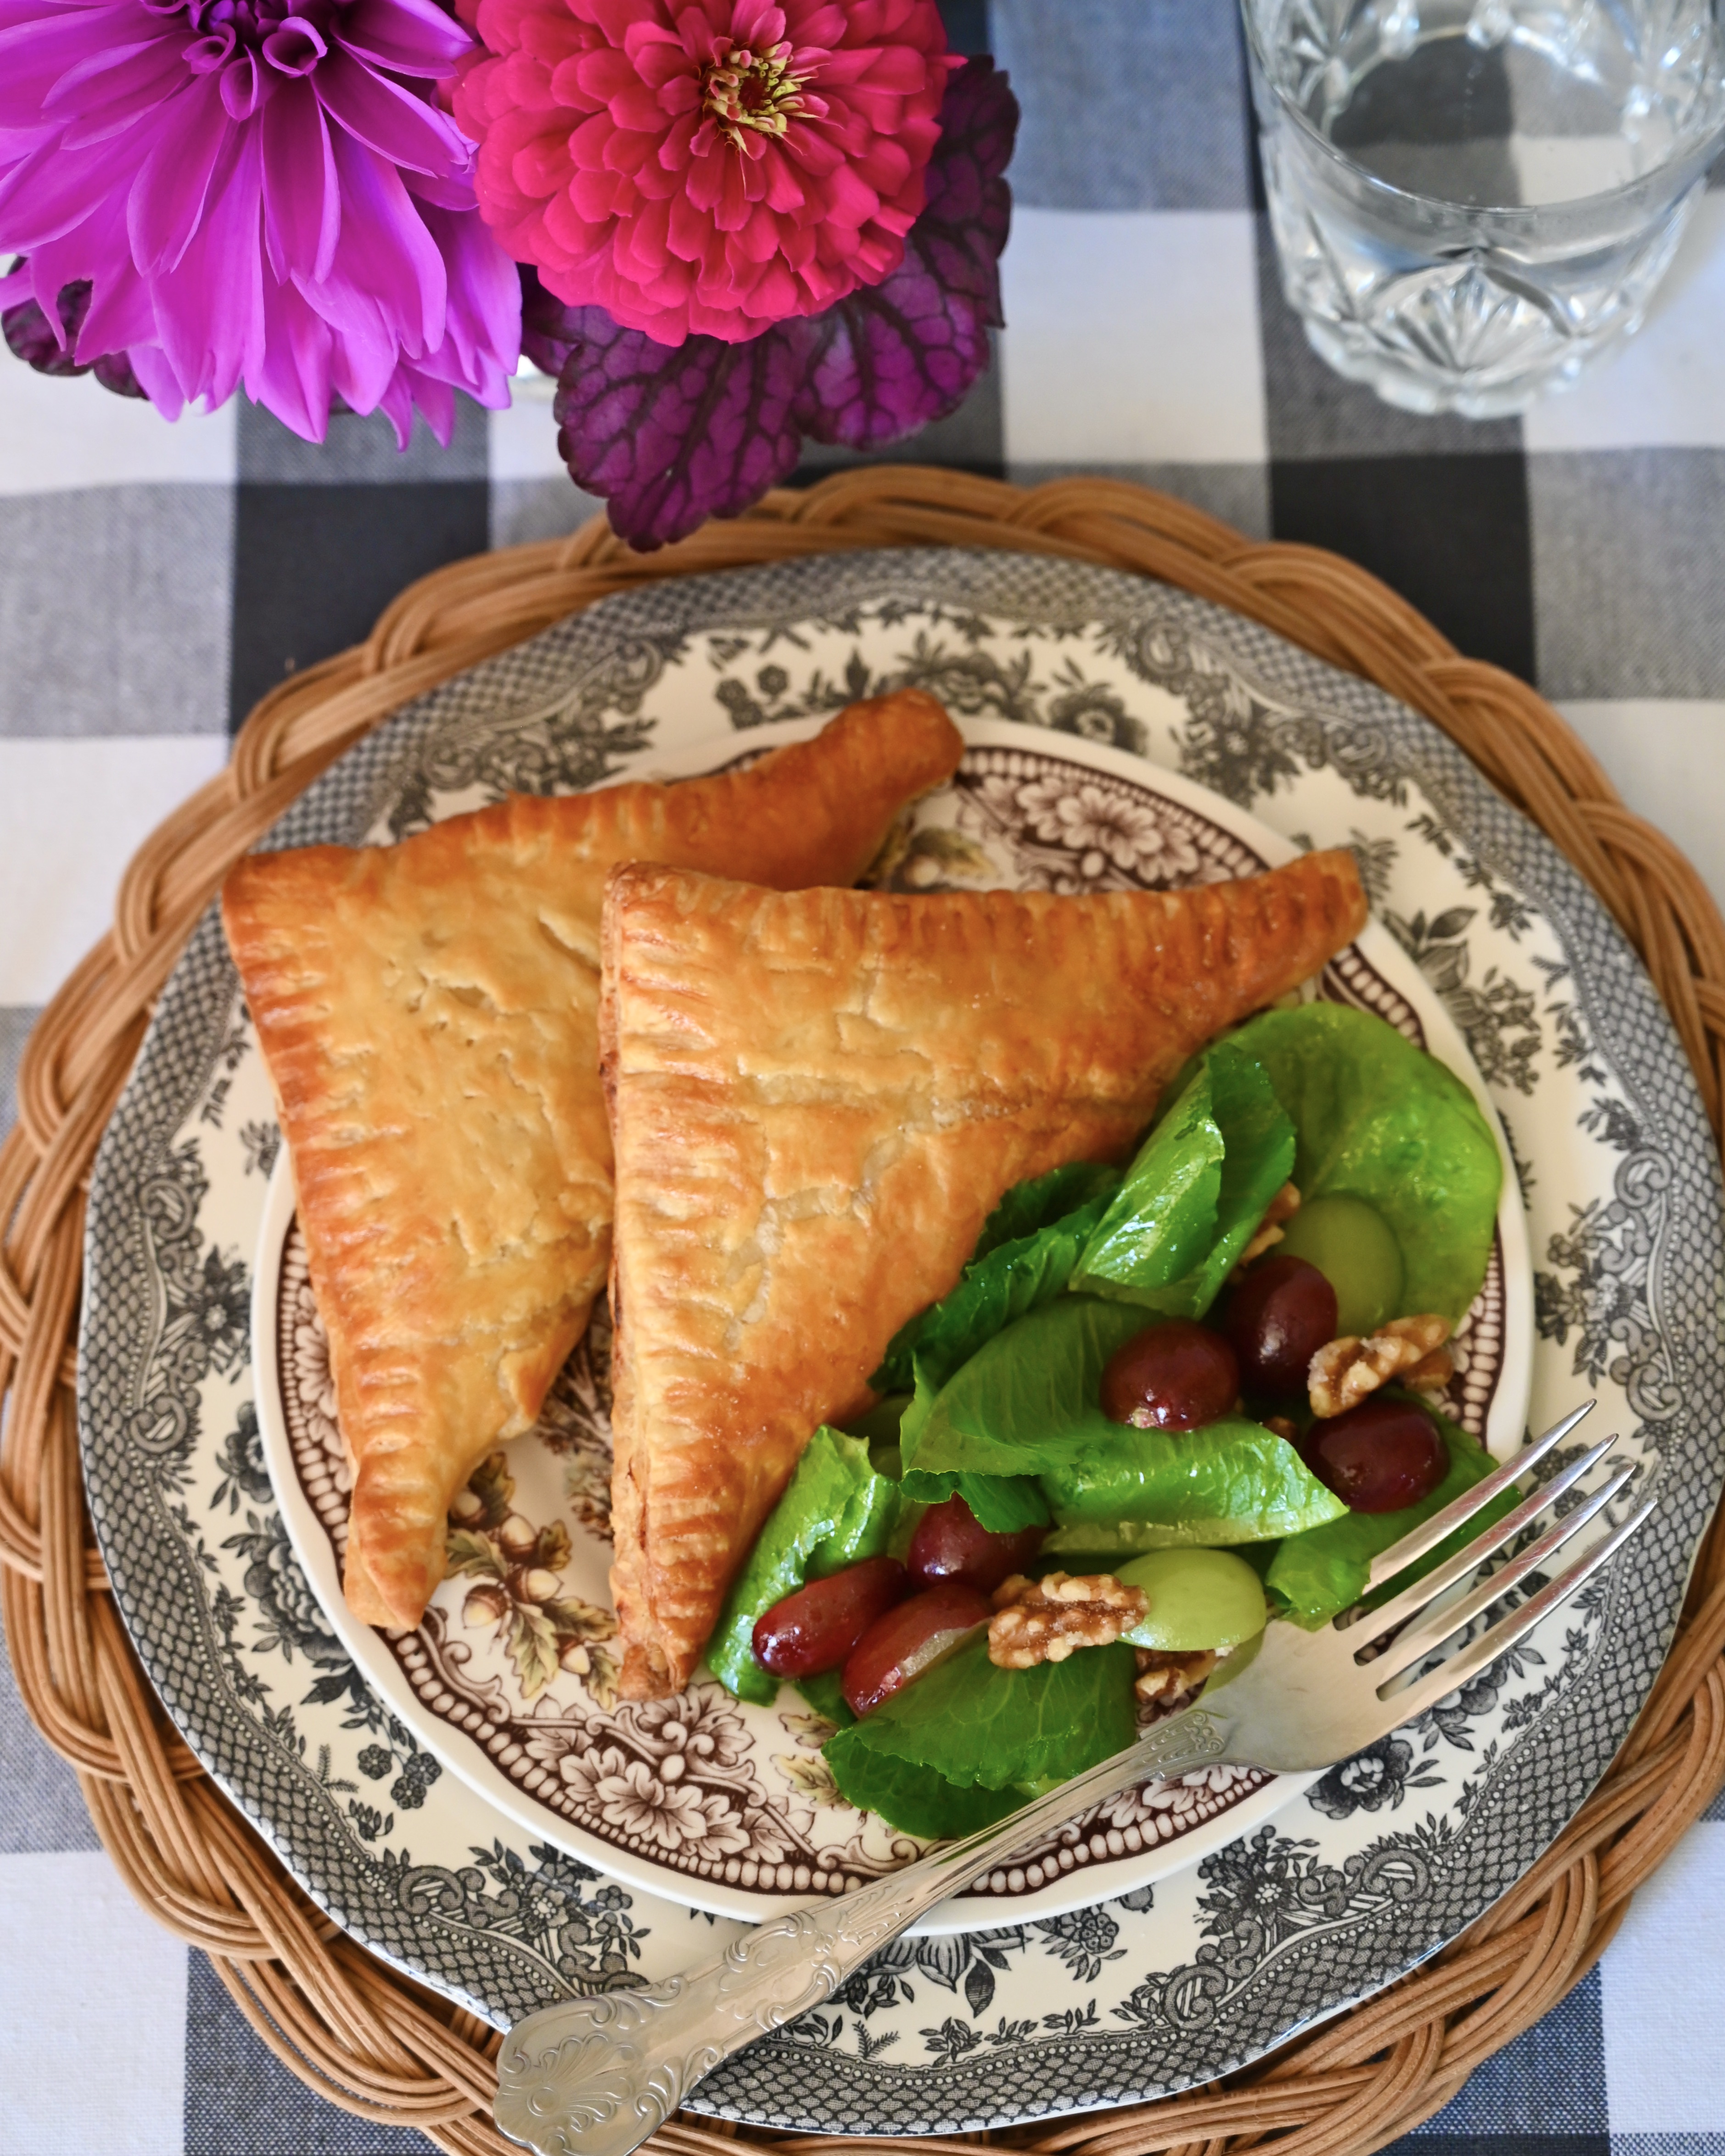
Now when I find myself alone in the kitchen or cooking for just my daughters, I think of Lucullus and seize the moment to make what I adore. So, the recipe I thought I would share is one that I make for myself, a Parma Ham and Provolone Pastries. The puff pastry makes it decadent, but it’s easy to put together. I like to serve it with a simple grape salad with a champagne vinaigrette. It’s a meal I find worthy of those nights when “Lucullus is dining with Lucullus.”

Parma Ham and Provolone Pastries

  • 1 (17 oz) package of frozen puff pastry, defrosted
  • 2 to 3 tablespoons Dijon mustard
  • 4 slices of Parma ham or prosciutto cut in half
  • 8 slices of provolone cheese slices
  • 1 large egg
  • 1 tablespoon water

Preheat the oven to 375 degrees.

First, on a floured surface or silicone baking mat roll one sheer of the puff pastry to a 12 by 12 inch square

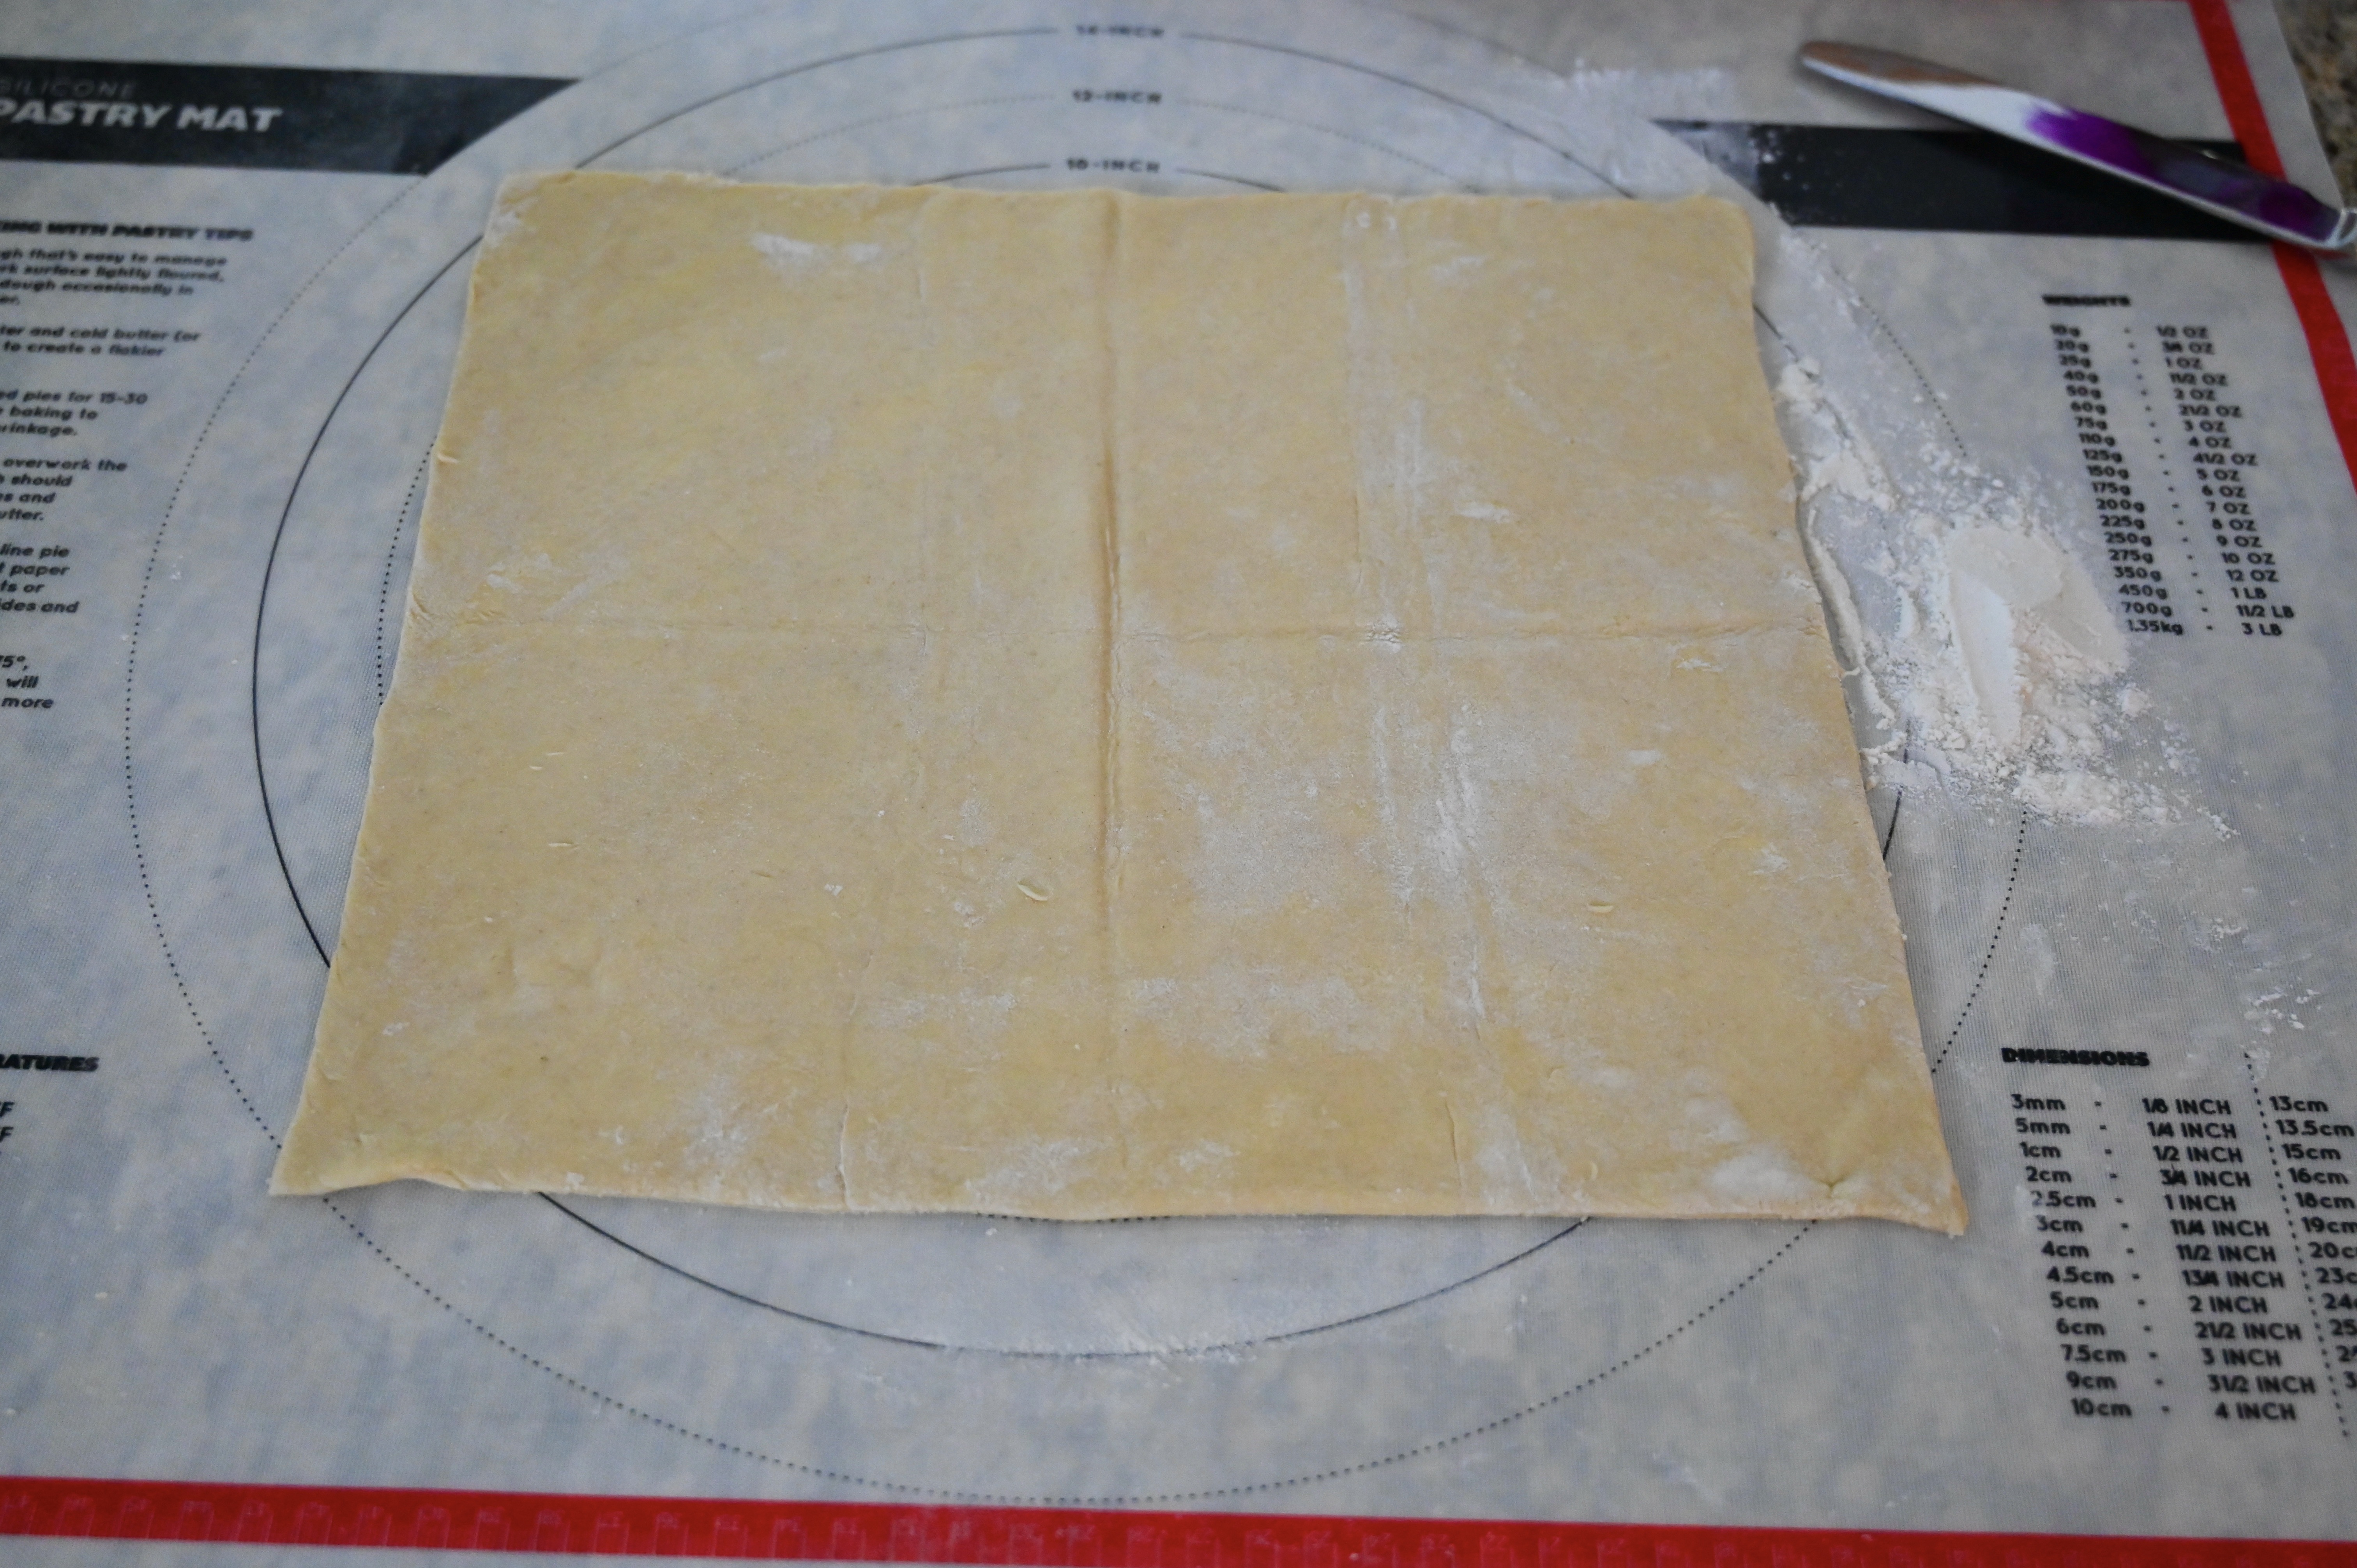
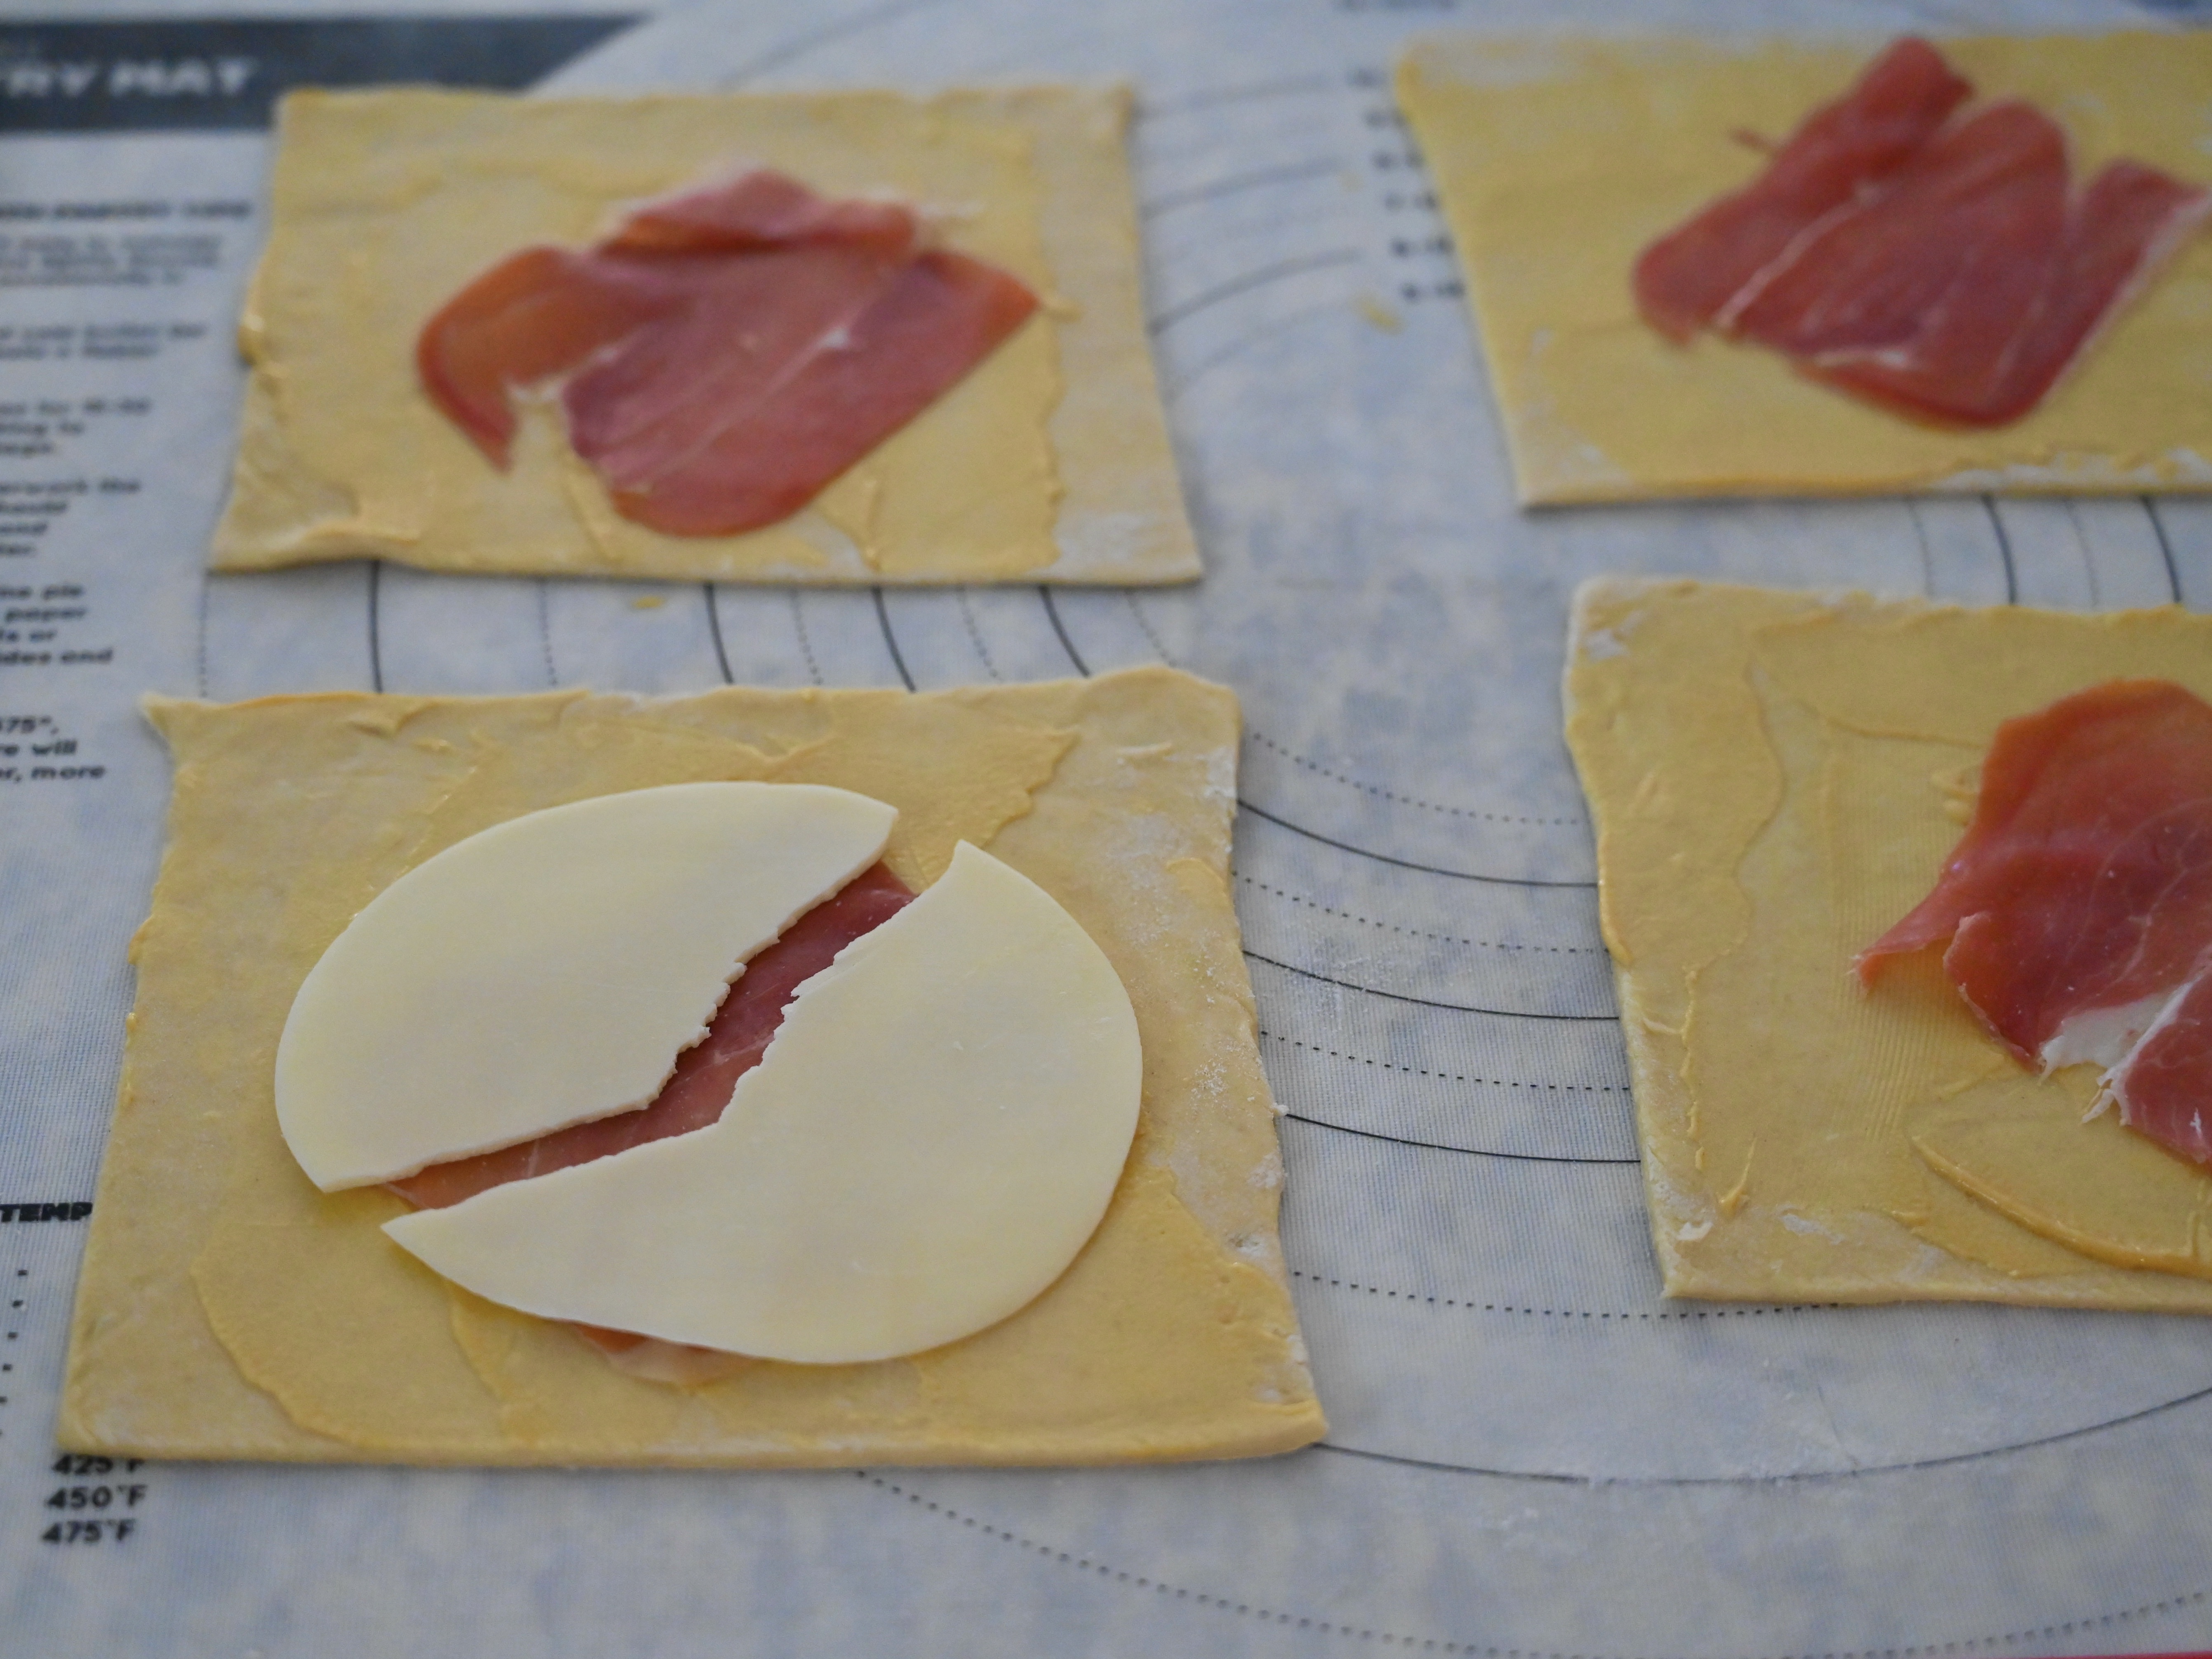
Then cut that square into four smaller squares. Lightly spread each pastry square with Dijon mustard. Next top the center of the pastry square with a half a slice of Parma ham and a slice of provolone cheese that has been torn or cut in half. I cut the cheese so it can easily be folded over in the next step.

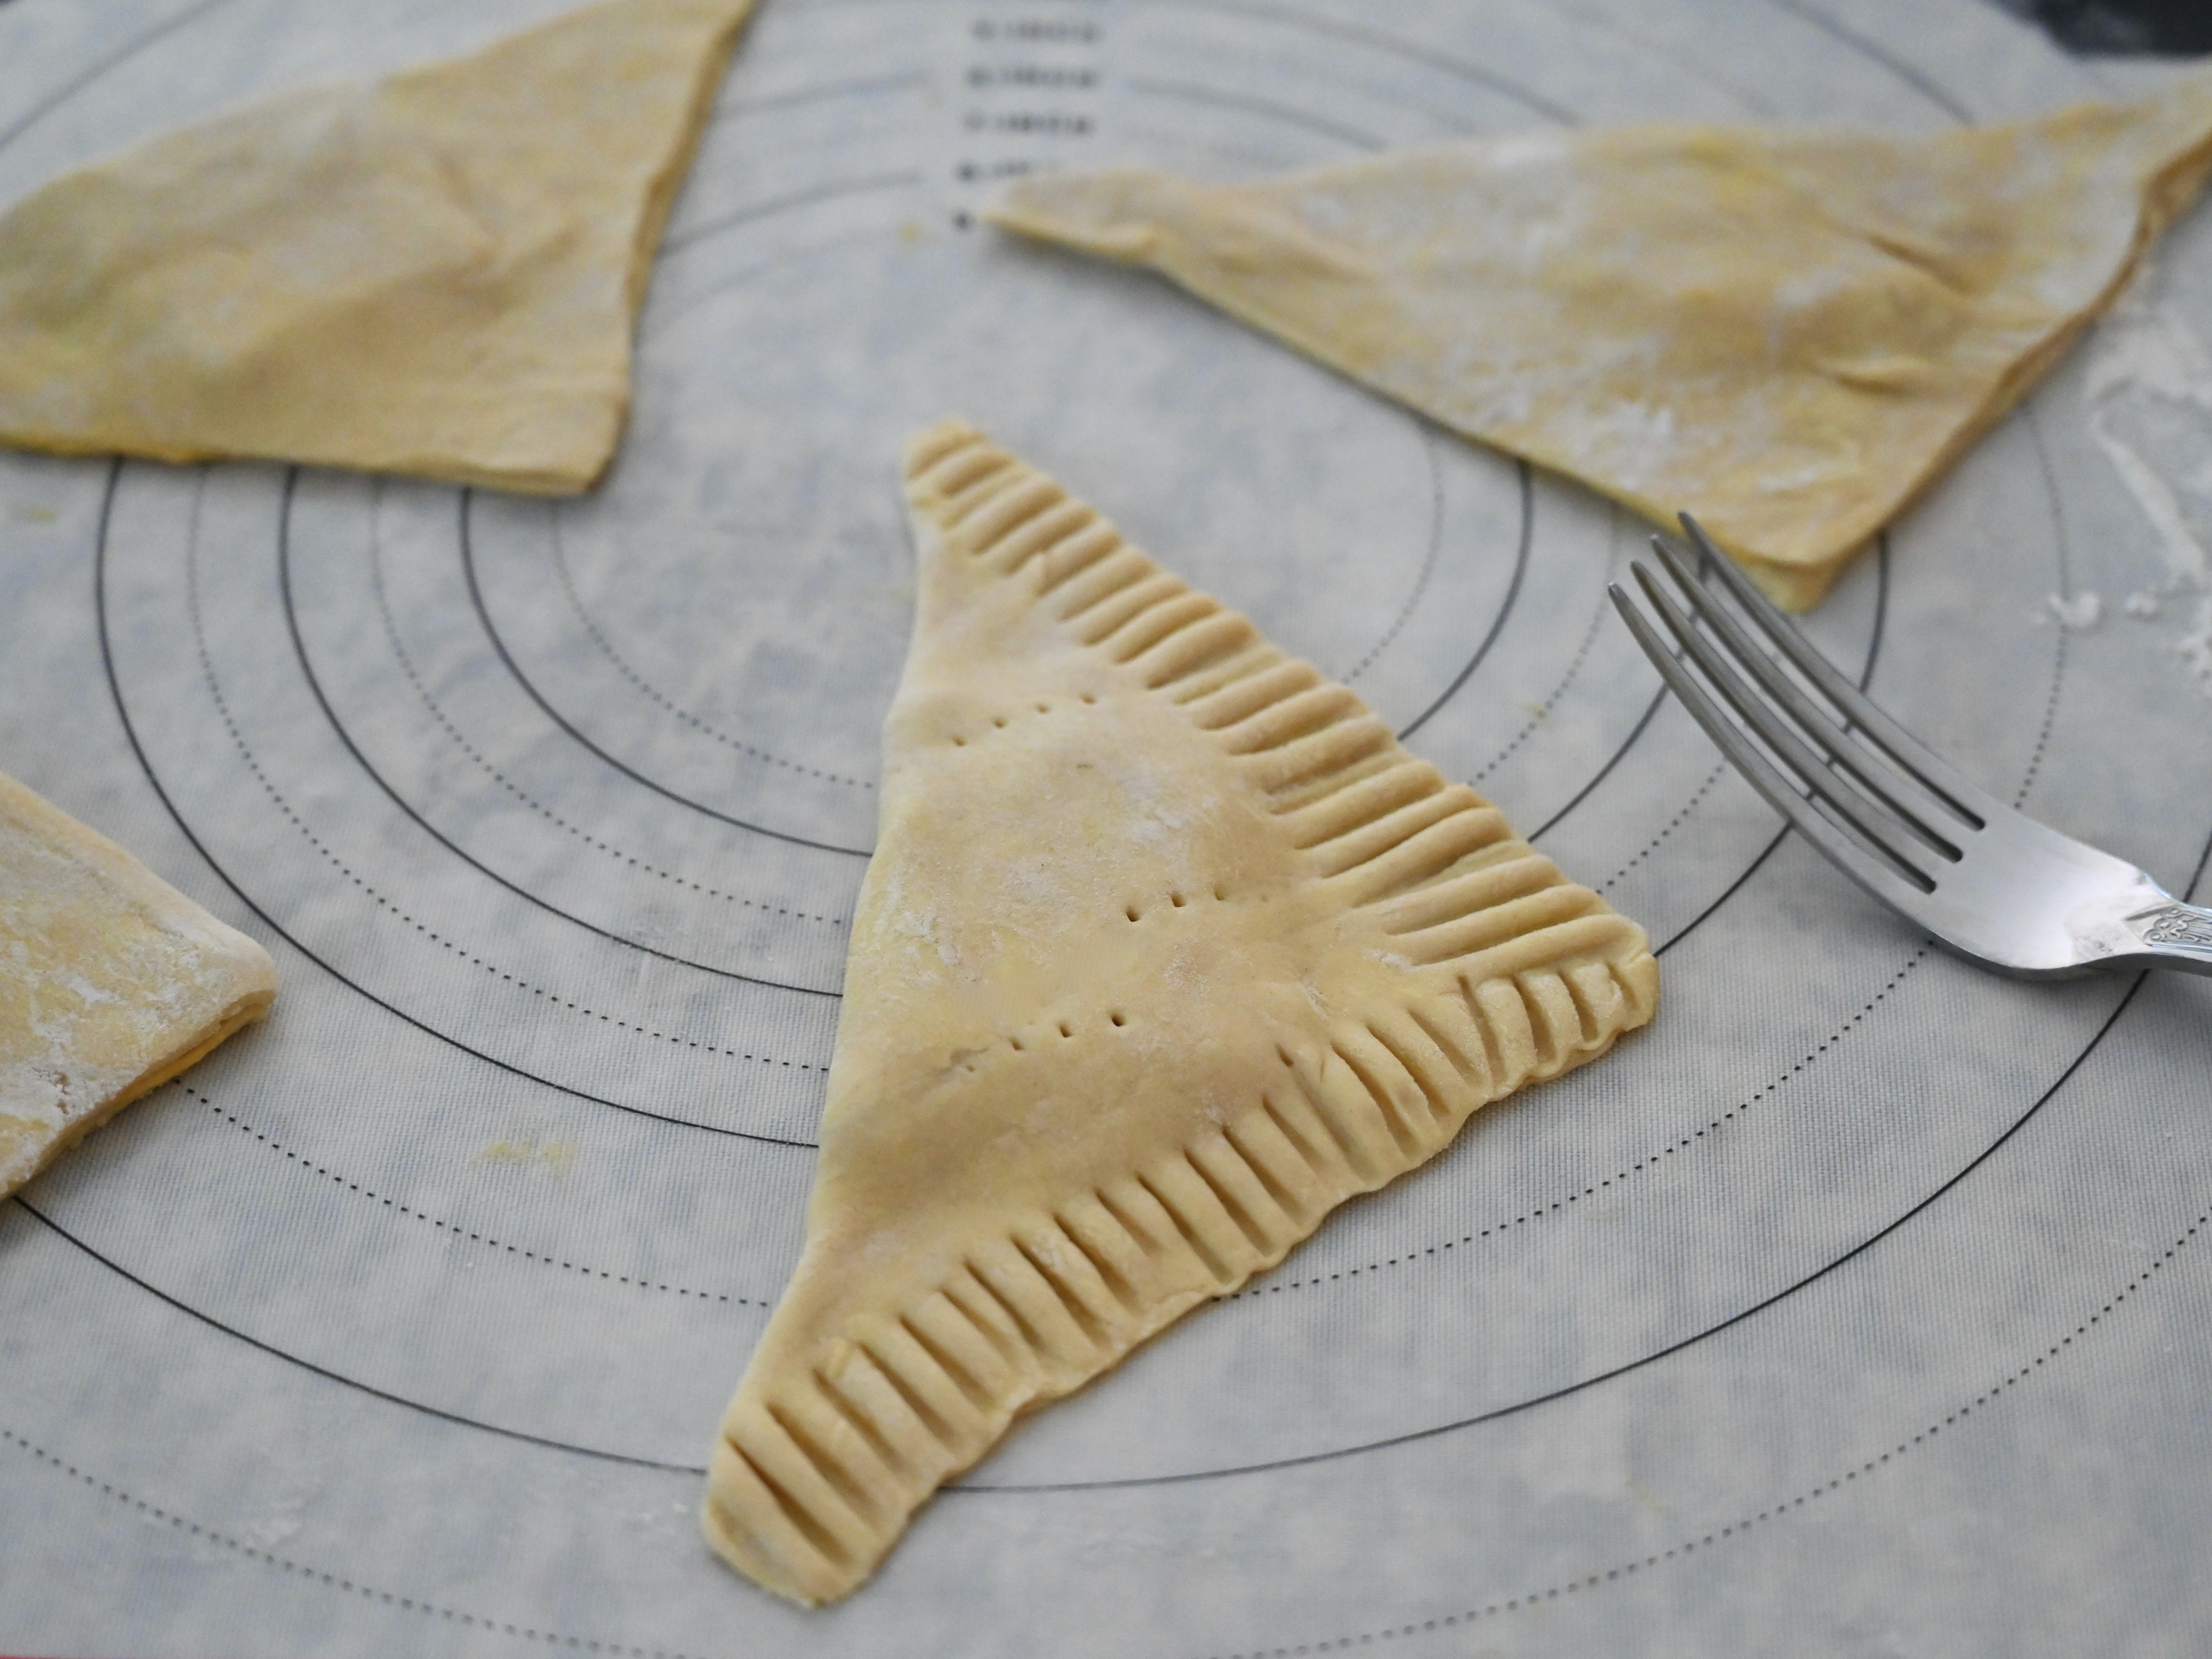
Then fold in half diagonally to create a triangle and crimp and seal the edges of the pastry with the tines of a fork. Then create a few steam holes by pricking the top of each triangle with the fork 2 or 3 times. Repeat this process with the remaining sheet of puff pastry.

Next, make an egg wash. In a small bowl whisk together 1 egg and 1 tablespoon of water. Brush the egg wash on top of the pastries right before baking. Bake on baking stones or a sheet pan lined with parchment paper for 15 to 20 minutes until golden brown. Meanwhile, while the Parma ham and provolone pastries are baking make the salad.

Grape Salad with Champagne Vinaigrette

  • 1/2 cup walnut or pecan pieces
  • 3 tablespoons sugar
  • 1 cup red or green seedless grapes
  • 1 (4.5 oz) package baby romaine lettuce

First make the candied nuts. In a small skillet place the sugar and the nuts over medium heat. Keep a close eye on it and stir with a rubber spatula as the sugar melts and coats the nuts. Remove the nuts from the pan immediately and place them on sheet of aluminum foil or parchment paper to allow the nuts to cool.

Next, slice the grapes in half and chop the lettuce into bit sized pieces. In a medium bowl gently mix together the, lettuce, grapes and nuts. Add the salad dressing to taste. See recipe below.

Champagne Vinaigrette

  • 2 teaspoons Dijon mustard
  • 3 tablespoons champagne vinegar
  • 1 tablespoon granulated sugar
  • ¼ teaspoon salt
  • 1/3 cup vegetable oil

In a small mixing bowl whisk together the Dijon mustard, champagne vinegar, sugar and salt. Then slowly drizzle in the oil while continuing to whisk it until the salad dressing emulsifies.

So set the table with your favorite flowers and a beautiful plate. Most importantly, take time to cook what you love, because life and dinner are worth celebrating!

Reading and Eating: Paul Hollywood’s Ginger Snaps

Chewy Ginger Cookie Recipe

I love a good weeknight dessert recipe. A simple recipe with good ingredients that I can bake and share my family. I was looking for new everyday dessert recipes at my library, when I came across Paul Hollywood’s Bake My Best Ever Recipes for the Classics. True to its title, the book is filled classic bakes from cookies and scones to breads and pies. However, what surprised me about this book is how many of the recipes are relatively quick bakes that could easily be made at home.

The first recipe I tried was the lemon drizzle cake which is baked in a loaf pan and then drizzled with a lemon juice syrup. It was light sponge cake with a bright lemon flavor. My husband especially loved this cake because it wasn’t overly sweet. I will definitely be baking this cake again.

I also made the chocolate macarons with my ten year old daughter in honor of the Paris Olympics. The ganache filling was exceptionally good. However, when making the macarons I recommend using extra-large eggs. Hollywood’s recipe calls for large eggs, but my meringue mixture was a little dry. This made my piping not quite as neat as I would have liked, but they were still delicious. I think with this small change they would be even better.

However, the gold medal winner and the recipe that everyone in our house adored was the ginger snap cookies. Hollywood says the recipe is his Mom’s and it was one of his childhood favorites. He says they were so good they would disappear before there was even a chance to place them in the cookie jar. After making them I understand why. These cookies are chewy, gingery and oh so good!

They have just six ingredients, so they are simple to make. The key to these irresistible ginger snaps is Lyle’s Golden Syrup. It’s a British import, but I’ve had good luck finding it in my grocery store baking aisle next to the molasses. So if you are looking for a good cookie to share then you need to try these ginger snaps.

Paul Hollywood’s Ginger Snaps

  • 7 tablespoons butter, softened
  • 1/2 cup sugar
  • 2 teaspoons ground ginger
  • 1 1/2 cups all purpose  flour
  • 1/2 teaspoon baking soda
  • 1/3 cup Lyle’s Golden Syrup

Preheat the oven to 375 degrees.

Using a stand or hand mixer cream together the butter and sugar. Then add in the ginger, flour, baking soda and Lyle’s syrup. Mix until the dough fully comes together.

Then scoop the cookies into even balls and lightly press the dough balls so you create little discs. I used a large cookie scoop that holds 3 tablespoons of dough. I was able to make 10 cookies.

Then refrigerate the cookie dough for about 30 minutes before baking.

I like to bake cookies on baking stones which I leave in my oven as it preheats. Baking stones are wonderful because when seasoned they are nonstick and my favorite for even baking. If using a sheet pan line it with parchment paper and bake the cookies for about 8 minutes if you want a softer and chewier cookie and 10 if you would like them to have a crispier snap.

I have truly loved this cookbook. Although I discovered it at my library, I am purchasing a copy to keep in my collection because I have thoroughly enjoyed baking from it. I can’t wait to try his recipes for a Sticky Ginger Loaf Cake, Almond and Orange Biscotti, Meat and Potato Hand Pies and his legendary Queen approved scones. They all sound so delicious. So if you too are looking for some weeknight baking ideas, then try my new favorite chewy ginger snap cookies and check out Paul Hollywood’s book, Bake.

Lemon Cheesecake Bars

Lemon Cream Cheese Bars

My lemon cheesecake bars are sweet, cool and irresistibly good on a warm summer day. The citrus flavor from fresh lemon juice and curd sings when paired with cream cheese and a crisp vanilla cookie crust. This recipe uses store-bought lemon curd, cream cheese and sweetened condensed milk as its base so it’s simple to make. It can be made ahead and is delicious with a swirl of whipped cream.

My husband and oldest daughter both love cheesecake, while my younger daughter and I are more partial to lemon desserts. So there’s something for everyone in our family to love about this new recipe. These bars are lighter than a traditional cheesecake with the all the bright citrus flavor of a lemon tart.

Lemon Cheesecake Bars

Vanilla Cookie Crust

  • 2 cups Nilla wafer crumbs
  • 1 stick of butter melted
  • 1/4 cup of powdered sugar

Lemon Cheesecake Filling

  • 1 (8oz) plain cream cheese bar, room temperature
  • 1  (14 oz) can sweetened condensed milk
  • 1/2 cup lemon curd
  • 3 teaspoons lemon zest
  • 1/4 cup lemon juice
  • 1/2 cup whipping cream

Whipped Cream Topping

  • 2 cups whipping cream
  • 4 tablespoons powdered sugar
  • 1 teaspoon vanilla extract
  • 1 lemon for decorative slices

Preheat the oven to 350 degrees

Then line a 8×8 baking pan with parchment paper and the lightly spray it with butter flavored cooking spray. The paper will make it easy to lift the bars to of the pan so they can be cut and decorated.

I cut two pieces of parchment paper to line the pan so all sides were covered. I left the paper a bit longer than the sides pan so I had a handle to later lift the bars from the pan.

Take the Nilla wafers and place them in a food processor and pulse until they are fine crumbs or alternatively place them in a large zip top bag and crush them with a rolling pen.

In a medium sized bowl mix together the Nilla wafer crumbs, powdered sugar and melted butter. Spread the cookie crumb mixture evenly in the bottom of the square baking dish. Bake for 8 to 10 minutes until golden. Allow the crust to cool while making the cheesecake filling.

In the bowl of a stand mixer or in large bowl with a hand mixer cream the cream cheese on medium speed for a minute. Add the condensed milk and lemon curd and lemon zest. Add the lemon juice a little at a time. Continue to mix on medium until they come together. Then add the whipping cream. Beat on high speed for about 5 to 6 minutes or until the mixture thickens.

Pour the lemon cream cheese filling on top of the cookie crust and spread evenly with a separated spatula or butter knife. Let the cheesecake bars chill in the fridge for 3 to 4 hours before cutting.

Once the bars have chilled lift the dessert out of the pan using the parchment paper. Cut the dessert into 2½ inch squares.

Next make the whipping cream using a stand or hand mixer. In the bowl of the mixer add the whipping cream, powdered sugar and vanilla. Whip at high speed until stiff peaks form.

Using a piping bag with a large star tip decorate the tops with decorative stars or swirls of whipped cream. Then top with lemon slice twists and lemon zest sprinkles.

Lemon Cheese Cake Bars

These cool and creamy lemon cheesecake bars make a wonderful summer treat. The whipped cream swirls make them as pretty as a patisserie tart, but they would be just as delectable with even layer of whipped creamed spread on top.

Chicken Milanese with a Green Apple, and Parmesan Salad

“What would you serve the president if he or she came to dinner?” This is the hypothetical question my husband likes to ask me every so often at dinner. Perhaps a poached pear salad and beef tenderloin. My answer changes with the season and who is currently in office.

Nevertheless, the question reminds me of a famous scene from one of my favorite movies Pixar’s Ratatouille. Remmy, the rat and chef behind the restaurant’s new found success has to decide what he will make for the much feared restaurant critic Anton Ego. His daring choice, ratatouille, a French vegetable dish with eggplant and tomatoes is questioned by others. However, one bite leaves Ego smitten because it takes him back to his family’s dinner table. It was his childhood favorite. So, I believe that knowing what a person loved as a kid could help you decide what to make.

I love reading about what inspires other cooks and learning if there is a childhood meal they still love and make for themself. My childhood favorite was breaded chicken cutlets. They were always my choice for my birthday dinner as a kid. So, when I went out for my birthday a few weeks ago I happily ordered the chicken Milanese and savored every bite.

Still thinking about that crispy birthday chicken days later, I decided to create my own ultimate version of the dish. I wanted to create a crispy and tender chicken so I used buttermilk and eggs with a panko and fine breadcrumb mixture. I also decided to tweak the traditional arugula salad. My recipe has a tangy green apple salad with a Dijon vinaigrette and toasted walnuts. The salad is a new favorite that I had been working on but the flavor combination with the crispy chicken is divinely good.

Chicken Milanese- Serves 4 to 6

  • 3 chicken breasts, slice into cutlets
  • 1½ cups flour
  • 3 large eggs
  • 1 tablespoon Dijon mustard
  • ½ cup buttermilk
  • 1¼ cup fine plain breadcrumbs
  • 3/4 cup Panko breadcrumbs
  • 4 tablespoons butter
  • 6 tablespoons olive oil
  • 1 lemon cut into thin slices

Preheat the oven to 350 degrees.

First, prepare the chicken breasts by slicing them in half horizontally to create cutlets. Place the chicken on a cutting board and put a sheet of plastic wrap over it. Then pound it with a meat hammer until it is about ½ inch thick.

Next bread the chicken. Prepare three shallow dishes with the breading ingredients. In the first bowl place 1½ cups flour. Whisk together the eggs, Dijon mustard and buttermilk in the second. In the third bowl mix together 1¼ cup fine breadcrumbs and 3/4 cup panko bread crumbs. Coat the chicken in the flour. Then dip it in the egg mixture letting any excess drip off. Lastly coat the chicken in the bread crumbs. Continue the breading process for all of the chicken.

Finally, pan fry the chicken. In a large non stick skillet melt 2 tablespoons butter and add 3 tablespoons of olive oil over medium to medium high heat. Add three pieces of chicken and cook until golden brown about 6 minutes a side or until cooked through. Place the cooked chicken on a baking sheet with a wire rack and place it in the oven while cooking the second batch. Carefully, wipe the pan clean with a paper towel. Then place the pan back on the heat and add the remaining butter and oil and cook the last pieces of chicken and keep them warm in the oven while making the salad.

Green Apple and Parmesan Salad

  • 2 tablespoons white wine vinegar
  • 1 teaspoon Dijon mustard
  • 1 teaspoon fresh lemon juice
  • ¼ teaspoon kosher salt
  • ½ teaspoon honey
  • ¼ cup olive oil
  • ½ cup walnuts
  • 3 tablespoons sugar
  • 2 (4.5 oz) package of Baby Romaine lettuce, like Gotham Greens
  • 1 green apple
  • 1 small wedge of Parmigiano Reggiano cheese

First, make the salad dressing. In a small bowl whisk together the vinegar, mustard, lemon juice, salt and honey. Then slowly stream in the olive oil while continuing to whisk the dressing until it comes together.

Second, candy the walnuts. In a small nonstick skillet over medium heat add the sugar and walnuts. Keep a close eye on it and stir occasionally until the sugar melts and coats the nuts. Remove the nuts from the pan and allow them to cool.

Next, cut the apples and the parmesan. Cut the apples into thin matchstick slices. Then cut the parmesan into thin matchstick pieces until you get about 1/3 of a cup. I like to use a julienne cutter which makes quick work of it.

Finally, assemble the salad. In a large bowl mix together the chopped lettuce, apples cheese and walnuts toss with salad dressing to taste. Serve the warm chicken with a side of apple and parmesan salad and a slice or wedge of lemon for squeezing on the chicken.

Green Apple and Parmesan Salad


Chicken Milanese with a green apple and Parmesan salad- this is the dinner I have found my self making again and again. It’s a light and delicious summer dish. The crispy chicken cutlet with the tangy green apples and Parmesan cheese is a flavorful twist on a well loved classic.

The Sisterhood of Strawberry Waffles

Waffles with Strawberry Syrup

The best Mother’s Day gift we ever gave my mom was a Belgian waffle maker. I feel certain she’s the one who gave us the suggestion. However, it was really my sister Laura and I who loved it.

I was in middle school that year. When summer came, my sister and I spent all our time swimming. My mom would be at work when we came home from morning practice. As a result, the two of us were left in charge of making our own breakfast. We always came home starving. It was the kind of hunger that a bowl of cereal couldn’t touch. So that’s when the waffle maker called to us from the depths of the kitchen cabinet.

Determined to make our own, we went looking for a waffle recipe. Thoughts of crispy waffles with sweet maple syrup filled my head as I suddenly remembered my mom’s Cooking Light magazines. I specifically recalled seeing an issue with a stack of waffles covered in strawberries and powdered sugar. So, I climbed on the kitchen desk and searched through a tall tower of magazines until I found it.

Excited and famished, my sister and I pulled out the flour, sugar, eggs and milk and began measuring and mixing the batter. We poured it into the waffle maker and watched in amazement as it slowly puffed up. When it began to steam wildly, we bravely lifted the lid to find our treasure, golden waffles. We made a short stack and ate them together. Full and happy we vowed to make waffles all summer long.

Summers have a way of flying by. Now my sister and I each have two daughters of our own. Laura lives in New Jersey so we don’t see each other quite as often as we would like. But some things don’t change, my girls love Belgian waffles as much as my sister and I did. These days it’s my daughters who are in the kitchen mixing up a batch of waffles and as I watch them, I am reminded of all those summers at the pool and morning waffles with my sister.

Laura’s Belgian Waffles

  • 2 cups flour
  • 1 tablespoon plus 1 teaspoon baking powder
  • 1 tablespoon sugar
  • ½ teaspoon salt
  • 2 eggs, beaten
  • 1 ½ cup milk
  • 4 tablespoons butter, melted

First, preheat the Belgian waffle maker. In a medium bowl mix together the flour, baking powder, sugar, and salt. Add the eggs, milk, vanilla and melted butter. Whisk with a fork until most of the lumps are gone.

Next, when the waffle iron is hot, add the batter. Use a ladle or large spoon to spread about ½ cup of batter per each individual waffle. Since waffle iron shapes can vary adjust the amount of batter so it just covers the waffle squares.

Close the lid and cook for about a 4 ½ minutes or a number four setting if the waffle iron has a timer. You will know the waffles are done when the steam slows down and the top looks golden brown. Extra waffles can be saved and reheated in your waffle iron. Makes 6 waffles.

Finally, the best part of making waffles is dreaming up new toppings. Add fresh berries, peaches or powdered sugar. In my house we love making a strawberry syrup, but you could substitute your favorite jam and fruit.

Strawberry Syrup

  • ½ cup strawberry jam
  • 1 teaspoon lemon zest
  • ½ cup maple syrup
  • 1 cup sliced strawberries

First, in a small saucepan heat the strawberry jam. Then add the lemon zest and maple syrup. Stir until the jam and syrup until well combined. Finish the waffles off by drizzling the syrup over your berry topped waffles.

By the way, if you’re still looking for a Mother’s Day gift might I suggest a Belgian waffle maker. It just might be the gift that keeping giving all summer long.

Pineapple Fruit Dip

Cream Cheese Fruit Dip

Nostalgic recipes are having a moment. Everywhere I look from the New York Times to Better Homes and Gardens, and Southern Living there are more recipes with a wink to the past. I love this because a lot of these older recipes are for family meals that definitely deserve a comeback.

Looking at all these retro dishes had me thinking about one I have from my grandmother for a pineapple fruit dip. My grandmother, Latrell, was a minister’s wife. So, she had lots of recipes for salads that you could share at an event.

My grandmother kept all of her recipes on notecards in a kitchen drawer. They were all neatly divided into categories in labeled vanilla envelopes. The kitchen in her house was where we all used to sit and talk. So one summer when I was in high school, I took the time to go through all the envelopes. I sat down and copied any recipes that caught my attention. Years later, I am so thankful that I did that because there were some gems in all those envelopes that I still make today. One of my favorites is this pineapple fruit dip.

This recipe is a cream cheese based dip with brown sugar and sour cream. However, what makes it different from so many of the other fruit dips is addition of cinnamon and pineapple. The combination of these two ingredients might have you raising an eyebrow, but I assure you they make the recipe.

This pineapple fruit dip whips together in minutes. I find it makes any fruit plate or berry board something special to share. I love to serve it with strawberries, raspberries, grapes, blueberries and pineapple slices, but you could pair it with your favorite fruits.

Pineapple Fruit Dip

  • 8 oz cream cheese, softened to room temprature
  • 1/2 cup brown sugar
  • 3 tablespoons sour cream
  • 1/4 cup pineapple juice
  • 1/2 teaspoon vanilla extract
  • 1/4 teaspoon ground cinnamon

First, the bowl of a stand mixer using a paddle attachment or using a hand mixer beat together the cream cheese and brown sugar for 2 to 3 minutes on medium speed. Finally, add in the sour cream, pineapple juice, vanilla and cinnamon and blend until creamy. Spoon the dip into a small bowl and serve with your favorite berries and fruit.

I haven’t seen fruit plates on restaurant menus in a while but I for one am all about bringing them back. A plate filled berries, fruit dip and a side slice of zucchini or banana bread sounds like a divinely good breakfast. This pineapple fruit dip would also be a wonderful to share at a brunch, Mother’s Day or any spring party.

Reading and Eating: The Brown Derby’s Cobb Salad

Over the last few weeks I’ve been traveling across America by way of my kitchen and a great new cook book called Signature Dishes of America. This book was written by culinary historian Sherry Monahan. It explores American food and how American cuisine has been shaped by historic restaurants and hotels.  The book has a collection of 100 recipes from all over the United States from Kentucky Hot Brown sandwiches to New York’s Eggs Benedict to New Mexico’s fried sopapillas.

Monahan worked to collect these recipes from hotels, newspapers, restaurants and old travel guides. In her research, she discovered a series of travel books created by the Ford Motor Company which also featured recipes for some of these dishes. She also found an amazing collection of historic American recipes that were collected and preserved by Duncan Hines of the Duncan Hines baking company. As a historian, Monahan explores the origins of these dishes and the cooks and chefs who created them.

The recipes in this book have the unique ability to take you places. So far, I have been out for mint juleps at the Willard Hotel in Washington D.C. and to the Peabody in Memphis for their famous vanilla muffins. However, my favorite trip thus far is to the original Brown Derby restaurant in Los Angeles where I had the signature Cobb salad. Monahan got the recipe from Bob Walsh who is the grandson of the late restaurateur Robert “Bob” Cobb. Cobb opened The Brown Derby restaurant in 1926.

The original Brown Derby is closed but it’s been recreated at Disney’s Hollywood Studios.

His grandson reports that the now famous Cobb salad was first created in the 1930s from leftovers that his grandfather had in his fridge. However, Cobb continued to refine his dish and the version that we know was placed on his restaurant’s menu in 1935. Walsh worked in his grandfather’s restaurant and remembers serving the salad with toasted pumpernickel bread spread with butter and grated parmesan.

The recipe in the book serves 8 to 10. So, I adjusted the recipe measurements to make a smaller version for my family. I also changed how the chicken is prepared. Cobb called for poaching the chicken but I made my seasoned skillet chicken instead. My family loves this chicken. The secret is the garlic powder seasoning. My girls just can’t get enough of it. I use this chicken for all sorts of dishes from chicken club sandwiches to chicken fried rice, but I don’t think I have put it on the blog before.

Cobb’s French salad dressing is especially good. The Worcestershire sauce makes it different than your usual vinaigrette. Most importantly, the avocados and bacon are what put this salad over the top. It’s a restaurant dish that translates well to the home kitchen. The Brown Derby’s Cobb salad is a beloved classic for a good reason.

I have enjoyed cooking from Signature Dishes of America and reading the origin stories behind so many American dishes. I can’t wait to try more like Brennan’s bananas foster and Chicago’s Palmer House brownies. This nostalgic cookbook has quickly become a new favorite. It has lots of wonderful recipes that have been fun to make and share. If you’ve not had a chance to read this one yet, then I highly recommend it.

The Brown Derby Cobb Salad -Serves 4

  • 2 boneless skinless chicken breasts, sliced in half
  • 1 teaspoon garlic powder
  • 1 teaspoon kosher salt
  • 2 tablespoons olive oil
  • 6 slices thick cut bacon, cooked and crumbled
  • 6 hard boiled eggs, peeled and sliced in half
  • 2 medium tomatoes, diced
  • 2 (4.5 oz) containers baby romaine lettuce, like Gotham Greens
  • 3 green onions, sliced diagonally
  • 1/4 cup fresh parsley chopped
  • 2 large avocados, sliced into bite sized pieces
  • lemon juice as needed
  • 1/2 cup blue cheese, crumbled (optional)

First prepare the chicken. Split the chicken in half lengthwise. Pat them dry. Mix together the garlic powder and salt and use it to season the chicken breasts on both sides. Heat the olive oil in a large nonstick skillet over medium heat. Cook the chicken until golden brown on both sides and cooked through. Let it cool slightly and dice into bite sized pieces.

Meanwhile cook the bacon and hard boil the eggs. Then chop the lettuce, parsley and green onions. Half peel and dice the avocados and squeeze fresh lemon juice on them to keep them from browning. Next, make the salad dressing as follows:

Cobb’s Old Fashioned French Dressing -Makes 1½ cups

  • 1/4 cup water
  • 1/4 cup red wine vinegar
  • 1 tsp salt
  • 1/4 tsp sugar
  • 2 tsp lemon juice
  • 1 tsp Worcestershire sauce
  • 1 tsp dry English mustard
  • 1 tsp garlic, finely minced
  • 1/4 cup olive oil
  • 3/4 cup vegetable or salad oil

In a medium bowl whisk together all of the salad dressing ingredients except the oils. Then combine or measure the oils together and slowly drizzle them in the salad dressing while whisking. Continue whisking until the dressing emulsifies and comes together.

Finally, assemble the salad by tossing the chopped lettuce and greens with the salad dressing to taste. Then place equal amounts of the greens in the base of four shallow bowls or plates. Top each salad with the chopped chicken, bacon, tomatoes, avocado, hard boiled eggs and if using add some crumbled blue cheese. Drizzle with an additional spoonful of salad dressing.

The Brown Derby’s Cobb salad has been an American favorite since the 1930s. This salad recipe is easy and fun to eat. I particularly love the Cobb’s French salad dressing. I have made this salad several times now and it’s so delicious that I know I will be making it for dinner again sometime soon.

Soft Bake Chocolate Chip Cookies

Maison McCauley chocolate chip cookies

“No one can sleep if a bunch of chocolate chip cookies sing all night from the cupboard.” -Snoopy

These soft bake chocolate chip cookies are the all time most requested dessert in our house. Needless to say, my girls and I have made countless batches of these cookies over the years since I first put this recipe on the blog. However, over time as all bakers do I have made a few tweaks to the recipe to make them even better. So, I thought I would share the recipe with you.

First, I found that I needed to make more cookies. Because Snoopy is right I actually have to put these cookies in a kitchen cabinet to keep them from disappearing before dessert. So now I make a larger batch of cookies so we can all dream of cookies and still find some waiting for us in the kitchen.

The second thing I did was add some cake flour to the recipe which gives these cookies an irresistibly soft bake texture that I love. I also found that the chewy texture is even better when I use well softened butter.

Finally, I like using baking stones when baking cookies. I leave my stones in the oven as it preheats. The stones are nonstick and bake very evenly. If you don’t have a stone you can use a parchment paper lined sheet pan.

So, without further ado here is our new and better than ever soft bake chocolate chip cookie recipe.

Soft Bake Chocolate Chip Cookies

  • 2 sticks butter, well softened
  • 2 cups light brown sugar
  • 4 tsp vanilla extract
  • 2 large eggs
  • 1/2 tsp salt
  • 2 tsp baking soda
  • 2 cup all purpose flour
  • 2 cups cake flour
  • 2 1/4 cups chocolate chips

Preheat your oven to 350 degrees.

First, place the butter in the bowl of your stand mixer or in a large mixing bowl if you are using a hand-mixer.  Cream the butter at medium speed for abut a minute. Scrape down the sides of your bowl and then add the cup of brown sugar. Continue mixing or creaming the butter and sugar together for another 3 to 4 minutes. Then scrape down the sides of the bowl and add the vanilla and egg. When incorporated add the baking soda, salt and flour and continue to mix at a low speed until the dough comes together. Then mix in the chocolate chips.

I use a large ice cream or cookie scooper to ensure that my cookies are all the same size and bake evenly. My scoop holds 3 TBSPs of dough. I make an even scoop an then with the palm of my hand I slightly press down on the ball to make a thick disc.

Make sure you leave some room for the cookies to spread a bit on the pan when baking. Then bake the cookies for 8 to 10 minutes depending on your oven.

I know they are ready when the cookies just start to get some golden color and cracks on the surface. Leave them to cool on the baking sheet for about five to seven minutes or until they are set and cool enough to handle.

brown sugar chocolate chip cookies

These soft bake chocolate chip cookies are a family favorite. They’re so delicious that they’re sure to be singing to you from the kitchen!

The Great Dinner Dilemma

Aretha Franklin was once asked what her greatest creative challenge was and her answer was surprising. “Trying to figure out what to cook for dinner… nightly.” The interviewer Larry London paused and laughed. Her honesty was refreshing and at the same time so endearing because it made you realize that even the queen of soul had to think about dinner. 

That’s the problem with dinner; it’s so nightly. Even if you love to cook it’s easy to hit a creative challenge when planning so many meals. We all have a those five to ten recipes that we tend to make again and again. That’s why I’m always looking for new dinner inspiration. Sometimes I find it in a new cook book, newspaper article or food blog.

However, the inspiration for this steak and rice noodle stir-fry came from an Instagram story from Sally Potts. Sally has one of my favorite British home accounts. When I saw a quick video of a beef and green bean stir-fry, she had made for dinner one day I knew I had to make something like it. What I particularly loved about her dish was the idea of using green beans instead of the usual beef and broccoli.

Although I love broccoli, I have certain members of my family, who will remain nameless, whose taste buds can’t stand the thought of it. So, with that picture of garlic beef and green beans in mind I began to work on crafting a stir-fry recipe that everyone in my family would love. I worked to create a sauce that was flavorful, but not as spicy as some Thai dishes so my kids would be able to enjoy it too.

Then one night after serving it over rice a couple of times I decided to try rice noodles. I was running short on time and as they say sometimes “necessity is the mother of invention.”  In this case my short cut really ended up putting the dish over the top. My whole family was raving how much they loved these noodles with the sauce. So now I’ve been making it with rice noodles because I had to agree the noodles were so delicious. How had I not thought of that before?

So, if you too have found yourself wondering what should I make for dinner tonight? Then I have a recipe that hits all the right notes for a delicious weeknight dinner- my garlic steak and green bean stir-fry.

Garlic Steak and Green Bean Stir-fry – Serves 4 to 5

  • 2 tablespoons vegetable or canola oil
  • 1¼ lbs tip steak or stir-fry beef, thinly sliced against the grain
  • 4 garlic cloves, thinly sliced
  • 1 small yellow onion, sliced into thin strips
  • 1½ cups green beans, cut into bite sized pieces
  • 1 teaspoon, sesame oil
  • 4 tablespoons oyster sauce
  • 1/4 cup soy sauce
  • 1/4 cup beef stock
  • 1 (8 oz) package of instant rice noodles (I like the MAMA brand)

First, prepare the ingredients. If slicing the steak yourself, place it in the freezer for 20 to 30 minutes. Freezing the beef makes creating thin slices much easier. Then peel the garlic and create thin slices from the whole clove. Slice the onions in half and then into thin strips and cut the green beans in bite sized pieces.

Next, blanch the green beans and boil water for the noodles. Fill a large saucepan with water and bring to a boil. Place the green beans the boiling water for a 1½ to 2 minutes. Remove the beans from the water with a slotted spoon and set aside. Then place more water on to boil for cooking the rice noodles.

Then make the stir-fry. Heat 1 tablespoon of the oil in a wok or large skillet over medium high heat then add the beef and cook until browned. Set the beef aside on a plate while cooking the vegetables.

Add the last tablespoon of vegetable oil and a teaspoon of the sesame oil and add the garlic, onions and green beans until the onions begin to turn translucent and the green beans are tender.

I used a large electric wok but you could use a large skillet if you don’t have a wok.

Finally, create the sauce and serve. Add the oyster sauce, soy sauce and beef stock and stir. Return the beef to the pan to heat through. Then prepare the rice noodles according to the package instructions.  Place the noodles on the plates or bowls. Spoon the sauce on top of the noodles and top with the steak stir fry.


These garlic steak noodles are a fast and fun meal. They’re sure to get you out of any what’s for dinner dilemma.

Contact Us