Cajun Salmon with Three Bean Salad

Blackened Salmon with Cajun Three Bean Salad

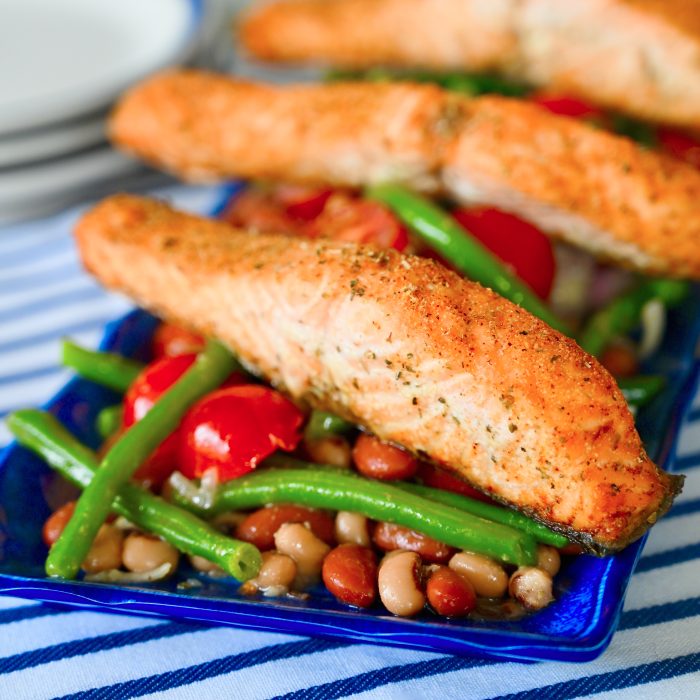
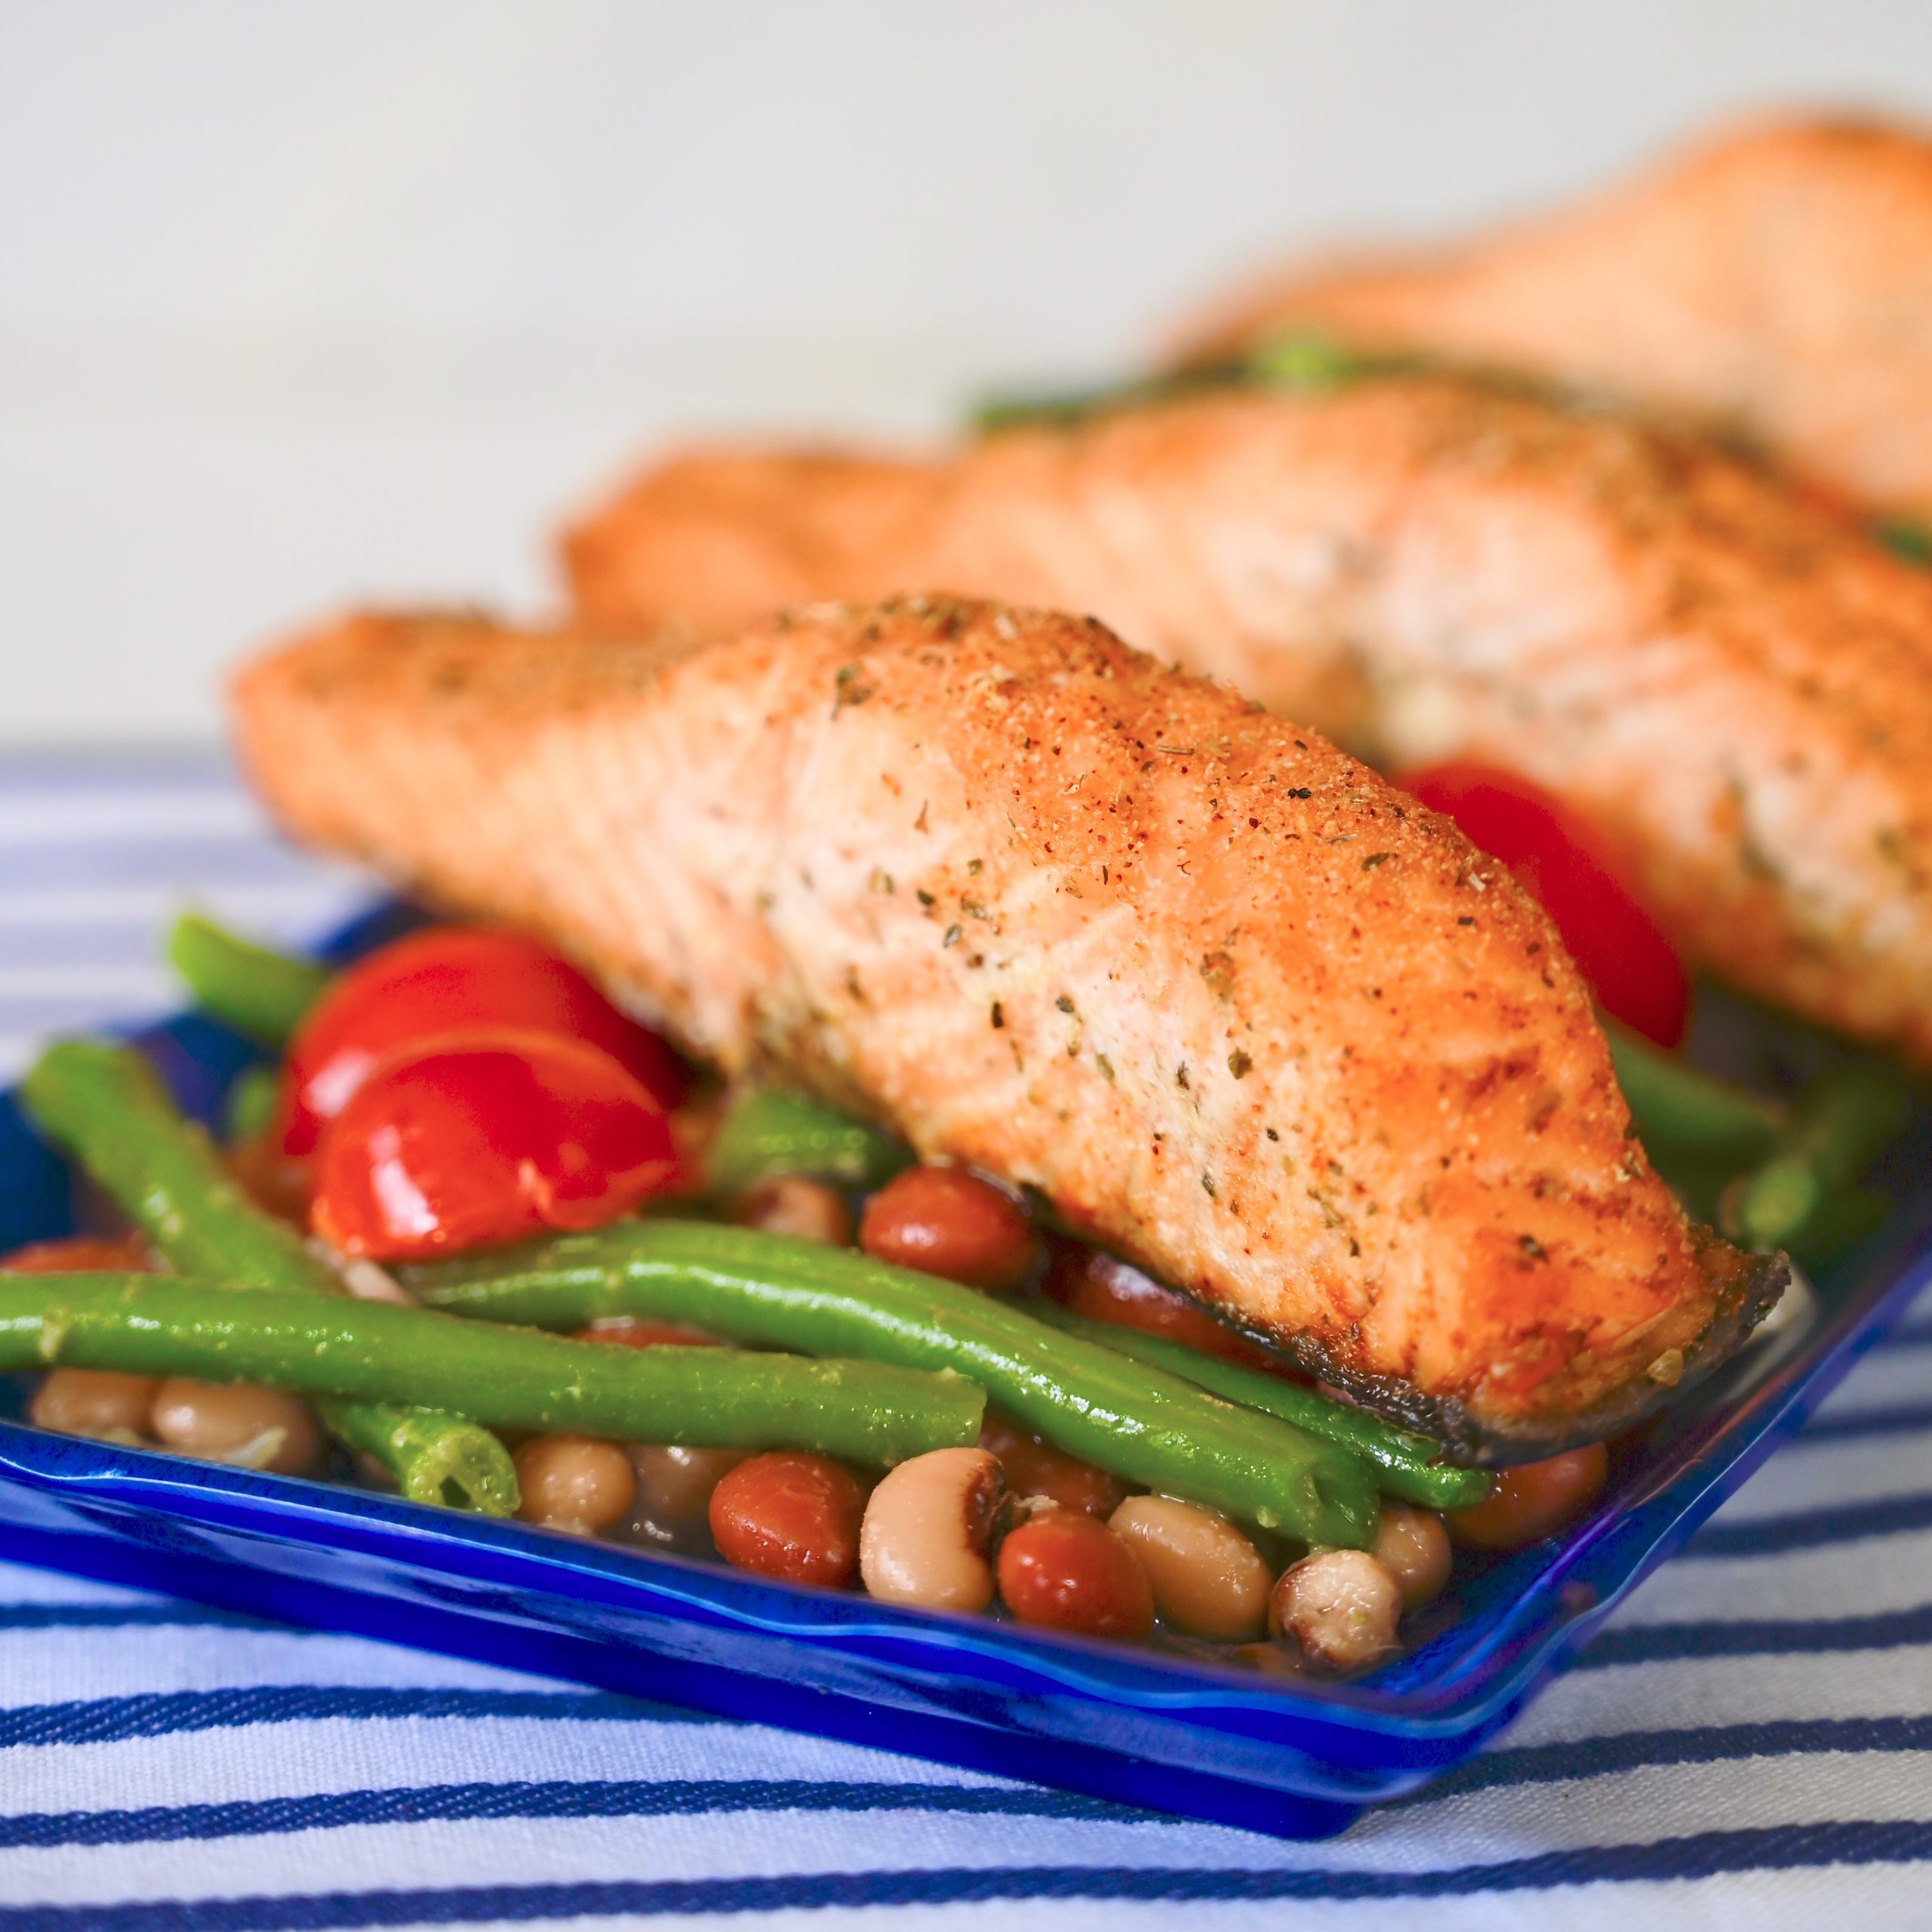
Dinner in our house is one of the best parts of my day, but sometimes getting it on the table can be tricky. Cajun salmon with three bean salad is a recipe for nights when you need dinner on the table pronto. The key to this recipe is the homemade cajun seasoning.

It’s quick to mix together, but it really makes this dish. Cajun flavors can sometimes be a little spicy for kids so this seasoning mix has all the flavor with a little less heat. The seasoning is wonderful on the fish and it makes an unbelievably good salad dressing mix.

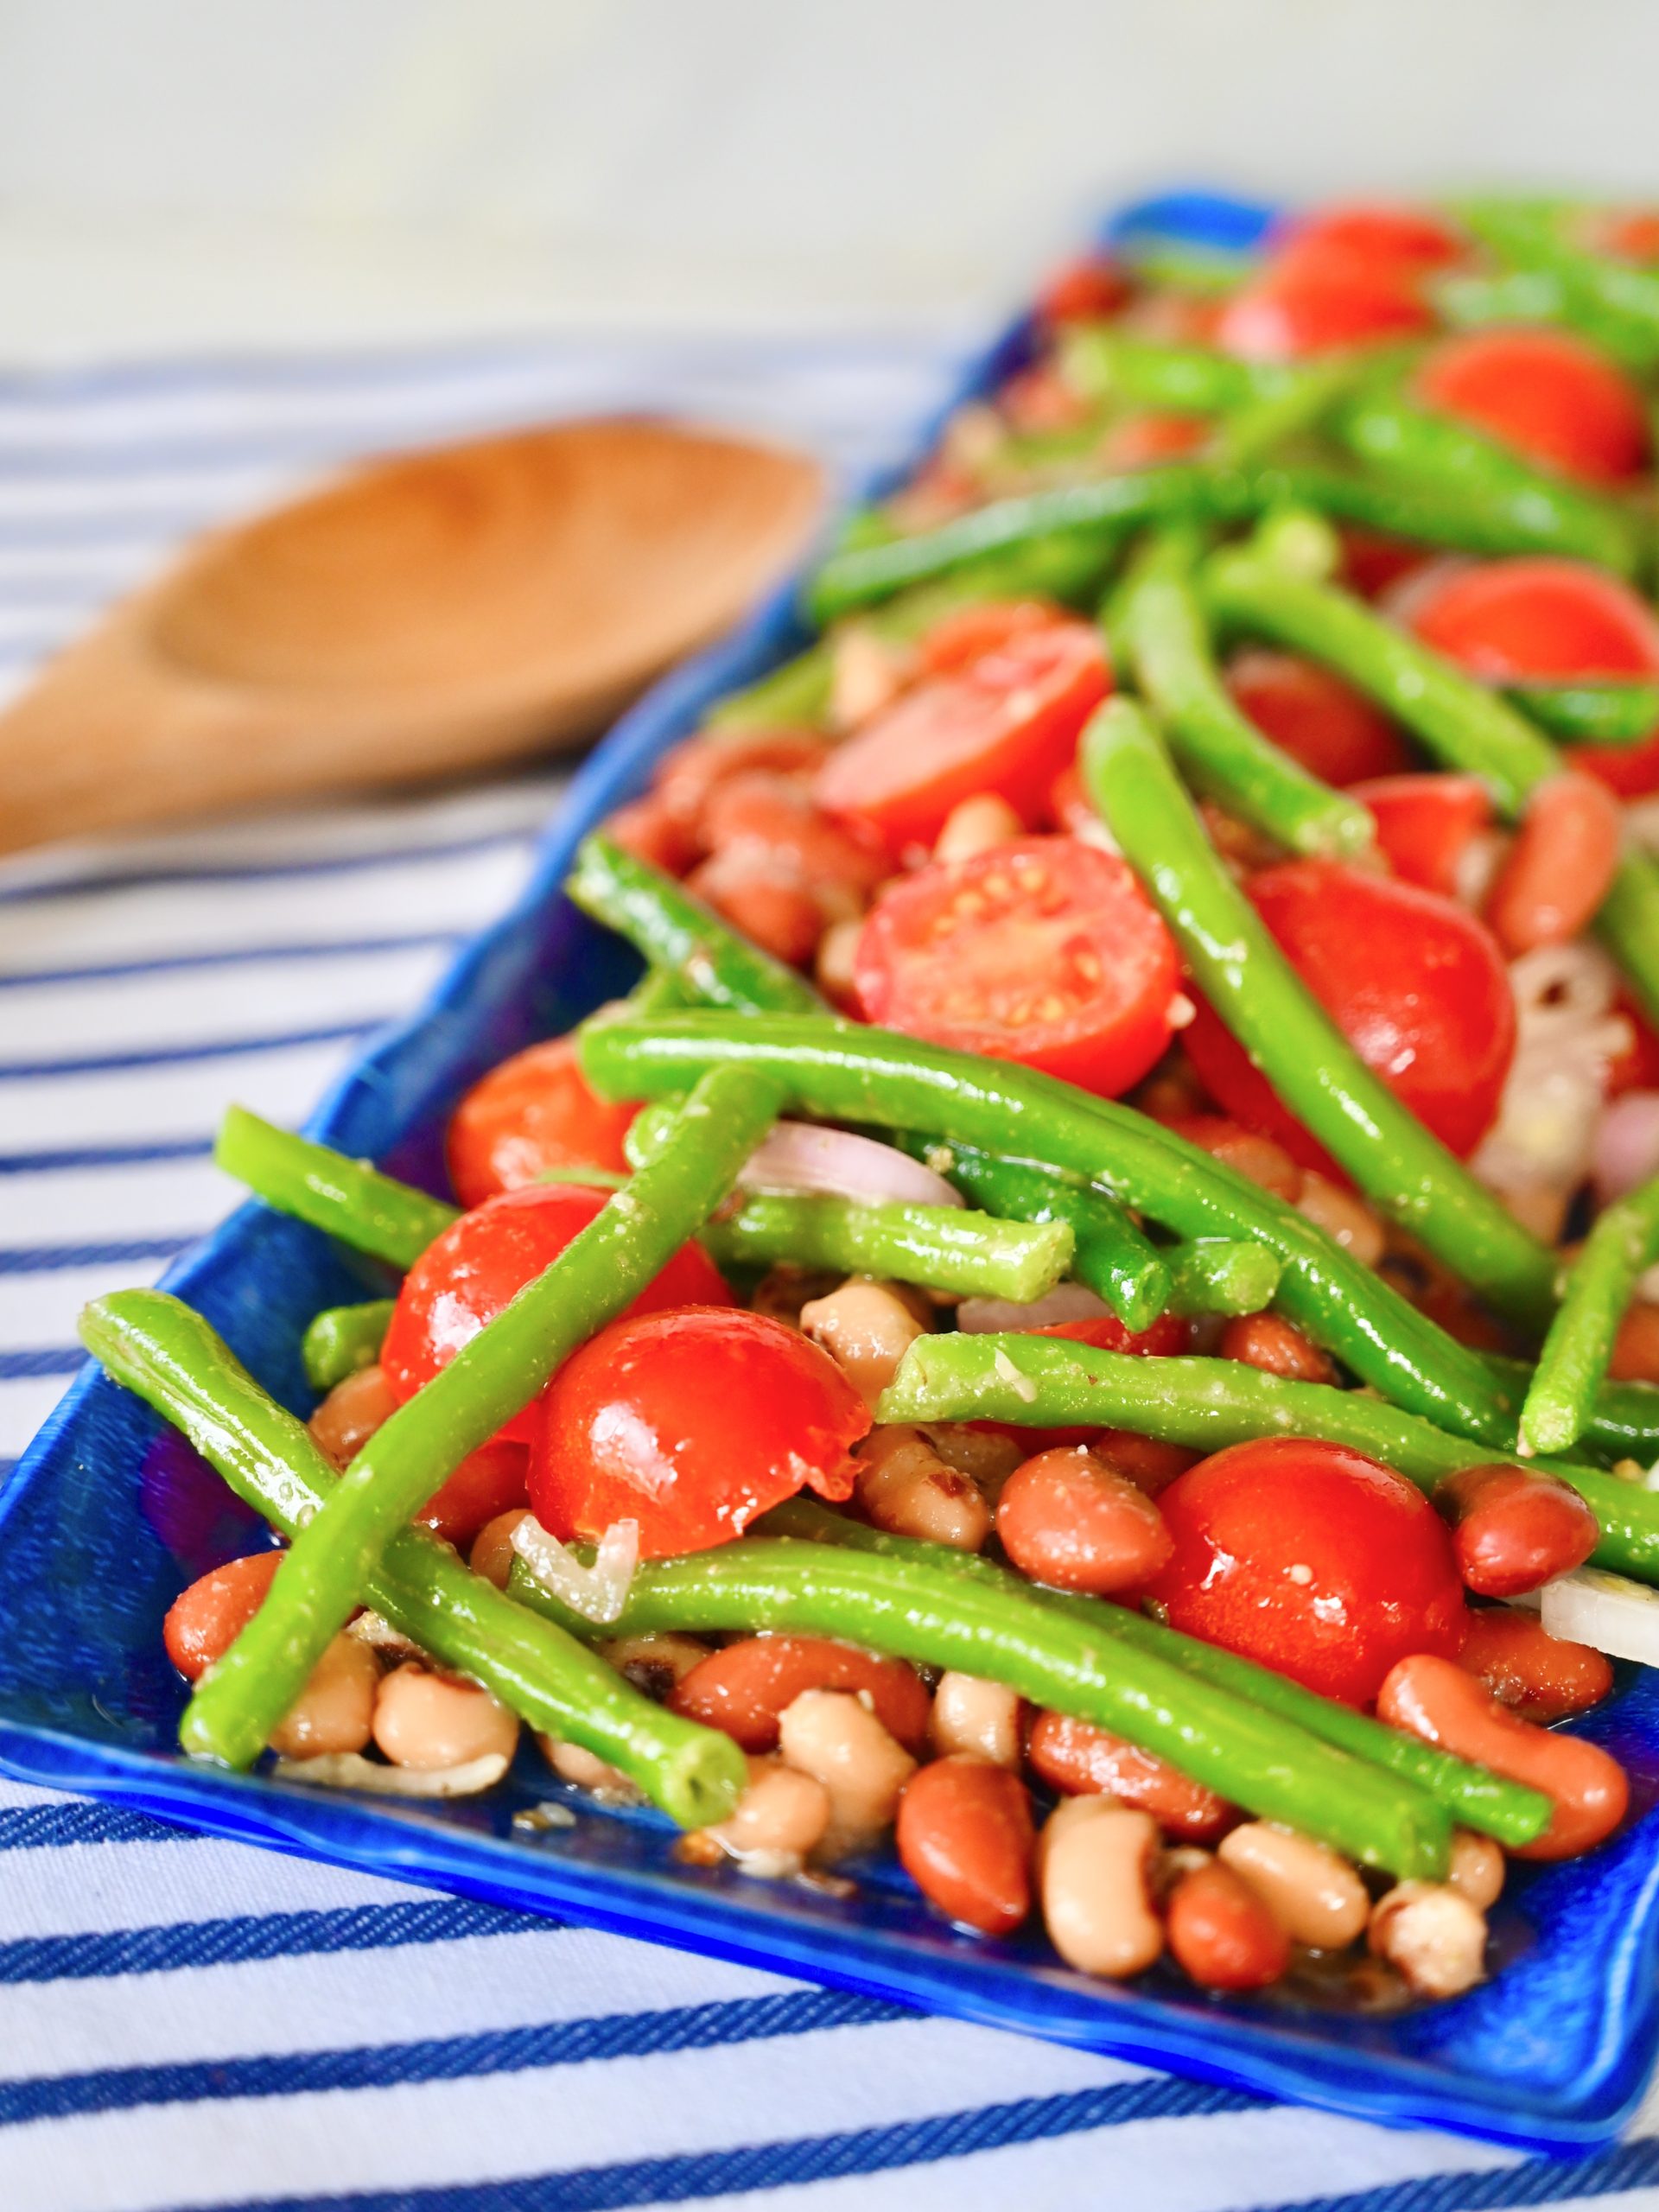
In the twenty minutes it take to get the salmon cooked you can get the bean salad tossed together. Add a side of crusty Italian bread and in no time you have a delicious and healthy weeknight meal. The bean salad is so good that if you are wanting a vegetarian dinner you could easily double the bean salad recipe and have enough for a main dish.

Cajun Salmon-serves 4

  • 1 teaspoon kosher salt
  • 1/4 teaspoon cayenne pepper
  • 1 teaspoon garlic powder
  • 1 teaspoon dried oregano
  • 2 tablespoons olive oil
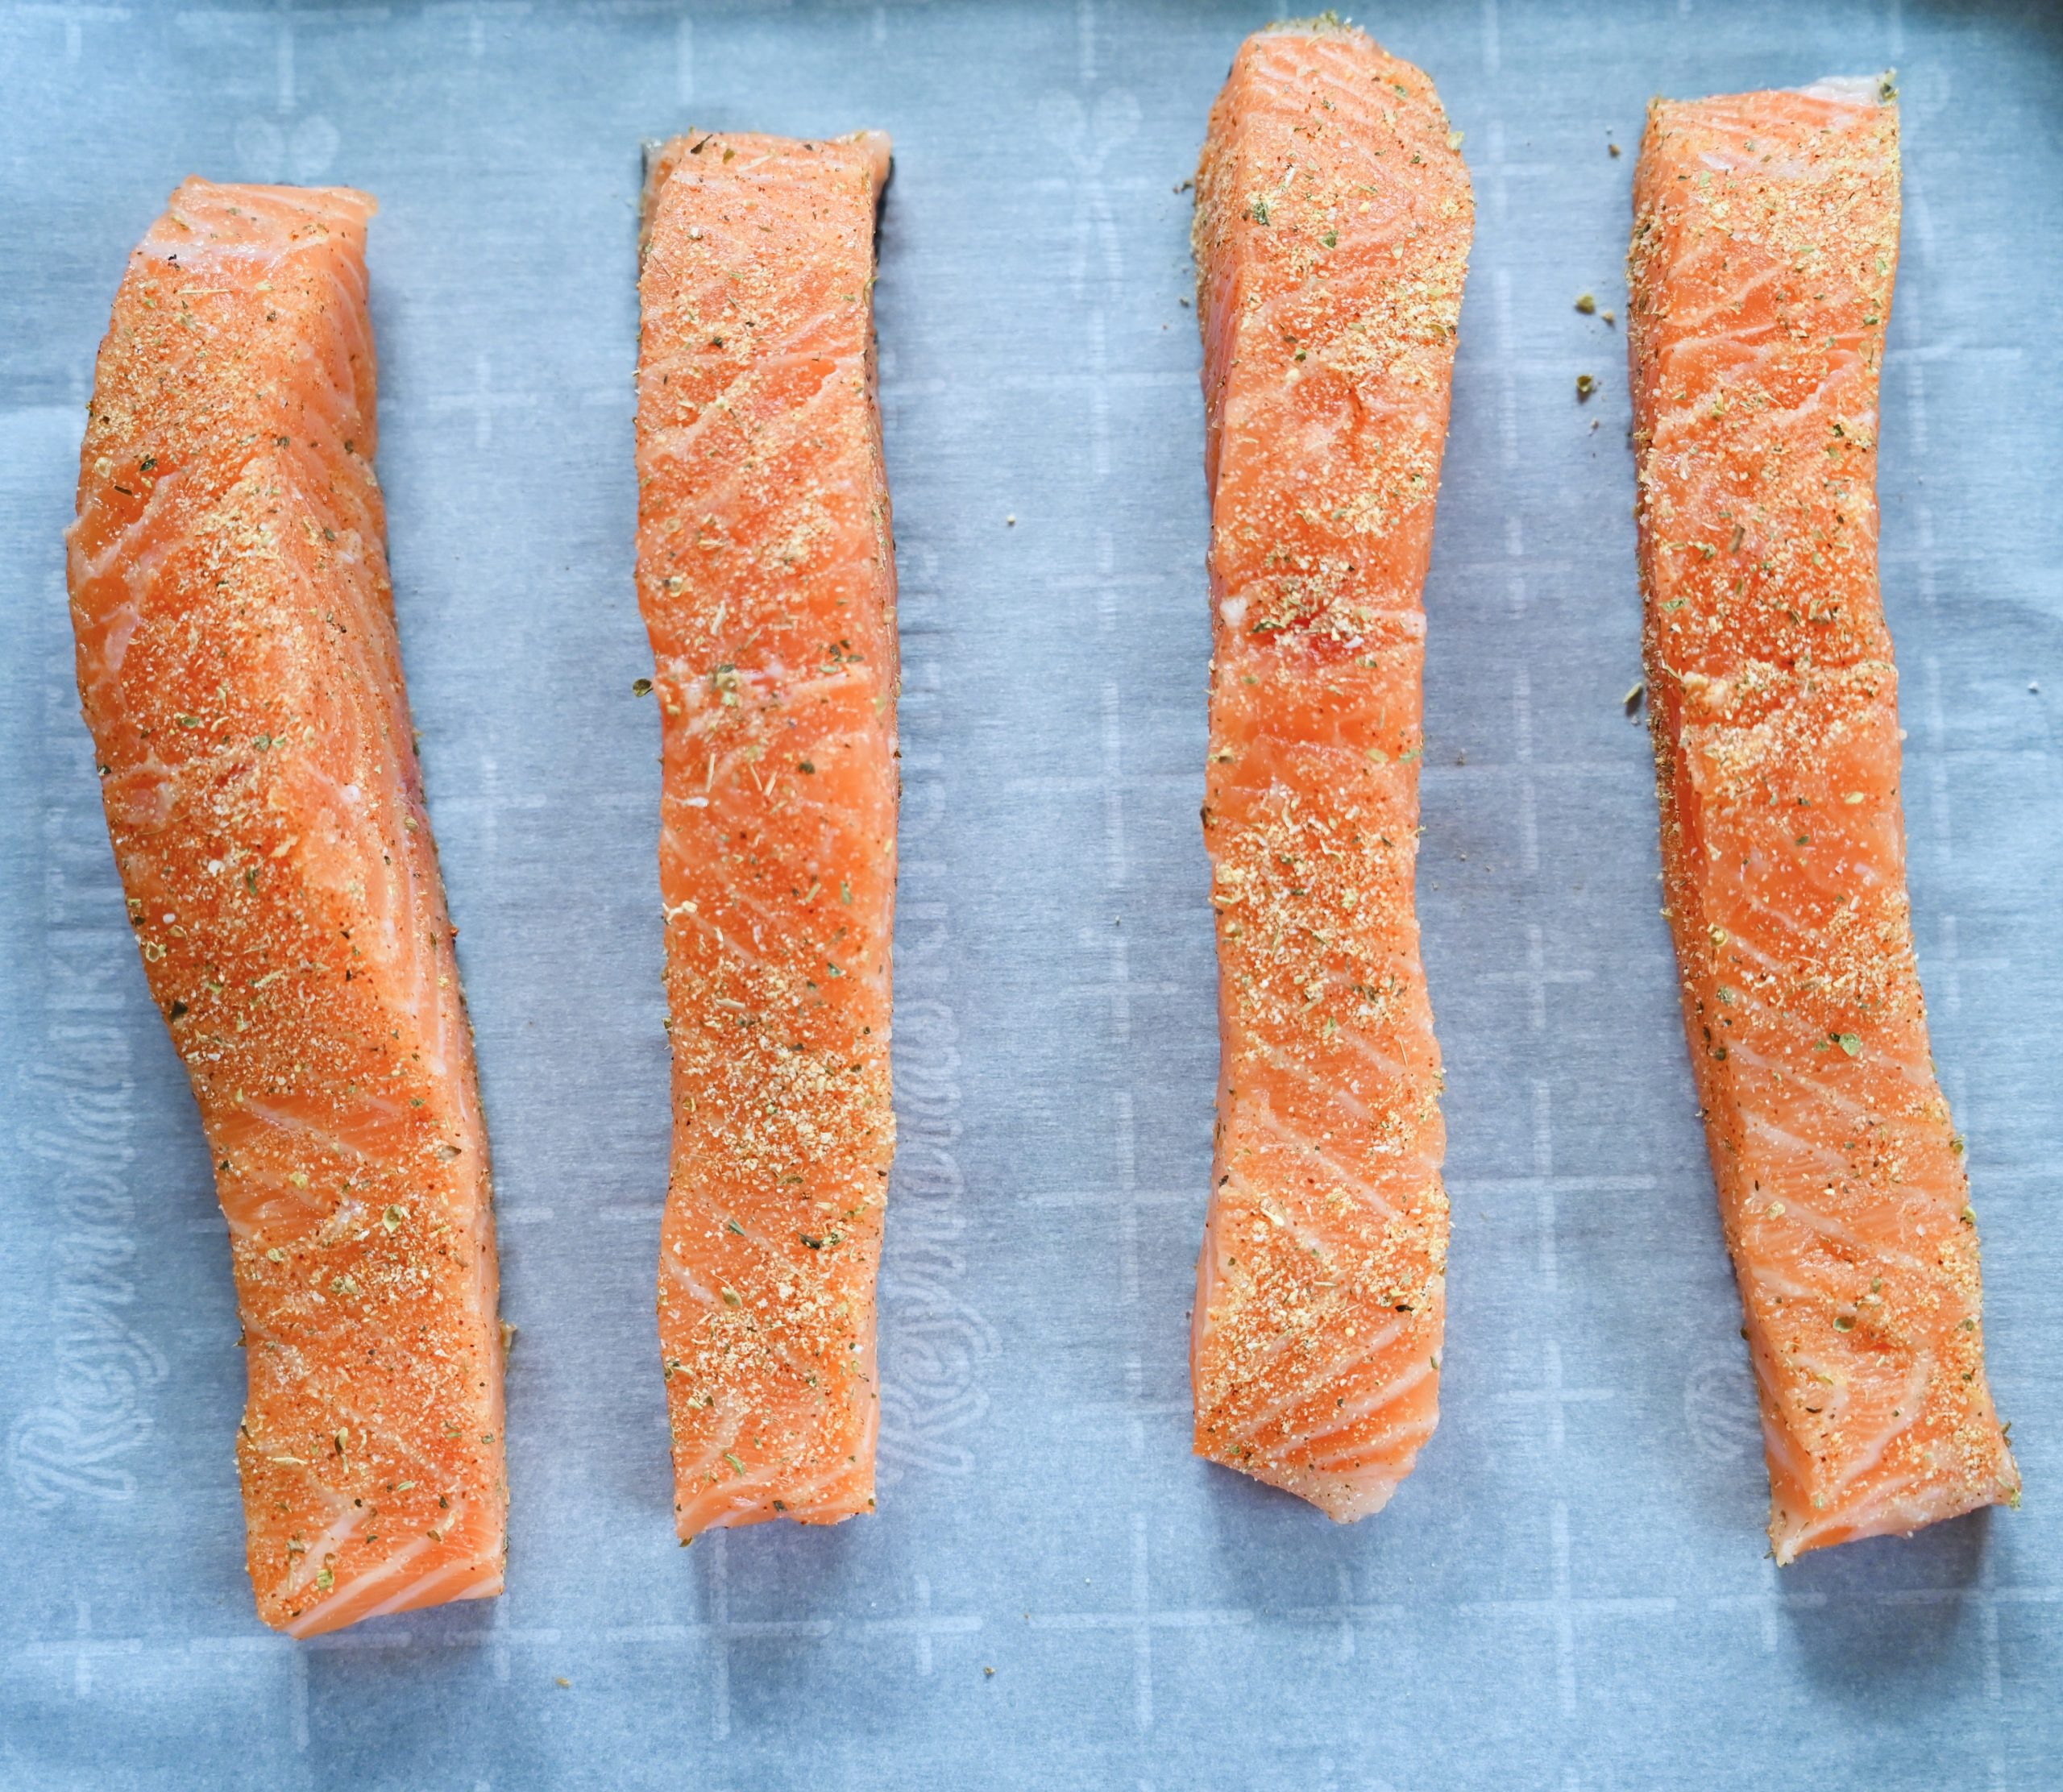
  • 1 ¼ pounds salmon

Three Bean Salad

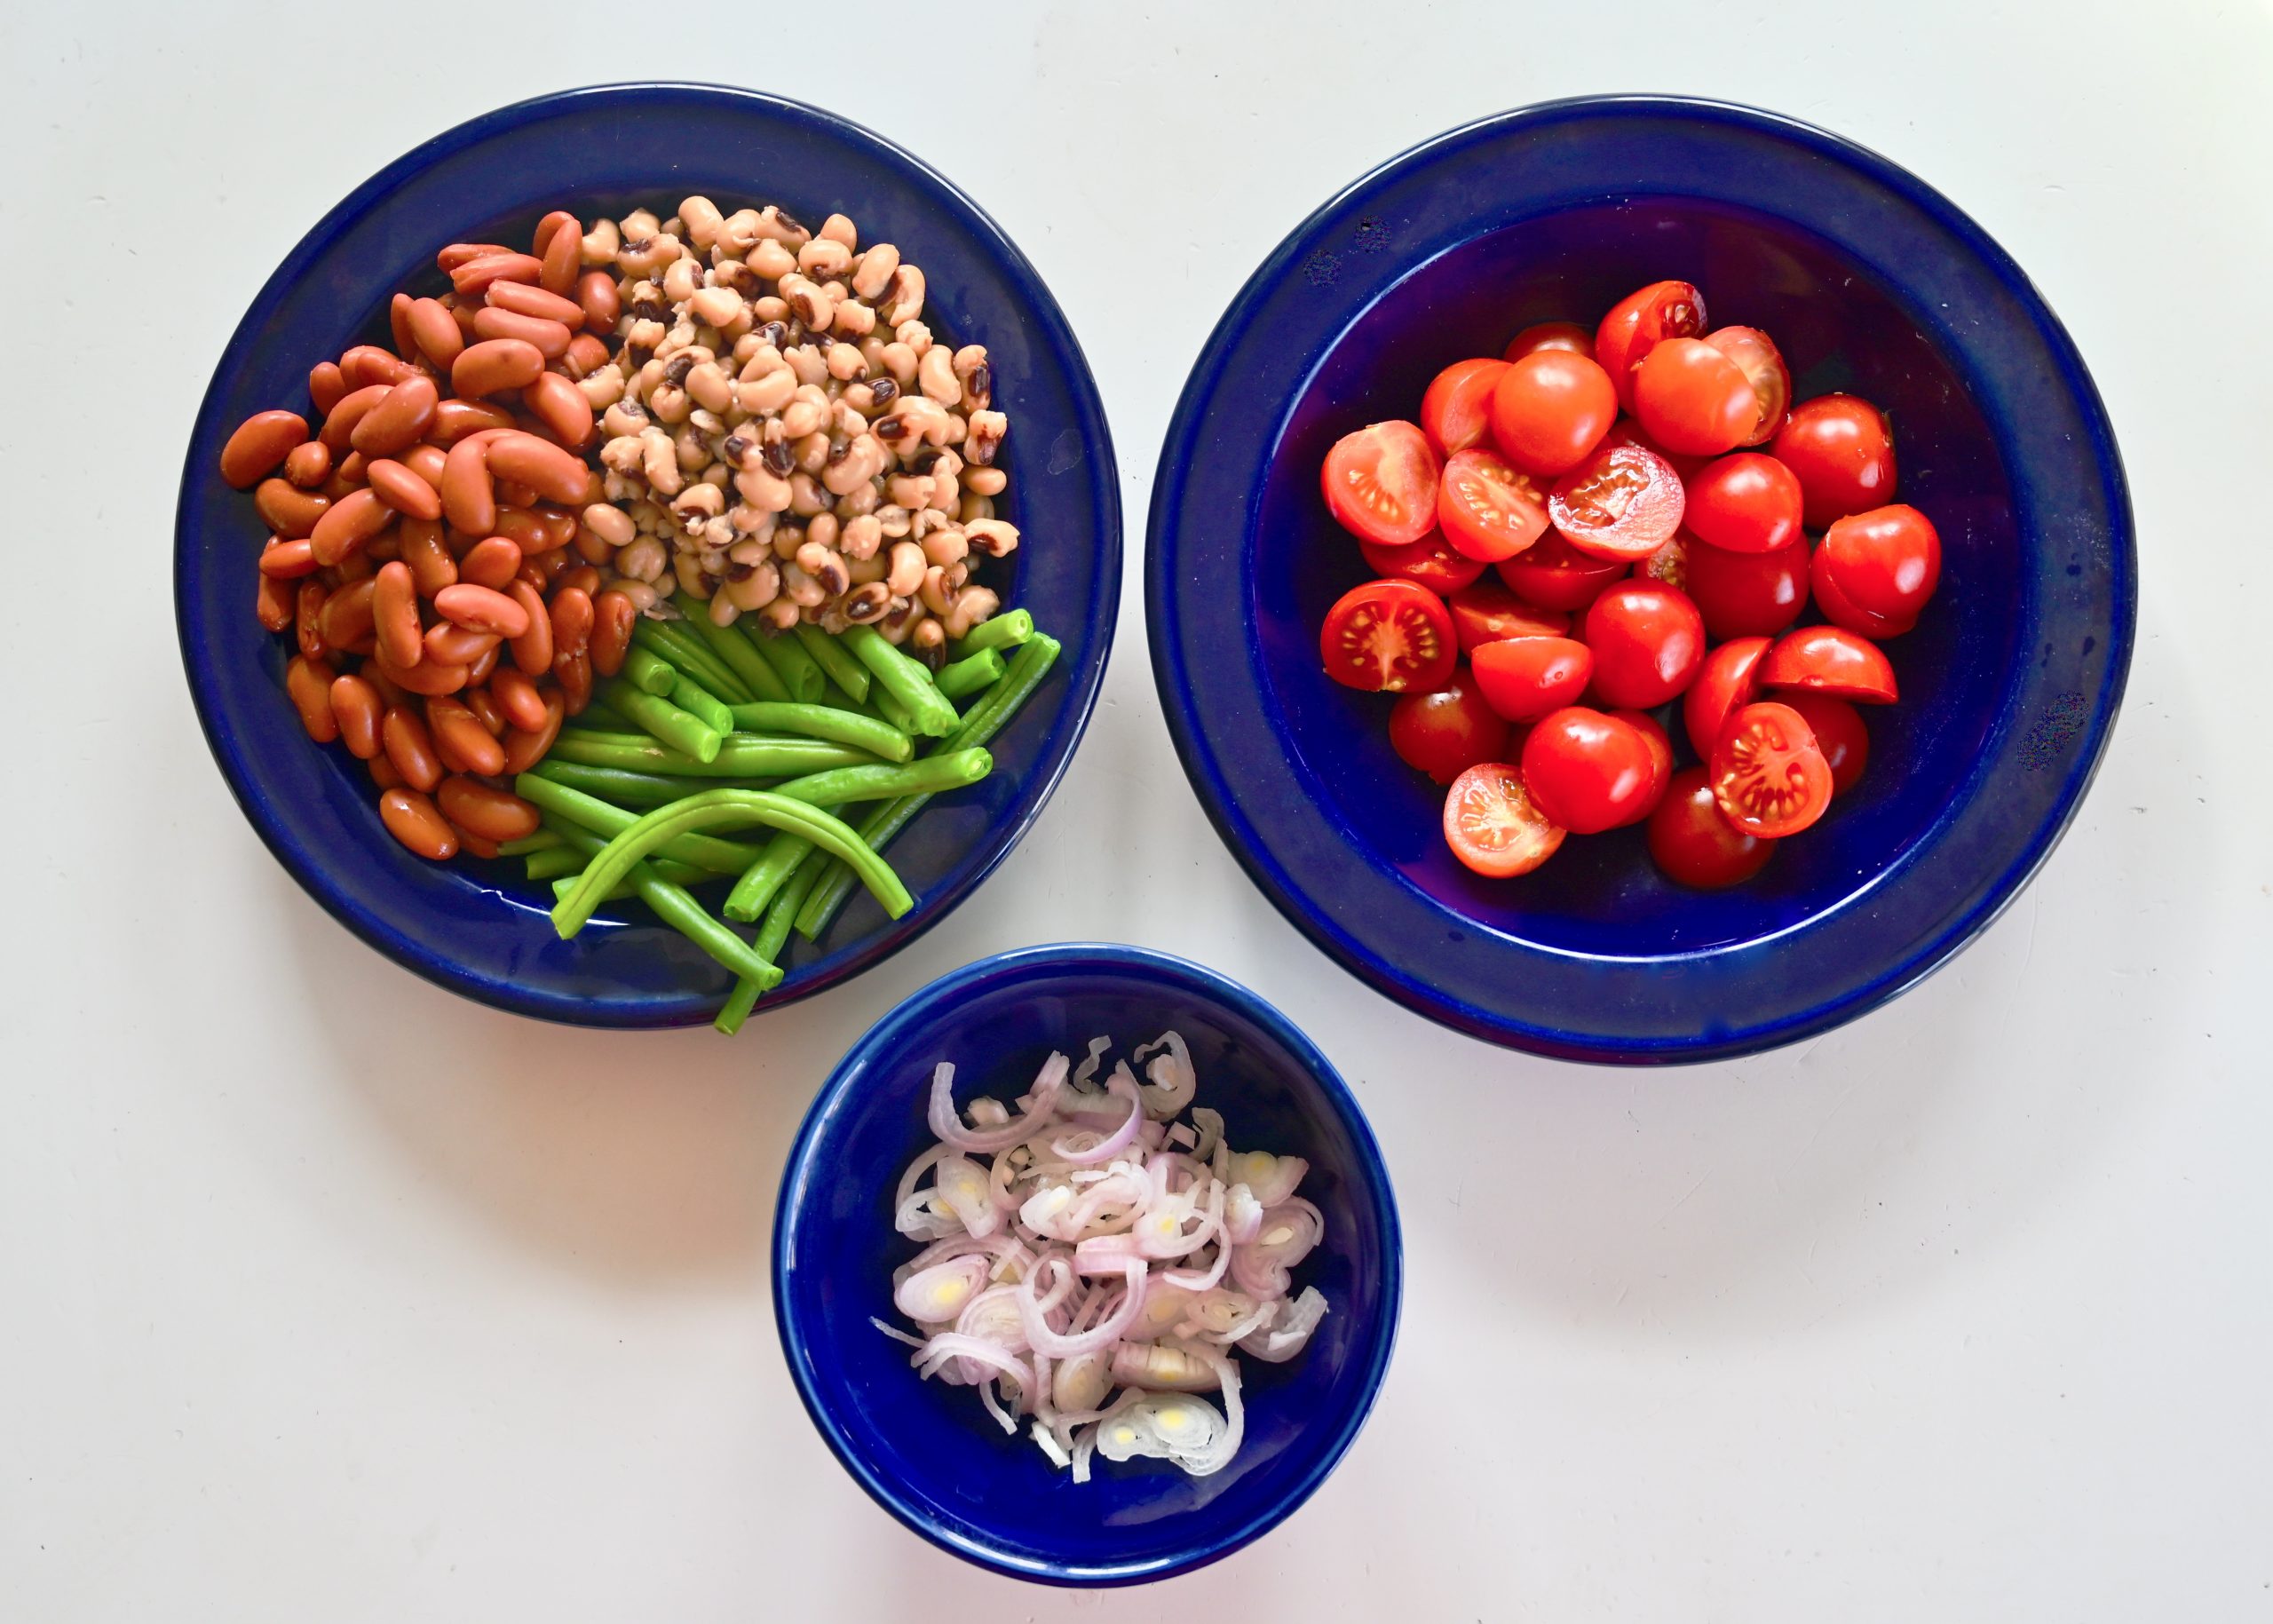
  • 2 cups fresh green beans, cut into 1½ inch pieces
  • 2 cups cherry tomatoes, halved
  • ¼ cup (about 2 small) shallots, sliced into thin rings
  • 1 (16 oz) can red kidney beans, rinsed and drained
  • 1 (16 oz) can black eyed peas, rinsed and drained
  • 1½ teaspoons of reserved cajun seasoning
  • 2 teaspoons dijon mustard
  • 2 tablespoons apple cider vinegar
  • 1/3 cup olive oil

Preheat the oven to 375 degrees

First mix together the cajun seasoning. In a small bowl combine the salt, cayenne pepper, garlic powder, dry mustard and dried oregano. Set seasoning aside to use on the fish and in the salad dressing.

Second prepare the cajun salmon. Drizzle 2 tablespoons of olive oil on the salmon coating the tops evenly. Sprinkle on 2 teaspoons of the cajun seasoning. Place the salmon on a sheet pan lined with parchment paper or foil. Put them in the oven to roast.

I like my salmon cooked through so I cook mine to 135 degrees which is about 22 minutes in my oven. If you like your salmon less firm then you will want to start checking it’s doneness at about 15 minutes. You want salmon to be anywhere between 120 degrees to 140 degrees on an instant read thermometer.

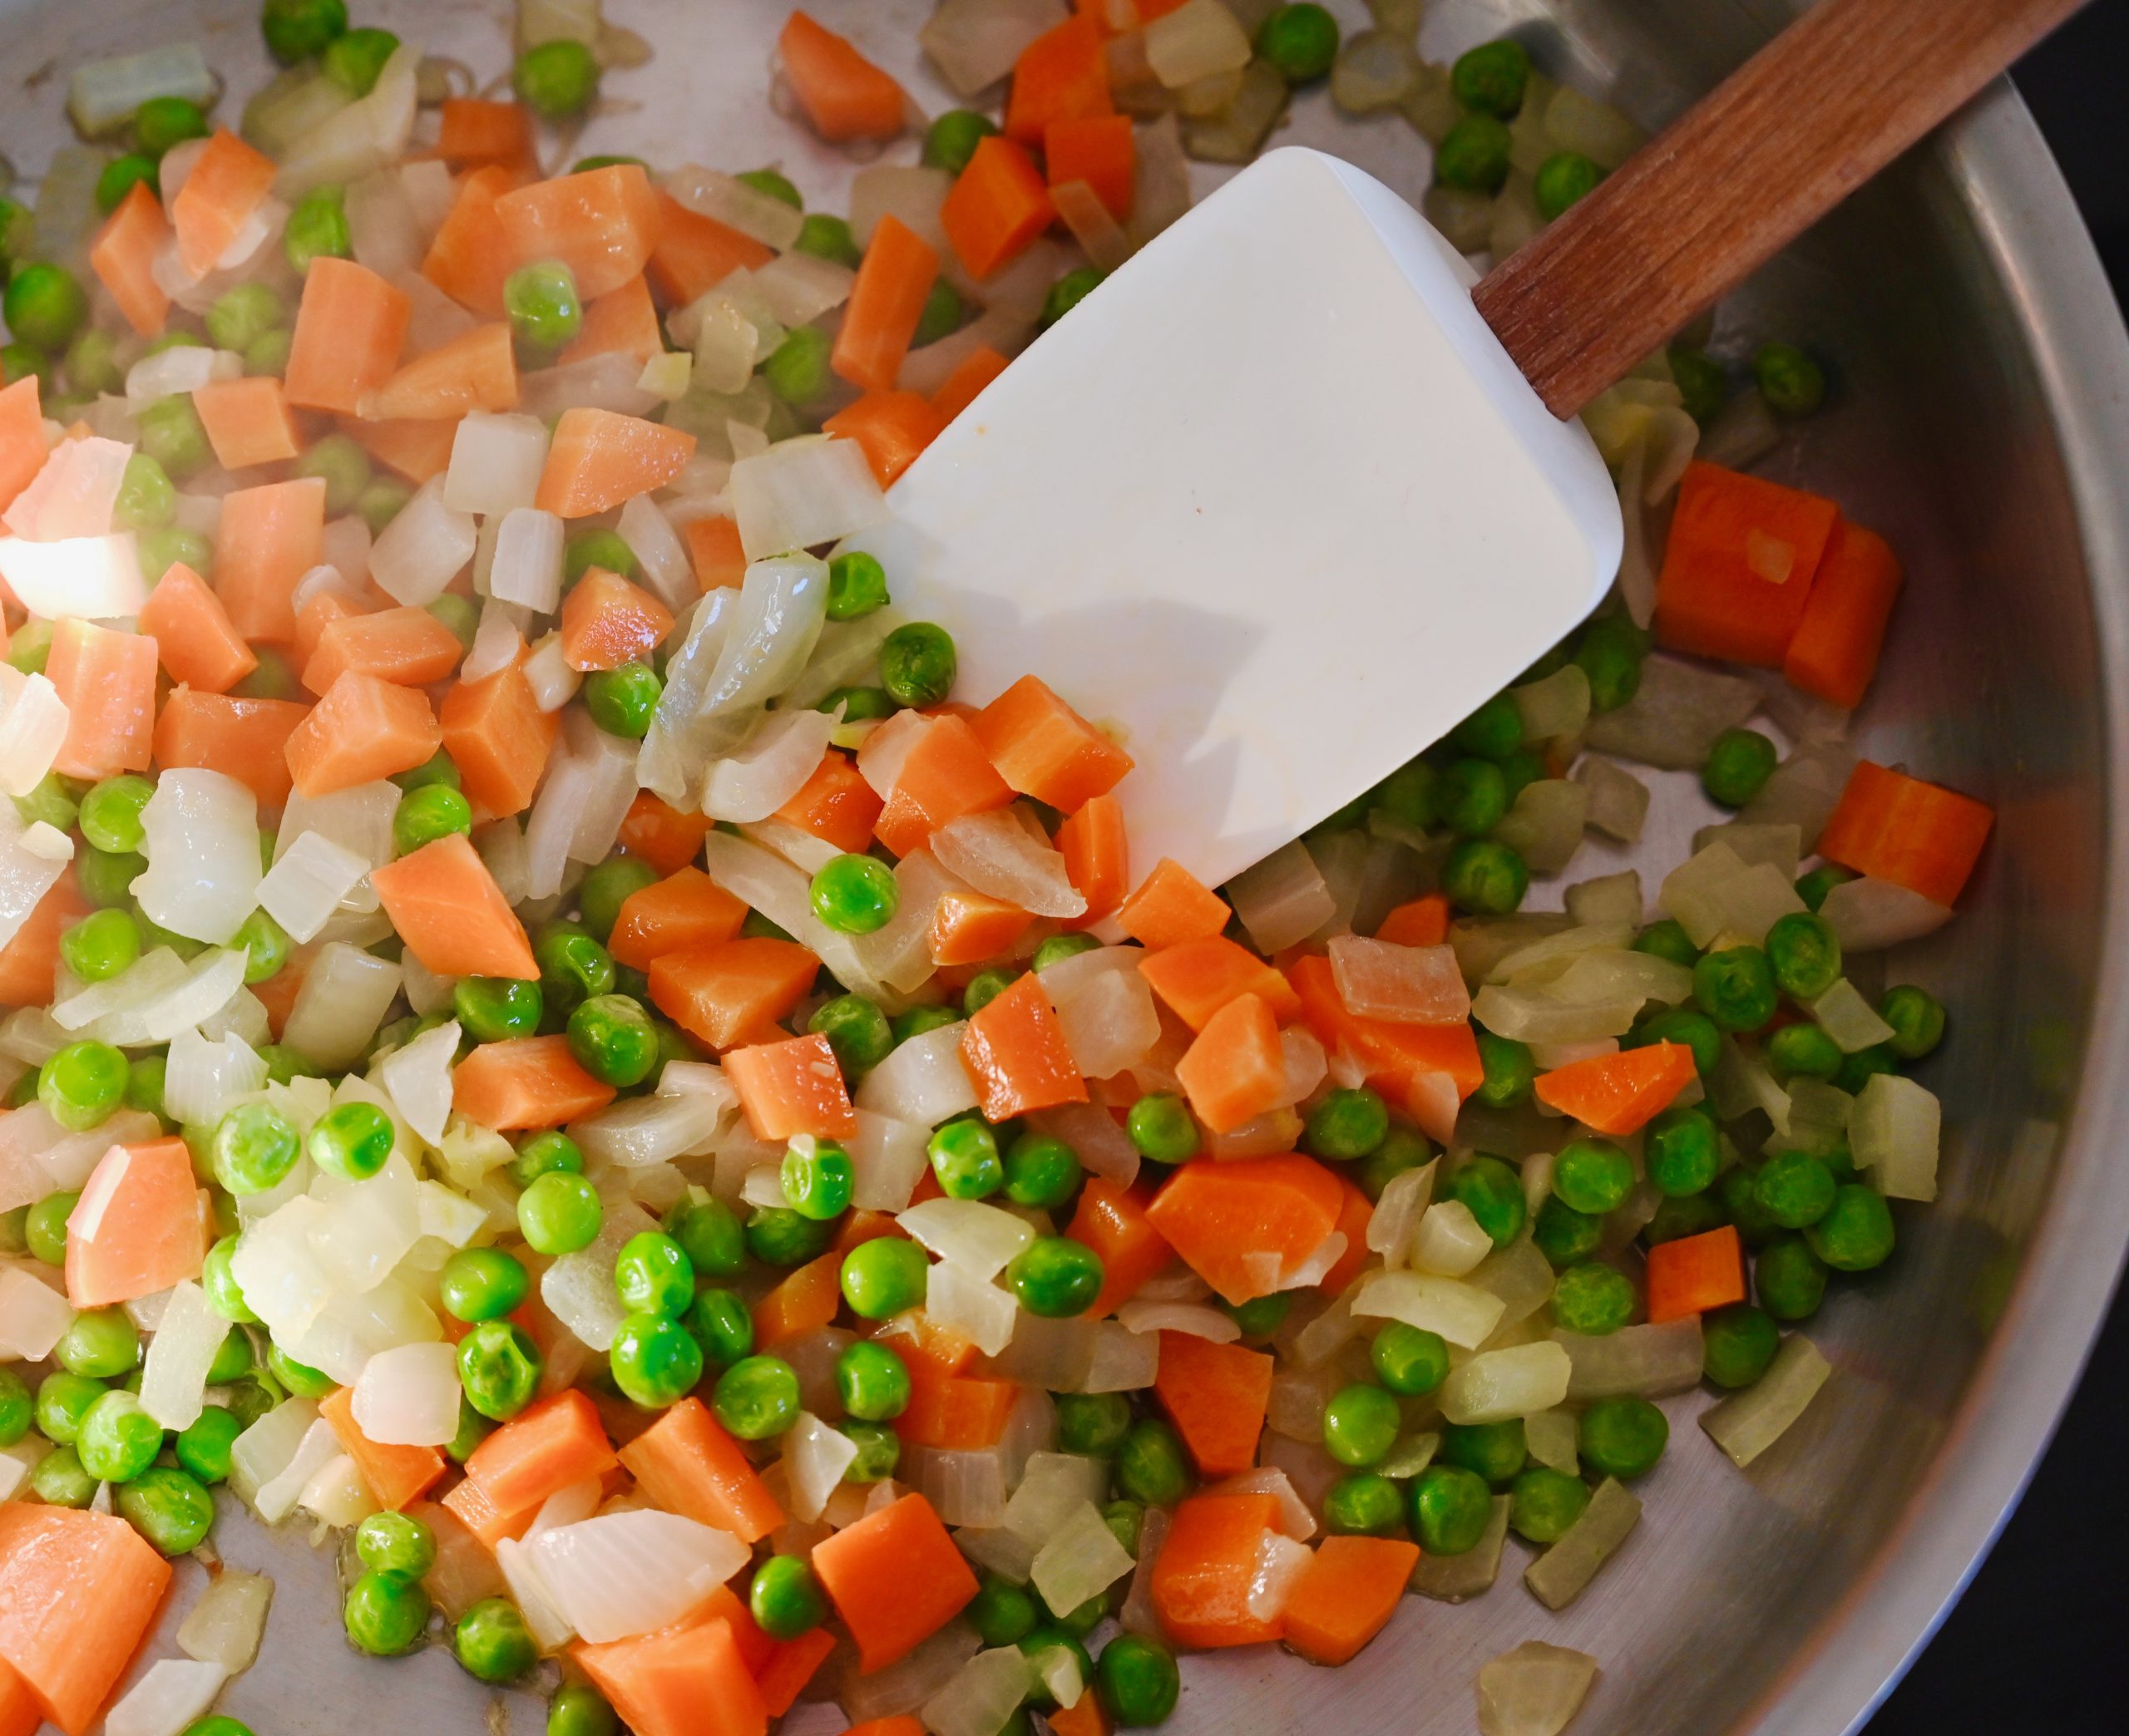
While the salmon is roasting make the three bean salad. Fill a large sauce pot with water and bring it to a boil. Add the green beans to the boiling water and cook them for 5 minutes. Once cooked, remove the green beans from the water and allow them to cool. Slice the tomatoes and shallots and rinse and drain the red beans and black-eyed peas.

Next, make the salad dressing. In a medium sized bowl whisk together the mustard, apple cider vinegar and 1½ teaspoons of reserved cajun seasoning. Then slowly drizzle in the olive oil while continuously whisking the dressing. Continue whisking until the dressing is emulsified into a vinegrette.

Finally mix together the salad. In a large bowl gently mix together the kidney beans, black eyed peas, green beans, shallots and tomatoes. Add salad dressing to taste and stir.

As you finish the salad the salmon should coming out of the oven. Add a side of some crusty Italian bread and you have a delicious dinner.

Cajun salmon with three bean salad is the perfect trifecta that I am looking for in weeknight dinners- quick, healthy and delicious. So if you are wondering what to make for dinner this week then this recipe is for you.

Celebrating Five Years with Lemon Mousse Parfaits

Lemon Mousse Parfait

“So often in life things that you regard as an impediment turn out to be great good fortune.”

Ruth Bader Ginsburg

In life I have found that adversity is often an essential ingredient for growth. Experience has taught me to be grateful for all those seemly sour lemons. Because life’s most delicious moments come when you are brave enough to embrace them and whisk in a little sugar.

I began Maison McCauley five years ago as a way to write a new beginning for myself. I had just made a big cross country move, and left my legal career behind and at the time I was feeling a bit lost. However, as I learned it’s never too late to write a new beginning. Looking back, although I was worried about hitting publish on my first post I am so grateful that I did. So to celebrate this occasion, I decided to design and add some new artwork to my blog and writing home.

However, it wouldn’t be a celebration at Maison McCauley if it didn’t include dessert. In honor of the occasion, I created a new recipe in for Lemon Mouse Parfaits. This sweet and incredibly light mousse is paired with buttery shortbread. Its like the best lemon bar you have ever tasted!

So thank you friends because after 283 posts, 133 recipes and over 205,000 words I am grateful that you keep coming back to read more. Writing this blog has been incredible because it took a seemingly hard moment in my life and made it into the best and most delicious journey imaginable.

Lemon Mousse Parfaits -serves 6

Lemon Mousse

  • 3 large eggs
  • 3 large eggs yolks separated (save two of the egg whites)
  • 1 cup sugar
  • 2 teaspoons lemon zest
  • ½ cup fresh lemon juice (about 3 large or 4 small lemons)
  • 2 egg whites
  • ¼ teaspoon kosher salt
  • 2 tablespoons sugar
  • 3 cups heavy cream
  • 4 tablespoons of sugar
  • ¼ cup lemon curd
  • ¾ cup shortbread cookies, crushed into course crumbs
  • lemon zest twirls, fresh berries and mint leaves for garnish

Shortbread Cookies

  • 2 ¼ cups flour
  • ½ cup sugar
  • ¼ teaspoon kosher salt
  • 1 cup (2 sticks) butter, at room temperature for at least 1 hour
  • 1 teaspoon vanilla extract
  • 1/2 cup vanilla candy melts or chopped white chocolate (decoration for the cookie garnish)

First make the base for the lemon mousse. Fill a large sauce pot with water and get a double broiler pan or a heat proof bowl ready. Heat the water over medium heat till it comes up to a simmer.

Meanwhile, in the bowl of your stand mixer combine 3 eggs, 3 egg yolks and 1 cup of sugar. Beat them together on low speed. Then slowly drizzle in the lemon juice while continuing to beat the eggs and sugar.

Once the water is at a simmer turn the heat down to medium low and place the bowl or double broiler pan on top. The pour in the egg and lemon juice mixture and whisk it constantly as it cooks over the simmering water. Continue cooking and whisking it for 10 to 12 minutes until it is thick like a pudding or pastry cream.

The egg mixture will begin to thicken in about 3 to 4 minutes keep whisking it as it continues to thicken and cook.

Then remove the bowl from the pan. If using a double broiler place the lemon mousse base a medium sized bowl. Allow it to cool for 15 minutes and then cover it with plastic wrap directly on the surface and refrigerate it until it is completely chilled about 1 hour.

Now while the lemon mousse is cooling make the shortbread cookies. If you are running short on time then you could substitute store bought cookies; however there is nothing like homemade shortbread.

Preheat the oven to 375 degrees.

In the large bowl of a stand mixer combine the flour, sugar and salt. Then cut your butter into small pieces, like you would for pie dough or biscuits. Add the butter into your flour mixture and blend on low.

Then as the butter begins to get cut into the flour increase your mixer speed to medium and add in your vanilla. Continue mixing the dough until it just comes together. This dough will be very crumbly, but the butter will help it all it to be press together.

Roll the dough out to a ¼ inch thickness on a lightly floured surface and cut it into small circles with a 2 inch diameter cookie cutter or something similar.

Bake the cookies on a parchment paper lined cookie sheet for 7 to 8 minutes until the very edge of the cookies is a light just barely golden color.

Allow the cookies to cool and if you want a patisserie like finish decorate them with melted white chocolate or candy melts. Place the white chocolate in a small microwave safe bowl. Then microwave the chocolate for 30 seconds. Stir and continue to heat it at 20 second intervals stirring in between until it has just melted.

Place the chocolate into a small pastry bag and cut a small tip off the bottom. Create a lattice like pattern on onside of the cookie by creating three lines on a diagonal and the cross them with three more diagonal lines going the opposite direction. Then smooth the chocolate off the side of the cookies with your finger.

Finally, finish the lemon mousse and assemble the parfait. Place two egg whites and ¼ teaspoon of salt into the bowl of a stand mixer with a whisk attachment. Whisk on high speed until the are soft and foamy add in 2 tablespoons of sugar and continue to beat them until the egg whites are slightly shiny and they form stiff peaks.

Carefully fold the egg whites into the cooled lemon mousse base using a rubber spatula or spoon.

Then place 3 cups of heavy whipping cream and 4 tablespoons of sugar into the bowl of the stand mixer. Beat the whipped cream on high until stiff peaks form.

Fold 1 cup of the whipping cream into the lemon mousse and then fold in ¼ cup of lemon curd.

Assemble the parfaits by placing about 2 tablespoons of shortbread cookie crumbs in the bottom of 6 small bowls or dessert cup. Then pipe or carefully spoon about am even amount of mousse into each of the bowls. Then take the remains 2 cups of whipping cream and pipe or spoon a generous swirl on top of each dessert.

Decorate the lemon mousse with a shortbread cookie. If you want to add a festive touch then top it with some blueberries, blackberries, a mint leaf or a lemon twist. Now matter how you serve them these lemon mouse parfaits are wonderful.

Lemon Mousse Parfaits are a wonderfully light and sweet desert. Perfect for holidays like Easter and Passover because the shortbread cookies don’t have any leavening in them. The mousse can be made ahead of time and then decorated with the berries and mint before they are served. Bon appétit! These French lemon mousses make any day you create them celebration and that in my mind is what cooking is all about.

Reading and Eating: Amy Wu and the Perfect Bao

Every so often I find a book character that I love so much that they seem to transcend the page and become a friend. This is what happened to my daughters and I when we began reading the Amy Wu book series by Kat Zhang and Charlene Chua. Amy Wu is a sort of kindred spirit and a spirited powerhouse of creative energy. My girls and I adore her adventures. Our favorite book so far is Amy Wu and the Perfect Bao.

In the book Amy is tired of feeling like she is too little to get in the kitchen and cook. She longs to create her own bao (delicious Chinese steamed buns) like her parents and grandmother. So determined to do it herself. She carefully puts together a plan to make the perfect bao. However when her plan hits a snag Amy has to get creative.

I can relate to Amy’s struggle. As kid I wanted more than anything to get in the kitchen and cook on my own. As a five and six year old I longed to make fancy frosted layer cakes. There were understandably rules about not using the oven. So desperate to bake I stacked and frosted sandwich bread. Perhaps not the best plan, but I was learning. Looking back those frosted sandwich bread cakes turned out to be important to me because they fueled my desire to keep creating and baking.

So when my daughters like Amy Wu want to get in the kitchen and cook I let them. There are a few rules for safety.  However, sometimes I look the other way when it come to kitchen messes. They have made their own toast and jam cakes and many other   creative dishes along the way. The important thing is they are learning and getting a chance to try something on their own. Amy Wu reminds kids and even kids at heart to persevere and not let the little things (like using the oven and small fingers) stand in the way of your dreams.

After reading this book my daughters had to get in the kitchen to make their own bao buns. My oldest daughter was so serious about it that she specifically asked for a bamboo steamer for her birthday. So we put her new steamer to work and got in the kitchen to make Amy Wu’s bao. Our recipe has a few adaptations to the filling to make them perfect for our family.

Amy Wu’s Perfect Bao Recipe- Makes 20 Bao

Bao Dough

  • 1 packet active dry yeast (2¼ tsp)
  • 1/2 cup warm water (100 to 110 degrees)
  • 4 cups all purpose flour
  • 2 tsp baking powder
  • 2 tsp salt
  • 1/4 cup, plus a pinch of sugar
  • 1 cup low fat milk
  • 2 tbsp vegetable oil
  • You will also need a bamboo steamer and twenty 2 inch square squares of parchment paper

Prepare the bao dough.

First, bloom the yeast. In a glass measuring cup or small bowl add the hot water and stir in a pinch of sugar. Then stir in the yeast packet. Let it sit for five minutes until the yeast begins to bubble and grow.

Meanwhile, in a large mixing bowl combine 3½ cups of the flour, 2 tsp baking powder, 2 tsp salt and 1/4 cup sugar.

Next, add the milk, oil and yeast mixture into the dry ingredients. Mix until the wet and dry ingredients are well incorporated. Knead the dough. Use a bit of the remaining 1/2 cup of flour to flour the kneading surface and add a small amount only if the dough is still sticky. (I found that I didn’t need to add much). Continue to knead the dough for 5 to 10 minutes. You will know the dough is ready when a thumbprint pressed into the dough slowly rises back.

My daughter helping me knead the dough.

Form the dough into a ball. Clean the bowl and lightly spray it with cooking spray. Place the dough ball in the bowl and cover with plastic wrap. Leave it in a warm place until the dough doubles in size about 1 to 1½ hours. (Note if your kitchen is a bit chilly like mine is this time of year, then turn on your oven. Place the dough bowl on top of the oven as it rises. The oven will warm your kitchen which helps with the rise.)

Gently punch down the dough and knead it for another 5 minutes. Place it back in the bowl. Cover it with plastic wrap and let it rise for an additional hour.

Bao Filling

  • 1 pound ground pork
  • 1 egg
  • 1 tsp sesame oil
  • 2 tbsp soy sauce
  • 2 tbsp oyster sauce
  • 1 tsp ginger powder
  • 3 cloves garlic, finely minced
  • 2 tsp fresh garlic, peeled and minced

While the dough is rising make the pork filling. In a medium sized mixing bowl add the ground pork, egg, rice wine, sesame oil, soy sauce, oyster sauce, ginger powder, fresh ginger and garlic. Mix well and form into generous rounded tablespoon sized meatballs. Refrigerate the meatballs until you are ready to assemble the bao.

The bao dough before and after the second rise.

Once the dough has risen a second time, it is time to assemble the bao. First, cut 20 two inch parchment paper squares and prepare your steamer. Use a wok or a deep sided skillet that your steamer fit inside. Fill the skillet half way full with water and heat it on medium heat. You want the water level at time of cooking to be just below the bottom steamer rack. Wait to add your steamer when the bao are ready to be cooked.

Next shape the bao dough into a rope that is 3 inches in diameter and then cut the dough into 20 equal sized pieces. Take each piece of dough and flatten it into a rough circle. the with a rolling pen or by hand roll or press our the edges to make about a 5 inch diameter circle. The dough should be thicker in the center and thinner on the edges.

Then take the seasoned pork meatballs and place one in the center of the dough circle. Pleat the top of the dough by creating small back and forth fan like folds in the dough all along the top. It will look like a little ribbon drawn purse.

I am still working on my bao pleating skills, but if you are new to it too then here is an idea about what it should look like.

Then pinch and bring the folds together and twist them to form a top that resembles the shape of a garlic head. Take the twisted tip and press it down in the center.

Place each pleated bao on a parchment paper square. Pleated boa should rest for 15 minutes before they are steamed. It takes at least this long to pleat all the bao so by the time you finish the first batch will be ready to go.

My daughters wanted to be a part of this reading and eating post so we made a little video on how to roll and pleat the bao buns.

Place the about 5 to 6 bao on each layer of the steamer. Carefully put the steamer in the simmering water and steam the bao for 10 minutes.

The bao before I put the lid on to steam them.

Then remove the steamer from the heat heat for 3 to 4 minutes before removing the lid, to keep the bao from deflating. Repeat the steaming process adding more water to the pan as needed until all the bao are cooked.

Then the best part eating and sharing the bao.

The pork filling creates a salty sweet balance with the dough. If you want you can dip the bao in soy sauce or make a soy based dipping sauce with some rice wine vinegar, sesame oil and if you want a tiny bit of garlic chili sauce.

So, cook up an adventure in your own kitchen. These bao take a little time, but most of it is spent allowing the dough to rise. The assembly of the bao went quickly with the three of us working together. My girls and I really enjoyed learning something new! These bao buns were so delicious that I am sure we will making more soon. They would be wonderful to make for Chinese new year next week or to celebrate the upcoming Olympic Games.

Dreaming of Dahlias

“Dahlias have a life force of their own. They are the gift that keeps on giving.”

William Li

Grow what you love and your garden will flourish. There is no single garden that is right for everyone, but I have always loved flowers. They bring me so much joy. I love planting them and filling my house with bouquet after bouquet. This is how I fell in love with dahlias. I started with a few tubers that I picked up from Home Depot, but now I find myself growing more each year.

Dahlias are less fussy than roses and perfect for small gardens. I love them because they defy the small garden dilemma- should pick and share the flowers or leave them in the garden? Dahlias allow you to do both. They create a three month bonanza of summer blooms and their abundance only increases as you cut them. So I don’t feel bad about picking my flowers. Their dazzling petals and outrageous colors make gorgeous arrangements.

A bouquet of dahlias from my garden. I love the combination of the purple and coral blooms.

My summer flower garden plans begin in late December and January as I begin to order my dahlia tubers for the coming year. I love looking at all the different possibilities as I narrow down my selections for the coming year. Reading through the catalogs and online listings is like being a kid with the big Christmas toy catalog. It’s fun to scroll through Instagram posts of other gardener’s favorites, because I have yet to find another flower with such an enthusiastic fan base.

When I am outside gardening in the summer people often stop to ask about my flowers which makes me happy. I love talking to other gardeners. Dahlias do indeed have a certain “life force” about them. Because their beauty causes us to stop for a moment and ponder the wonder of nature.

Like any gardener I have perennial favorites that I grow every year, but I always like to try out a few new varieties too. As I am writing this post it is a frosty 9 degrees outside, however the thought of summer dahlia season warms my heart.

Here are a few of my all time favorite dahlias that made my ordering list:

Milena Fleur

These salmon pink beauties are the sturdiest and most abundant bloomers that I have ever grown. They have medium sized flowers with strong stems. I love their slightly shorter growth habit. It makes them the perfect variety to layer in front of other larger dinner plate dahlias. Their compact size would also work well in a large pot or container.

American Beauty

The name says it all. This dahlia has the most beautiful deep coral color with fuchsia tipped petals and dark purple stems. Their color and abundant blooms make them the star of any floral arrangement. They are a more compact variety so I love to plant them in front of larger dinner plate dahlias like Le Barons or Thomas Edisons.

Le Baron

Le Baron Dahlias were one of the first dinner plate varieties that I tried and I have planted them every year since. Their huge magenta blooms and bright green foliage pair well with the coral color of the American Beauties.

Thomas Edison

These flowers have large purple blooms with deep purple stems. They are an older American variety that are well loved because they tend to be sturdier than other larger dinner plate varieties. They love full sun and are a more heat tolerant variety.

Lilac Time

These English heirlooms dahlias have blueish lavender color with deep purple stems. Their large blooms and ruffled edges make these dahlias stunning. Their big blooms need some some support or staking, but they are well worth the effort because they are outstanding bloomers.

Lavender Perfection

This vintage dinner plate dahlia has a soft pinkish purple color with long elegant petals. Its large flowers are so spectacular that just one lavender perfection in a vase makes a beautiful arrangement. Their large blooms require a careful staking or a garden hoop support system. However, they have a lovely cottage garden feel to them.

Milena Fleur and Le Baron Dahlias layer well in my garden.

Tips for Growing Dahlias

  • First know your garden zone. Most dahlias do not like extreme humidity and heat so if you live in a tropical zone you may need to protect them from too much rain and grow more heat tolerant varieties.
  • Second, if you want more flowers and sturdier stems then you need to pinch back the center stalk as the plant begins to grow. You can do this when your plant is a foot or so tall and has at least four sets of leaves on the center stalk. You want to cut the center bud off leaving 3 to 4 sets of leaves on the bottom. This will encourage the plant to send out twice as many branches and give you more flowers into the fall.
  • Third, large decorative dahlias need support, so the plants don’t break in the wind or from the weight of the blooms. I have found that garden hoops work well if you have a small planting area. If you have a lot of plants, you can stake the perimeter area and use soft garden twine to create a support structure. The key is to not damage the roots with the stakes and allow for some supported movement of the plant.
  • Fourth, you want to protect dahlias from Japanese beetles. These beetles are the nemesis of any dahlia gardener. They can devourer dahlia flowers at an astonishingly fast pace, but there is a simple solution. Spray the plants with Japanese beetle spray. It is better for the flowers if you spray them early in the morning or in the evening when it is cooler.
  • Finally, now is the time to order dahlia tubers for spring shipment. Most bulb and seed companies open dahlia sales in December and the most popular varieties can sell out quickly. So plan now for a gorgeous summer garden!

If you are a dahlia enthusiast too then I highly recommend reading Floret Farm’s Discovering Dahlias by Erin Benzakein. It is an excellent resource with great pictures and in depth explanations. This book covers everything you need on how to grow and even cultivate your own varieties of dahlias.

Milena Fleur Dahlia. This waterlily form blossom is one of the prettiest and most low maintenance dahlias.

Dahlias are a gift to the garden because they produce an abundance of beautiful flowers. There are so many colors and varieties to love. Once you grow them it’s hard to imagine a summer garden without them.

Rooting for the Underdog of a Year with Cheddar Topped Shepherd’s Pie

cheddar topped shepherd's pie

The new year has begun with a bang. Watching and reading the news, it feels like the grand finale of a fireworks show. Only after two years of fatigue riddled craziness, I certainly hope it’s nearing the end.

New Year’s Day brought us snow here in Chicago and a renewed sense of peace. We watched the snowflakes swirl and fall from our windows. Then when enough snow had covered the ground, my daughters raced to pull on their coats and boots so they could go out to play. Looking out my kitchen window, I could see the sun setting against the fresh snow. I watched it while I cooked. Even the last little glimmer of light shown brighter in the snow, which reminded me that it’s who you surround yourself with that matters most. 2022 may indeed be better and brighter not because of what has happened, but because of who we have become in the struggle.

I thought I would begin the year by sharing a recipe that I made for New Year’s Day, shepherd’s pie. This recipe has ground beef which technically makes it a cottage pie. However, it is also good with a more traditional ground lamb. My version of this cheesy potato topped dish is inspired by a British pub called the Black Labrador. It was a local favorite in my hometown of Houston for over thirty years. After the owners retired a couple of years ago, I had to recreate the dish I missed.

Not everyone makes it with cheese. But when I was watching an episode of the British football inspired comedy Ted Lasso, I thought it was interesting that they mentioned “cheesy topped” shepherd’s pie. It’s Rebecca’s childhood favorite. So, if you are wanting a feel good British pub inspired dinner then try my shepherd’s pie and watch and episode or two of Ted Lasso. It’s sure to make you smile and have you rooting for what feels like an underdog of a year.

Cheddar Topped Shepherd’s Pie – Serves 4 to 6

  • 2 tablespoons butter
  • 1 medium yellow onion, finely chopped
  • 2 large carrots (3 small carrots), peeled and chopped
  • 1 garlic clove minced
  • ¾ cup frozen peas
  • 1¼ to 1½ pounds ground beef or lamb
  • ½ teaspoon garlic powder
  • ½ teaspoon kosher salt
  • ground black pepper, to taste
  • 1 tablespoon flour
  • 2 tablespoons tomato paste
  • 2 teaspoons Worcestershire sauce
  • 1 cup beef broth
  • 1 cup shredded sharp cheddar cheese, grated (white cheddar cheese is also good)

Mashed Potato Topping

  • 3 medium russet potatoes, peeled and diced
  • 4 tablespoons butter
  •  ½ cup cream or milk
  • 1 teaspoon kosher salt

Preheat the oven to 350 degrees.

First, place the potatoes in a large pot and cover them with cold water about one inch higher than the potatoes. Then bring the potatoes to a boil over medium high heat. Cook the potatoes for 25 minutes until they are soft and break apart with a fork.

Meanwhile melt the butter in a deep skillet add the diced onions and carrots and cook over medium heat stirring occasionally until the onions begin to turn translucent and the carrots begin to soften. Add in the garlic and peas and cook until the peas are warmed through. Transfer the cooked vegetables to a large plate or bowl.

Then add the ground beef to the pan. Cook the meat until it is cooked through and crumbly. Season the beef as you cook it with the kosher salt, garlic powder and pepper. Sprinkle the tablespoon of flour over the ground beef then stir in the tomato paste and Worcestershire sauce. Next, slowly pour in the beef broth while stirring so that the flour is well mixed in and the broth makes a sauce. Then add the cooked vegetables back to the pan. Continue to cook for two to three minutes more until the sauce thickens.

Set the beef and vegetables aside for a minute, while you prepare the mashed potatoes. Drain the cooked potatoes and then rice them with a potato ricer or mash them in the pot.

Add the butter, cream and salt. Then mix them together with a rubber spatula until they are light and creamy.

Pour the beef and vegetables in a lightly greased square (8×8) baking dish. Spread the mashed potatoes evenly over the top and then sprinkle on the cheddar cheese. Place the baking dish on a cookie sheet or baking pan just incase the filling bubbles as it bakes.

Bake for 20 to 25 minutes until the cheese is melted and golden on the edges.Shepherd’s pie is classic pub food that feeds the soul. The seasoned beef and vegetables with cheddar topped mashed potatoes make a delicious dinner. It’s a wonderful meal to share on a cold winter day. So, cheers to the new year and here’s to believing that brighter days are coming soon!

Apple TV Ted Lasso

Chocolate Mousse Cake

Julia Child once said the the most important ingredient you can bring to a recipe is a “love of cooking for its own sake.” Because if you love to cook, the preparation and time it takes to make something truly wonderful is a joy. This chocolate mousse requires a little planning, but it is one of the most decadent and elegant chocolate cakes. It would be a great finale for any holiday meal.

I have always felt that cooking for those that you love is such a wonderful gift. I created this cake for my husband’s birthday. He loves dark chocolate and chocolate mousse so this year I decided that I wanted to create a chocolate mousse cake. This recipe is inspired some of my favorite chocolate recipes by Ina Garten and Rebecca Rather. What can I say, some people and recipes are worth a little extra time in the kitchen.

Chocolate Mousse Cake 

  • Chocolate mousse
  • 3 Round ten inch chocolate cake tiers
  • Chocolate Glaze
  • 1 (4oz) bar of good semi sweet chocolate, grated
  • 1 (6oz) container of raspberries
  • 1 small bunch of mint

Chocolate Mousse -makes about 6 cups (Adapted from Ina Garten’s Barefoot in Paris

  • 6 ounces good semisweet chocolate, chopped
  • 2 ounces good dark chocolate, chopped
  • 2 teaspoons vanilla extract
  • 12 tablespoons (1½ sticks) butter, room temperature
  • 8 large eggs, at room temperature, separated
  • pinch kosher salt
  • ½ cup plus 2 tablespoons sugar
  • ½ cup cold heavy cream

Chocolate Cake -makes 3 ten inch tiers (adapted from Rebecca Rather’s The Pastry Queen)

  • 1 cup (2 sticks) butter
  • 2 cups water
  • 1 cup canola oil
  • 4 cups sugar
  • 1 cup unsweetened cocoa
  • 4 cups flour
  • 4 large eggs
  • 1 cup buttermilk
  • 1 tablespoon baking soda
  • ½ teaspoon kosher salt
  • 1 tablespoon vanilla extract

Chocolate Glaze

  • 12 ounces semi sweet chocolate, chopped
  • ¾ cup light corn syrup
  • 1 ½ cup heavy whipping cream
  • 4 teaspoons vanilla extract

First make and chill the chocolate mousse. In a heat proof bowl or double broiler pan combine the semisweet and dark chocolate. Set it over a pan of simmering water. Stir until the chocolate just melts. Then remove from the heat and let it cool for 5 to 7 minutes till it become room temperature. Then whisk in the butter a tablespoon or two at time.

Next place the egg yolks and ½ cup of sugar in the bowl of an electric mixer. Using the paddle attachment, beat the yolks on highs peen for 4 minutes until the eggs are pale yellow and thick. Transfer the eggs to a large mixing bowl. Then whisk in the chocolate mixture.

Now place the egg whites, a pinch of salt and 1 tablespoon of sugar in the clean mixer bowl and whip them using the whisk attachment on high speed until they are stiff, but not dry. Whisk half of the egg whites into the chocolate mixture and the gently fold in the rest of the egg whites using a rubber spatula.

Lastly, without cleaning the bowl whisk the heavy cream with the remaining 1 tablespoon of sugar until it is firm. Fold the whip cream into the chocolate mixture. Chill the mousse in the fridge.

Second bake the chocolate cakes and let them cool completely. Preheat the oven to 350 degrees. Line the bottom of 3 ten inch cake pans with parchment paper rounds and grease with Baker’s Joy or grease and dust with flour.

In a medium sized sauce pan combine 2 sticks of butter, 2 cups of water and 1 cup of canola oil. Heat over medium heat until the butter has melted. Then take the pan off the heat and let it cool. Meanwhile, in the large bowl of your mixer stir together 4 cups of sugar, 1 cup of cocoa powder and 4 cups of flour.

Now pour the butter mixture into the flour mixture and whisk on low speed till smooth. Whisk in the eggs one at a time. Then add in 1 cup of buttermilk. Next mix in the baking soda, salt and vanilla until well combined.

Pour the cake batter into the prepared cake pans and bake for 35 minutes. Let the cakes cool.

Third, pipe the mousse filling between the layers and place the cake in the freezer for at least 2 hours or preferably overnight. Using a large pastry bag and large star tip pipe the chilled chocolate mousse between the two layers. Reserve about 1 cup of mousse to pipe the top of the finished cake. Keep the mousse remaining mousse in the fridge. Then place the piped cake in the freezer.

Here is a step by step look at how this cake comes together. As you can see the sides of my glazed cake are not perfect, but that is fine. The grated chocolate will cover any minor spatula marks or imperfections.

Fourth, prepare the chocolate glaze and grated chocolate for the sides of the cake. Place 12 ounces of chopped semisweet chocolate into a large mixing bowl. Then in a medium sized sauce pan combine the 1 ½ cups cream, 4 teaspoons vanilla and ¾ cup light corn syrup. Corn syrup can be sticky so grease the measuring cup with a little cooking spray. Heat the cream mixture of medium heat until it just comes to a boil. Pour the hot cream mixture over the chocolate and whisk until the chocolate is completely melted. Keep the glaze a room temperature to ensure that it will pour.

Finally, decorate the cake with the chocolate glaze and pipe the remaining mousse on the cake. Remove the cake from the freezer and place it on a small cardboard cake round. Then place the cake on a cookie rack that has parchment or wax paper under it. The rack makes it easier to neatly pour and spread the glaze. The parchment paper below keeps the work space clean and allows you to reuse any glaze that falls to frost the sides of the cake. Ladle or pour the glaze over the tops of the cake. Then using a separated spatula make an even and smooth layer of chocolate glaze on the tops and sides of the cake.

Then carefully press the grated chocolate onto the sides of the cake for a beautiful finish. Let the glaze set in the fridge for 10 to 15 minutes and then pipe on the remaining chocolate mousse and add the raspberries and mint leaves.

Make sure that this cake is kept in the fridge until you are ready to serve it. Now the best part, eating and sharing this amazing cake. This recipe takes some planning ahead but its well worth it.

This cake is moist and although there is lots of chocolate in it, the mousse layers keep it light.

Want another idea for decorating this holiday cake? Then try a black and white design. Use chocolate sprinkles on the sides of the cake and top it with a ring of white chocolate snowflakes.

No matter how you decorate it, this chocolate mousse cake is sure to make any holiday gathering a celebration to remember.

Bake Yourself A Merry Little Christmas

The holidays are filled with so many of my favorite things twinkly lights, Christmas trees, time with family, holiday baking and gingerbread houses. But inevitably there are things like mile long to do lists, COVID booster shots, work and other distractions that can threaten to take the merry right out of the season.

Six months ago, I was making dentist appointments for my daughters and the receptionist wanted to schedule it on my husband’s birthday which is close to Christmas. I explained that afternoon wouldn’t work because I needed the time to bake a birthday cake. She then laughed and said “they can have clean teeth for the cake.” She actually thought I was joking and I get it. Who schedules an afternoon off to bake a cake? Yet, I was serious. I have found that if you don’t make time for the things you love, the holidays and birthdays can fly right by you.

This is why for the last twenty something years I have made time for seemingly crazy holiday baking traditions like homemade birthday cakes and gingerbread houses. They are a part of my art and what I love to share with my family. Now that my daughters are in apart of this tradition it has become even more meaningful.

Our gingerbread village adds a festive touch to my kitchen bookshelf.

This year my house is a patisserie inspired by The Queen of Tarts that I once visited in Dublin Ireland. I have always wanted to make a bakery and this one has such a lovely red front door that it was perfect for a holiday gingerbread house.

The red door is made from sugar gum paste and the front window is filled with a gum paste cake and tarts. In order to get a more vibrant color for the red and green accents I painted the gum paste with gel food coloring diluted with a few drops of vodka. You could also use a clear alcohol based extract like almond extract. The alcohol will evaporate and leave the color behind. The gold accents are from gold luster dust mixed with a small drop of vodka so I could paint it on evenly.

A side view of a winter tree, ice cream cone Christmas trees and white chocolate snowflakes.

My girls have been decorating their own gingerbread houses since they were in preschool. However, now that they are older, they have their own creative plans. My oldest wanted to add a not so cookie cutter prince and princess for a fairytale themed house. While my other daughter went with a Peanuts house with a patterned candy roof.

This year I thought I would share a new gingerbread house recipe that I have been using for the last two years from an excellent book called The Gingerbread Architect. What I like about this recipe is how quickly and evenly it bakes. If you want to make your own house then see my tips on baking and decorating in my post on gingerbread with kids.

Gingerbread Dough (from the Gingerbread Architect) – Makes one medium house

  • 1 cup Crisco shortening
  • 1 cup sugar
  • 2 teaspoons baking powder
  • 1 teaspoon baking soda
  • 2 teaspoons ground ginger
  • 1 teaspoon cinnamon
  • 1 teaspoon salt
  • 1/2 teaspoon ground cloves
  • 1 cup molasses
  • 2 large eggs
  • 2 tablespoons white vinegar
  • 5 cups all purpose flour

Preheat the oven to 375 degrees.

In a large stand mixer combine the shortening and sugar on medium speed until light and fluffy.

Next add the baking powder, baking soda, salt, cinnamon and cloves until well incorporated. Then mix in the molasses, eggs and vinegar and scrape down the sides.

Finally mix in the flour one cup at a time on low speed. scrape down the dough.

Then you can roll out the dough in small batches on a silicone mat or well floured piece of parchment paper. Bake for 12 to 14 minutes or until the gingerbread is firm. Then while the gingerbread is still warm cut out your house pieces. This will ensure that your sides are perfectly straight. I find that if I cut the dough ahead of baking I risk shrinkage and a possibly wonky edge issues.

Continue baking small batches until all the walls and pieces are baked. Once the house pieces are cool assemble them with royal icing.

Note: If you want an easier project then see my post on gingerbread house fronts or just use the royal icing recipe to make one from a kit. I have found that the icing that comes in the kits is harder to use than homemade.

Royal Icing- Makes 5 cups of icing

  • 4 large egg whites
  • 1 teaspoon cream of tartar
  • 2 teaspoons of water
  • 1 pound of powdered sugar

Mix all your ingredients in the bowl of your stand mixer at medium speed. Continue to mix until your icing forms stiff peaks (about 5 minutes).  You want your icing to be thick so it can hold your structure together. If your icing is not thick enough you can add more powdered sugar. If you want it a bit less stiff to pipe decorating details then you can add a little water, but be careful because a little goes a long way.

So here is to gingerbread and making time for the things that make you happy this holiday season!

The Sunny Side of the Street

Midwesten Fall Gardening

Grab your coat and get your hat. Leave your worries on the doorstep. Life can be so sweet. On the sunny side of the street

Dorothy Fields

The air is crisp, but the sun is warm as it streams down through the autumn leaves. There is a skip in my step as I walk down the street and sing this happy tune. Each tree lined road is full of autumn’s brilliance. Then the wind blows sending hundreds of leaves swirling through the air. I stop for a moment and marvel at the kaleidoscope of colors.

I take my camera along with me as I try to capture the wonder of a Midwest fall.

Everywhere you look walkways are lined in purple, orange and yellow mums

Fall Porch Decor

The historic homes seem to greet you with gorgeous flowers and pumpkins in every color and shape.

As I walk further I spy window boxes filled with crimson and gold mums.

I feel a kind of reverence as I gaze up at a towering orange maple tree.

As I look closely each leaf seems to be painted with such divine detail. Is that tree really chartreuse, crimson, magenta and purple all at once?

Then I glance over at a near by tree. Now there are leaves in shades of apricot, auburn, marigold and marmalade that shimmer in the light.

I round the bend near the park where there is cottage style house with the most charming garden path.

The squirrels are darting in and out of the bushes burying acorns as fast as they can. In the distance I can hear the geese calling as they fly overhead. There is a magical melody to this time of year. 

As the colored canopy of trees envelopes me in its wondrous beauty, the worries of my day seem to fade away. As I stroll home along the golden leaf lined streets I feel the sweetness of taking a walk on “the sunny side of the street.”

Stone garden arch

Why the World Needs Fairytales and Princesses

There is a great sense of anticipation in my house as Halloween approaches. My daughters are currently counting down the days. Our family loves to dress up and celebrate. However, no one loves Halloween more than my eight-year-old daughter, Gabby. As far as she is concerned every day should be filled with costumes and magical thinking. This year she is going to be Princess Zelda and her sister Alyssa is going to be Dorothy from the Wizard of Oz. Princess Zelda proved to be a bit more of a costume ordering challenge but my daughter helped me get all the details just right. Because she is an expert on princesses.

For as long as I can remember my daughter, Gabby has loved princesses and fairytales. She has always been one for costumes, crowns and stories. She once took a flying leap off the living room curtains while playing Rapunzel. Alas her curtain hair could not support her plans to swing her way out of her pretend tower as the rod came crashing down. She was fine but the curtain rod was toast. Then in kindergarten she began designing her own costumes. She would spend all of her free choice time in school coloring and cutting out costumes complete with crowns and earrings she taped to her ears. Every day was a royal adventure.

However, there was a time when I began to worry that her zealous love of princesses might have become too much. One day in preschool she brought home a “what I want to be when I grow up” project. As we began to work on it, I was curious to see what she would choose. Her answer without a moment’s hesitation was “I want to be a princess.”

This preschool project suddenly had me to questioning myself as mother. What had I been teaching her? Is being a princess really a job you can choose? Concerned, I tried to talk my four-year-old out of it, but what should I say? Being a princess is an inherited burden. Historically speaking royal life doesn’t always end so happily ever after. However, what I failed to realize is that her definition of princess was different than mine.

After all modern-day storybook princesses are no longer limited to the role of the damsel in distress. They are crime fighting superheroes like the Princess in Black. They can bravely fight to save their own kingdom like Disney’s Moana, Mulan and Elsa. Princesses can now courageously write their own story like Amazon Prime’s new version of Cinderella. In this modern tale Ella unexpectedly turns down the crown in order pursue her dreams of being a fashion designer and small business owner. So, is wanting to be a princess really as bad as I had feared?

Sarah Coyne, a developmental phycologist at BYU recently made headlines from the Wall Street Journal to Time magazine for her research on the new “princess culture.” Her studies surprisingly found that children who had higher engagement in the “princess culture” in the preschool years actually had more progressive attitudes about women and a healthier sense of body image as they grew older. Perhaps my daughter had it right all along.

Fairytales are powerful stories that often inspire courage in the face of adversity. This is why I have come to appreciate her love of princesses. In her own way my daughter has used these stories to make herself stronger when facing of her own challenges in school.

When Gabby was in first grade, she needed eye therapy to correct her vision. Vision therapy was difficult and there were days when she just wanted to give up. One day after a particularly tough session, the therapist was giving Gabby a pep talk when my daughter stopped her. She said “I bet you would feel much better about this if you could wear a princess outfit.”  The therapist had to laugh and agree.

We may only be little once, but the lessons we learn and stories we tell stay with us. I now realize that I was wrong to question her royal ambition. Because as my daughters grow, I want them to become brave and confident women who know how to tame the dragons of this world and become anything they want to be.

French Onion Soup with Gruyère Cheese Croutons

Onion Soup

French bread, caramelized onions, white wine and cheese was there ever a more comforting and decadent list of ingredients? This is why French Onion Soup soup remains a cherished favorite. It’s one of those good weekend recipes when you have just a little more time in the kitchen. The caramelized onions take a little patience, but apart from some occasional stirring they are easy to make and well worth the effort. One spoonful of the beefy onions with the crusty baguette and nutty melted cheese warms the soul.

French Onion Soup with Cheese Croutons -Serves 4 to 6

  • 4 Tbsp butter
  • 5 large sweet yellow onions, halved and thinly sliced
  • 1 tsp kosher salt, plus more for seasoning
  • 1/2 cup dry sherry
  • 1 cup white wine
  • 6 cups good quality beef broth
  • 3 bay leaves
  • 1 fresh thyme sprig
  • 1/2 tsp fresh ground pepper
  • 1 small French baguette, sliced into 1/2 inch thick slices
  • 3 Tbsp butter, melted
  • 1/2 cup grated Gruyère or Swiss cheese
  • 1/4 cup grated parmesan cheese

Melt 4 tablespoons butter in a large stockpot over medium heat. Add the sliced onions and cook for 30 to 40 minutes stirring occasionally to make sure the onions cook evenly. Season the onions with 1 teaspoon of kosher salt. Once the onions turn a caramelized golden brown add in the sherry.

Scrape up the brown bits and let the sherry simmer for 5 minutes. Then add the white wine and simmer for 10 minutes more. Add beef broth, bay leaves, 1 spring of thyme and pepper. Taste the soup for seasonings and add additional salt if needed. Let the soup simmer for 20 minutes.

Preheat the broiler and melt 3 tablespoons of butter. Brush the melted butter on the top of each French bread slice. Toast the bread for 1 to 2 minutes until the edges of the bread slices are just golden. Then sprinkle parmesan and Gruyère or Swiss cheese on top of each slice. Broil for an additional 2 to 3 minutes until the cheese is melted and bubbly.

Remove the bay leaves and thyme sprig from the onion soup and serve the it hot with two to three cheese croutons on top. Garnish with small fresh herb sprigs.

I have been known to serve this soup with the Caesar salad, but for an over the top meal serve it with my Avocado and Romaine Salad. They are amazing when paired together. As the days get shorter and chillier there is nothing like a comforting bowl of French onion soup.

Contact Us