Spring Is Here

The earth laughs in flowers- Ralph Waldo Emerson

After a cold April, May is here and the flowers in Chicago are all in bloom. My mom was in town this past week so I took some time away, but this week we made it out to one of my favorite places, the Chicago Botanical Gardens. The spring blooms were gorgeous so I had fun taking a few photos hoping to capture a bit of the beauty of spring.

This pink anemone with its feathery two toned purple center was one of my favorites.


The stately foxgloves towered over the flower beds welcoming bees and butterflies.

There are ranunculus in every color imaginable. Theses layers of fuchsia petals are a happy sign of spring.

A honey bee stopped long enough for a photograph.


Lilies taking in the warm spring sun.

Then there was a hillside of poppies in vibrant reds, yellows and oranges. The view was spectacular. Spring is here and everywhere you look there are breathtakingly beautiful flowers.

Chocolate Cabernet Tart

Chocolate Raspberry Tart Recipe

What should I bring for dessert? I was looking for a recipe to share with friends last week and I thought it might be fun to make a tart. So as I was searching through my cookbooks trying to decide what to make, I found this recipe for a Chocolate Cabernet Tart from a well-loved French restaurant in Houston called Chez Nous. It comes from a wonderful cookbook my sister-in-law gave me a few years ago called Houston’s Classic Desserts. The book has a collection of dessert recipes from some of the best restaurants from my hometown of Houston.

This recipe just read like it would be good, so I decided to take a risk and try something new. The results were so delicious that I decided I would make it again and share it on the blog. It’s an elegant and pretty dessert, but it’s also surprisingly easy to make. The crust is made from almonds so this tart is also gluten free. I know I have some readers with nut allergies, so if I were going to make a crust without nuts then I would substitute a chocolate graham cracker crust instead.

Chez Nous’ Chocolate Cabernet Tart (Serves 8)

  • 1 2/3 cup almonds,blanched and slivered
  • 3/4 cup granulated sugar
  • 4 tablespoons unsalted butter
  • 1/2 cup creme fraiche (you can also use sour cream I have tested both but the creme fraiche adds a subtle tanginess that I like)
  • 1/2 cup granulated sugar
  • 3/4 cup Cabernet
  • 3/4 cup heavy cream
  • 10 ounces semi sweet chocolate, broken into small pieces (I used Ghirardelli but you could use another high quality chocolate)
  • 1 (6 ounce) container of raspberries
  • 1 small bunch of mint leaves (optional)

Preheat your oven to 350 degrees.

Place the almonds, 3/4 cup sugar and 4 tablespoons butter cut into small pieces in the food processor and blend them at high-speed for 45 seconds to 1 minute.

Then scrape down your sides of your food processor and do this about 3 times so your nuts are finely chopped and blended with your butter.

Here is what my almond mixture looked like before I place it in my tart pan. Then lightly spray the sides of a 10 inch tart pan with a removable bottom with cooking spray and press your almond mixture evenly on the sides and bottom of your pan. I like to start with my sides first because I find that it is easier to get my sides even if I start there and then press the remaining crumbs evenly on the bottom. Next, to keep your tart from unevenly puffing up as it bakes, I like to use a fork to lightly prick some holes in just a few places to allow the steam to escape as it bakes.

Here is my tart crust before I placed it in my oven to bake. Bake for 15 to 20 minutes until your crust turns golden brown.

Then let your crust cool while you make the chocolate filling. First get you chocolate broken or chopped into small pieces in a medium-sized mixing bowl. Then in a medium sauce pan mix together your creme fraiche, sugar, cream and Cabernet and bring it to a simmer over medium heat. Whisk your creme fraiche mixture so the sugar dissolves evenly. Then when it comes to a simmer take your pan off the heat and pour it over your chocolate. Then whisk together the chocolate and creme fraiche mixture. Until it is smooth and all the chocolate has melted.

Then pour your chocolate filling in your almond tart shell. If you get a few air bubbles that rise to the top then use a toothpick or the tip of a knife to pop the tiny bubbles so you have a smooth glossy top.

Then place your tart in the fridge to cool and set for a least 3 hours before serving. Once your chocolate tart is set you are ready to remove the ring from your tart pan and decorate the top with raspberries. I made one where I covered the whole top with raspberries and then I made this second one that I liked even better, where I made a wreath of berries around my tart with some mint leaves. Decorating or garnishing the top is always my favorite part. I used a clusters of three berries with one mint leaf placed at a slight angle and I repeated that pattern all the way around my tart.


One bite of the crunchy almonds, silky smooth chocolate and the sweet raspberries makes it’s worth the effort. This tart is particularly good because the richness of the chocolate is balanced with the subtle flavor of the Cabernet.  Chocolate, wine and French pastry all in one dessert, am I dreaming? It’s just amazing. So if you are looking for some baking fun then you need to try this raspberry chocolate tart. It’s as delicious as it looks.

Another Girl’s Treasure

I was driving down 7th street when I saw it leaned up against a big blue trash can. My heart skipped a beat as my mind swirled with the possibilities, but before I could stop to pick it up I had to drop my girls off at school. I quickly made my way back to see if it was still there, the large old picture had perhaps seen better days. The 1950’s landscape photograph was peeling off, but the large solid frame was a find. So I decided it was coming home with me, the only trouble was how it was going to fit in the back of my car. I carefully began to slide the five foot long frame into my car. I questioned my own judment as I struggled to load the frame, because it was almost as tall as me, but I was determined. I said a little prayer that the tailgate would close and when it did I was grateful I didn’t have far to go.

What was left of the lake scene after I got it loaded out of the car.

I have been working on a small bedroom remix for my five year old’s new “big girl room” and I thought this frame would make a great custom pin board. My young budding artist loves to paint and draw. We enjoy her paintings, but recently the amount of artwork as become a bit overwhelming. So I though a new large cork board would be a great new piece to add over her bookshelf. This way she can create her own gallery of pictures to personalize her room.

I headed out to the craft store to get some supplies to transform this vintage lake house picture into something a bit more shabby chic. I found some cork tiles that I could cut down to fit my board, some heavy duty adhesive tape and white chalk paint. Then while I was getting all the supplies, I found these pretty metal flowers that I thought would add just the right vintage touch to the edges. Then I headed home to begin putting it all together.

A little white chalk paint helped give this frame a completely new look.

A solid roll of cork that was big enough to cover my board was going to cost over $60, so I decided to use less expensive cork tiles. I used a craft knife to cut them to fit. Then I found some clear heavy duty adhesive tape made by Gorilla Glue that is designed to hold up to 15 pounds. The heavy duty tape worked well to hold up the small cork squares.

I used a T-square which helped me cut straight lines on the edge pieces that needed trimming.

Admittedly the patchwork of cork tiles is not the best look on it’s own, so I took some extra fabric I had and I used it to upholster my pin board.

I used a staple gun to pull the fabric tight across my board. Then to cover the edges and staples I glued on some grosgrain ribbon trim.

Some fabric glues can leave a stain on ribbon even after it dries so I like to use hot glue, which dries clear.

Then for the final shabby chic touch I added some metal flowers to the corners.

These metal flowers were on sale at Michaels this week for $1.60 which made them an especially great find.

The flowers looked a bit too uniform for me so I took some pliers and bent the centers so they looked like roses. Then I spray painted the flowers since the back sides of the petals were not painted so they would be completely white. 

I love the finished look of the flowers and I think they are my daughter’s favorite part of the whole project.

Here is the finished pin board that is ready to be hung on the wall. Now it’s my daughter’s turn to start personalizing it by adding her favorite pieces of art.

This old picture may have been a little lonely sitting out on that curb, but I am glad I rescued it. I spent $55 in supplies which included the chalk paint, cork and gorilla glue, but to get just a large cork board alone would have been at least twice as much. So it was definitely worth the little bit of time it took to transform this old picture into something new.

This project had a very girly feel to it since it was going in my young daughter’s room, but a different fabric choice would give it a completely different feel and make this work in an office as well. It also could have been painted to become a chalkboard for a kitchen or covered in magnetic paper and then wallpapered for a message or photo board. The possibilities are endless.

Have you ever taken a chance on something you found?

Here are a few things I have learned when picking up roadside treasures:

  • It needs to spark some joy for you. Sometimes you can find something great but if you don’t have a place for it then it may be meant for someone else.
  • Make sure you give it a good cleaning and let it sit in garage quarantine just to make sure there aren’t and bugs or unexpected issues with your find.
  • Never underestimate the power of paint or things like silver or gold leafing. They can completely transform something that has good lines.
  • Be especially careful with upholstered pieces. They need to pass the smell test and stay away from it if it’s wet. However, slipcovers or new upholstery can do amazing things.
  • If you get home and change your mind then the worst thing that could happen is it goes right back out to the curb
  • Finally, I find there is a little extra design freedom when you get something for free so take a chance because you have a great opportunity to create something custom and one of a kind.


The Substantial Sandwich: An Italian Caprese and Prosciutto Sandwich

When we traveled to Italy last summer it was clear that not only did the Italians love their food, but they really cared about whether you the diner were enjoying what they made. What I love about Italian cooking is that it tends to be less fussy, because the food is so flavorful that there is beauty in that simplicity. While we were there we had these amazing mozzarella, prosciutto and tomato sandwiches. The flavor of the slightly salty prosciutto with the creamy mozzarella, and the bright tomatoes and basil made even a simple sandwich wonderful. So this week I decided to share a recipe for these brilliantly simple and delicious Italian caprese and Prosciutto sandwiches.

Italian Caprese and Prosciutto Sandwich -Serves 4

  • 1 French baguette (the better the bread the better the sandwich so go for the best and crispest baguette you can find)
  • 3 tablespoons extra virgin olive oil
  • 1 package (4oz) of thinly sliced prosciutto
  •  2 to 3 heirloom tomatoes or beefsteak tomatoes, sliced
  • 2 teaspoons of balsamic vinegar
  • 1/2 teaspoon kosher salt
  • 1/4 teaspoon black pepper
  • 1  package (8oz) of fresh mozzarella, sliced into thin rounds
  • 3 tablespoons of fresh basil pesto (I happen to love the Giovanni Rana brand)
  • 8 fresh basil leaves

First slice your baguette into four even pieces then cut each section in half horizontally. Next you want to spread a little olive oil on each side of your bread. Then toast your bread in a toaster oven or put your bread on a sheet pan and place it under your oven broiler, but keep a close eye on it. Just a minute or two under the broiler will be enough. You want to lightly toast your bread so it is warm and is just beginning to get golden brown edges.

Next get your tomatoes sliced. I find it’s easier to slice my tomatoes with a serrated bread knife. Cut your tomatoes into thin round slices and then cut those slices in half. Then you want to season your tomatoes by sprinkling them with salt and pepper and drizzling just a touch of balsamic vinegar on top.

Now you are ready to assemble your sandwich. Layer on your prosciutto slices then top them with your sliced fresh mozzarella. Then top your cheese with your tomato slices and a drizzle of fresh basil pesto. Add a few fresh basil leaves on top and there you have it.

The best part about this recipe is that you can make it in less than ten minutes.  How easy and delicious is that? Want to serve it the Italian way then get some Pellegrino sparkling water.  Then add a side of some gourmet veggie chips or some fruit and you have a simple but flavorful Italian meal. Sometimes sandwiches get overlooked when it comes to dinner, but a substantial sandwich like this Italian Caprese and Prosciutto Sandwich makes a great quick and easy weeknight meal.

A Garden Styled Little Girl’s Room

Spring like weather is finally here, well at least for now. It’s Chicago so you never know it could snow again, but the promise of warmer weather means I can finally get outdoors to tackle some painting projects. I have plans to paint a “big girl bed” for my oldest daughter’s room, but before I start making few changes to her room I thought I might be fun to share a few before and after photos.

Here is the room when we first moved in.  It was painted in two tones of yellow, so the first thing I did while we were waiting on the moving truck was to paint her room a soft pink from Benjamin Moore called Pink Cadillac. True to the name the color looks like Mary Kay Cadillac pink. I used the color at 75 percent strength so it would be just a bit softer.

The before: this was the room when we first moved in our home.

My oldest daughter loves flowers and being outdoors. She is the kid who from a very early age would beg for flowers from the grocery store. Forget the candy at the checkout lane, the floral department seems to be calling my daughter’s name every time I take her to the grocery store. It’s her favorite part of the store and there have been many a tear over some lovely flowers that we just couldn’t purchase.

Gabby loves to be outdoors in the garden. Here she is helping me plant tulip and muscari bulbs in our yard this fall. It was a cold day, but that didn’t stop her from spending hours helping me. When I met with her teacher for parent teacher conferences she shared with me that it was clear Gabby just loved anything to do with gardens and being outdoors. Here is an assignment she had at school where each child was asked what rule they would create if they were president. No surprise, Gabby drew a picture of herself in the garden.

So this love of flowers inspired her room. I wanted her to have a room that she loved that was filled with things that made her happy.  Before we moved from Houston I began making plans for her new room. Pottery Barn Kids had a Savannah floral pattern that reminded me of an English cottage garden. The pattern was being discontinuing so I decided to go ahead and get toddler sized bedding along with a twin sized duvet that I could use later as the starting point for the room.

Here my garden loving girl in her bedroom.  I used a twin bed sized dust ruffle that I had from college and pinned it so it fit her toddler bed and then layered in some more floral patterns from Rachel Ashwell’s Shabby chic line at target. The picture of the pink peony is from Wisteria and it’s my favorite part of her room. When I added that photo to her room she said “mom how did you know I needed a magical flower?” Needless to say she loved it and I think it adds a more sophisticated floral touch.

Every garden needs a little summer home, shed or tepee so I found this grey chevron tepee at Hobby Lobby. Both of my girls love hiding away in there with their blankets and pillows.

Tulips for my flower loving girl.

Art doesn’t have to be expensive. The “So Loved” picture was from Hobby Lobby and the button hearts are something I made to add something special to her room. Then to dress up a plain white lampshade I added some pink ribbon around it.

A view of the side of the room with a dresser that my mom and I had painted years ago with stenciled flowers. Then a sweet little slipper chair perfect for reading. Even the chair got a makeover for this room see the before picture below.

The chair it used to be the end piece of an old sectional couch, but I had a slip cover made for it to transform it into a more feminine ruffled slipper chair.

It’s amazing what a new slipcover can do. I found some white draperies that had a similar ruffle detail for the windows. Then in the corner I added a second peony photograph above her bookcase.

A garden styled bedroom perfect for my little flower loving daughter. A few more shabby chic changes are coming but before they do I wanted to remember the sweetness of this little girl’s room.

The Substantial Sandwich: Banh Mi Meatball Sandwich

What in the world am I going to make for dinner tonight? Dinner is so daily, that it’s easy to fall into a pattern and get bored with the same old rotation of dishes. So what do you make on those days when you need something quick, but more exciting to eat? My answer: the substantial sandwich. Filled with flavor, but perfect for a weeknight dinner, substantial sandwiches are some of the best-loved meals in our house.

One of my favorite substantial sandwiches is the Vietnamese Banh Mi. A crispy french baguette filled with sweet but tangy pickled carrot and cucumber with just a touch of heat from the honey lime sriracha sauce. I took a grilling course from Steven Raichlen a couple of years ago, where I made these absolutely delicious grilled lamb Banh Mi sandwiches. However, the problem was that although they were wonderful I absolutely don’t have the time to roast lamb on my grill for four hours to achieve the perfect sandwich.

I began thinking about how to create a flavorful version of my own. One that you could make in thirty minutes so I could enjoy it more often. My solution a banh mi meatball sandwich. The ground pork meatballs that are every bit as flavorful, but easy to make while you assemble your veggies and sriracha sauce. One crunchy, crispy, juicy bite and you’ll see why I just love this sandwich.

Banh Mi Meatball Sandwiches-Serves 4

  • 4 demi baguettes or one large french baguette, toasted (You want to use a good quality french baguette. I like the La Brea brand that I can find at most grocery stores in my area.)

Meatballs

  • 1 pound ground pork
  • 2 tablespoons soy sauce
  • 1 teaspoon worcestershire sauce
  • 2 cloves garlic, minced
  • 2 green onions, sliced thinly

Pickled Carrot and Cucumber Slaw

  • 1/2 cup carrots julienned in thin strips or you could use pre-cut matchstick carrots
  • 1/2 cup cucumber julienned in thin strips or thinly sliced into rounds
  • 3 tablespoons rice wine vinegar
  • 1 teaspoon granulated sugar
  • 1/4 teaspoon kosher salt
  • 2 tablespoons of cilantro leaves

Honey Lime Sriracha Sauce

  • 1/2 cup mayonnaise
  • 1 teaspoon sriracha
  • 1 teaspoon honey
  • 1 teaspoon lime zest
  • 1 teaspoon soy sauce

Preheat your oven to 350 degrees.

Then in a medium sized bowl mix together your ground pork, soy sauce, worcestershire, garlic and green onions. Then scoop out evenly sized meat balls. I used a 2 tablespoon sized cookie scoop which made the job easy.

Then place your meat balls on a cookie sheet lined with parchment paper. The parchment paper will keep your meatballs from sticking to your pan and it makes clean up much easier.

Then bake your meatballs for 30 minutes till they are golden brown.

While your meatballs are cooking make your pickled carrots and cucumbers. I have a julienne peeler that makes prepping my veggies simple.You just run the peeler down your vegetable and it will cut thin julienned slices. I got my peeler from a Texas grocery store called Central Market, but I found the same peeler available on Amazon. I love this little kitchen gadget, but if you don’t have one then don’t let that stop you from enjoying this sandwich. You could use store bought matchstick carrots and just slice you cucumber into very thin rounds.

Then in a small bowl mix together your rice wine vinegar,sugar and salt. Add in your cucumber, carrot and cilantro and let your veggies sit and pickle in the vinegar while you make the sriracha sauce.

Then make your honey lime sriracha sauce. In a small bowl mix together your mayonnaise, sriracha, honey, lime zest, and soy sauce.

Now you are ready to assemble your sandwiches. You want to slice your baguette into a V-shaped sandwich (think hot dog bun) where you don’t cut all the way trough the bread on one side. This makes a perfect pocket to hold your meatballs.  Then toast your bread and spread on your sriracha sauce in each side. Add on your meatballs and top it off with your pickled carrots and cucumbers and that’s it.

So if you are wondering what should I make for dinner tonight? Then try something different a banh mi meatball sandwich. Serve it with sweet potato chips, crispy oven fries or sliced vegetables and dip and you have a wonderful weeknight meal that is sure to bust any “what should we have for dinner?” rut.

A Happy Mess

I was looking at a magazine that featured the home of model and actress Molly Sims and a piece of artwork in the back of her living room caught my eye. On a large white canvas in a diagonal cursive script were the words “Happy Mess.” Sims designed her living room to have a contemporary styled back room that was set up as a play area for her young children. Sims had some black lacquered pocket doors designed to close off the area if she didn’t want to share the happy mess with others. As you would expect Sims’ home was styled and magazine page ready so it had me thinking what sorts of messes and fun might her house might hold on the average day. Take a tour of Sims’ home at this link to Better Homes and Gardens.

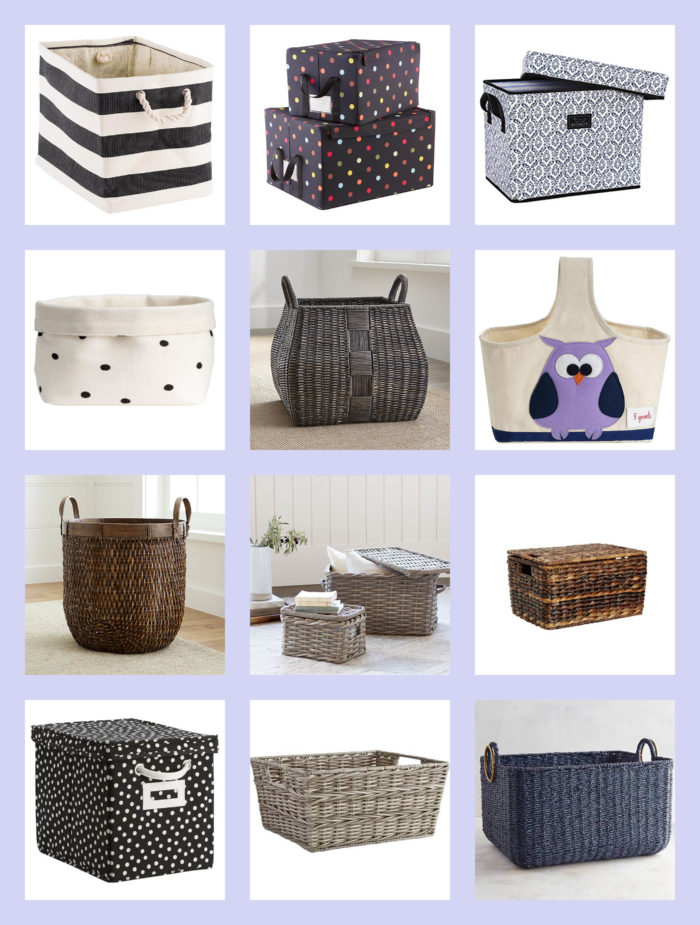
So what is a happy mess? Surely it helps if it’s filled with things you love, but even happy messes need to go somewhere. So to me a happy mess is one that has a home when all the fun is done. My former home was small and it had a very open floor plan so I was always looking for clever ways to store everything from office supplies, to craft paper, dishes, linens and toys. Closet space was limited so I found that having stylish baskets and bins was key. I have found that using smaller baskets and bins make organization easier, because even if you do have large closets things can still get lost. So I thought it might be fun to round up a few bins and baskets that can make any of life’s messes just a little happier.

Large Scale Open Storage

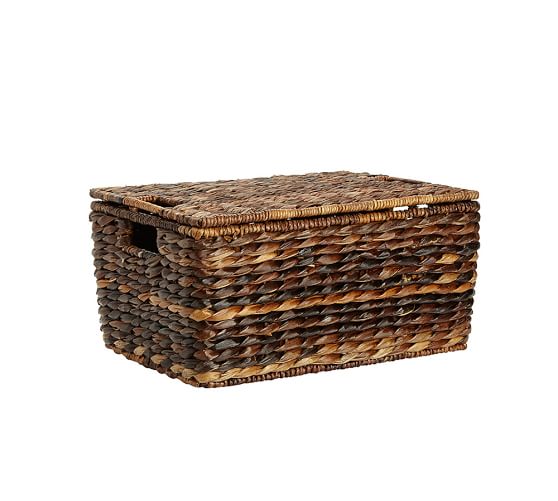
The texture and style of these baskets would definitely add texture and style to any room, but I love that they have the potential to store all kinds of things from large blankets, to books and magazines. I like the look of this dark walnut colored basket. I could see it next to an armchair or by the side of a sofa. Our old living room had to double as a play space for our girls so large baskets were a favorite of mine for storing stuffed animals and toys. It kept the things my children loved in the room without sacrificing the sophisticated look I wanted.
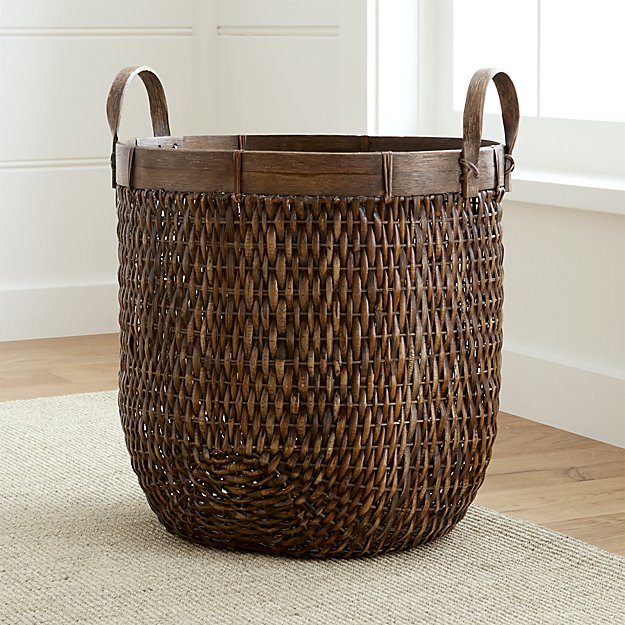
Halton Large Basket

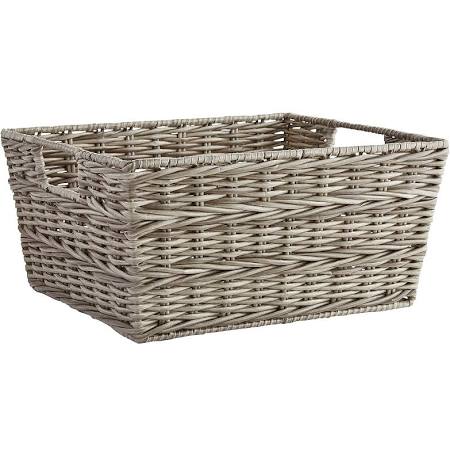
The woven pattern and weathered grey colored basket make this a great option for stylish storage.

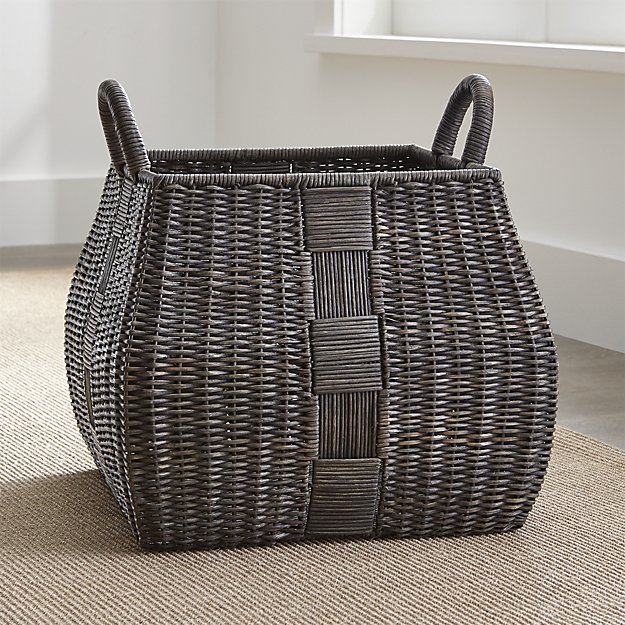
Auburn Square Basket

Finally, I liked the color of this indigo basket from Pier One and its price makes it a great deal for a large storage.

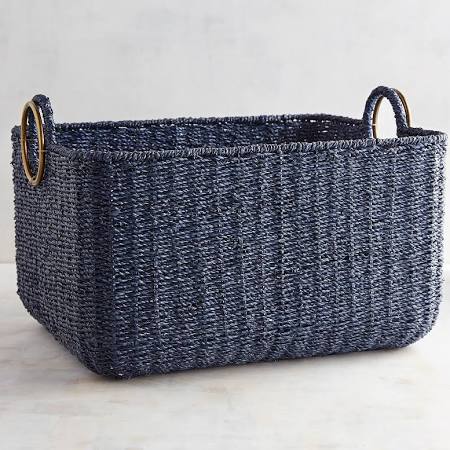
Pier 1 Indigo Blue Basket


Office and Media Storage

Paper work, magazines, mail and media can get overwhelming when they begin to stack up. So sorting them in baskets is one of my favorite ways to stay organized. This wicker basket would work well for sorting papers, holding mail or even storing things like DVDs or games in a cabinet or shelf.


Pier 1 Collin Gray Wicker Basket

I love these lidded textured Havana baskets from Pottery Barn. I have them in my media cabinet and in bookshelves. I have used them to store linens, table clothes, dishes, magazines, DVDs. The lids make them great for hiding those little things you need to store but don’t always want to have out on display.

Havana Lidded Basket

If this darker finish isn’t quite the right color for your space then check out these Aubrey baskets that come in a pretty light grey finish.

Aubrey Woven Lidded Basket


Bedrooms and Playrooms

These bold ruby striped storage boxes come in a whole array of colors and they are just the right size to use in a book shelf and they would be a great place to store small toys like Legos, blocks and all those little plastic ponies and dolls that always need a place to belong in our house. I have also found that open bins make it easier for younger children to use when cleaning up their own toys. I wish this type of easy storage would guarantee that it your little ones would pick up after themselves, but we are still working on that skill in our house.


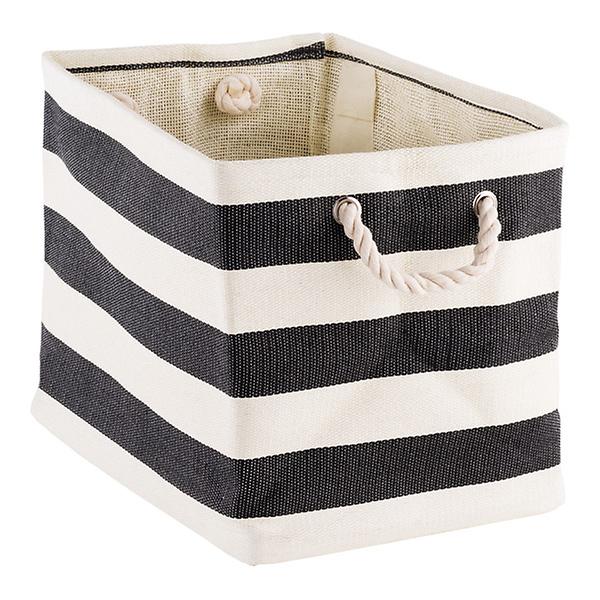
Black and White Stripe Bin or try these Striped Bins at Crate and Barrel Kids

The 3 Sprouts company has a whole line of these quirky and fun canvas storage units. They have an alligator toy box and woodland creature storage bins and this whimsical purple owl which would be great for holding books, toys, diapers or blankets.
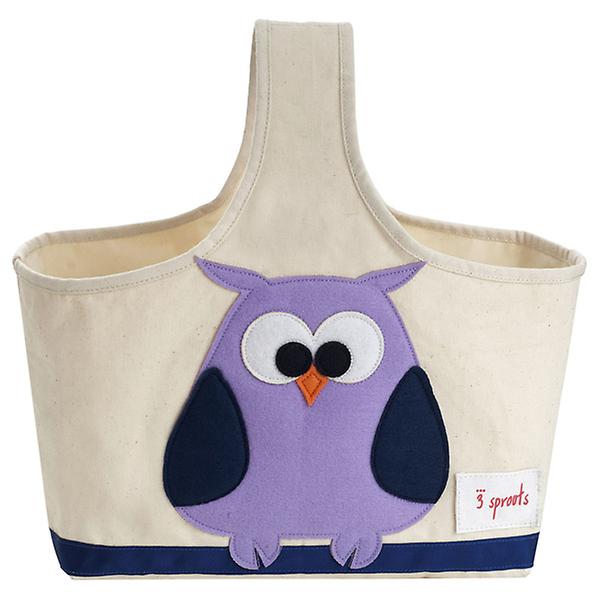
3 Sprouts Owl Caddy

H&M has these great small canvas storage bins that I could really see in a nursery. Babies come with so many little things that these little bins would working well near a changing table or on a dresser. They come in other pattens and colors, like a soft pink and a beige so you could easily customize your look. The other great thing is that the price on these fabric bins is so reasonable at just $3.99 they are very budget friendly.

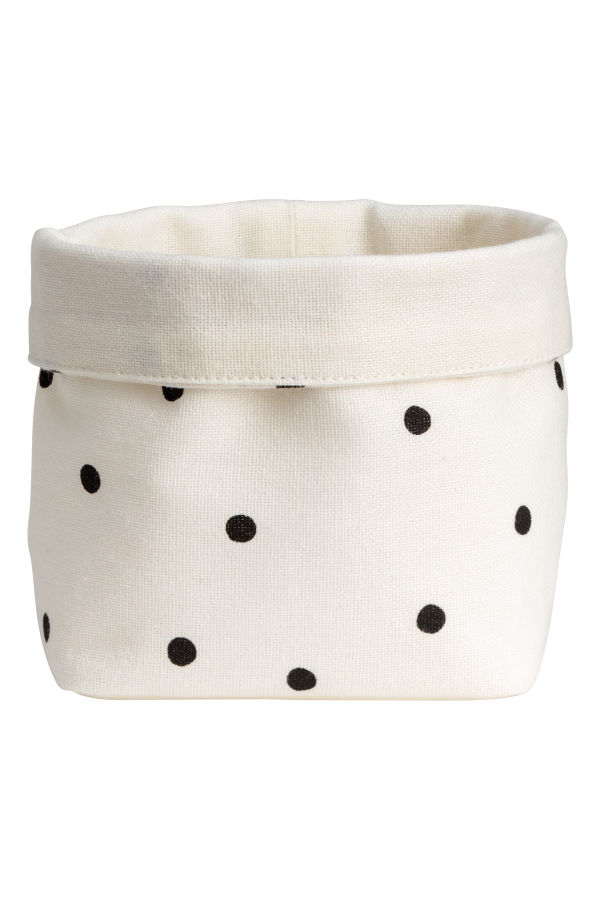
H&M Storage Fabric Bin


Closed Storage for Closets, Laundry and Mud Rooms

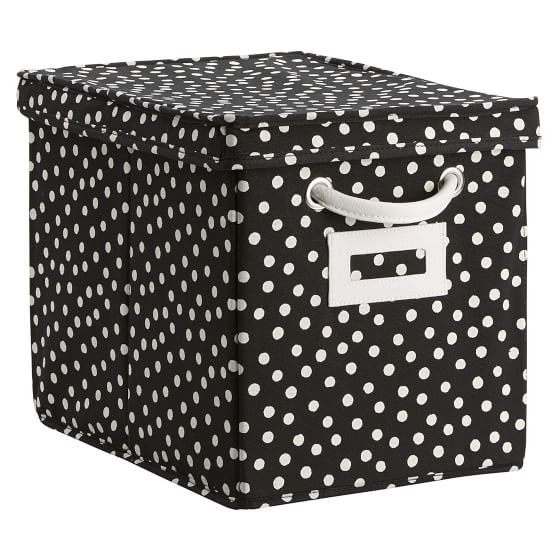
My former master bedroom closet was the largest closet in our house so it worked overtime as storage for more than just our clothes. One of my favorite finds were these Reisenthel zip top fabric storage containers from the container store. These fabric containers come in several different styles. I  have a set with red polka dots that I love because they have built in label cards and they are sturdy and stack easily.


Reisenthel Multi Dot Fabric Storage Box

Need smaller scale storage then PB Teen has smaller canvas zip top bags that come in a wide variety of colors from black and white to kelly green and turquoise.

PB Teen Canvas Polka Dot Bin

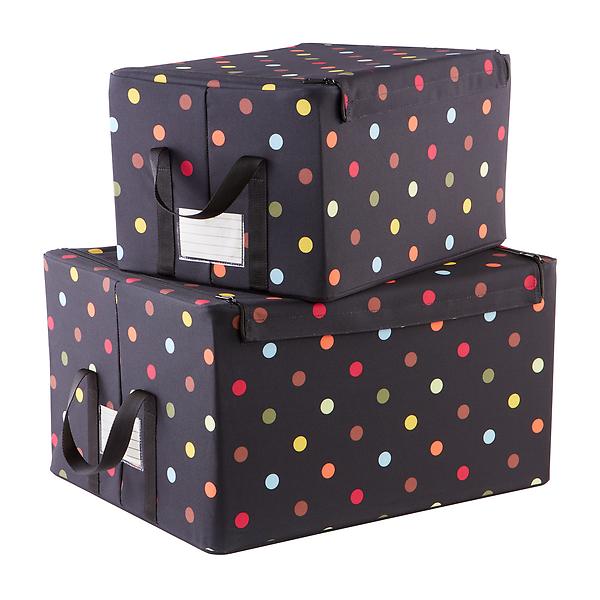
Have something like laundry, winter gear or home supplies you need to store then check out these collapsible storage boxes by Scout. They have a great selection of graphic patterns and colors that would add a pop of color and pattern to any room. Making storage of even ordinary things stylish and fun.

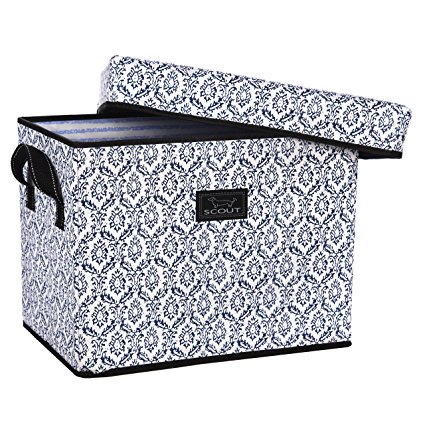
Scout Lidded Storage Bin

Life is too short to be stressed about having a house that is perfectly clean all of the time. I believe your home should be a place where you can relax and have fun. So I loved the phrase a happy mess because there has to be a balance. Mail, papers, books, shoes, clothes and toys are all a part of life, but having place where all those little things belong definitely makes for a much happier mess.

Texas Chili Cook Off Challenge

Award Winning Texas Chili Recipe

In the middle of my spring entertaining cooking craziness a few weeks ago, I also found myself working to create a new chili recipe. What can I say, I had a hard time saying no to the sweet lady at church with the clipboard who was trying to sign everyone up for the Boy Scouts’ chili cook-off. I must admit that although I have lots of recipes I love, I really didn’t have a traditional chili recipe that I was crazy about. My husband was a bit curious about what I would come up with, since you don’t normally get the same types of chilies and flavors in the Midwest that we are used to in Texas. So the lingering question in my mind was would making a more traditional Texas chili translate well to Midwestern tastes and could I make it work even if I couldn’t find some of the same chilies I am accustomed to using?

The first round of chili I made was more stew like with a smoky cumin flavor, then I even experimented with a mexican inspired chipotle and chocolate chili, but in the end I decided to stay true to my roots and create a more traditional chili that had elements of the smoky cumin and with a little layered heat from some chipotle chili powder. However, I think the thing that really made this chili special was adding my own roasted tomatoes. It added a certain brightness and depth to the traditional tomato base that made this recipe the one I ultimately decided to enter into the chili cook-off.

I thought my chili tasted good at home, but I really wasn’t sure if my Texas flavors would be what the judges were looking for. In the end, there were lots of great entries even ones that had the names Southern Living and Better Homes and Gardens in front of them, but I was lucky because my Texas Chili won the top prize. So I think it’s safe to say that I now have a signature chili recipe that combines a traditional tomato based chili with elements of the Tex-Mex cooking I love.

Oh how I miss the spring bluebonnets that you see everywhere in Texas at this time of year. I just can’t talk about chili cook offs and not think about the Houston Rodeo and fields of Texas bluebonnets.

Texas Chili (Serves 6 to 8- with a spice blend that has a medium level of heat)

  • 5 Roma tomatoes
  • 3 tablespoons of olive oil
  • 3 cloves of garlic (divided)
  • 1 teaspoon salt
  • 1/4 tsp pepper
  • 2 slices of bacon
  • 1 yellow onion, diced
  • 1 pound ground beef
  • 2 tablespoons chili powder
  • 2 teaspoons of cumin
  • 1 teaspoon oregano
  • 1/2 teaspoon chipotle chili powder (if you are a chili head then you can up the heat by adding more chipotle chili powder, but beware just a little bit packs quite a punch)
  • 2 (15oz) cans black beans, drained and rinsed
  • 2 ears of corn, cut off the cob
  • 1 cup beef broth
  • 1 (28oz) can crushed tomatoes
  • 1 tablespoon masa herena (corn flour used to make tortillas)
  • 1 tablespoon water
  • 1 cup shredded sharp cheddar cheese
  • 1/2 cup sour cream
  • 4 green onions thinly sliced
  • 1 bag of corn tortilla chips

Preheat your oven to 350 degrees

Then using a serrated knife slice your tomatoes horizontally into thin circular slices. Then peel and cut two garlic cloves into thin slices. Place your tomatoes on a sheet pan and drizzle them with the olive oil then place your garlic slices on top of the tomatoes and sprinkle them with salt and pepper. Then roast your tomatoes for 20 to 25 minutes until they just begin to get a bit golden brown on the edges.

Then once they are roasted add them to your food processor or blender along with a 1/3 of a cup of your crushed tomatoes. Then blend them till they become a chunky tomato sauce.

These roasted tomatoes take just a bit of effort but the freshness and depth of flavor that they add to the chili is so good that it’s definitely worth it.

Next in a large stock pot cook your bacon slices over medium high heat till they render some bacon fat. Then remove your bacon slices and add in your chopped yellow onion and cook it over medium heat until it begins to become translucent.  Next add in one clove of chopped garlic and the ground beef and continue to cook it until it is browned. Once your ground beef is cooked through drain off some of the fat from your pot.

Then season your ground beef to taste with salt and pepper and add in your chili powder, cumin, oregano and chipotle chili powder. Then add in your roasted tomato puree, the remaining crushed tomatoes, black beans and beef broth. Let your chili simmer for 30 minutes. Then before you are ready to serve your chili mix together your masa herena and water to make a slurry and add it to your chili, which will thicken your chili and then add in your fresh corn. Let it simmer stirring it occasionally for an additional 10 minutes. Then you are ready to pile on your favorite toppings and serve.

I like to add some sharp cheddar cheese, green onions and a dollop of sour cream. Then in Tex-Mex style I like to serve my chili with tortilla chips instead of the traditional cornbread side. I love the texture and crunch that they add to the chili.

Just keeping it real. Here are my girls in my messy kitchen after all the chili cook-off madness. My youngest was the most excited about the competition aspect, so she  quickly laid claim to our prize the chili cook-off apron.

This chili is absolutely delicious, but this time you don’t have to just take my word for it. This chili recipe makes a great one pot dinner, but it’s so flavorful that it would be great for a casual get together with friends.

A Summer Garden in Vienna

We got a light dusting of snow last night and although I know summer is still months away sometimes “I like to close my eyes and imagine what it will be like when summer does come.” Like Olaf the snowman I am a little frozen here in Chicago and I am dreaming of feeling the summer sun and seeing green grass and trees.

My dreaming of a summer garden was officially kicked into high gear last week when I discovered the British television show called Love Your Garden on Netflix. Master gardener and television host Alan Titchmarsh gives deserving families the most amazing home gardens. Titchmarsh studied horticulture at the Royal Botanical Gardens, Kew and he has received the Victoria Medal of Honor, which is the highest accolade given in British gardening. His gardens designs are inspiring and they reminded me of the beauty and transformative power of nature.

One of the things that Titchmarsh includes in each show is an opportunity to see an mature inspirational garden that has elements that he would like to incorporate in the garden he is planning. This past summer I had an opportunity to visit a beautiful garden in Vienna. I went with my husband on his work trip and while we were there I got to see the Belvedere gardens so I thought I might do a little day dreaming about this gorgeous summer garden and share some of my photographs.

This baroque style palace and gardens were originally built as a summer residence for Prince Eugene of Savoy in 1712. The gardens at Belvedere have a distinctively French feel with the gravel paths and trimmed boxwood hedges.

Here is the lower Belvedere palace. The stone work on all of the buildings is impressive and the gardens are filled with gorgeous stone statutes and fountains.

Here is a close up of one of the windows.

There was a series of cherubs for each month of the year that topped a long set of stairs that take you to the high point of the garden.

Here is the view as you approach the upper palace building and flower gardens.

Then here is the main lawn and flower garden.

There is an open lawn surrounded by this gorgeous boarder of flower beds filled with bright yellows and vibrant purples and pinks.

Another view of the ring of flowers that surounds the lawn. I love the purple salvia against the yellow marigolds and black-eyed Susans.

A close up of one of the marigolds blooms. They were so tall and the flowers were just gorgeous.

Then there was my favorite these white Dahlias with their rows of distinctive curved petals.

Happy bunches of blacked-Susans seemed to be drinking in the summer sun.

The mature tree lined paths and hedges are beautiful, but the thing I loved about this garden is that many of the flowers were plants I could actually grow. So these flowers have me thinking about a sunny flower bed I have on the side of my house and what it could be this summer. So until we are free from the frost I will just have to continue to watch and eagerly await the summer sun.

Cherry Almond Biscotti

Easter and choir practice had me busy last week, but I am back sharing a recipe for one of my favorite cookies, Italian biscotti. I love biscotti, because they are not overly sweet and their crispy texture makes them especially good. It’s been cold in Chicago this week. We even had a little snow today some coffee and baking seemed like a good idea. Well coffee to me is good anytime, but biscotti makes coffee even better.

We had some extra dried cherries from a recipe I made for Easter, so I decided that it might be fun to make some cherry biscotti. I tested a few flavor combinations, but my favorite was cherry and almonds with a little orange zest. You could leave out the almonds if you have a nut allergy and substitute mini chocolate chips instead.

Cherry Almond Biscotti (Makes 16 cookies)

  • 1  1/4 cup flour
  • 1/2 cup slivered almonds
  • 1/2 cup dried cherries
  • 1 tablespoon fresh orange zest
  • 1/2 cup granulated sugar
  • 3/4 teaspoon baking powder
  • 1 tablespoon water
  • 1 teaspoon vanilla extract
  • 1 egg
  • 1 egg white

Preheat your oven to 350 degrees.

In a large mixing bowl mix together your flour, almonds, cherries, orange zest, sugar and baking powder.

Next add in your water, vanilla and egg and mix them together until well blended. The mixture will be slightly crumbly at first, but it will come together. Then turn your dough out onto a lightly floured surface and knead it just lightly. Then shape it into a 12 inch roll.

Then use your hand to flatten that roll to a 1 inch thickness.

Then place your biscotti roll on a baking stone or a cookie sheet lined with parchment paper so it doesn’t stick to the pan.

Bake the biscotti roll for 30 minutes. Then take it out and allow it to cool for 10 minutes.

Now you are ready to slice your cookies and bake them a second time to give them that signature crispy texture.

Slice your biscotti roll at a diagonal into 1/2 inch slices using a serrated knife. Note if you add chocolate wipe your knife clean between each cut to keep your cookies looking pretty.

Then place your cookies cut side down on your baking stone or baking pan and bake them at 325 degrees for 10 minutes. The cookies will have a crispy edge with a softer center, but they will become a crisp as they cool completely.

My husband came home and was loving these biscotti (in between bites he may have said they were his favorite biscotti ever), so I think this flavor combination is a winner in our house. 

The other great thing about biscotti is they are lighter than your typical cookie since they don’t have butter. So if you are looking for a sweet and slightly healthier treat then give these biscotti a try.

Contact Us