Summer days as a kid were made for swimming, playing outside and eating ice cream. I remember going to visit my Dad’s parents every summer. I used to look forward to helping my granddad with his garden. We would pick fresh tomatoes, green beans and cucumbers for dinner. Then we would head out on the back porch to make homemade ice cream. We would help him layer the ice and rock salt and watch as the ice cream churned. The the best part, getting a taste.
I got an ice cream maker for my birthday last year. All those memories of summer ice cream as a kid made me want to share the tradition with my girls. Ice cream machines may have changed a bit, but the joy and excitement of making your own ice cream is as great as I remembered.
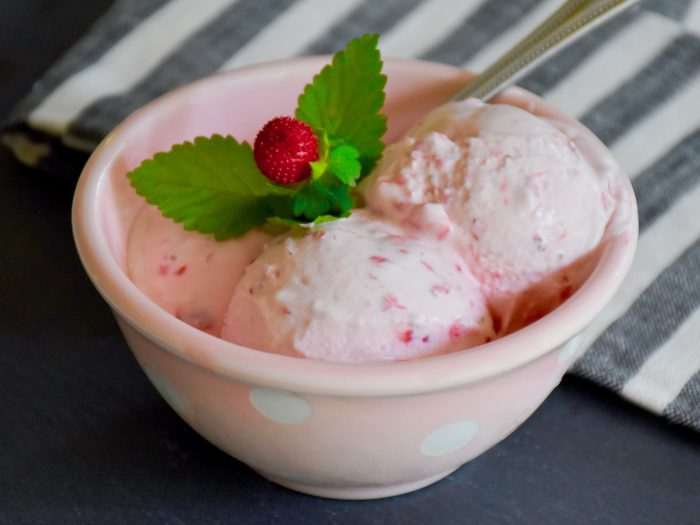
This week my youngest daughter and I went to the farmers market to buy strawberries, her favorite. Then we came home and my girls pushed their chairs up to the counter to help me measure and mix it all together. They eagerly watched and waited for a first taste. The cold, sweet strawberry ice cream was a wonderful treat on a hot summer day. So here is the recipe that had us all smiling and thinking about seconds.
First prepare your ice cream maker according to the manufacture. Make sure that if your are using a newer electric model that you have chilled the bowl ahead of time.
In a medium sized bowl mix together your strawberries and 1/2 cup of sugar. Cover your bowl and let your berries and sugar sit in the fridge for 30 minute to 1 hour to allow the berries to macerate or form their own syrup.
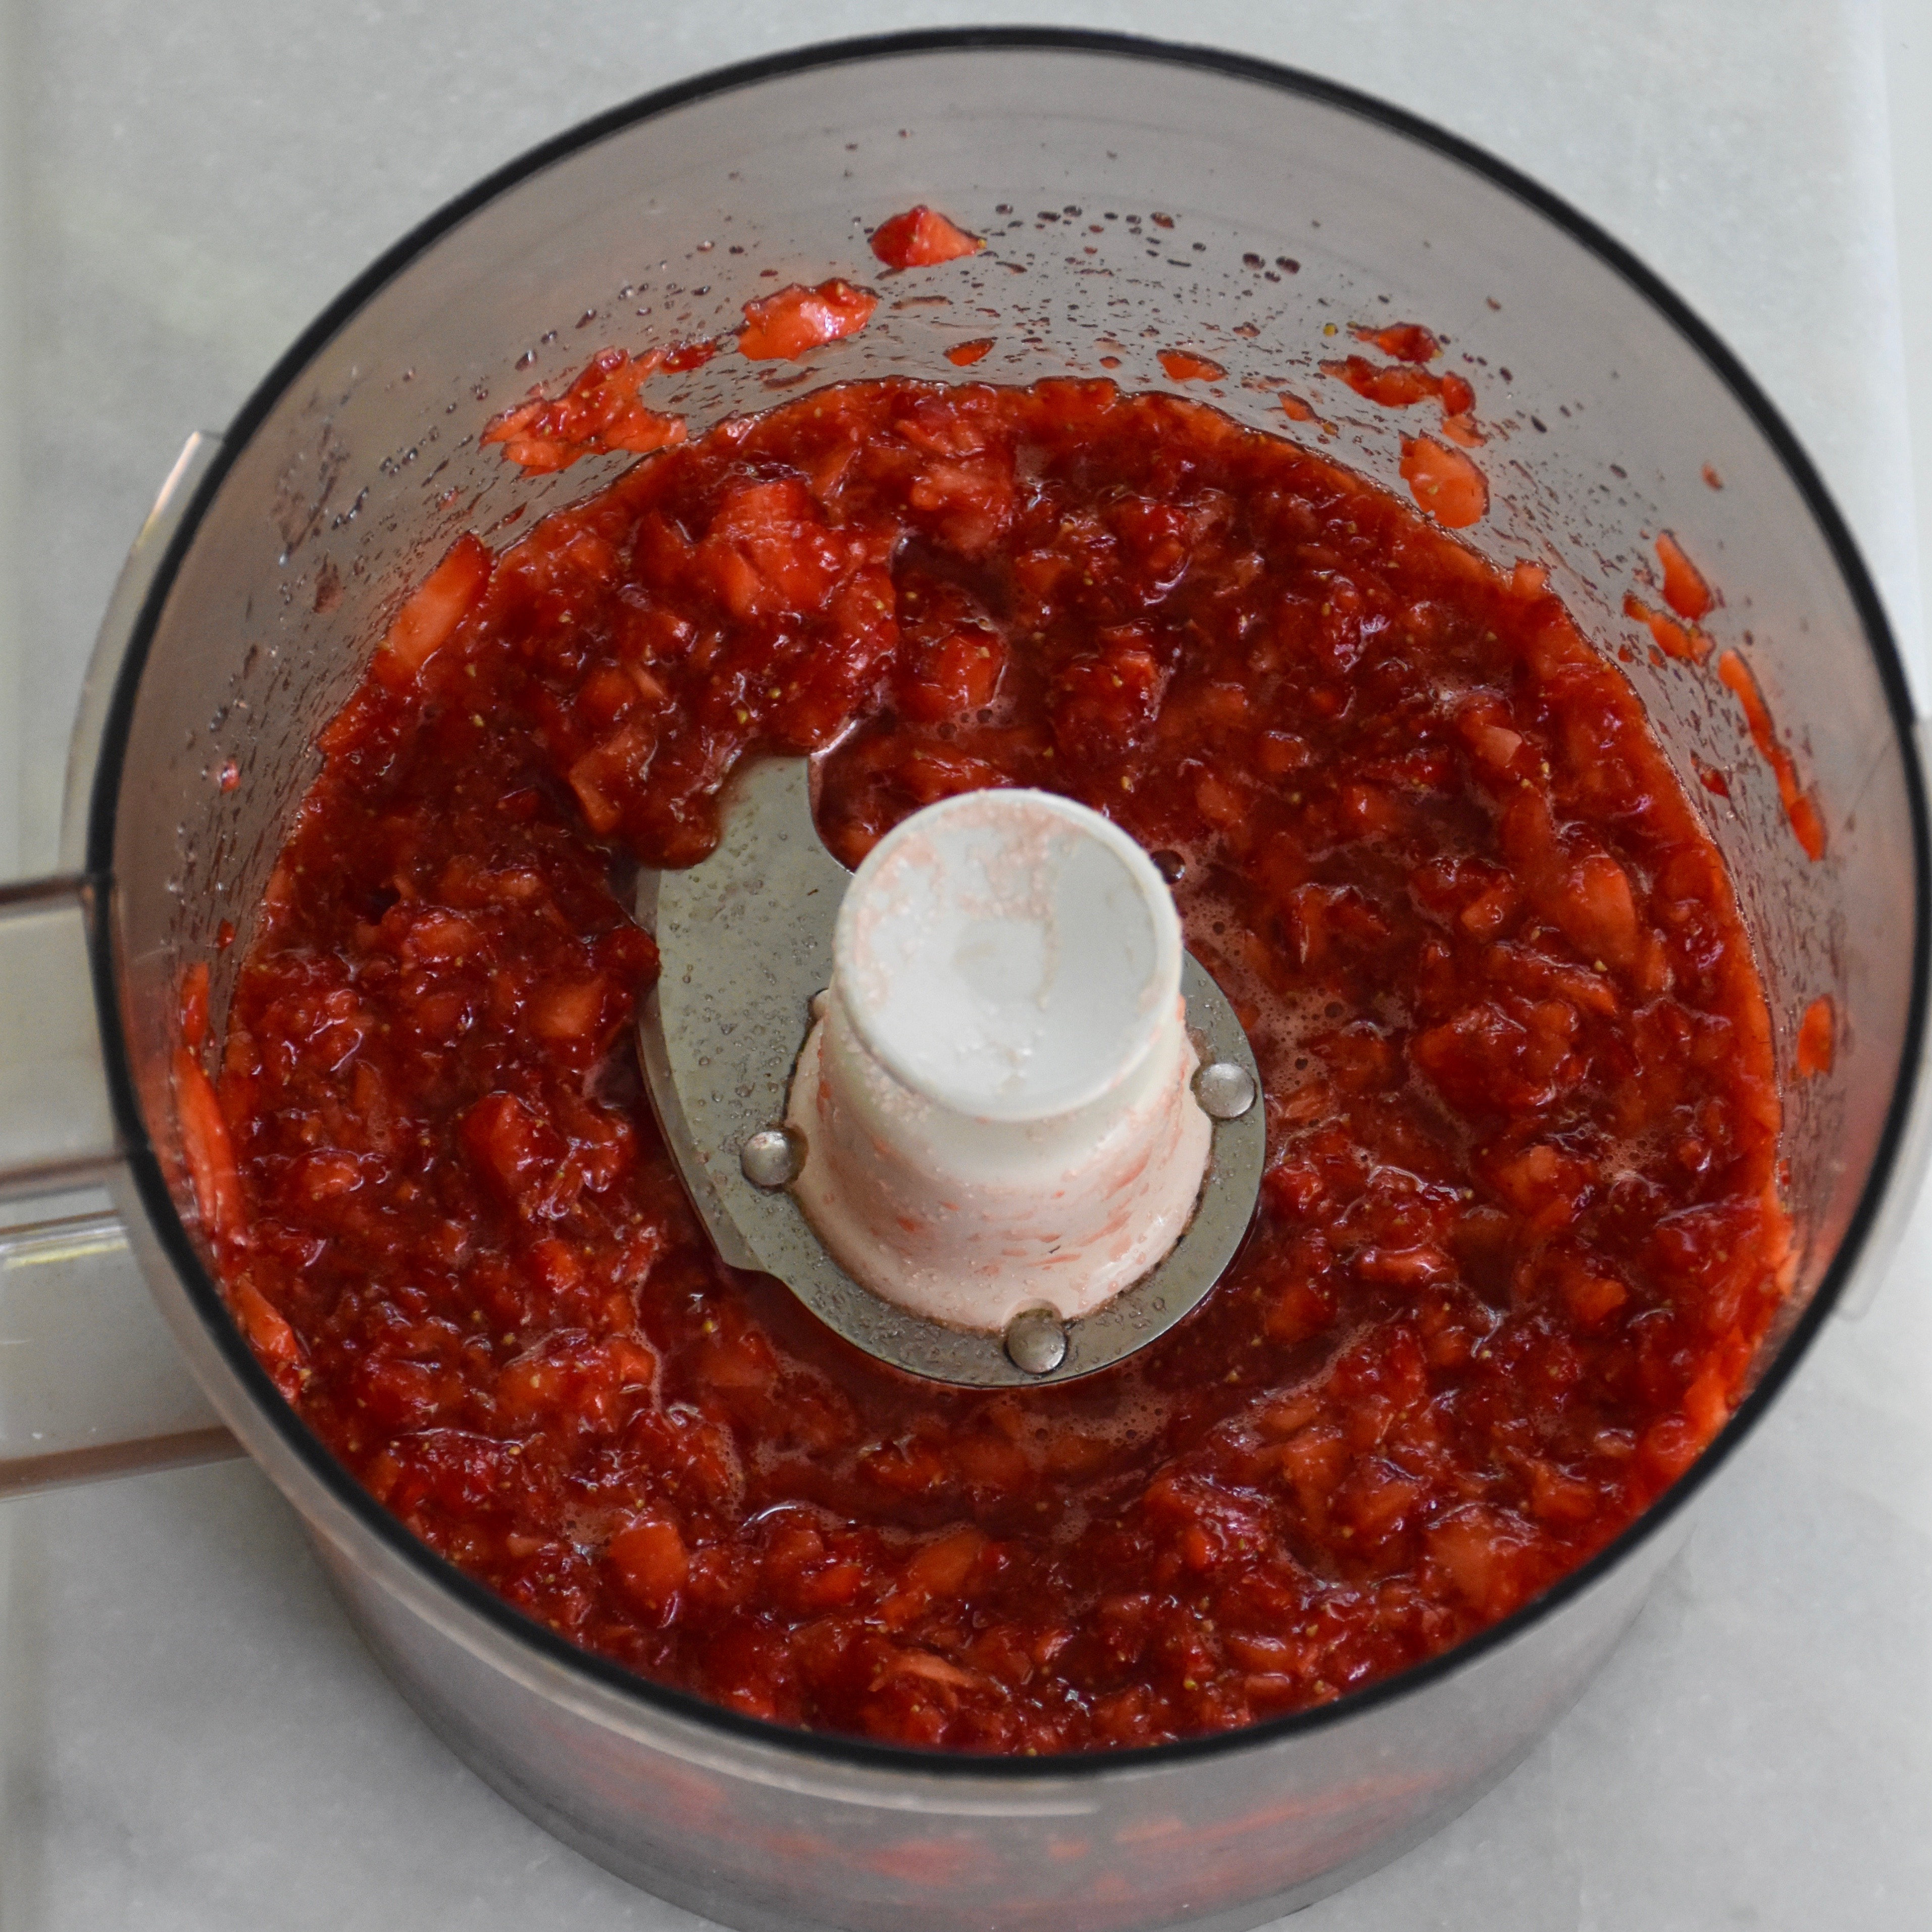
Then in a food processor or blender puree you berries until they are chopped into small pieces.
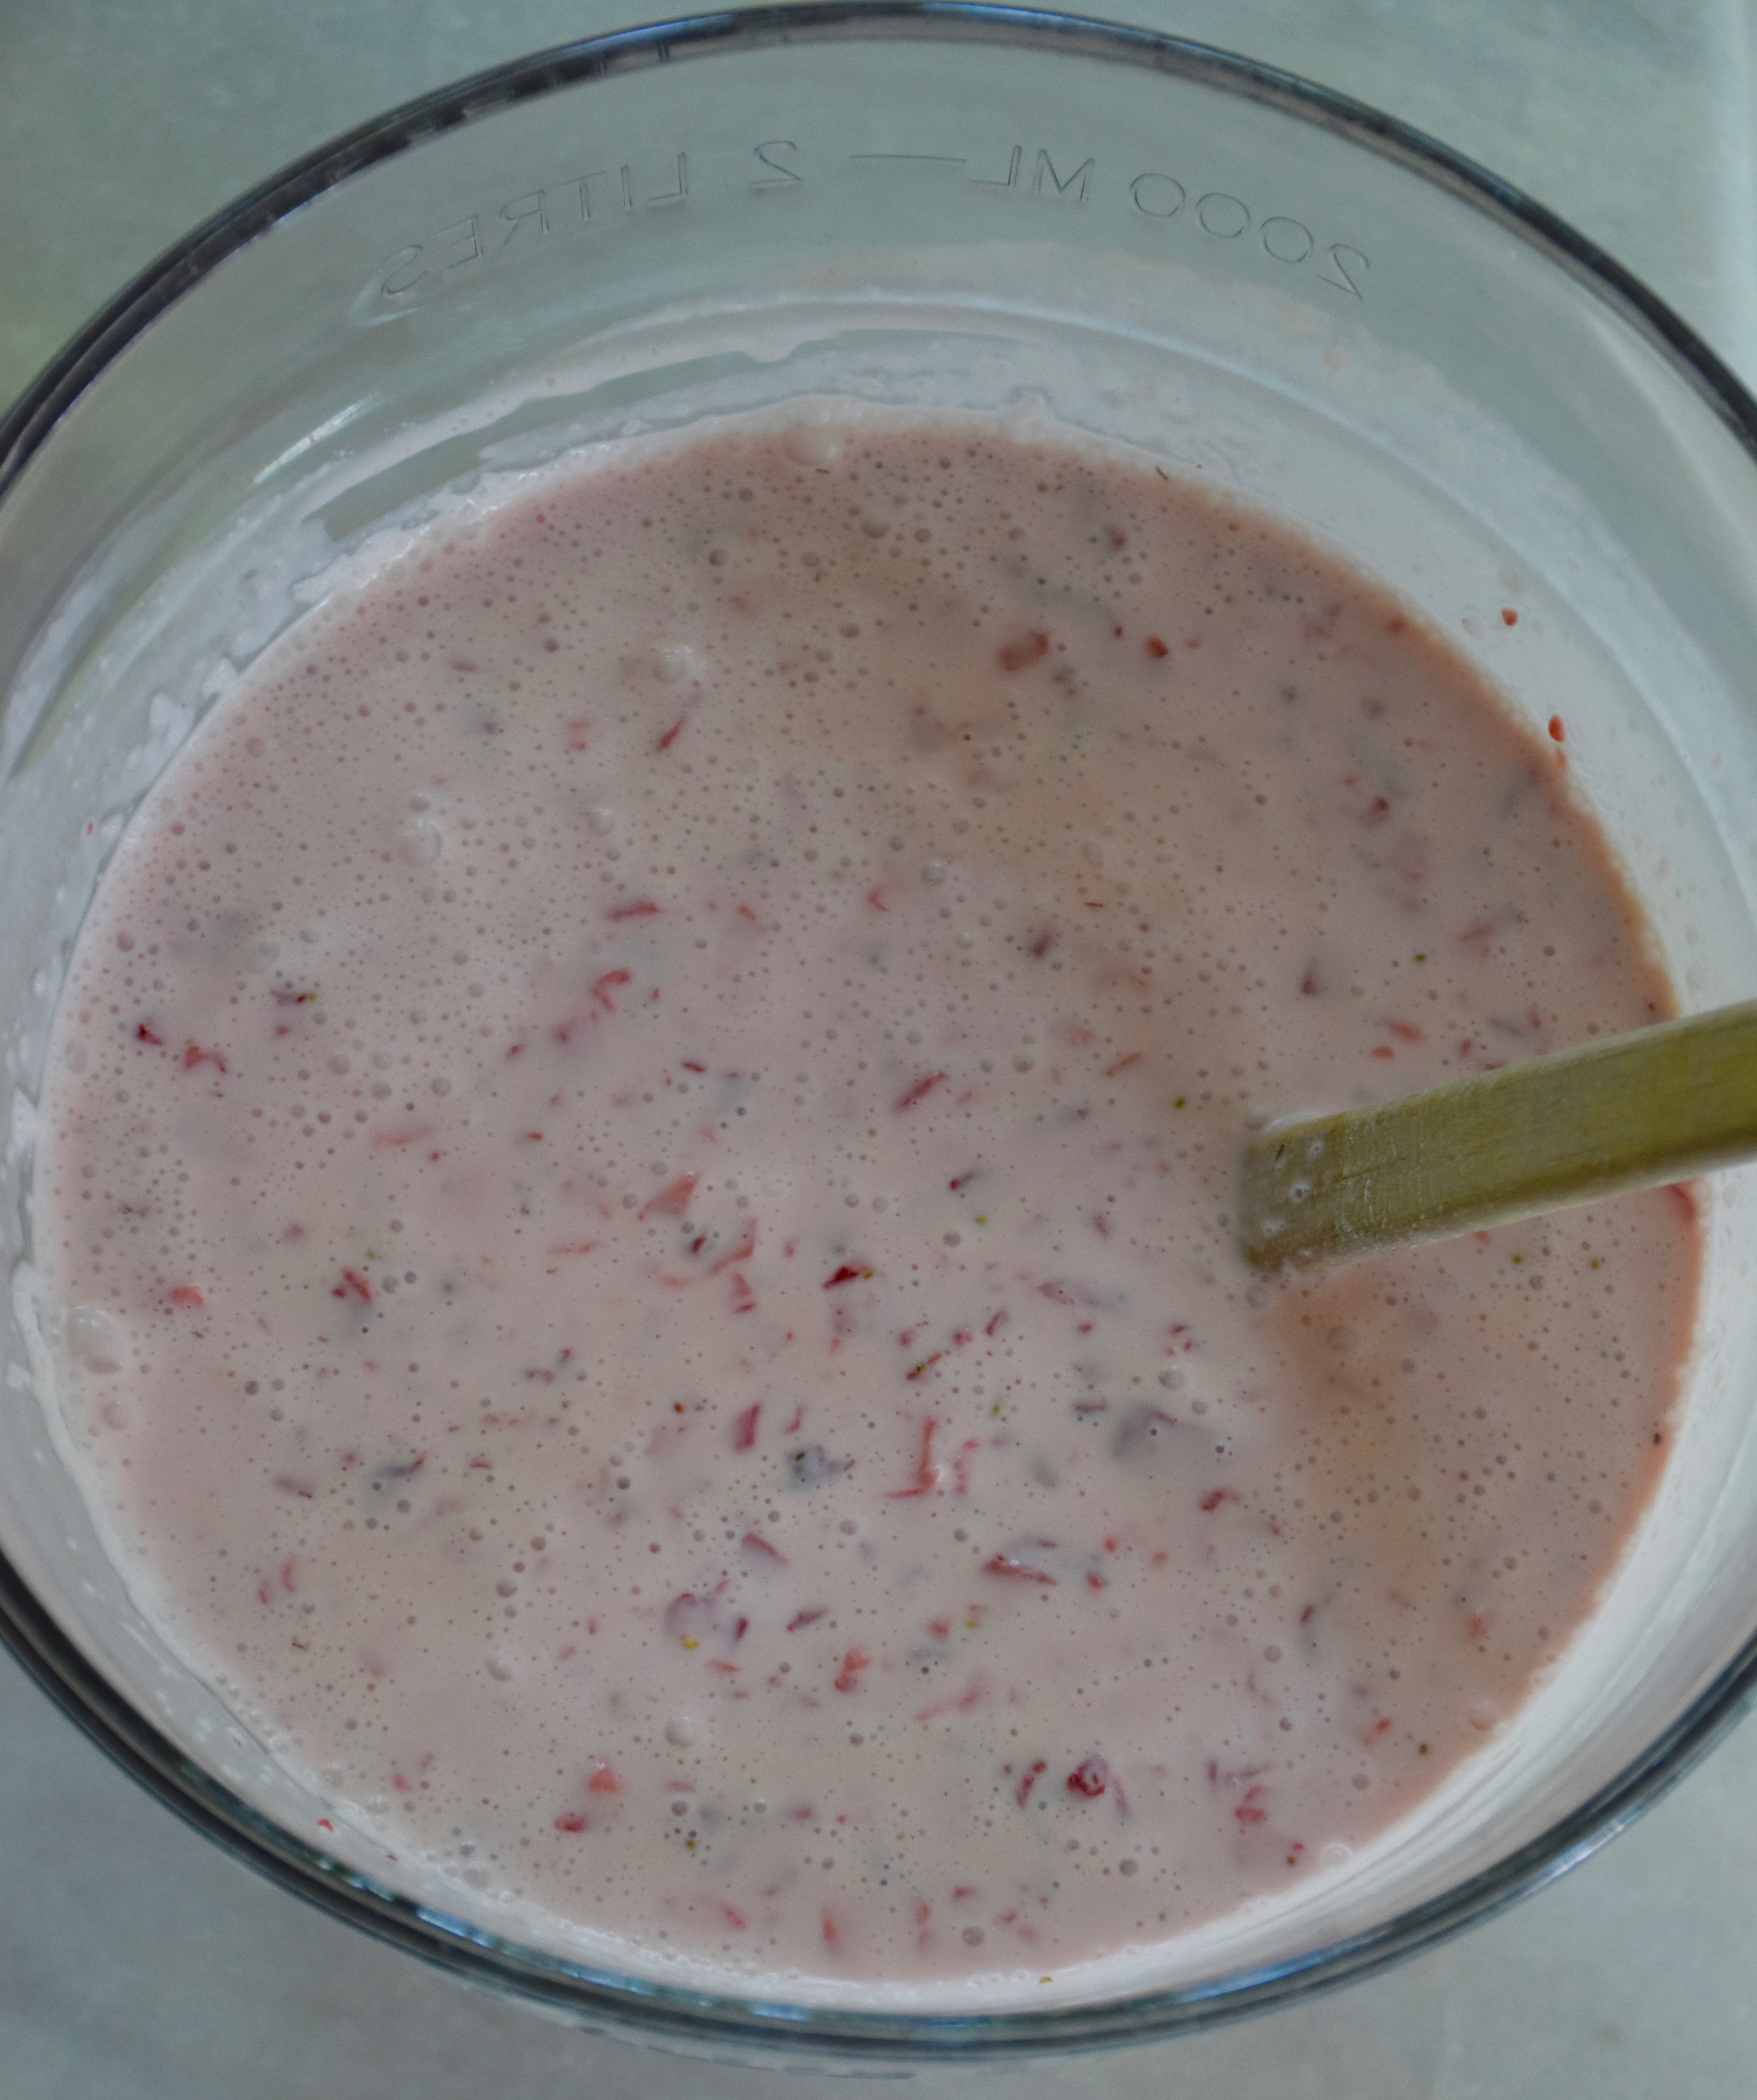
In a large bowl mix together the strawberry puree, milk, cream, the remaining 1/2 cup sugar, vanilla and salt.
Pour your strawberry mixture in your ice cream maker and allow it run until your ice cream is frozen. The ice cream setting on my Cuisinart is 25 minutes.
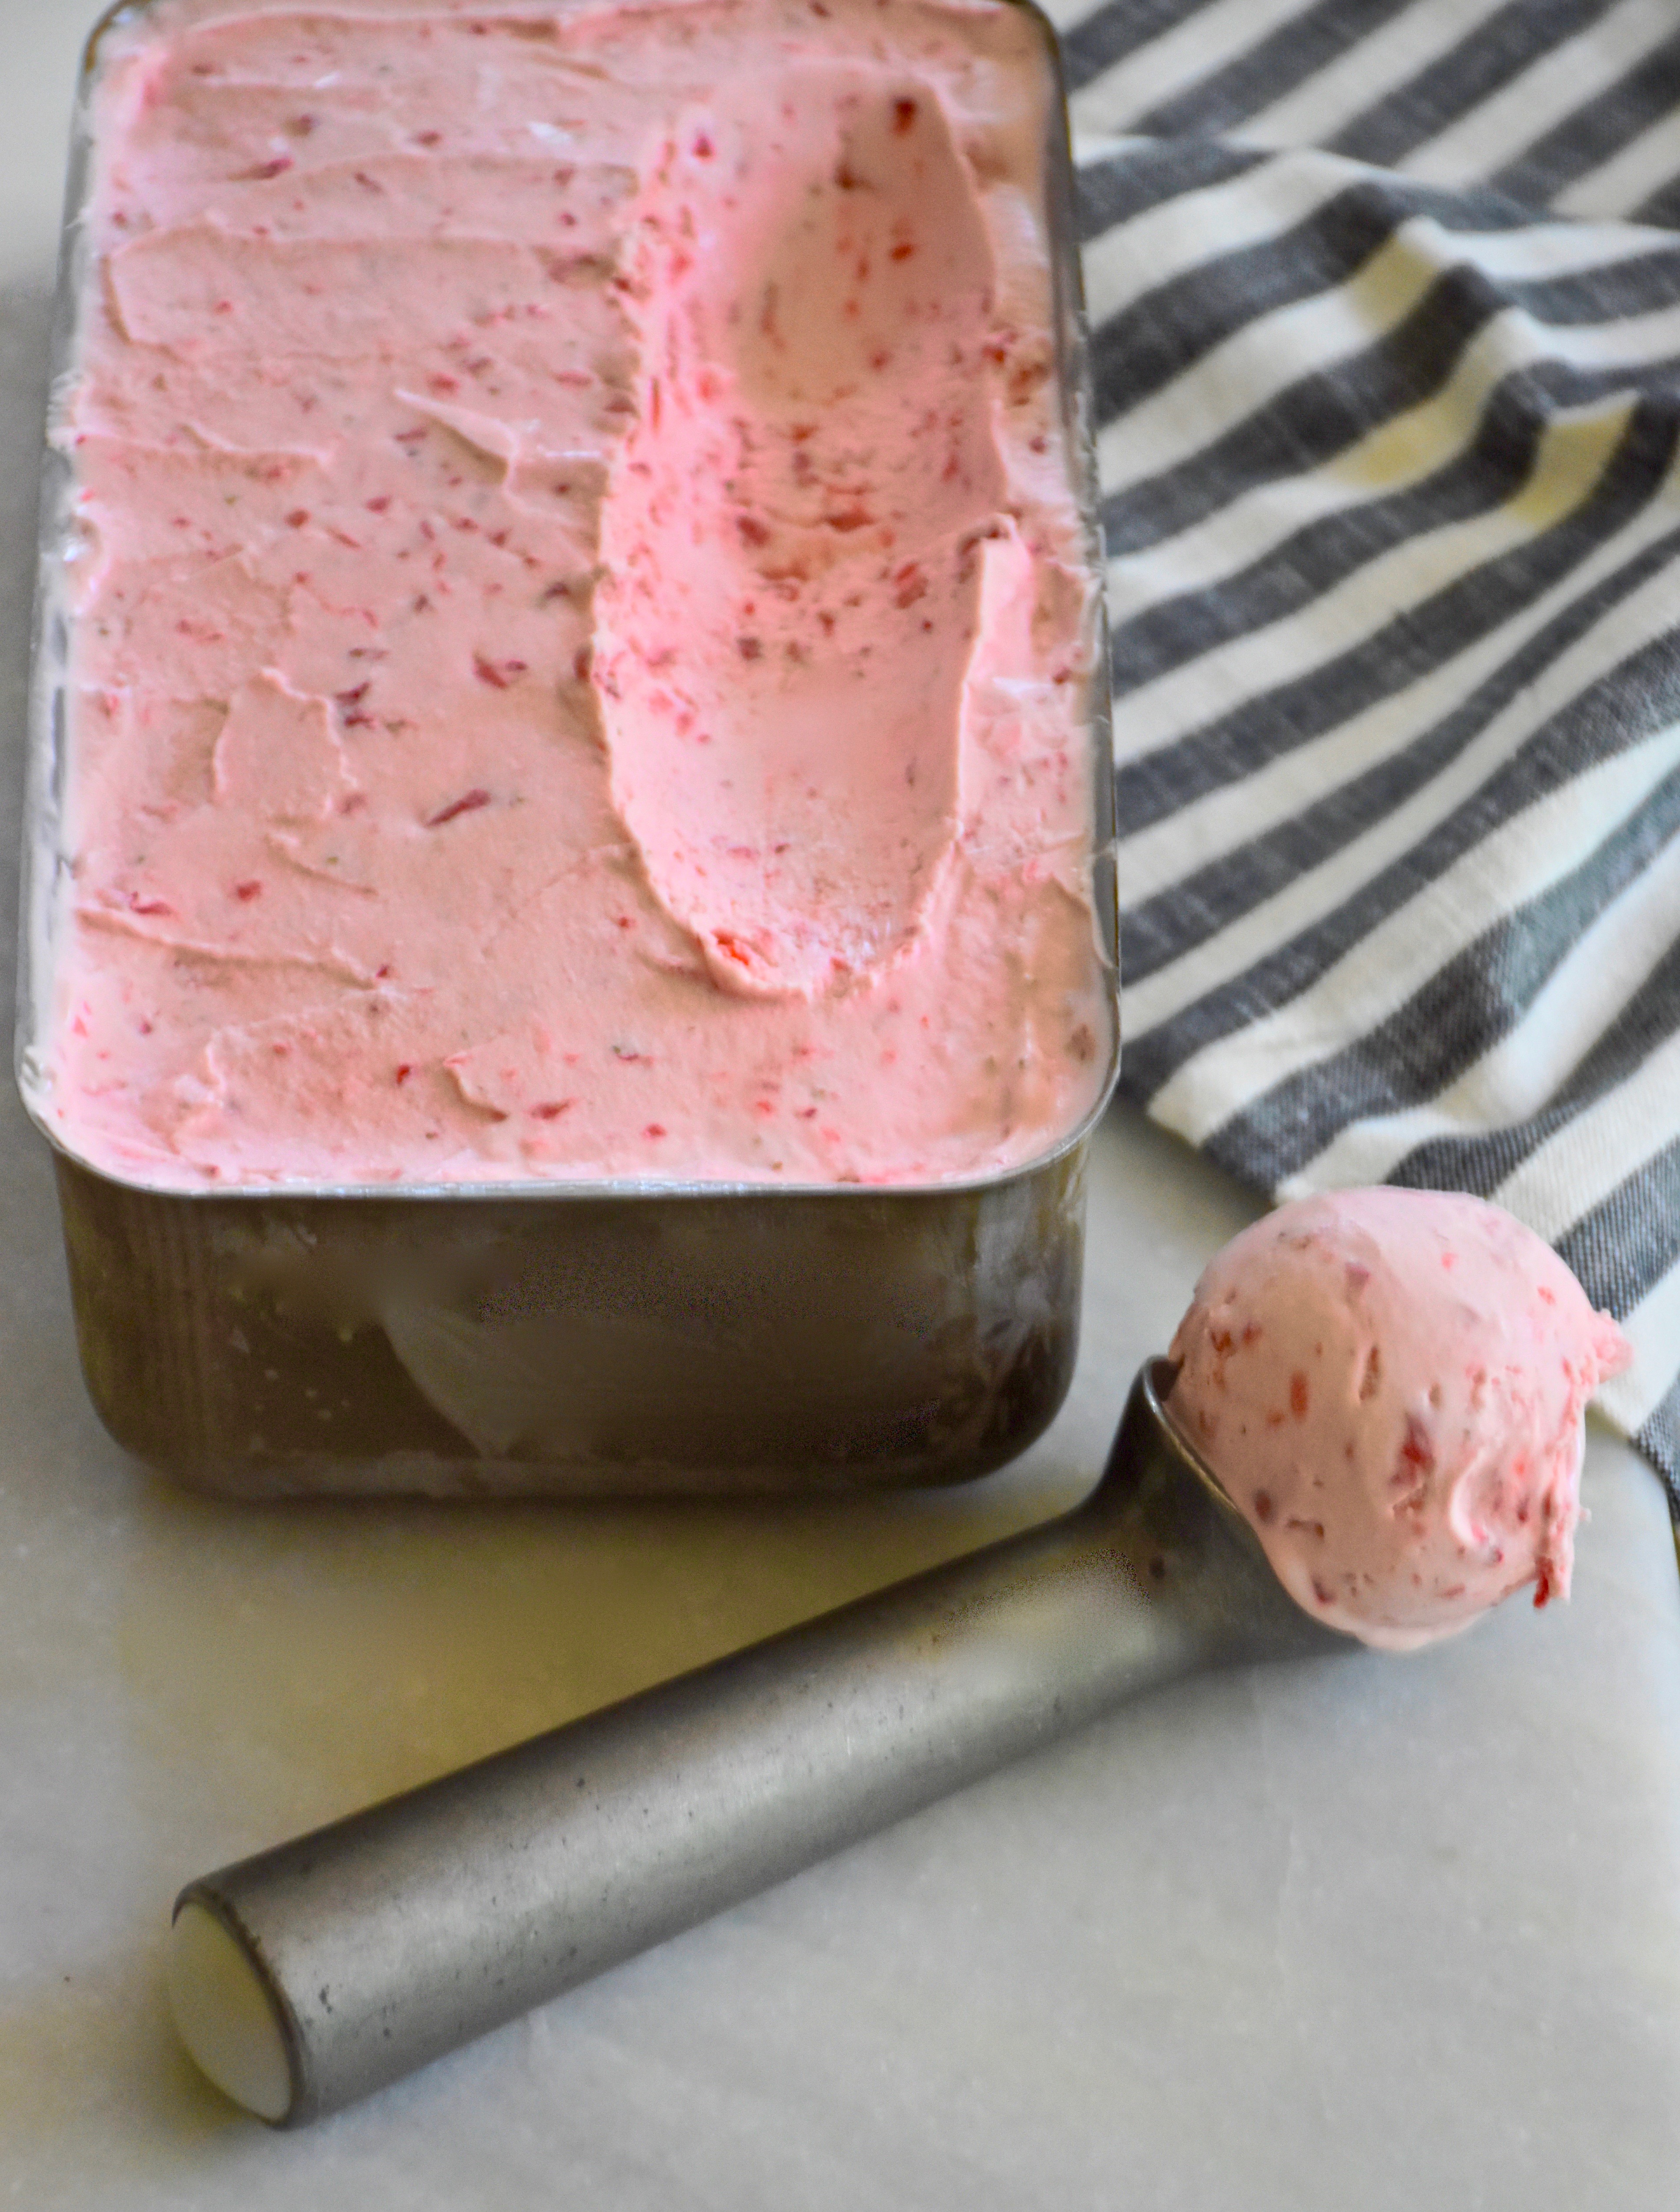
Spoon your ice cream into a freezer safe container and allow it to freeze and firm up for an additional 2 hours.
So scoop up some summer fun with homemade strawberry ice cream. This delicious treat is still fun to make on a hot summer day.
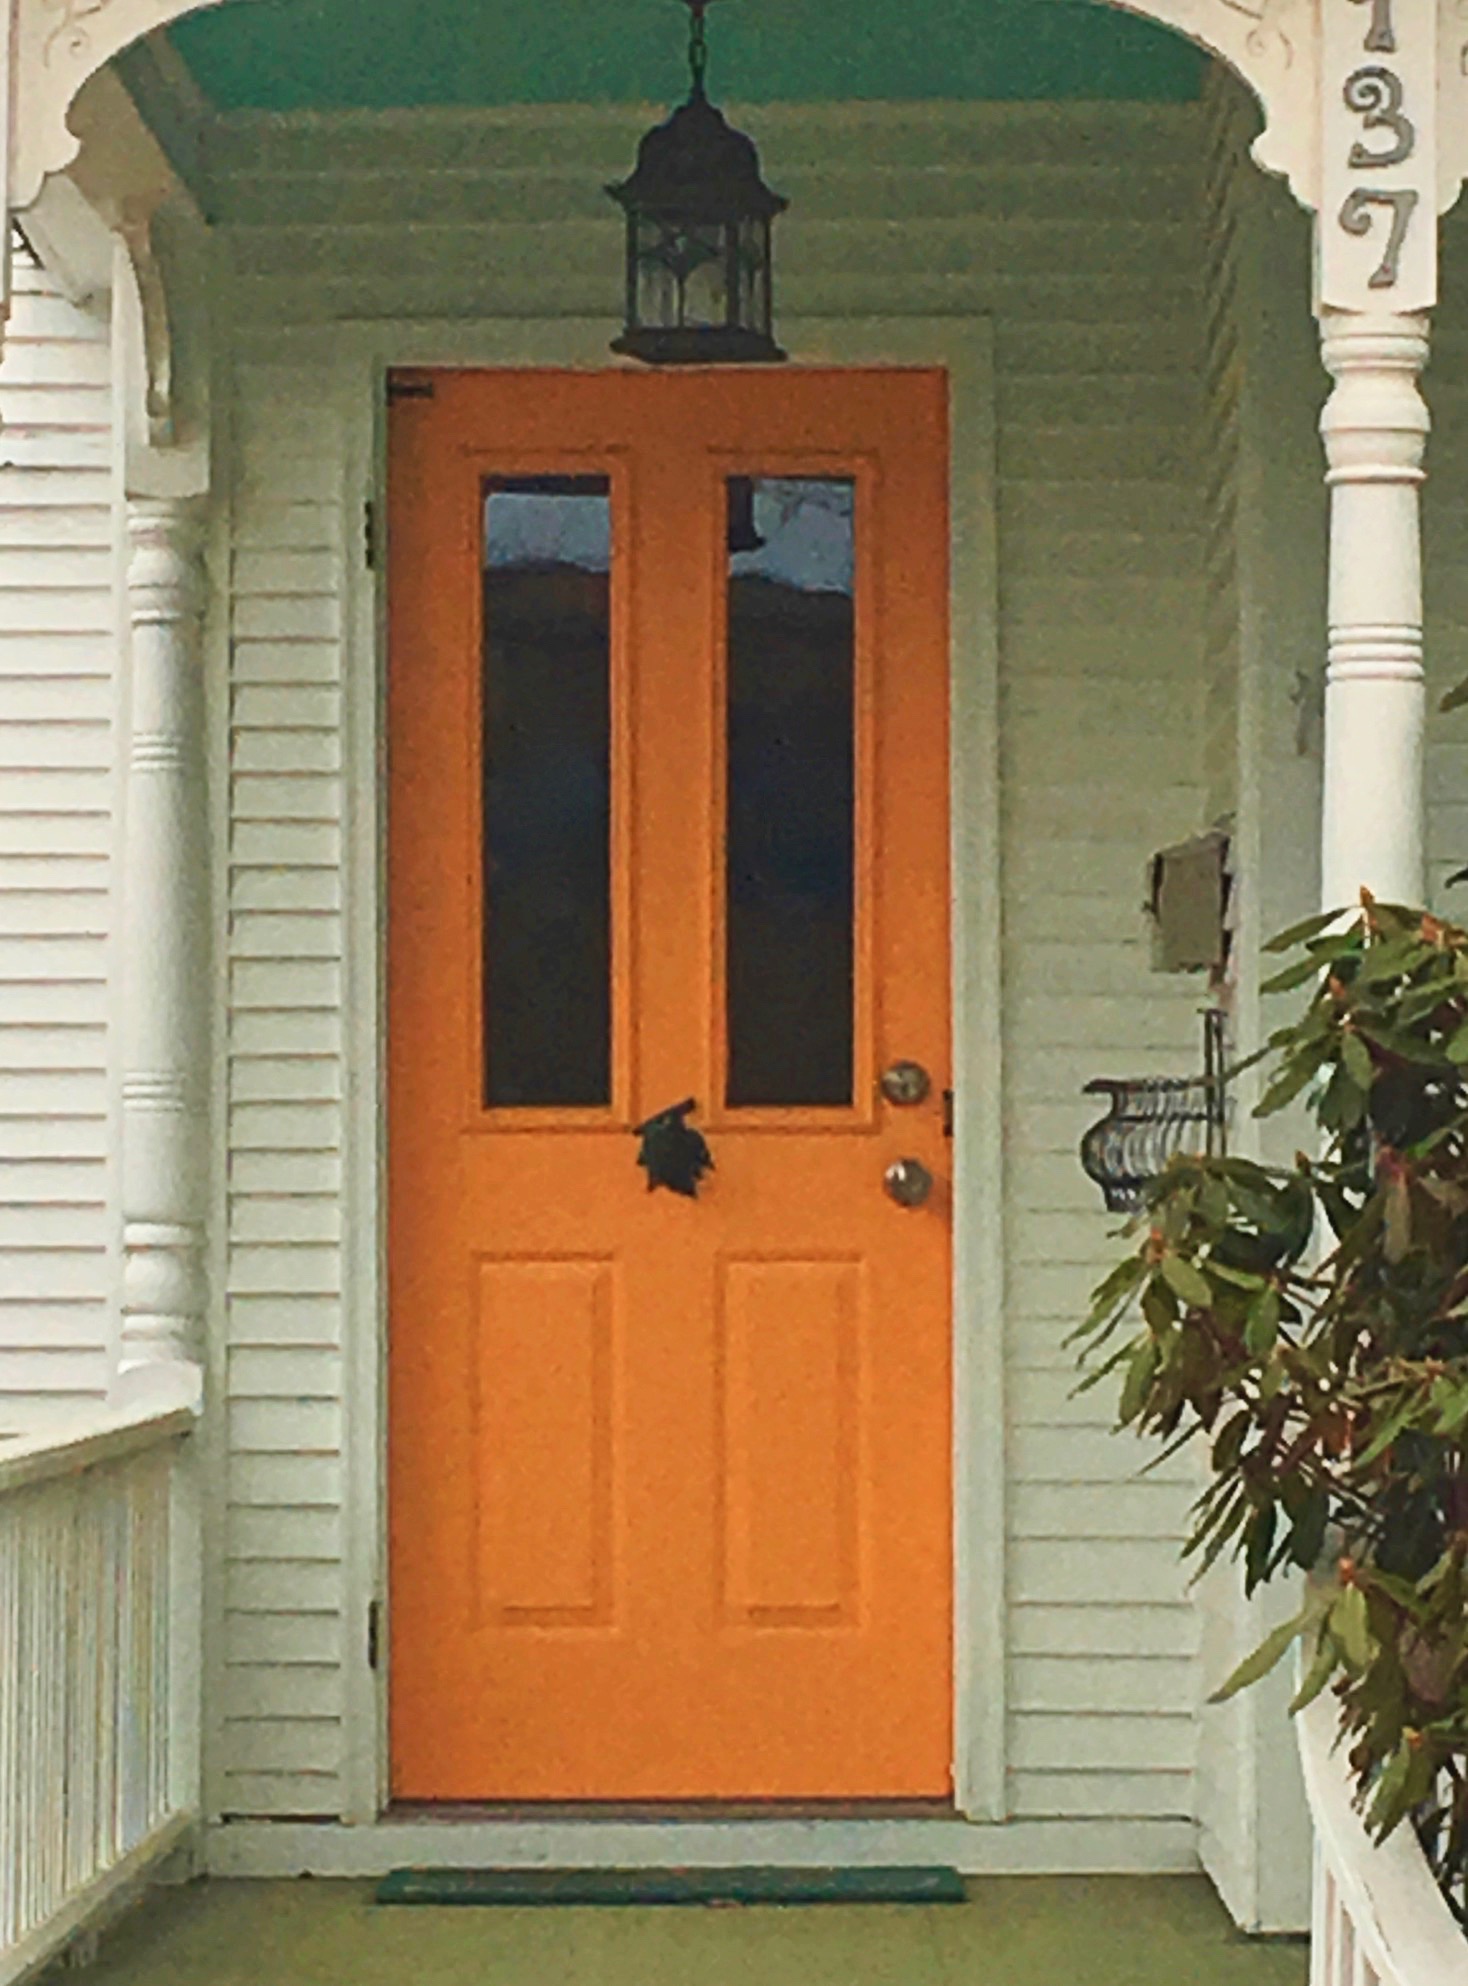
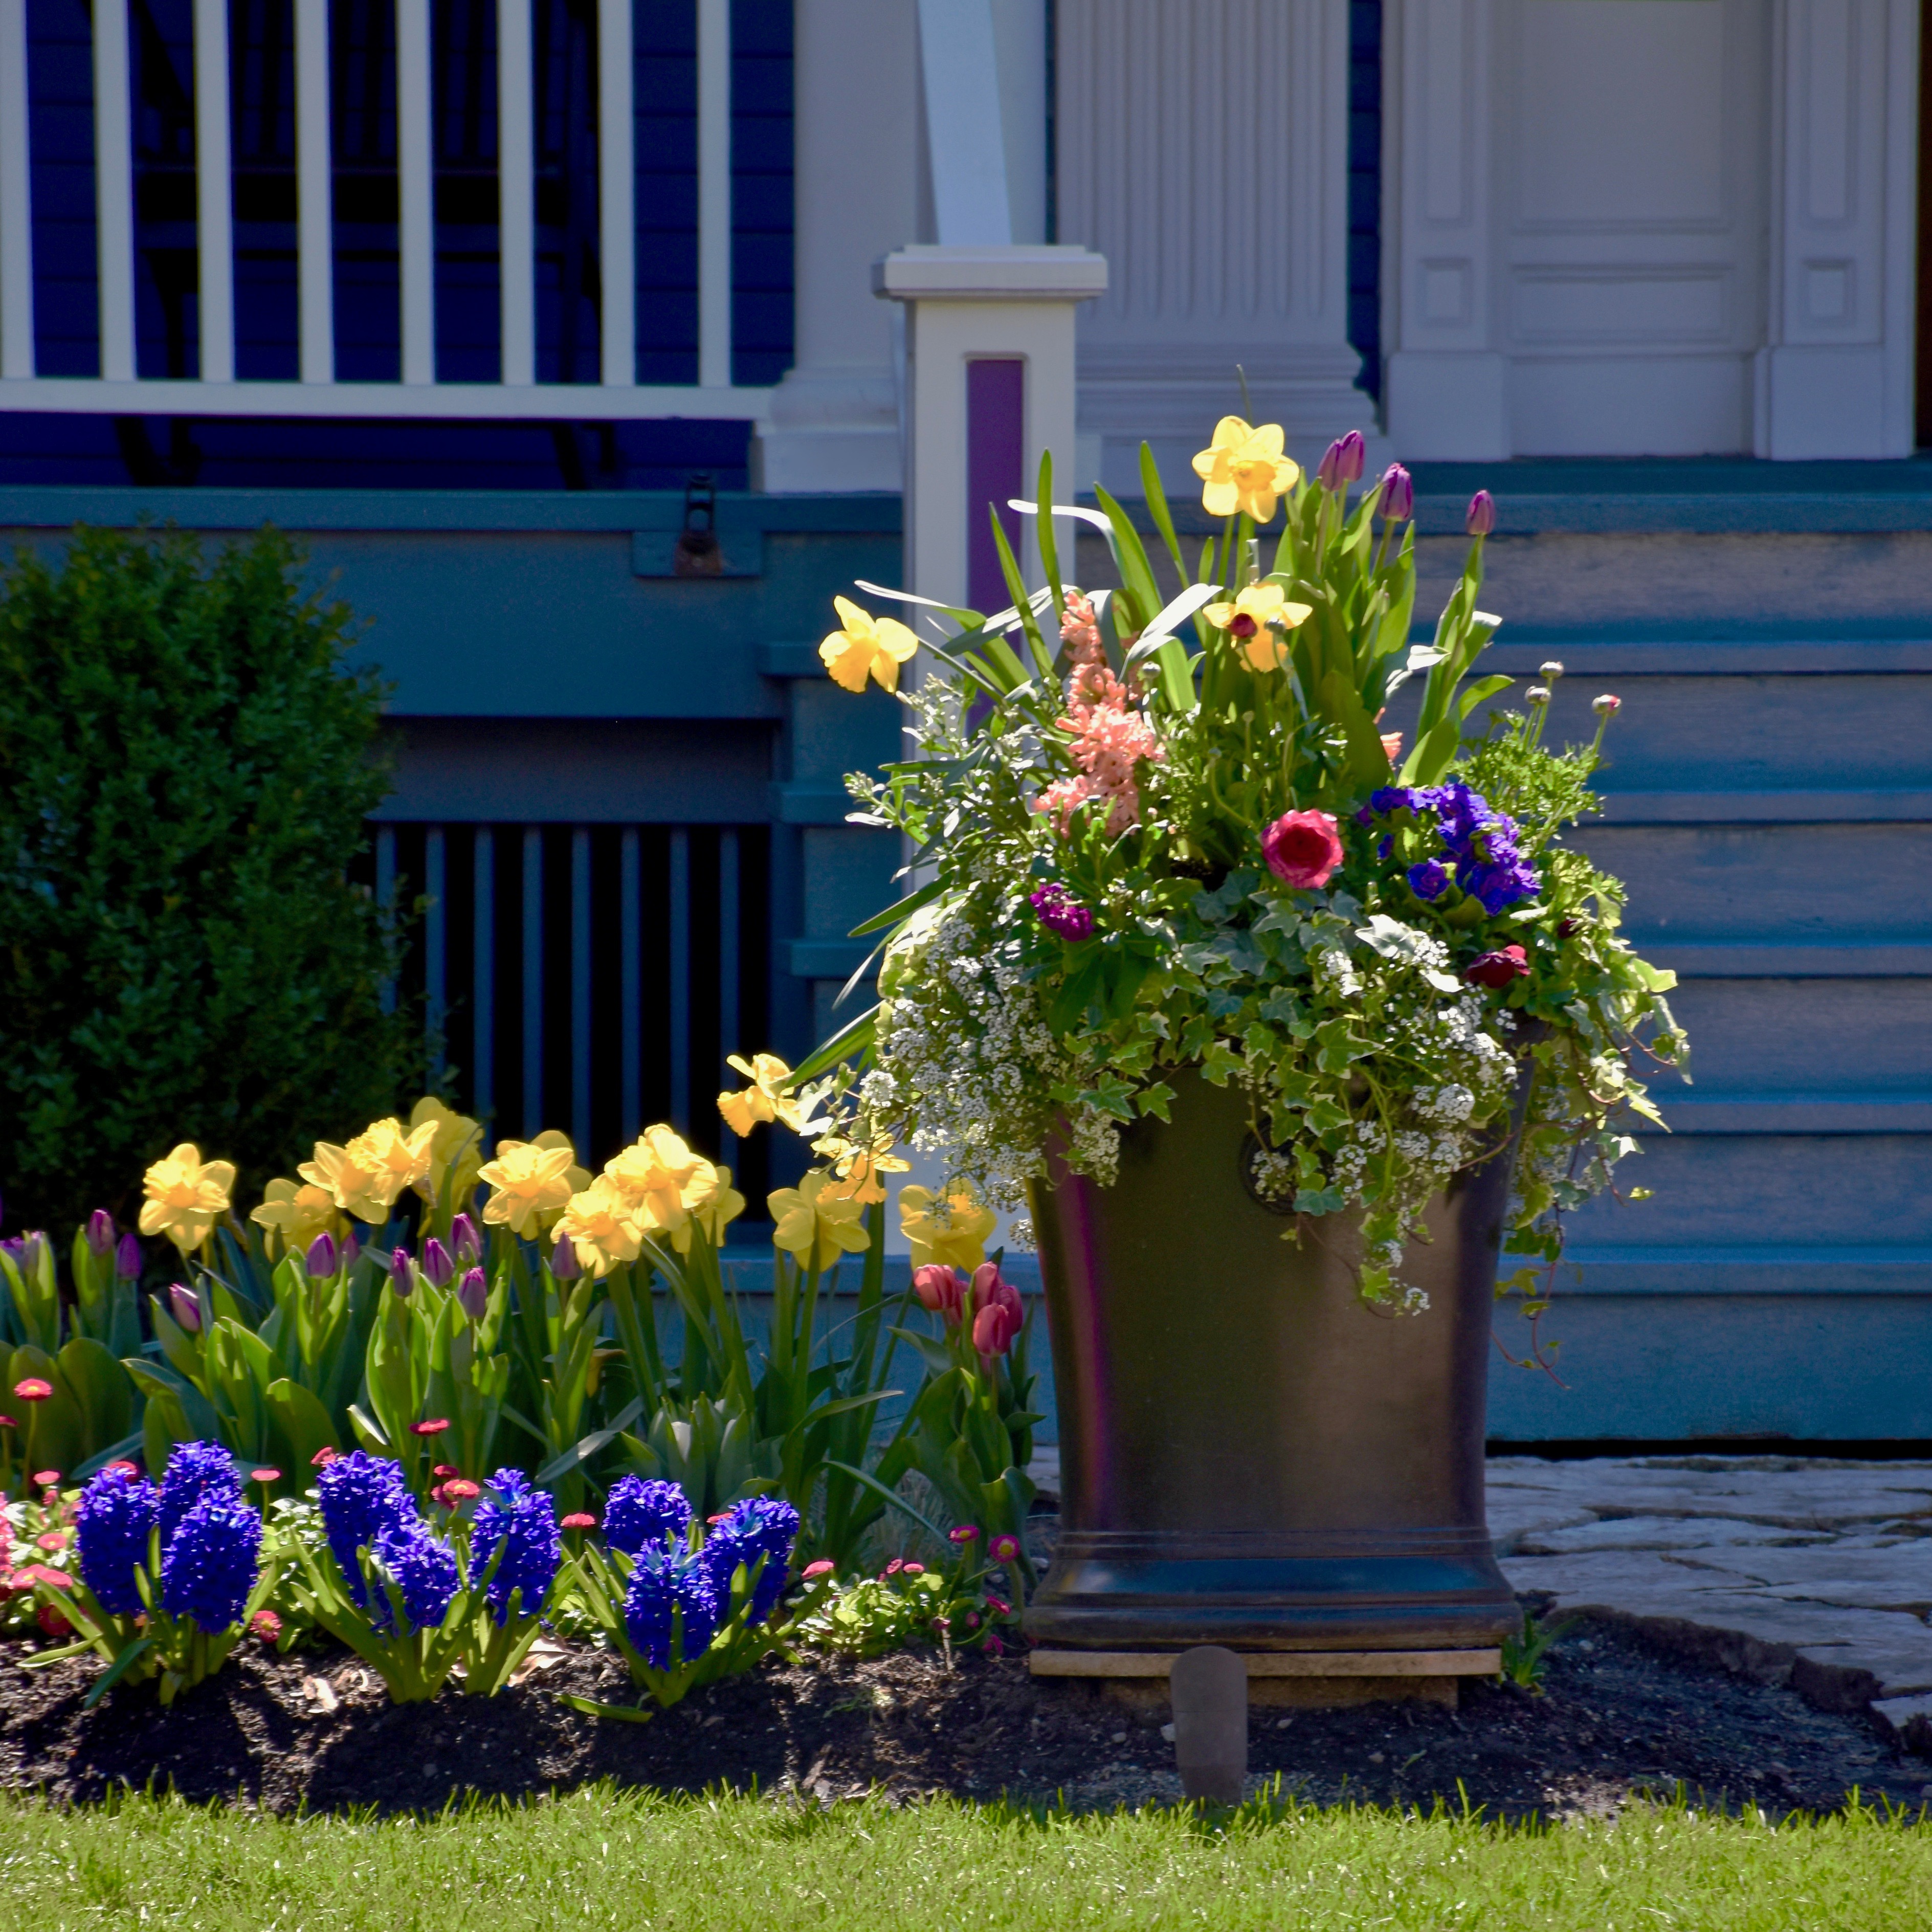
It’s hard to think about Chicago summers and not talk about color. The winter snow is now a distant memory and the trees and grass are all a deep summer green. Doors and walkways are adorned with colorful pots and the window boxes are overflowing with flowers. Summer is here and I have been out taking in the view and photographing some of my favorites.
I love photographing doors. I have shared a few posts on the subject before. Whether I am on vacation or just out walking I like to linger a moment to admire the architectural details or an interesting color that makes certain doors and homes stand out.
This little garden cottage has a cheerful touches of yellow against the crisp black and white exterior. The woven letter box and those wicker chairs look like a lovely place to sit and enjoy a view. I like the colorful window boxes and all the neatly trimmed boxwoods.
The contrast of this light pink door against the deep navy siding is eye catching. The brass light fixtures and lanterns add a polished finish that ties in the colors from stone stairs. Then little bird house detail adds just the right touch of fun.
This stately colonial looks fresh and up to date with this Tiffany blue door. The bright color draws the eye in and makes you notice the transom window and columns.
This coastal inspired home is one of my favorites. The contrast between the soft gray shingles and a robin’s egg blue door is so pretty. I like the weathered metal planters and the boxwood. It’s a city home that make you feel like you might be on the beach.
This tangerine door is something I saw while on vacation in Michigan. The preppy orange against the turquoise haint ceiling made this small home feel like it had a larger than life personality.
This classic victorian had me stopping to enjoy the view. The gorgeous coral door with the brass hardware makes you take notice of the leaded window sidelights and the detailed trim work. The metal urns of coral geraniums and ivy add a touch of color to the yard.
Finally, a craftsman styled home with a welcoming tomato red. The lighting and house numbers add a finished feel to the craftsmen look. I love the metal barn star. It adds a patriotic touch that feels like summer in Chicago.
Sometimes it’s fun to just stop and take in the beauty of a summer garden and a doorway or two. The bright colors and landscaping details add character and charm to all of these memorable homes.
Do you have a favorite pie? Or does picking a favorite seem like an unfair question? There are after all so many good choices. So maybe one should think about it seasonally or just narrow it down to a smaller list of seasonal favorites. When it comes to summer, I happen to be partial to berry pies. This week I was walking down the row at my local farmer’s market when a table filled with beautiful blueberries caught my eye. When I saw them I knew I wanted to take a few pints home. As I was walking back with a bag full of berries, I immediately began to think about the mixed berry crumb pie that I had on a trip to Michigan this spring. So inspired, I set out to create my own blueberry crumb pie.
Crumb pies are one of my favorites types of pies because they have all the best parts of eating both a pie and a cobbler or crisp. The buttery crust with a sweet berry filling and a crunchy oat strudel topping is summer pie perfection. I spent some time in my kitchen testing recipes to create the ultimate crumb pie. Baking with fresh berries is wonderful, but it helps to have a few baking tricks up your sleeve when dealing with juicy berries and pies crust. So I am sharing my recipe and all my tips to ensure your crumb pie is crisp and delicious.
Blueberry Crumble Pie – Serves 8
One pie crust, plus extra pie dough from a second if you want to add decorative cutouts. My favorite recipe for a double crust is featured at the link above, but if you are running short on time you could use store bought dough
Blueberry Pie Filling
4 cups blueberries, washed and then well dried out on some paper towels
1 lemon, zested
1/2 cup granulated sugar
1/4 cup of flour
Crumble Topping
1/3 cup brown sugar
1/4 cup granulated sugar
3/4 cup flour
1/2 cup oatmeal
1 teaspoon cinnamon
1 stick butter, cold and diced into small pieces
First, preheat your oven to 375 degrees.
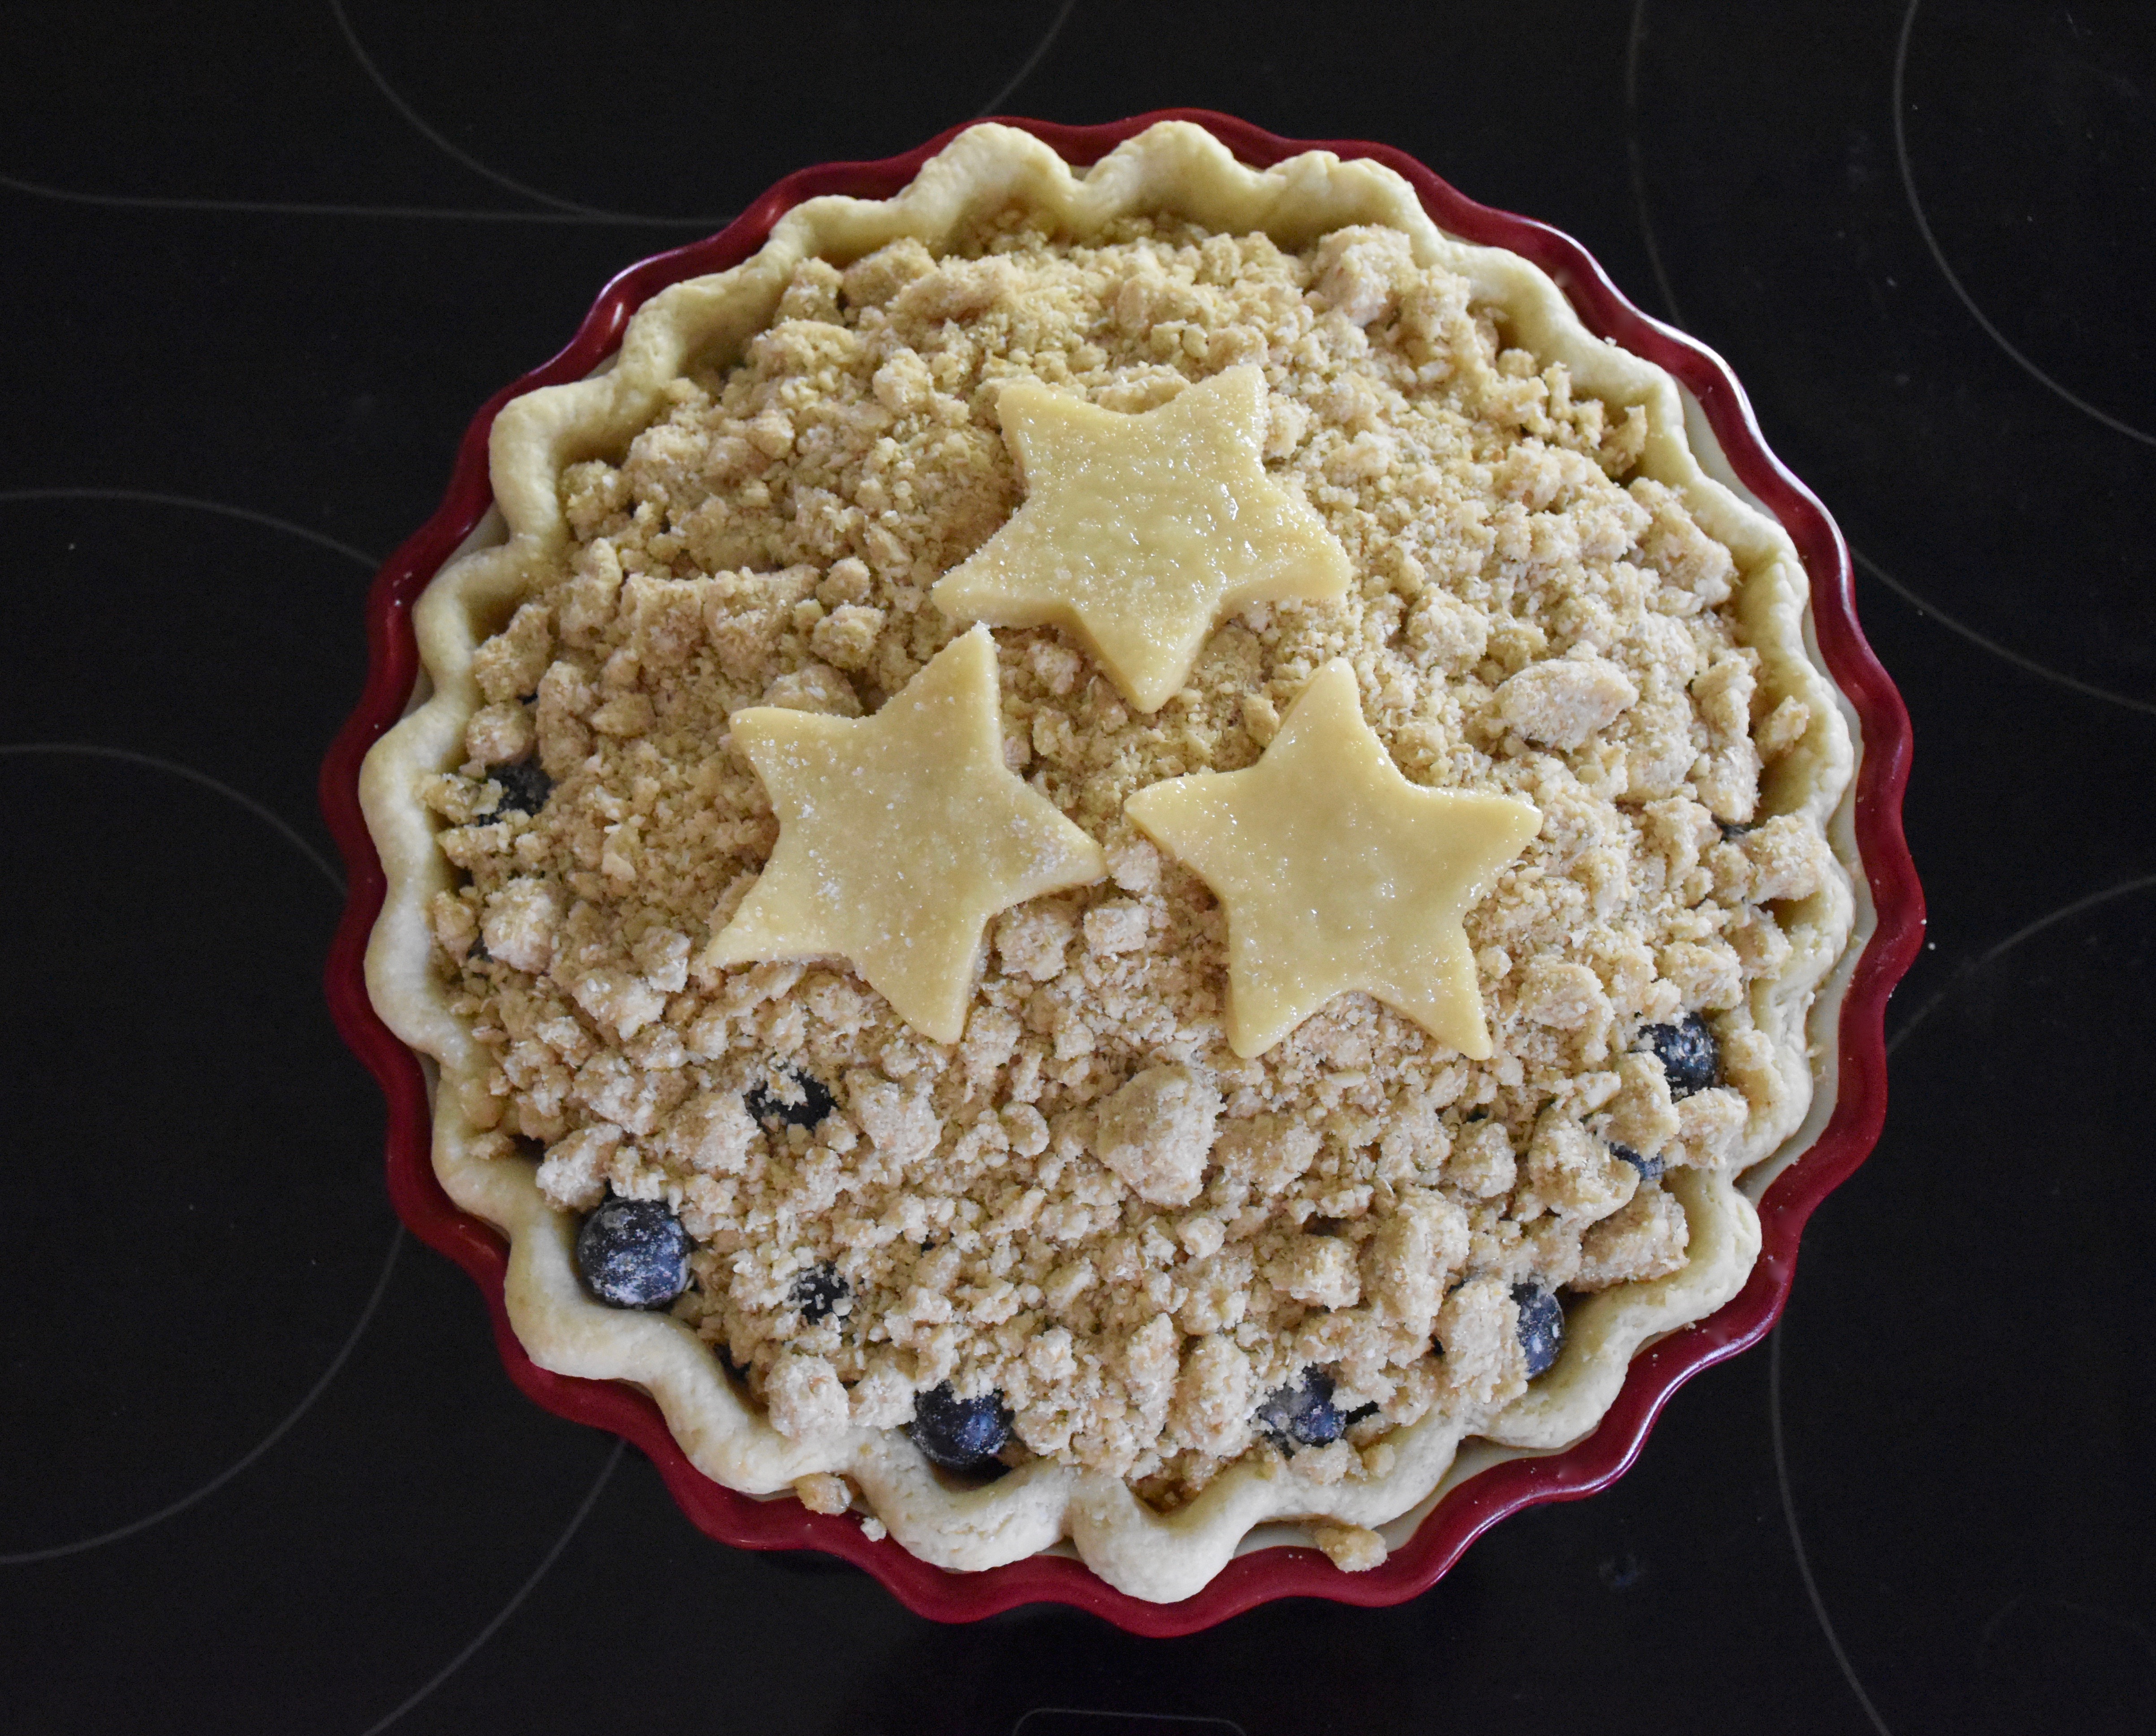
Then prepare your pie crust by greasing the bottom of your 9 inch pie plate with cooking spray and then fold over the edges of your dough. I like to roll my dough into a 12 to 13 inch circle and then I fold the extra dough over to create a thicker crust edge. Then flute the edges by pressing your thumb into the inside of the dough while holding the outside edge with your index and pointer fingers. Then if you would like, you can make some additional pie dough cutouts as a decoration for the top. Make sure to cut thicker pieces for your decorations so they don’t brown too quickly while your pie bakes.
Then you want to blind bake your pie crust before you place your filling in it. This step is important because crumb pies have lots of moisture from the topping and fruit filling. Blind baking your crust first will ensure that you don’t end up with a soggy pie bottom. (I tried a version without blind baking and it was a soupy mess.)
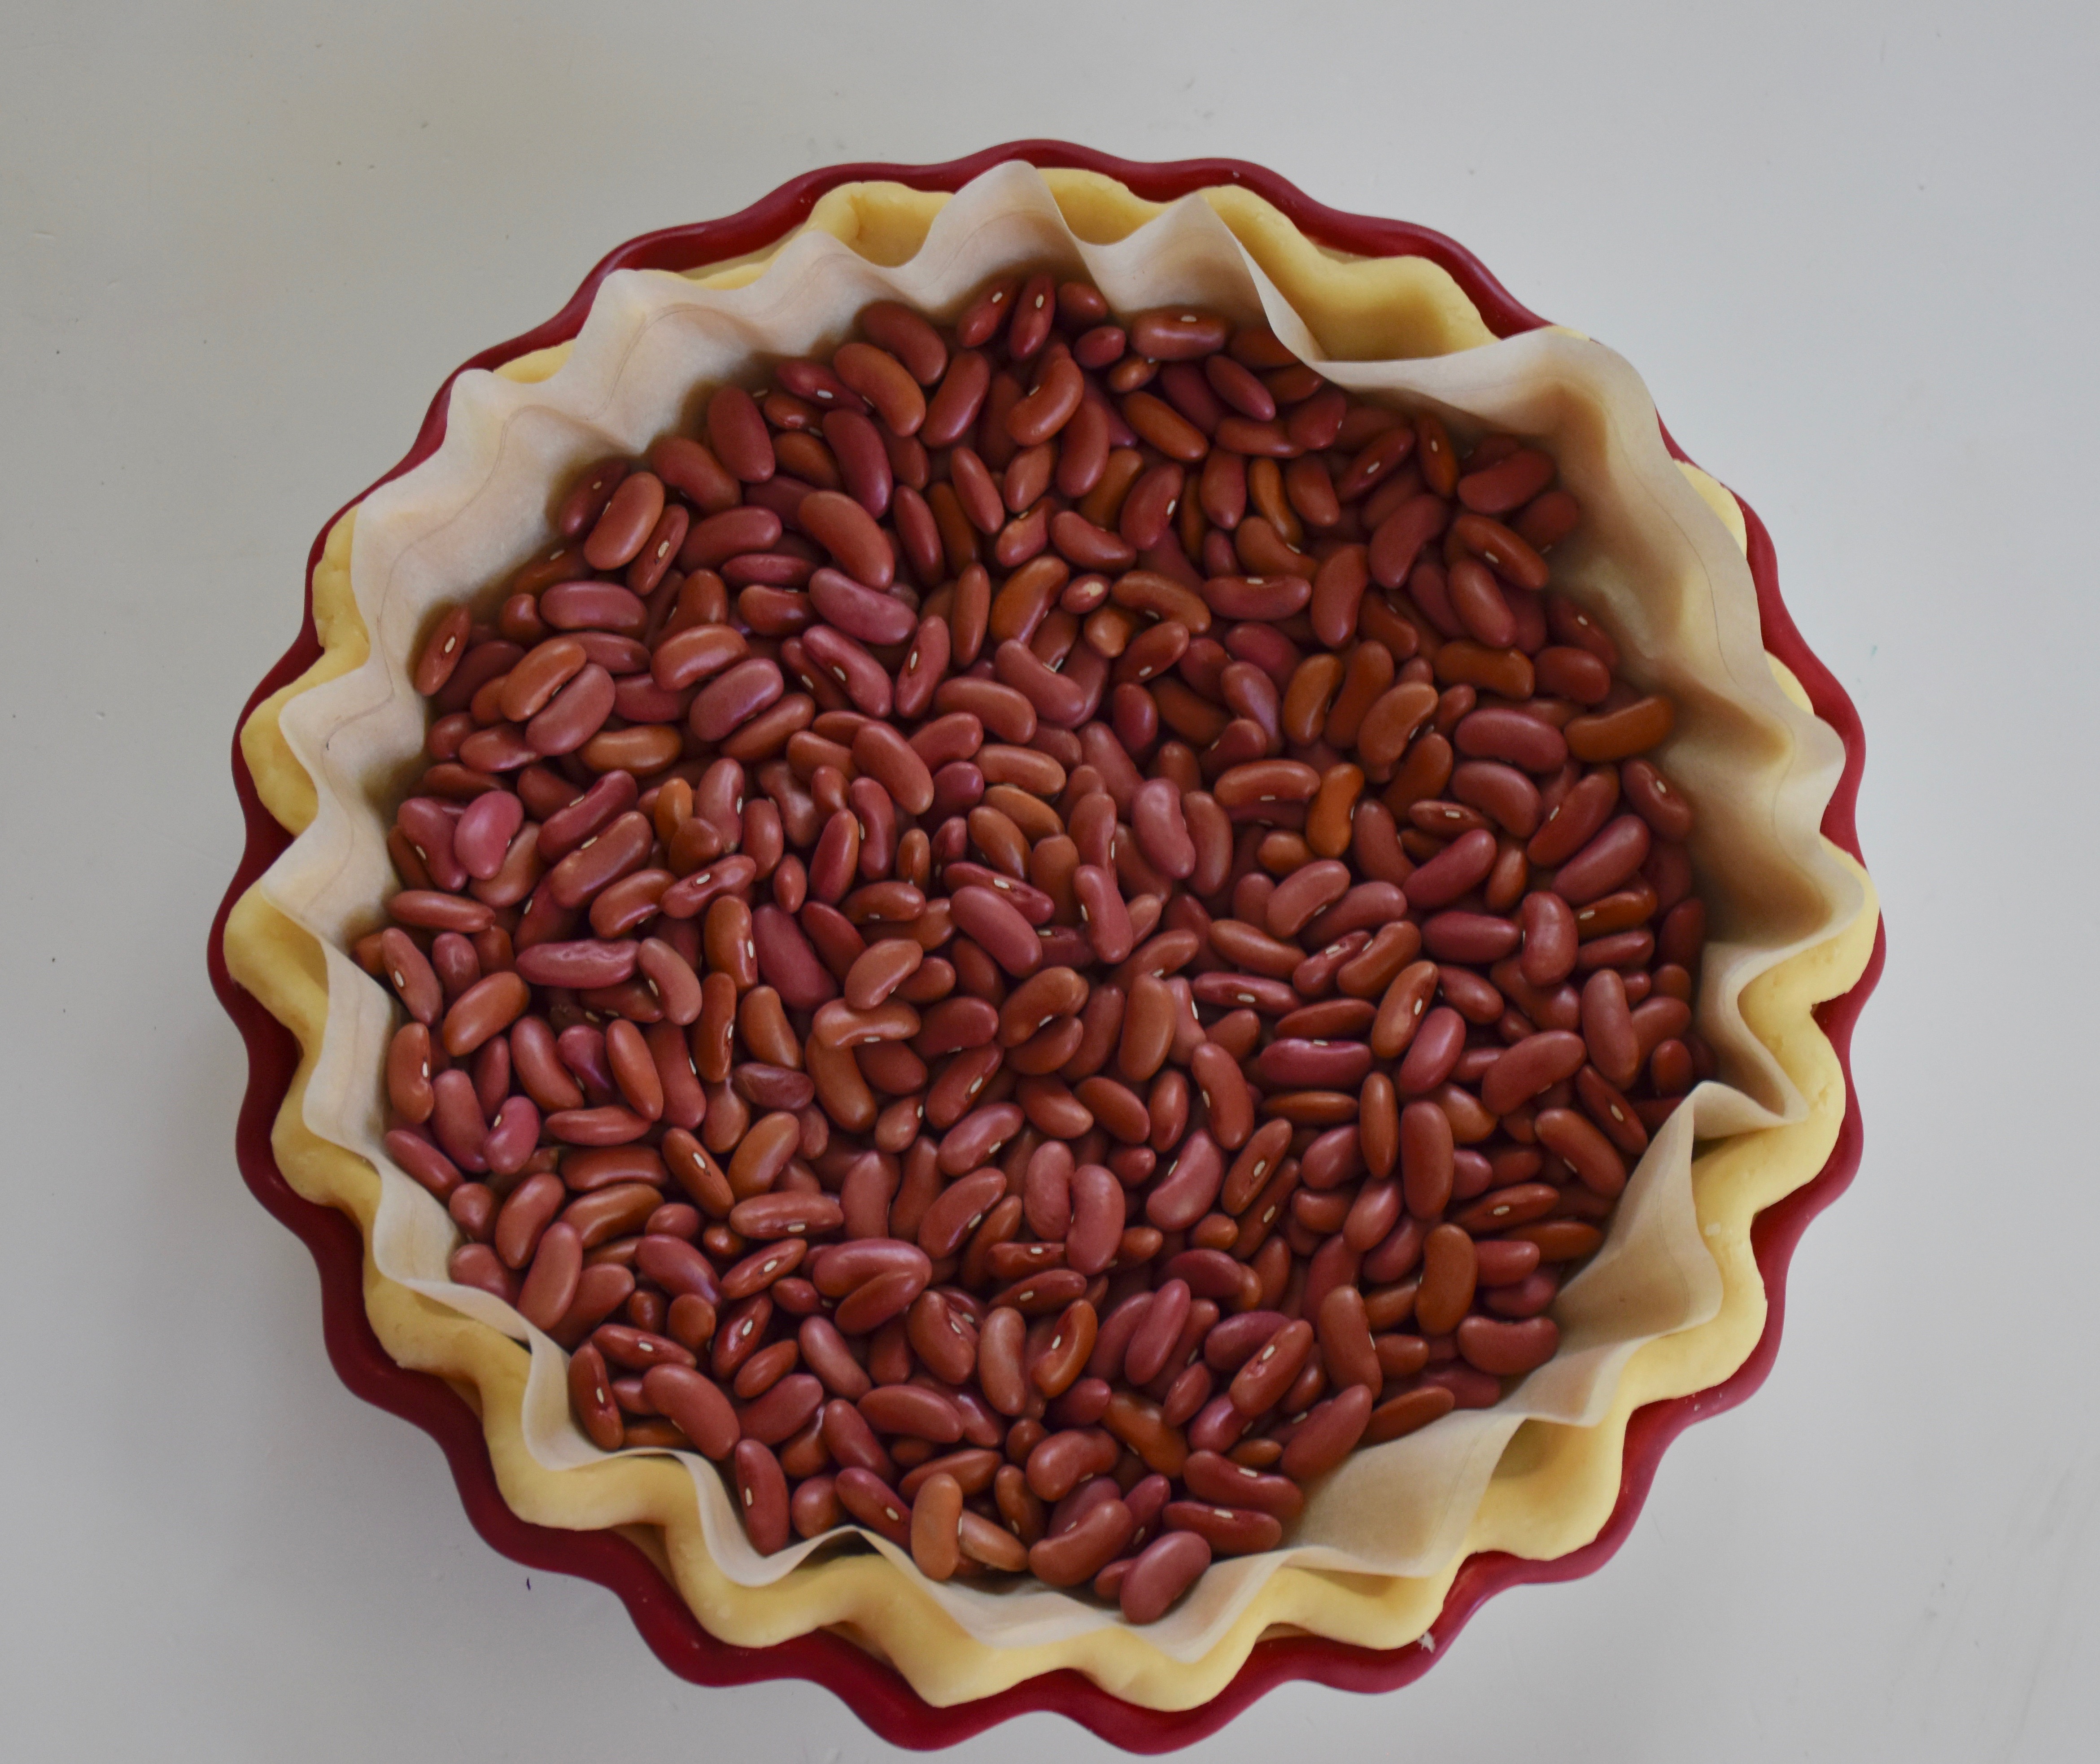
In order to blind bake your crust cut a circle of parchment paper that is 2 to 3 inches larger than your pie plate. Then place the parchment in your unbaked pie shell and fill it with pie weights or plain dried beans or rice will work too. You just need something that will allow your pie crust to keep its shape and not puff up while you bake it.
Here you can see I used some pinto beans that I keep on hand for pies. They are cheaper than pie weights and they work just as well.
Then bake your crust for 10 minutes with the weights. Then carefully remove the parchment paper and weights and return your unfilled pie to the oven for 5 more minutes. This will ensure that the crust is well cooked and crisp.
While your crust is baking you can make your filling and crumb topping.
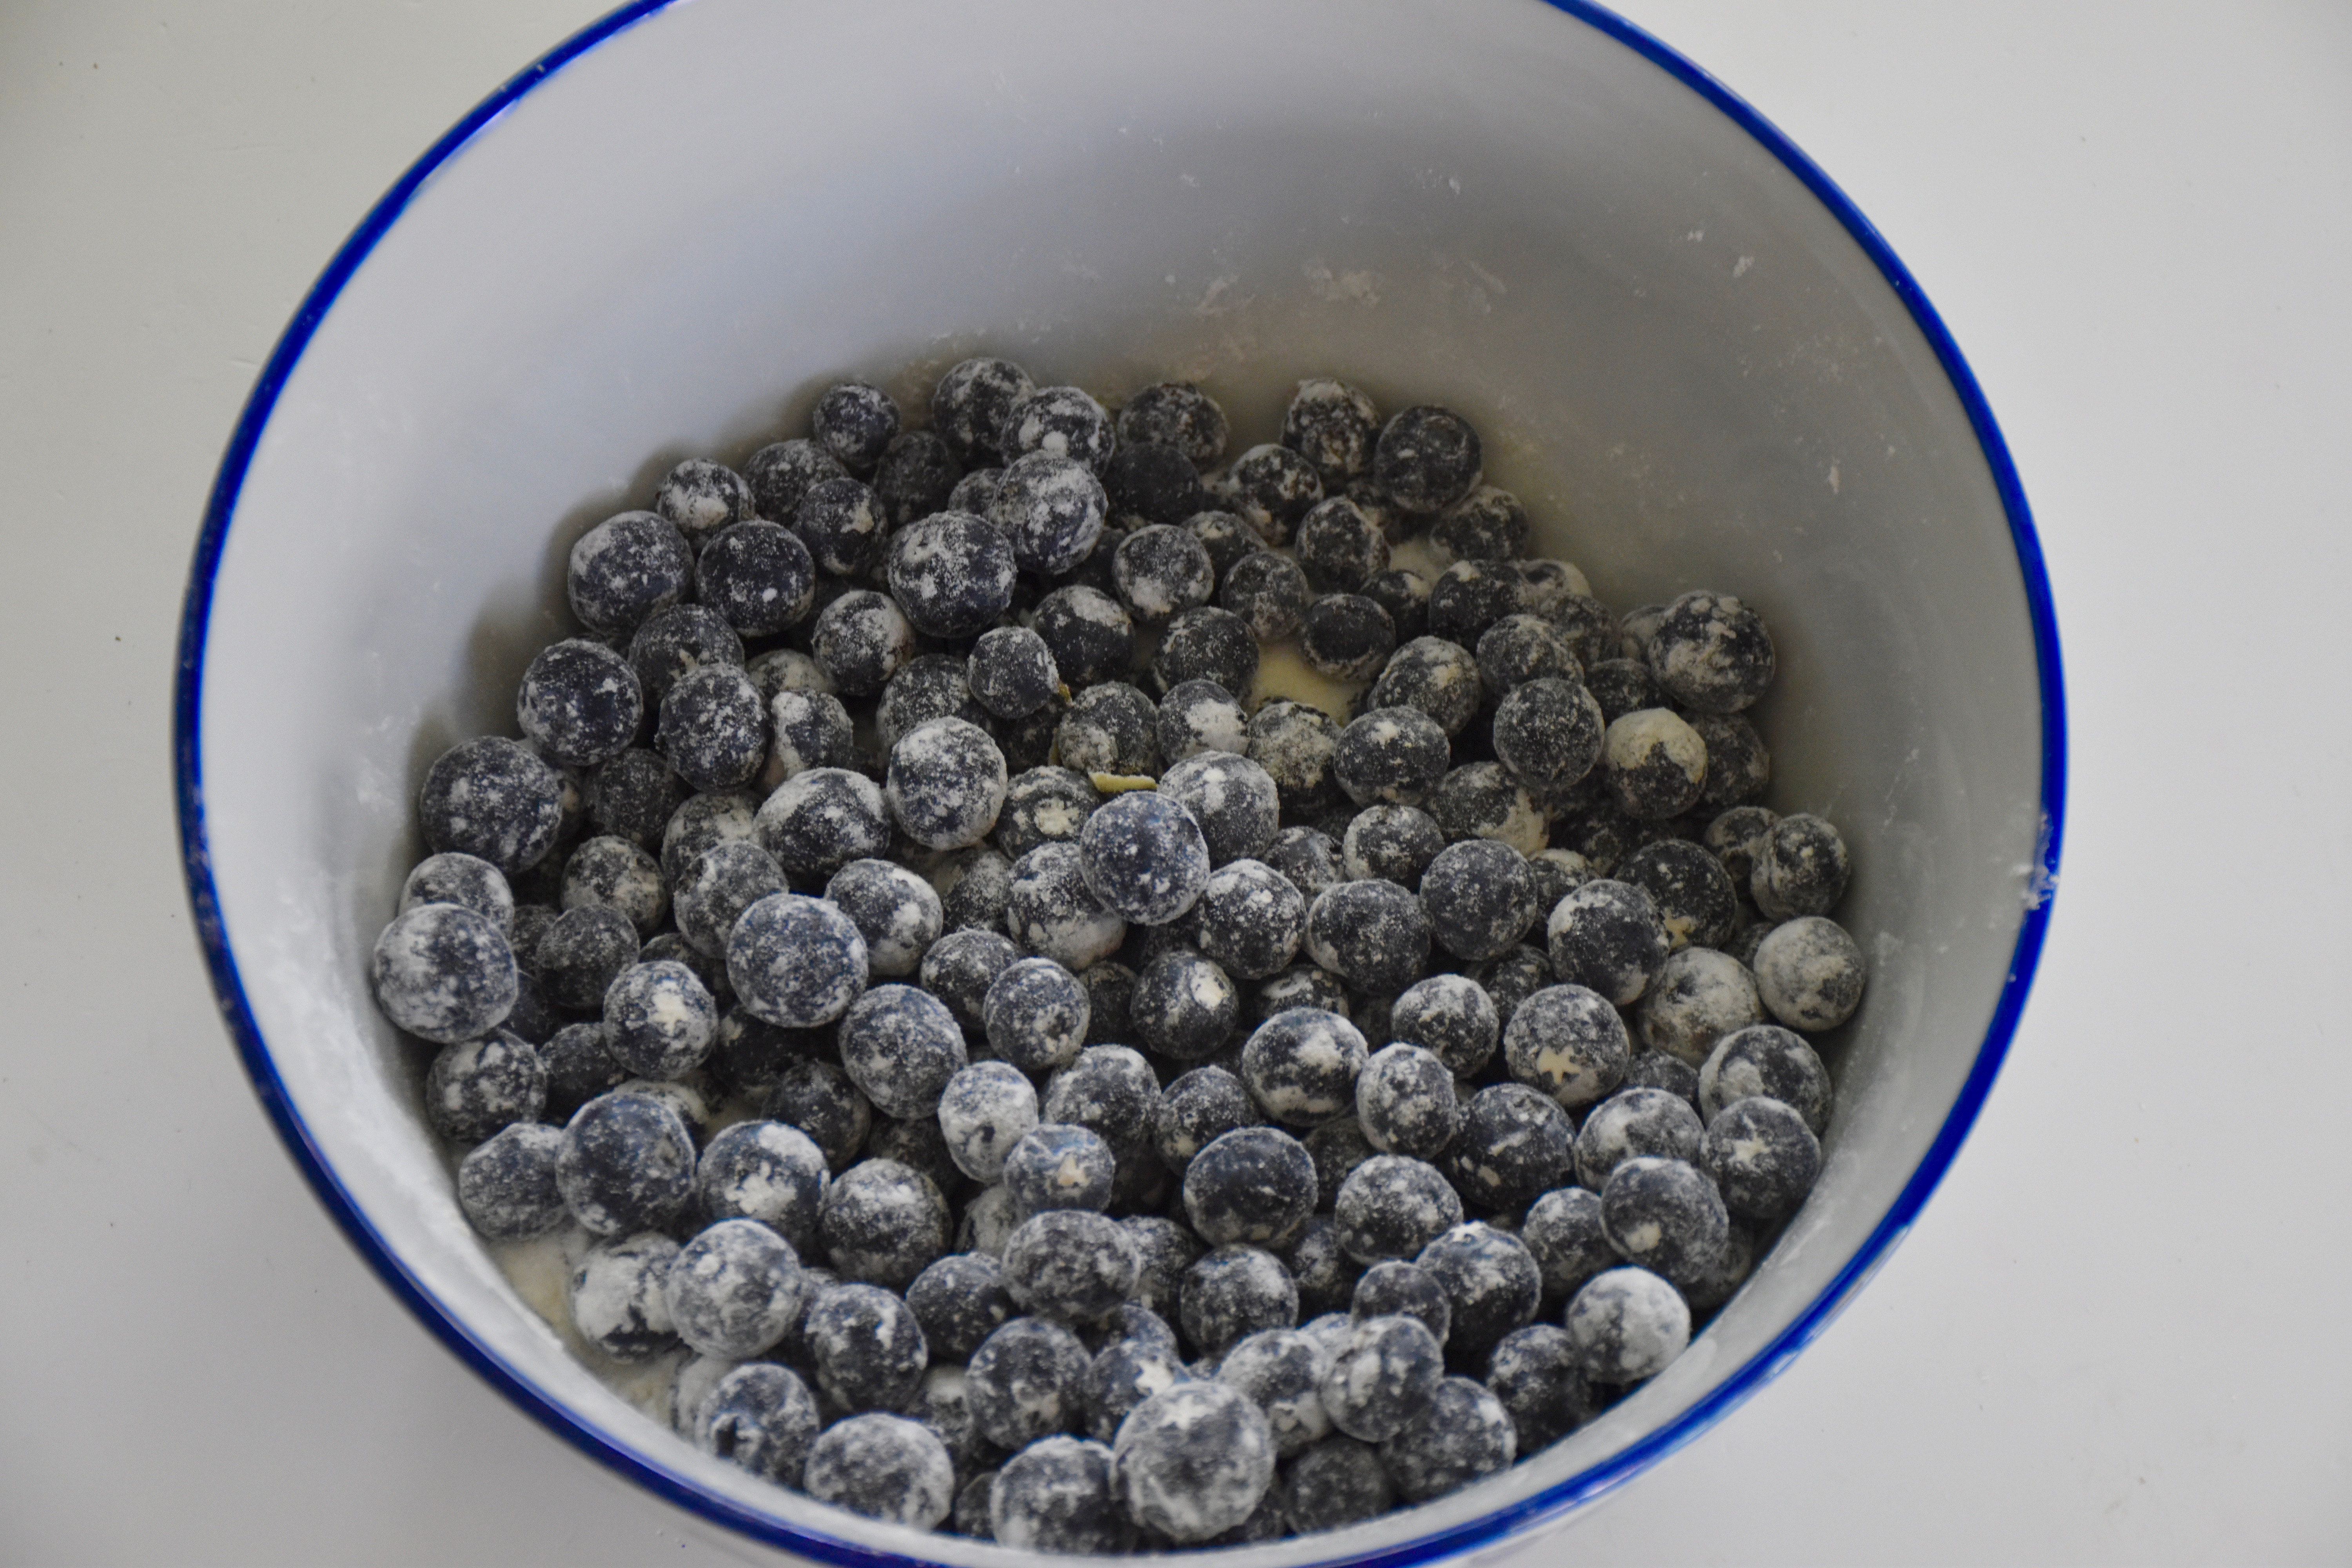
In a medium sized bowl mix together your blueberries, lemon zest, sugar and flour maker the flour and sugar are well mixed to coat all the berries.
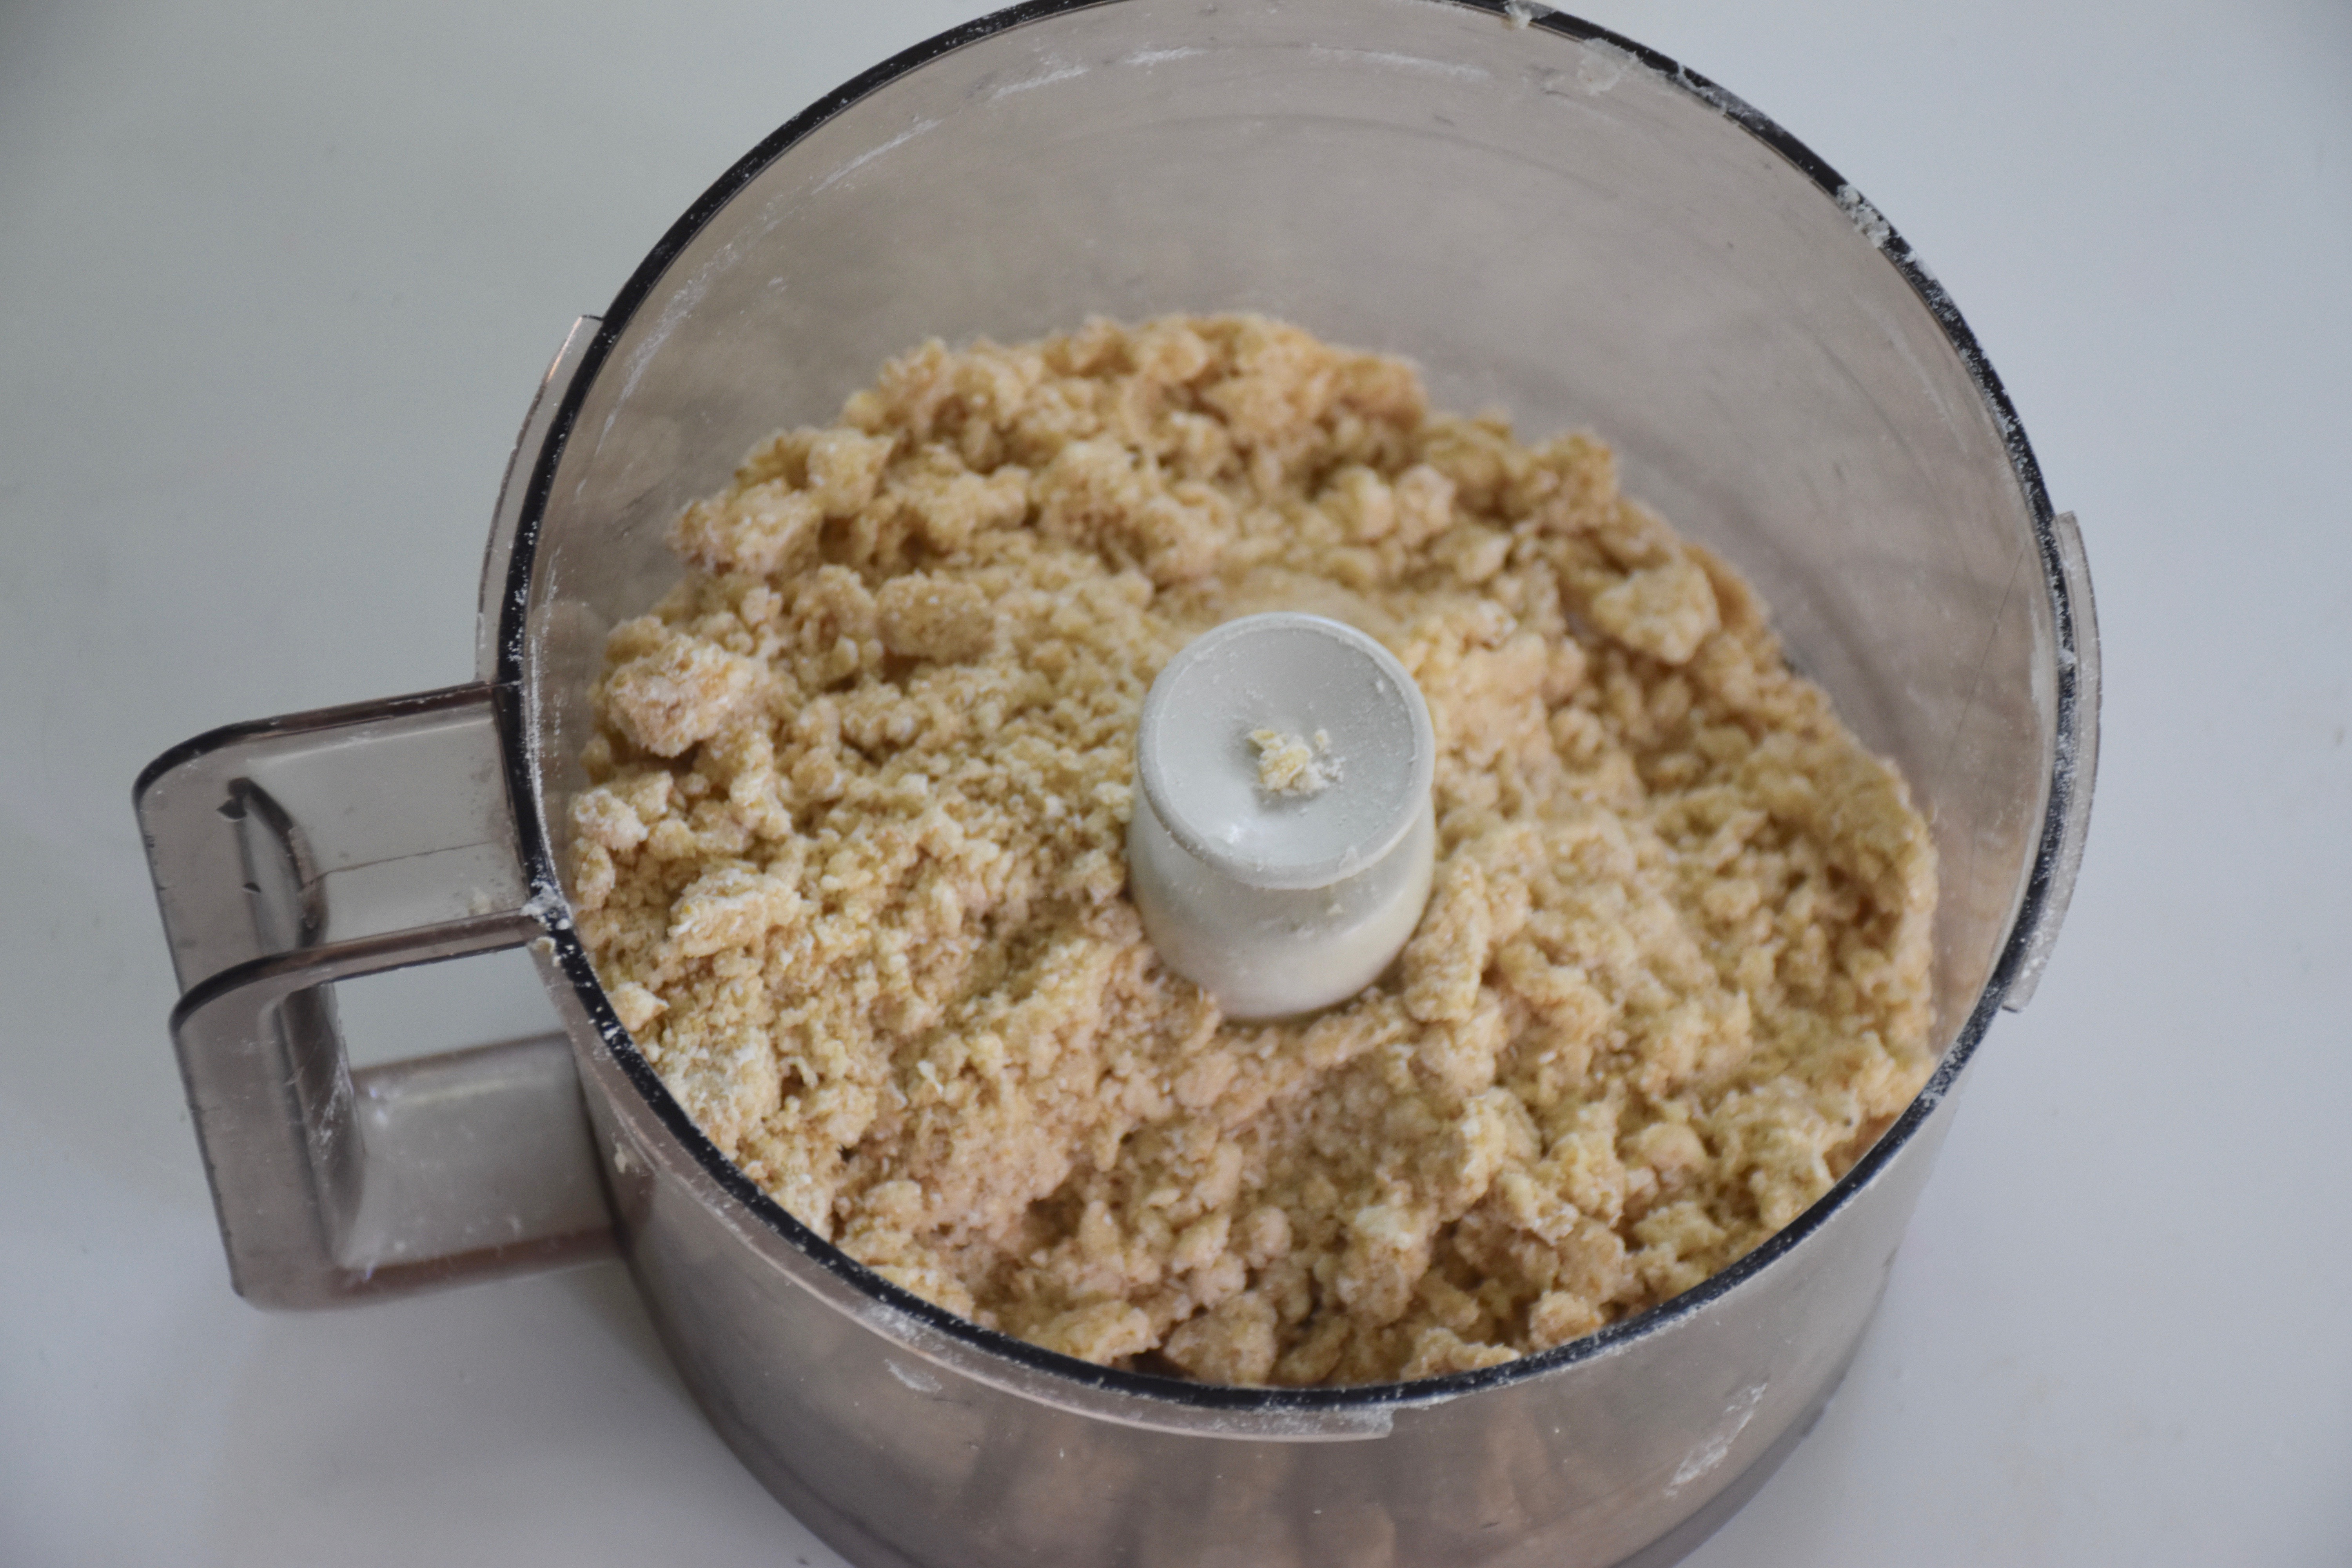
Next make your crumb topping. I used a food processor, but you could also use a fork or pastry blender. In a medium sized bowl or in the bowl of your food processor mix together the flour, oatmeal, brown sugar, sugar and cinnamon. Then add in your butter pieces using the food processor or a pastry blender or fork. You want to cut the butter into the flour mixture to create a crumb like topping.
Then pour your blueberry mixture into your blind baked pie crust and then top it with an even layer of the crumb mixture. Add on any pie dough cutout and brush them with a little melted butter and a sprinkle of granulated sugar.
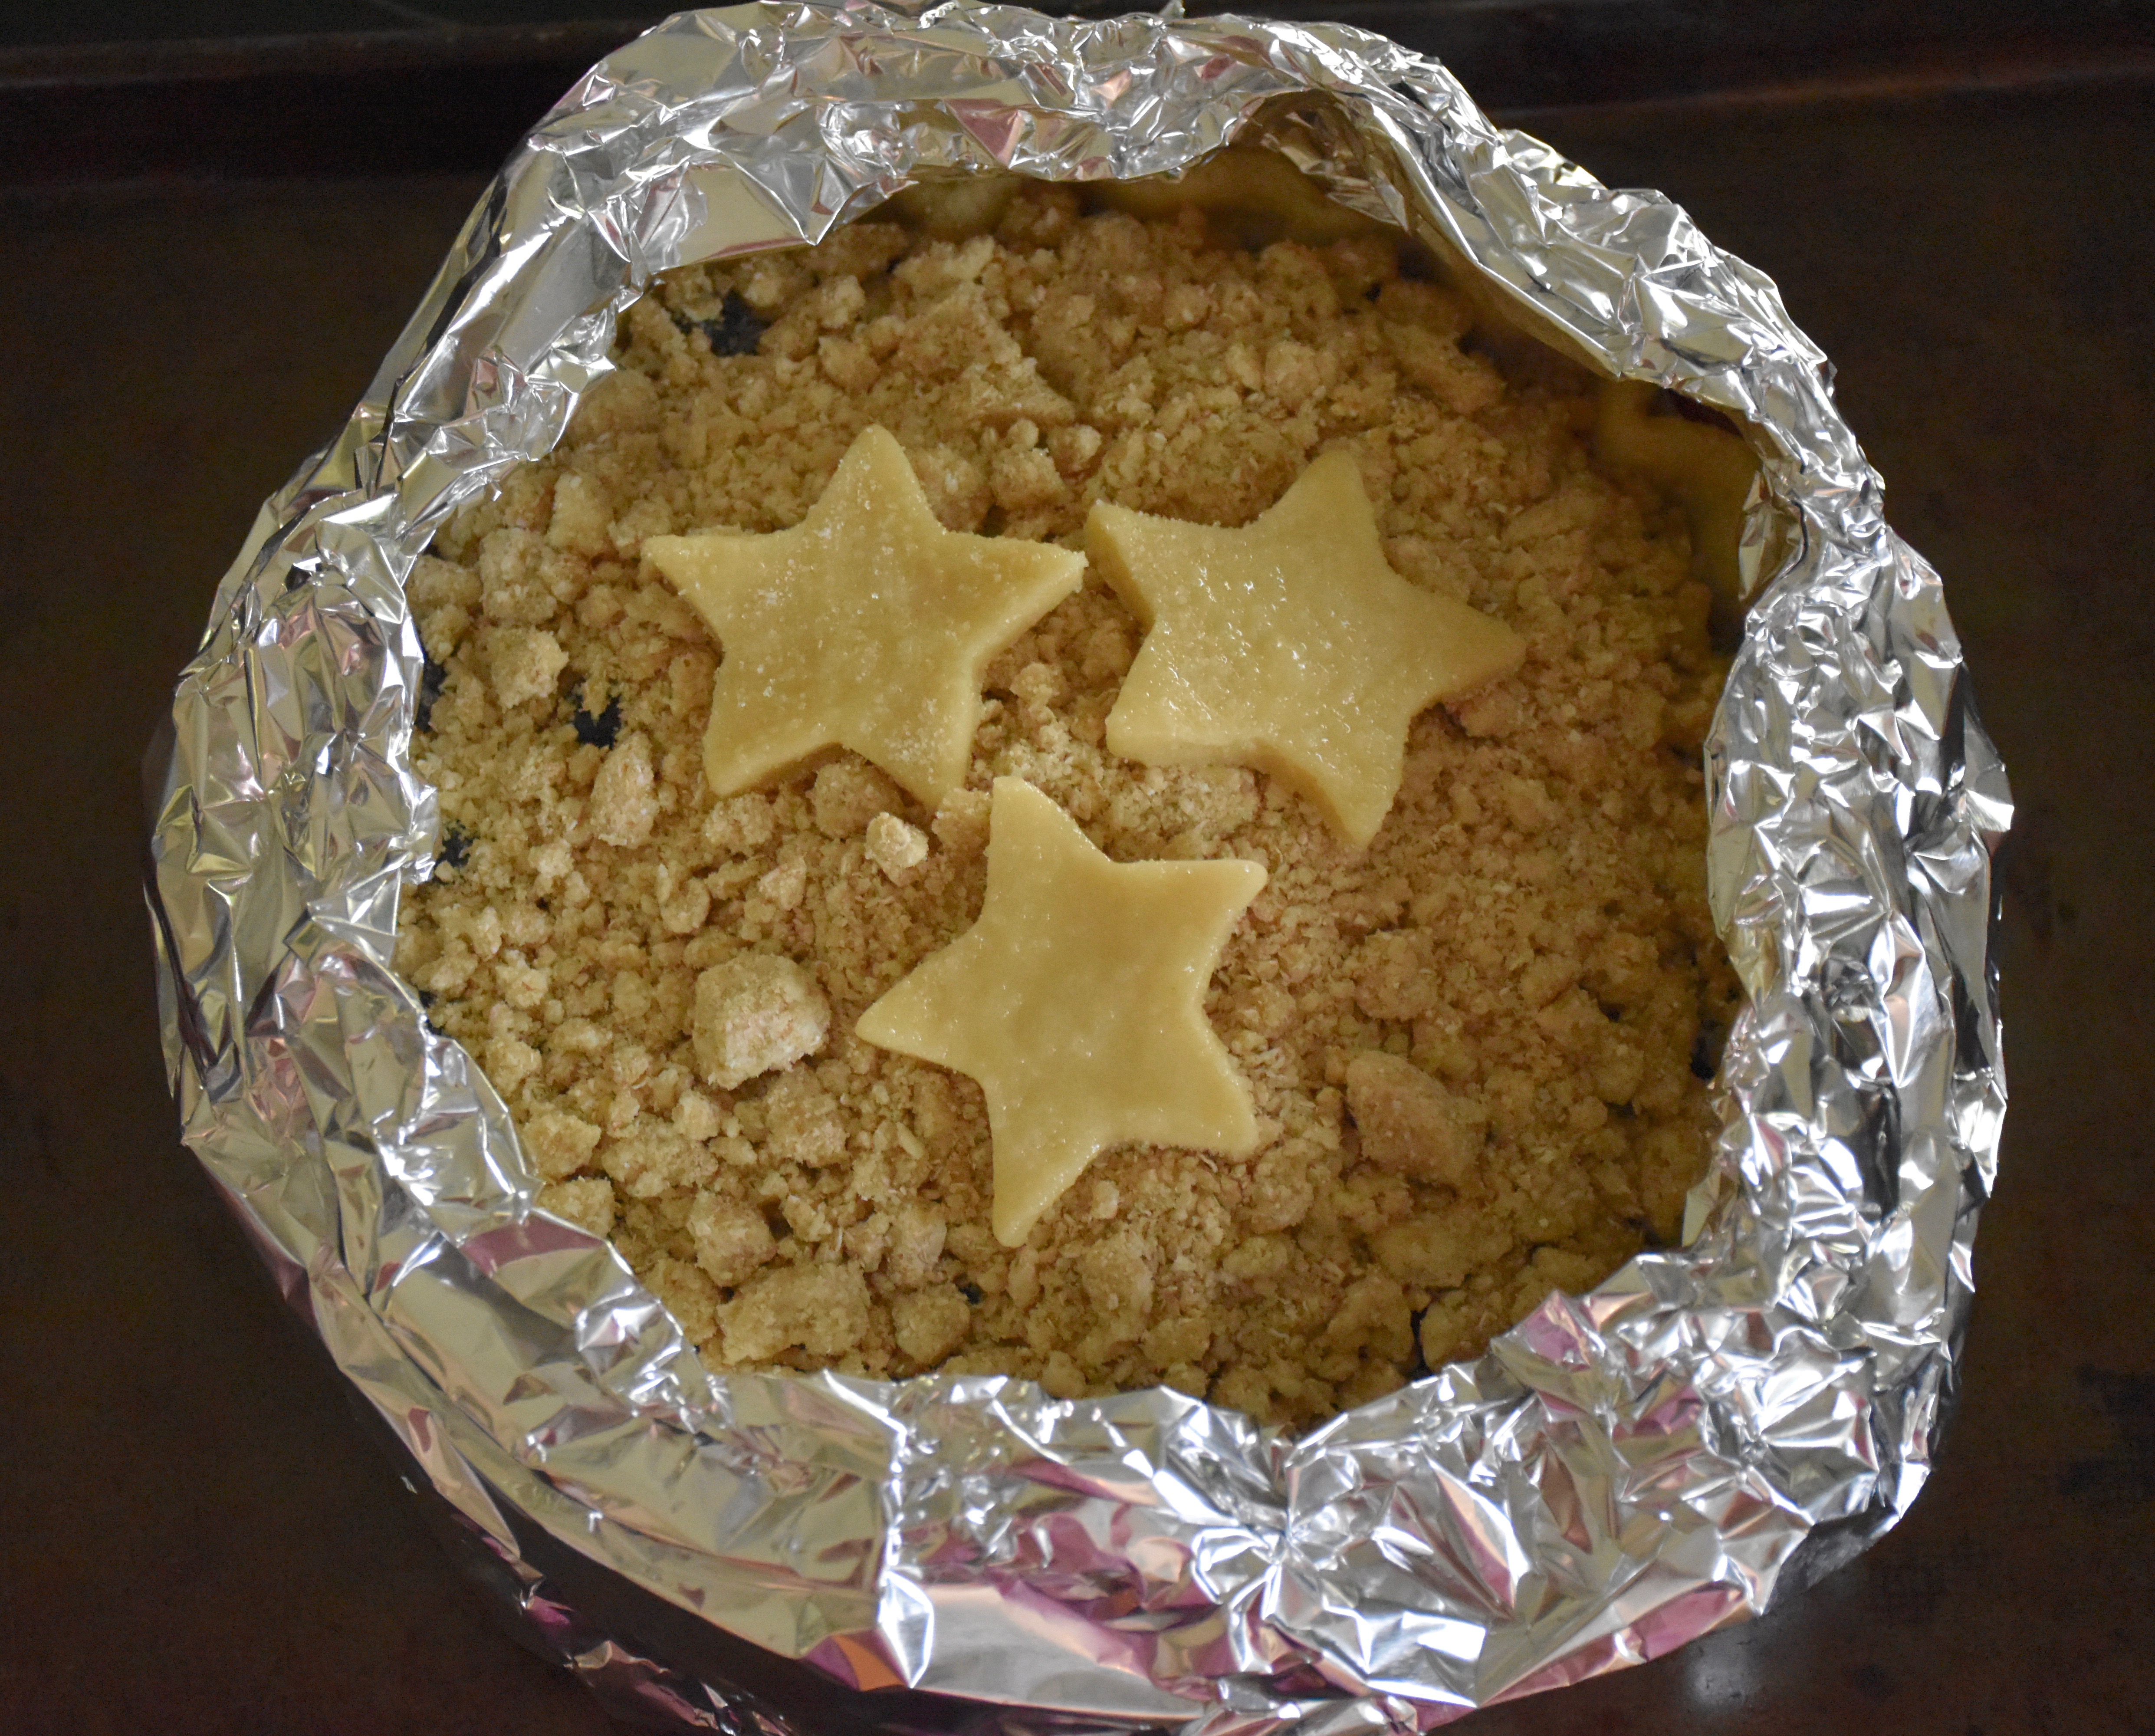
This is my pie before I put it back in the oven for it’s final bake.
Then to protect the edges of your pie crust and keep them from getting to brown use a pie shield or create your own with a long folded piece of foil.
Bake at 375 degrees for 30 minutes. Then remove your pie shield or foil and continue to bake for an additional 10 minutes. (Total baking time is 40 minutes.)
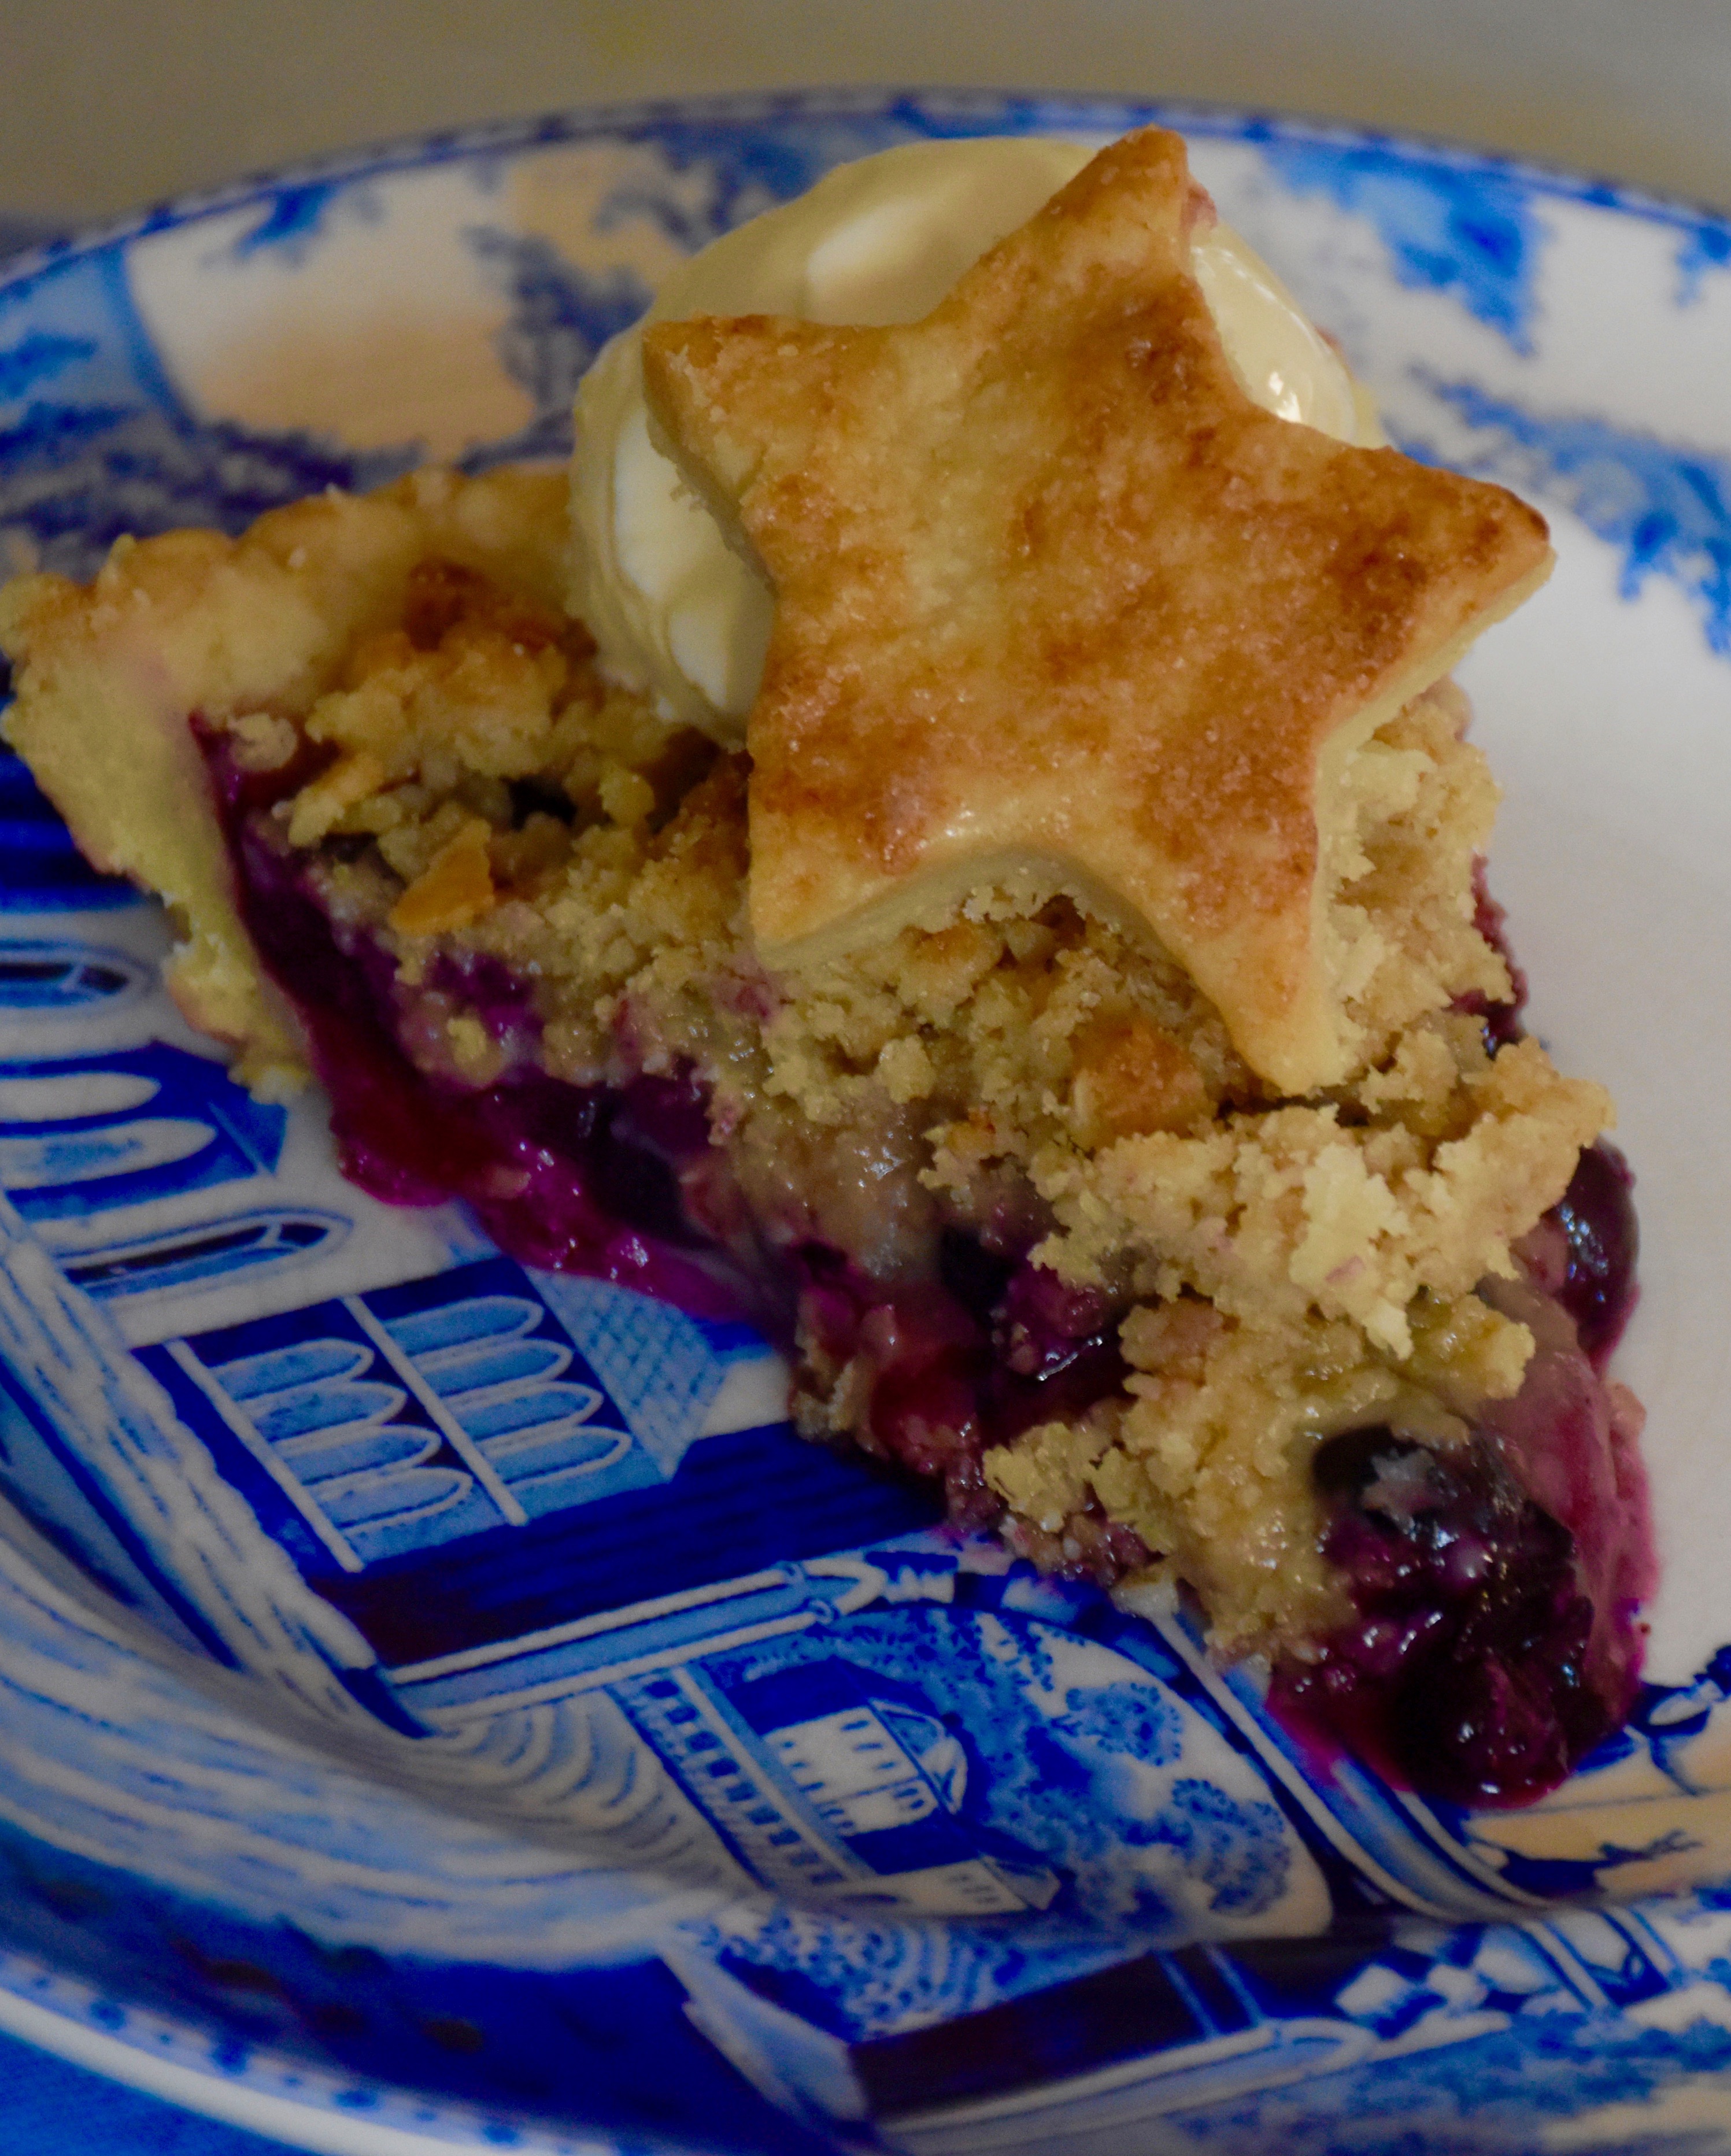
Then let it cool a bit before you serve it. The blueberry mixture will firm up to create a pretty slice if you let it rest for a couple hours, but it’s delicious no matter how you serve it. I like to add a little vanilla ice cream on top.
The amazing blueberry smell coming from your oven is reason enough to make this pie. My husband even had a slice for breakfast. Because is there ever really a bad time for pie?
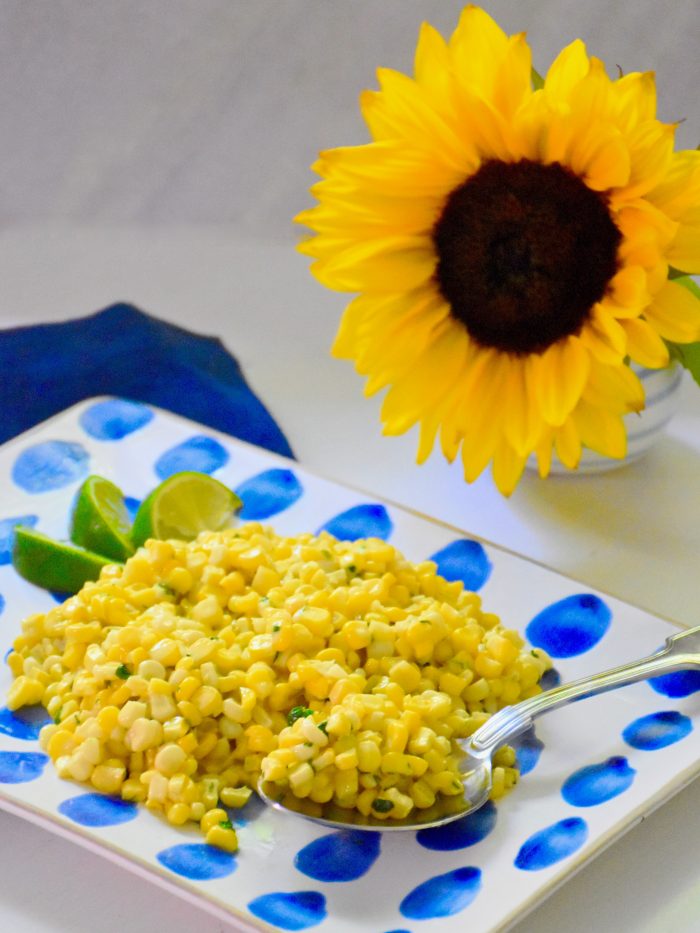
Summer is off to a fast paced start in our house. We have what feels like a full line up of classes and we have been out exploring the city with out of town company. All of this full speed fun has left me with a little less time for cooking, so I am sharing one of my favorite quick recipes. This corn is a well loved recipe of mine because it’s a delicious and versatile side that goes well with so many summer dishes. It pairs nicely with grilled chicken, fish or steak, but add just a touch of lime juice and a pinch of chili powder and it’s the perfect side for tacos. It takes just 10 minutes to make so if summer has you busy, then this corn recipe is just what you need to finish out a quick dinner.
Summer Corn – Serves 4 to 6
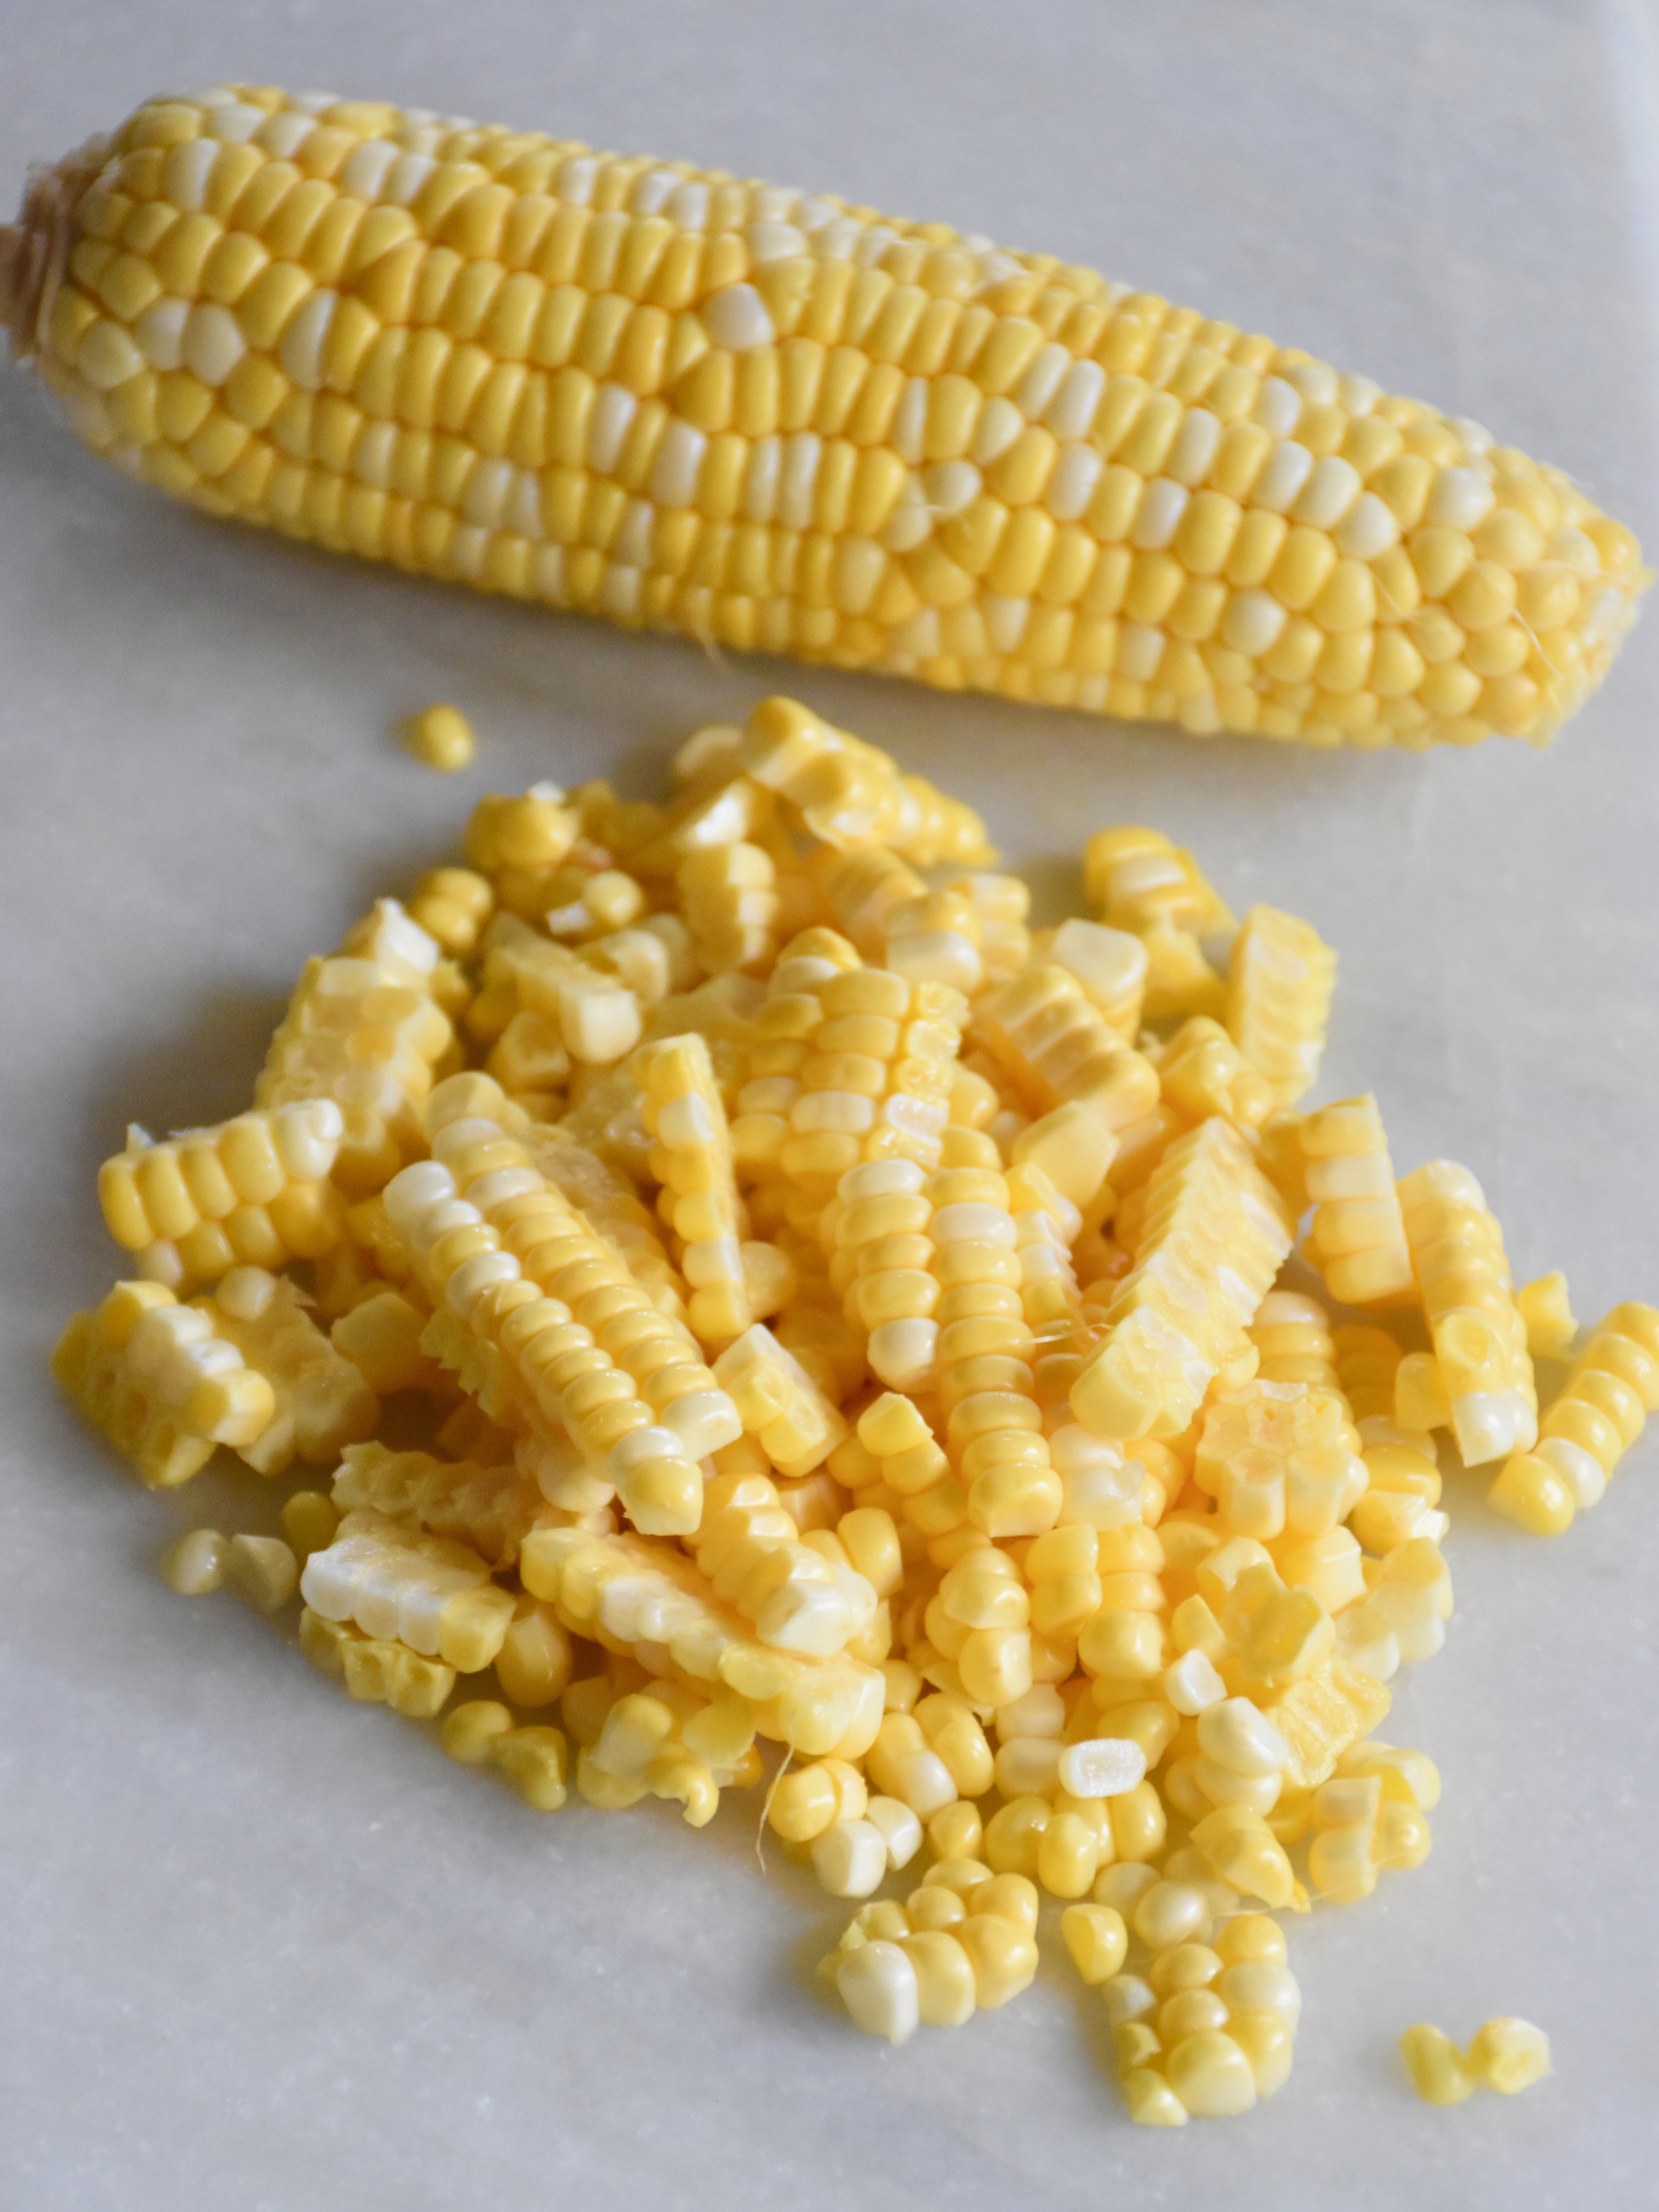
4 ears of corn, cut off the cob
2 tablespoons butter
1/4 teaspoon kosher salt
1/8 teaspoon ground pepper
1/4 teaspoon garlic powder
1 lime zested
1/4 cup cream
1 tablespoon cilantro, finely chopped (you could also substitute chives)
First, use a sharp knife to cut the kernels off of the corn discarding any remaining silks.
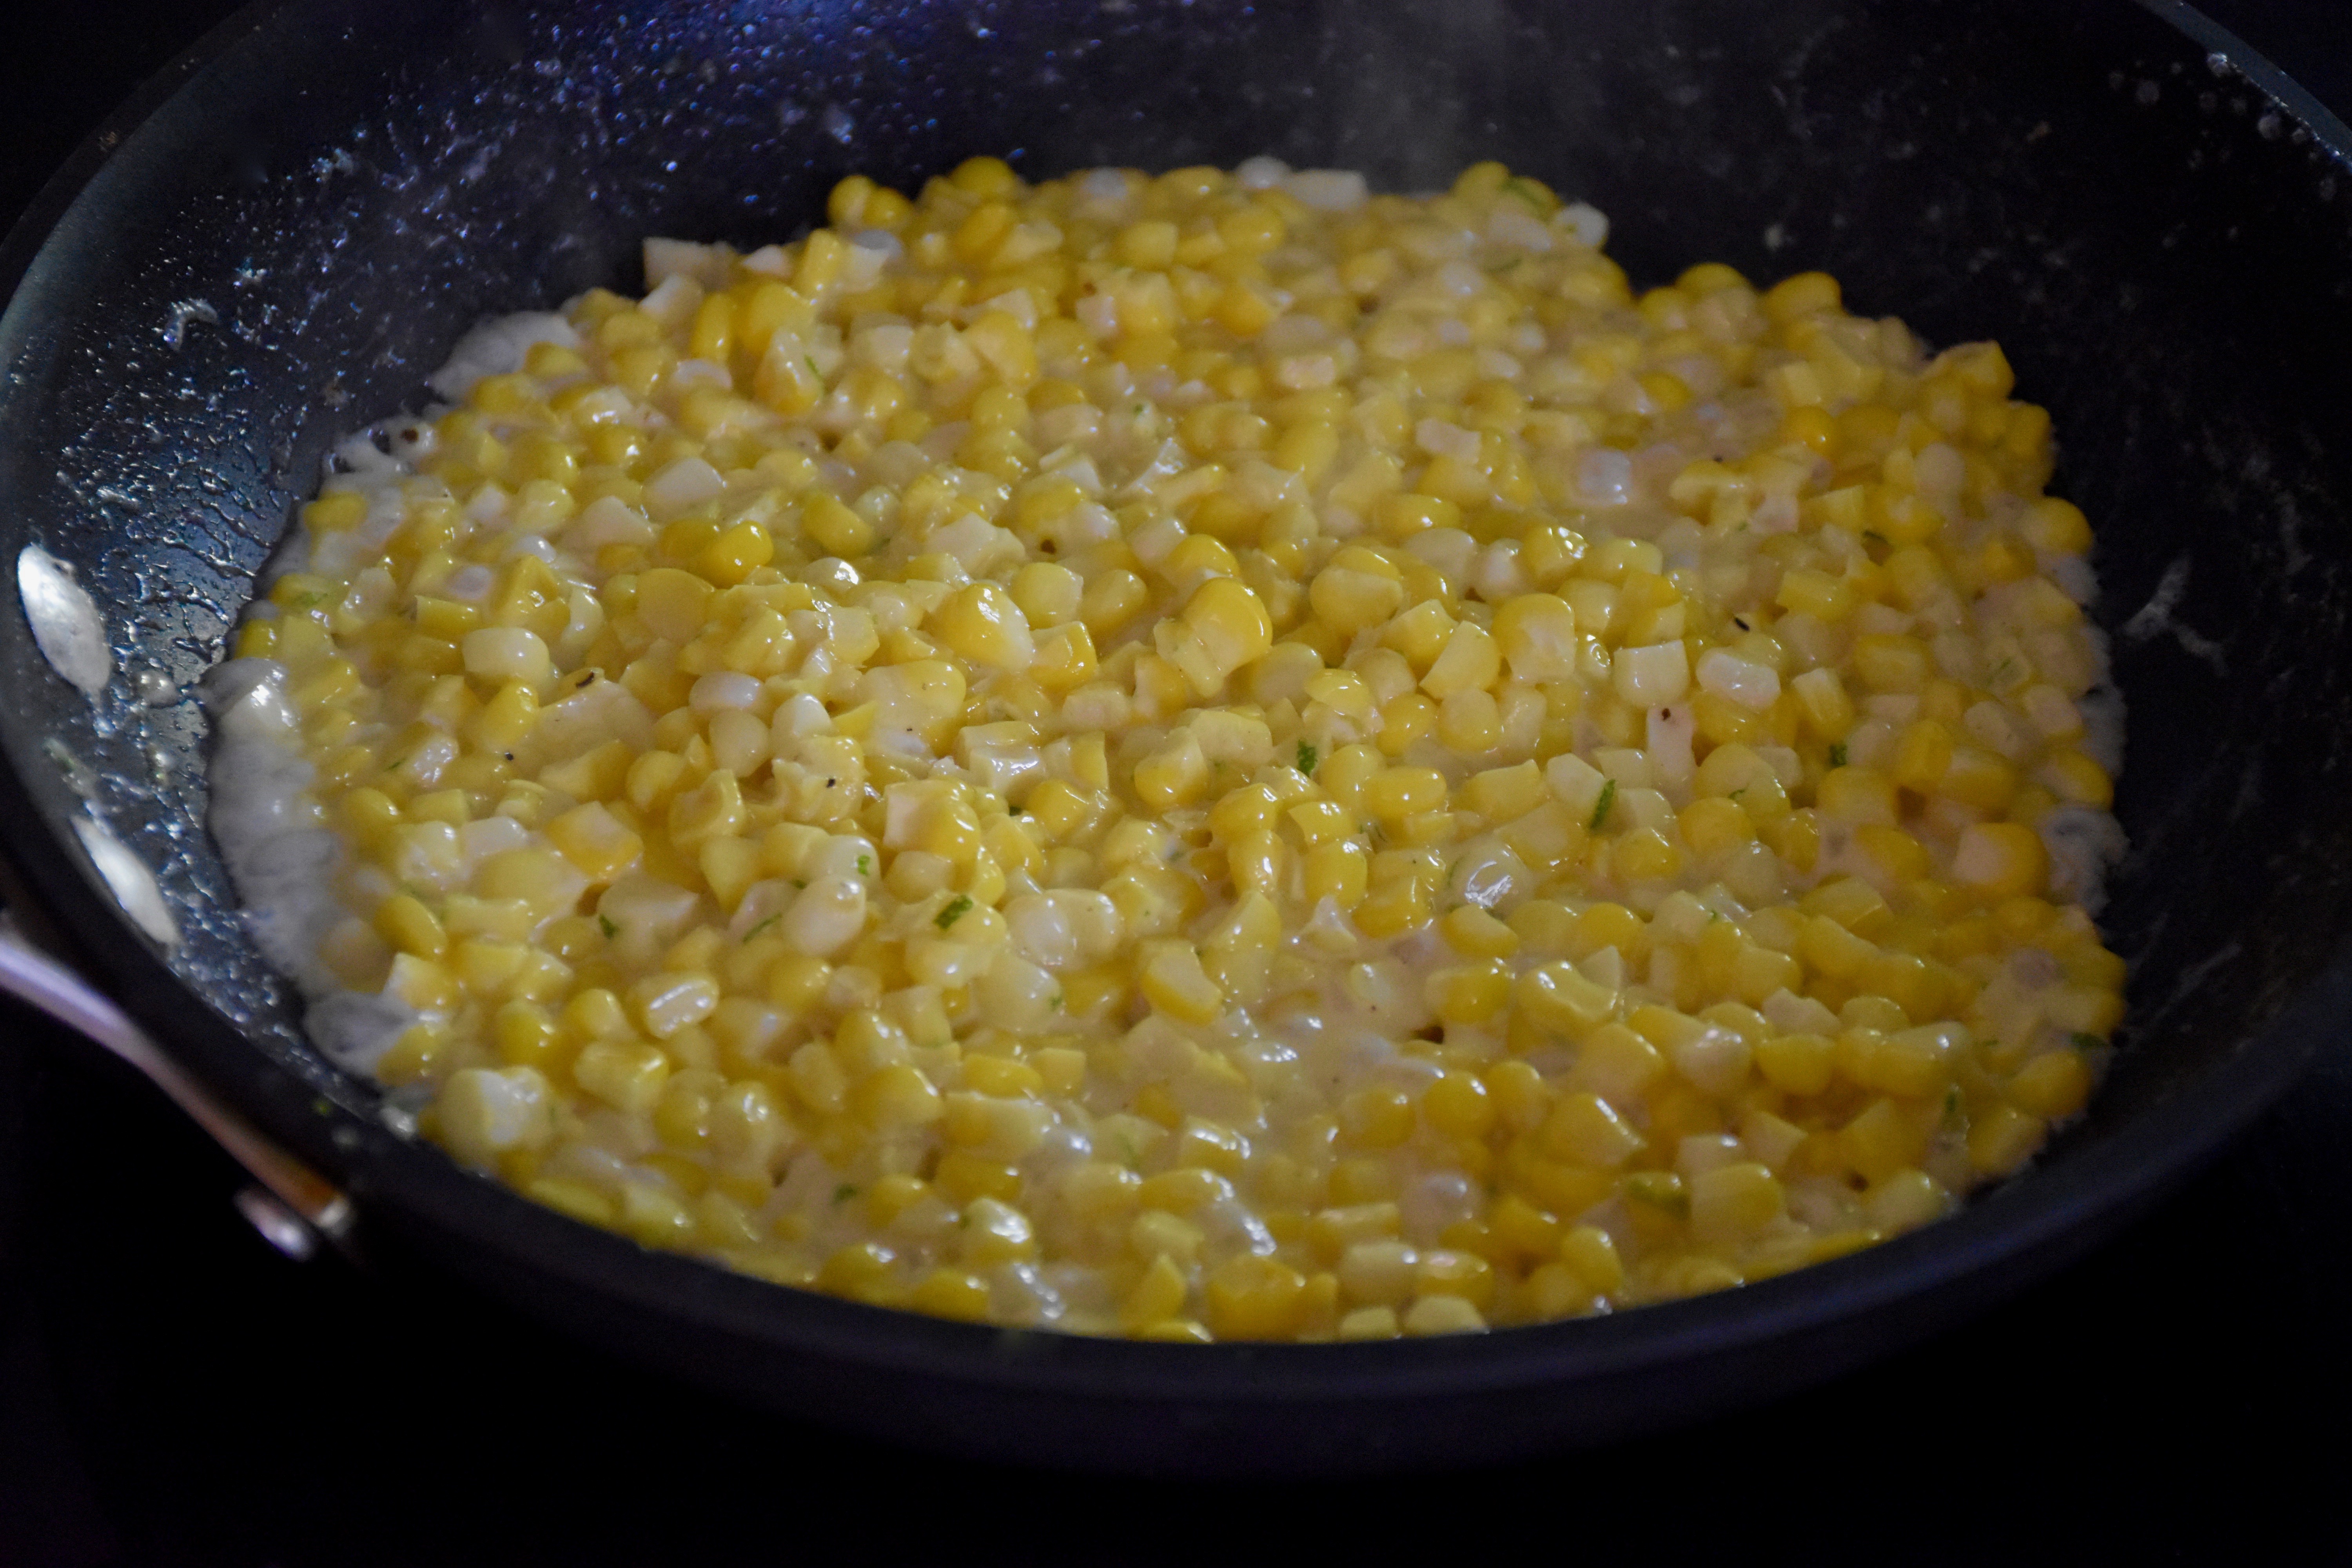
Then in a medium sized skillet melt the butter and add your corn and season with salt, garlic powder and pepper. Sauté your corn over medium heat for about 5 minutes until your corn turns bright yellow and is tender.
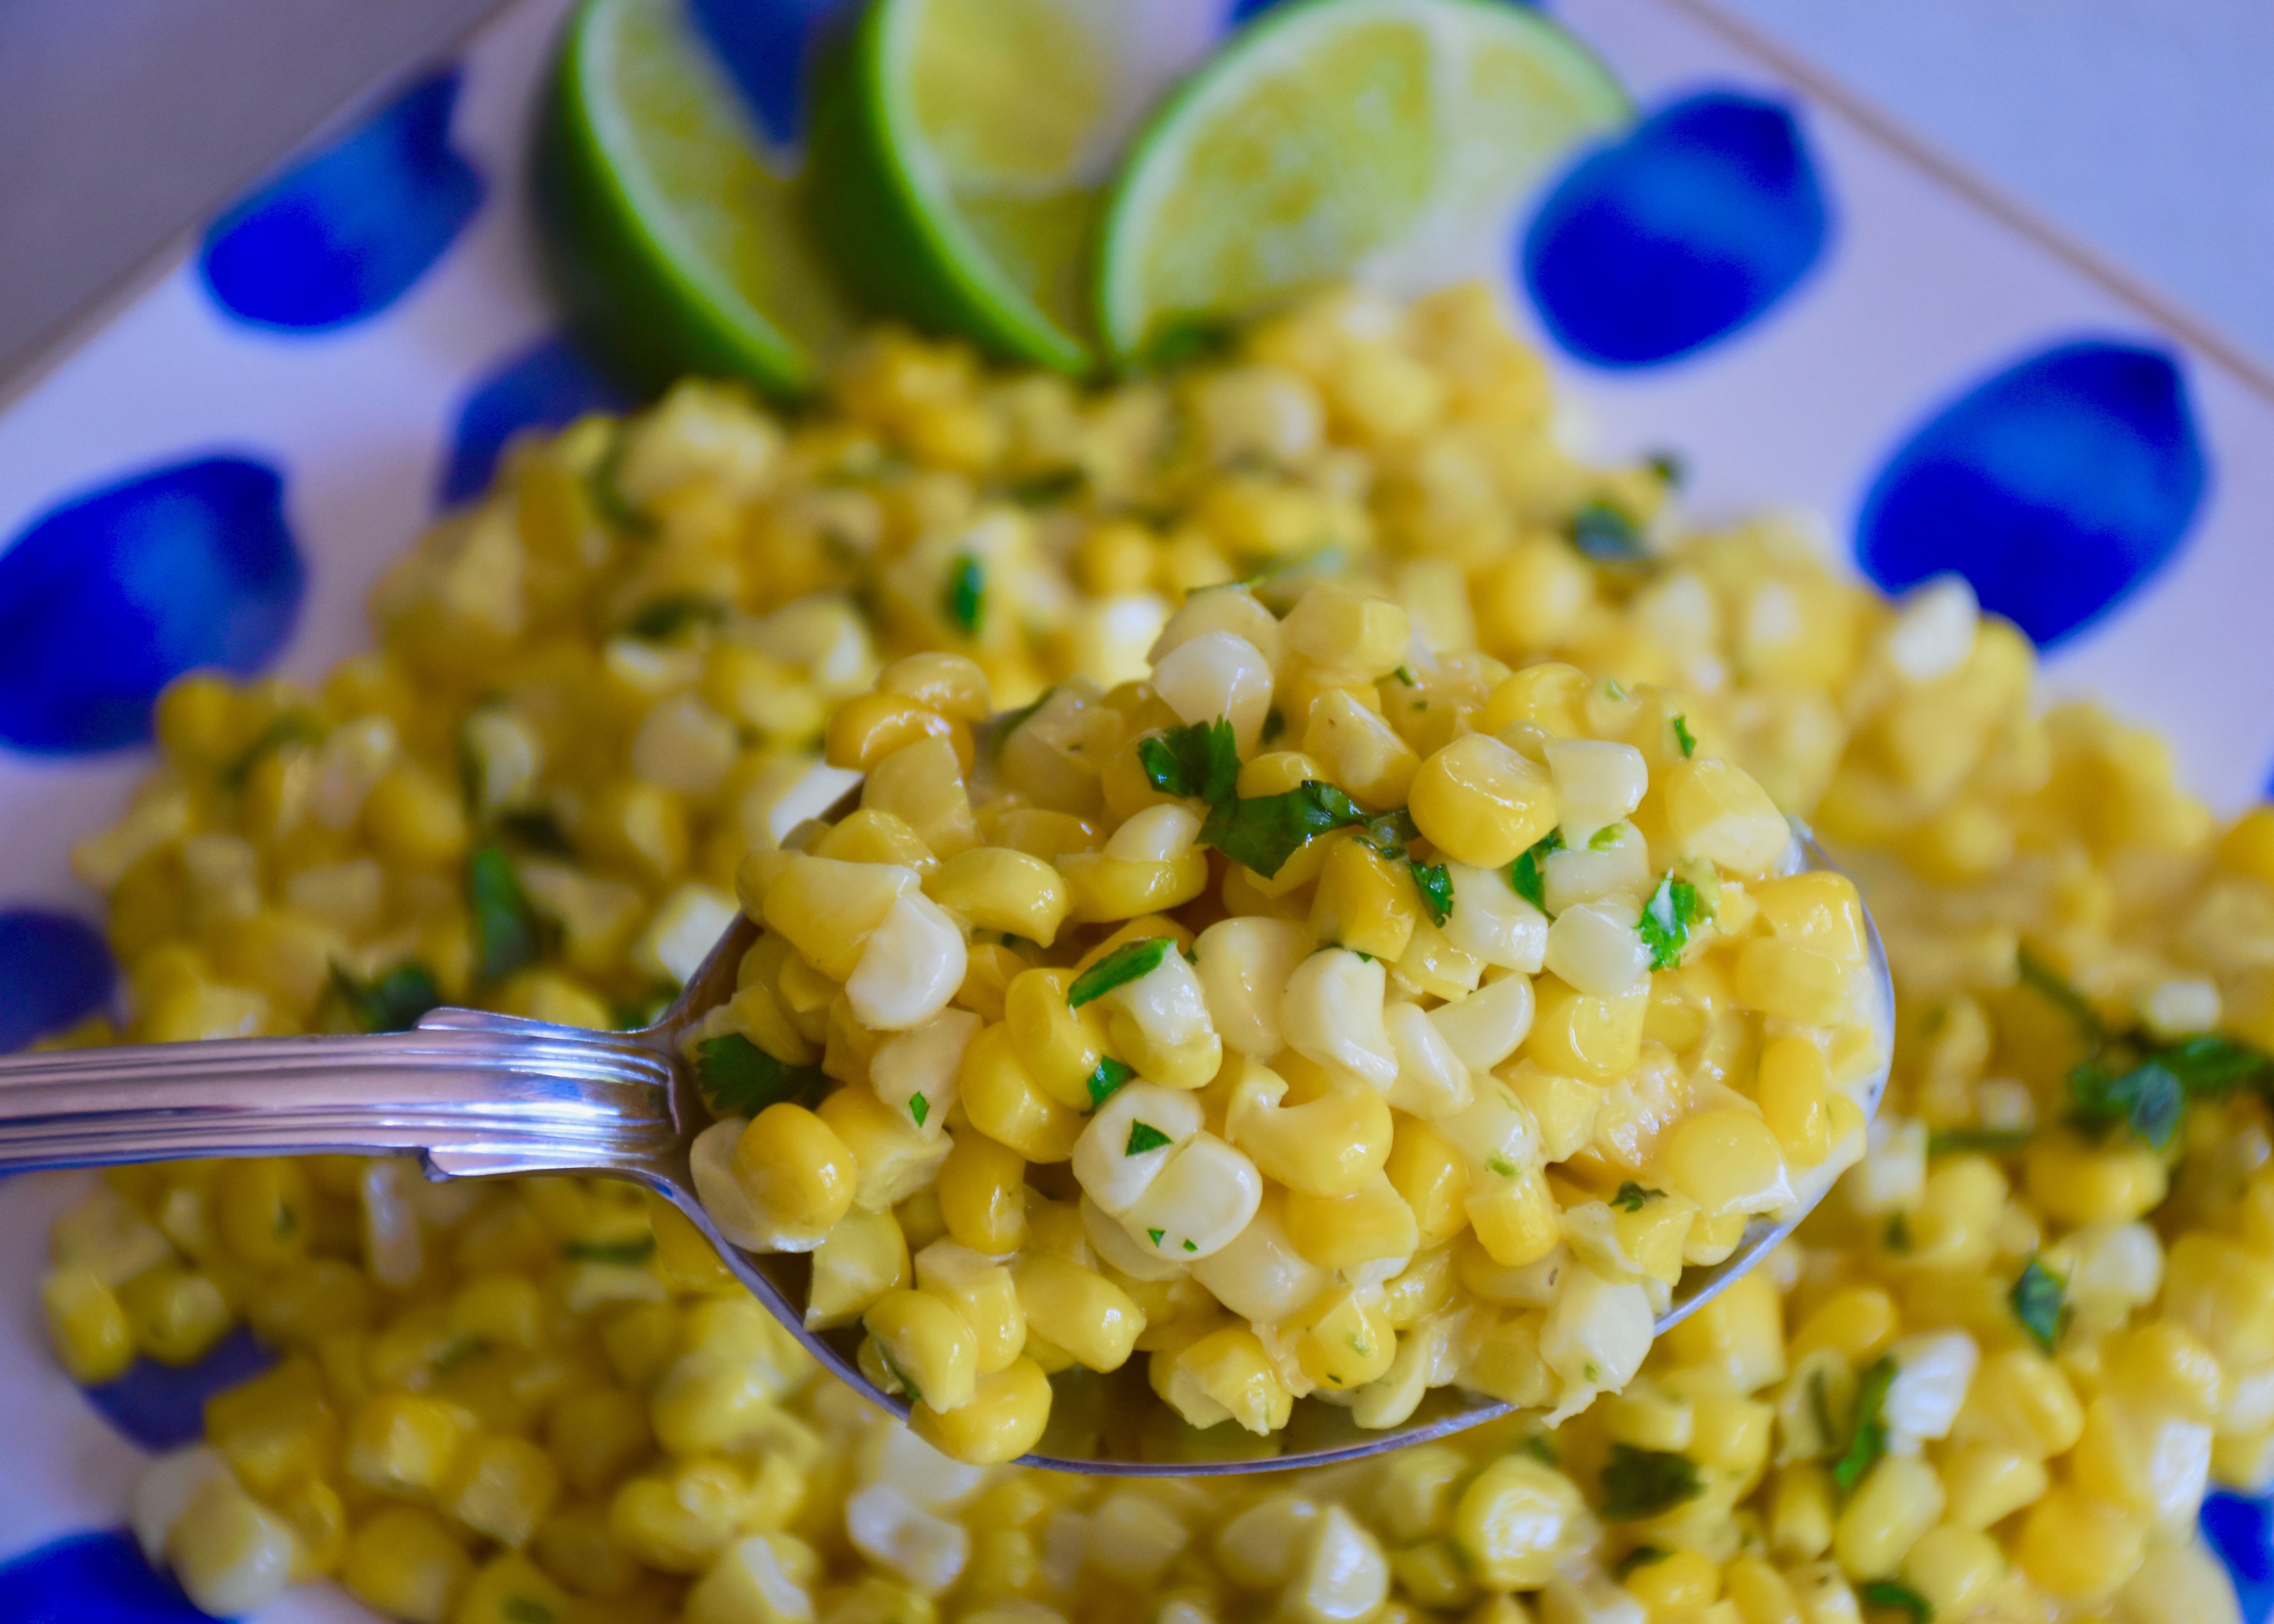
Then add in your lime zest and cream and cook for an additional 2 minutes until the cream has reduced down. Then remove your corn from the pan and add your cilantro.
For My Mexican Street Corn Variation:
Simply add in 1/4 to 1/2 teaspoon of chili powder depending on how spicy you like it and the juice of 1/2 of a lime. Just add them in while you are seasoning your corn with the salt and other seasonings.
Fresh corn is sweet and crisp and absolutely one of summer’s finest. This recipe is one of my favorite ways to cook it. So fire up the grill and enjoy all the best of summer.
Summer is here and with it comes gorgeous seasonal fruits and vegetables and hopefully some time to relax just a bit. When it comes to summertime cooking I love an easy recipe that gets me out of the kitchen, so I can enjoy my time outdoors. This is also a dinner that you can prep completely ahead of time since you use the crockpot which makes it great for entertaining or for any busy day.
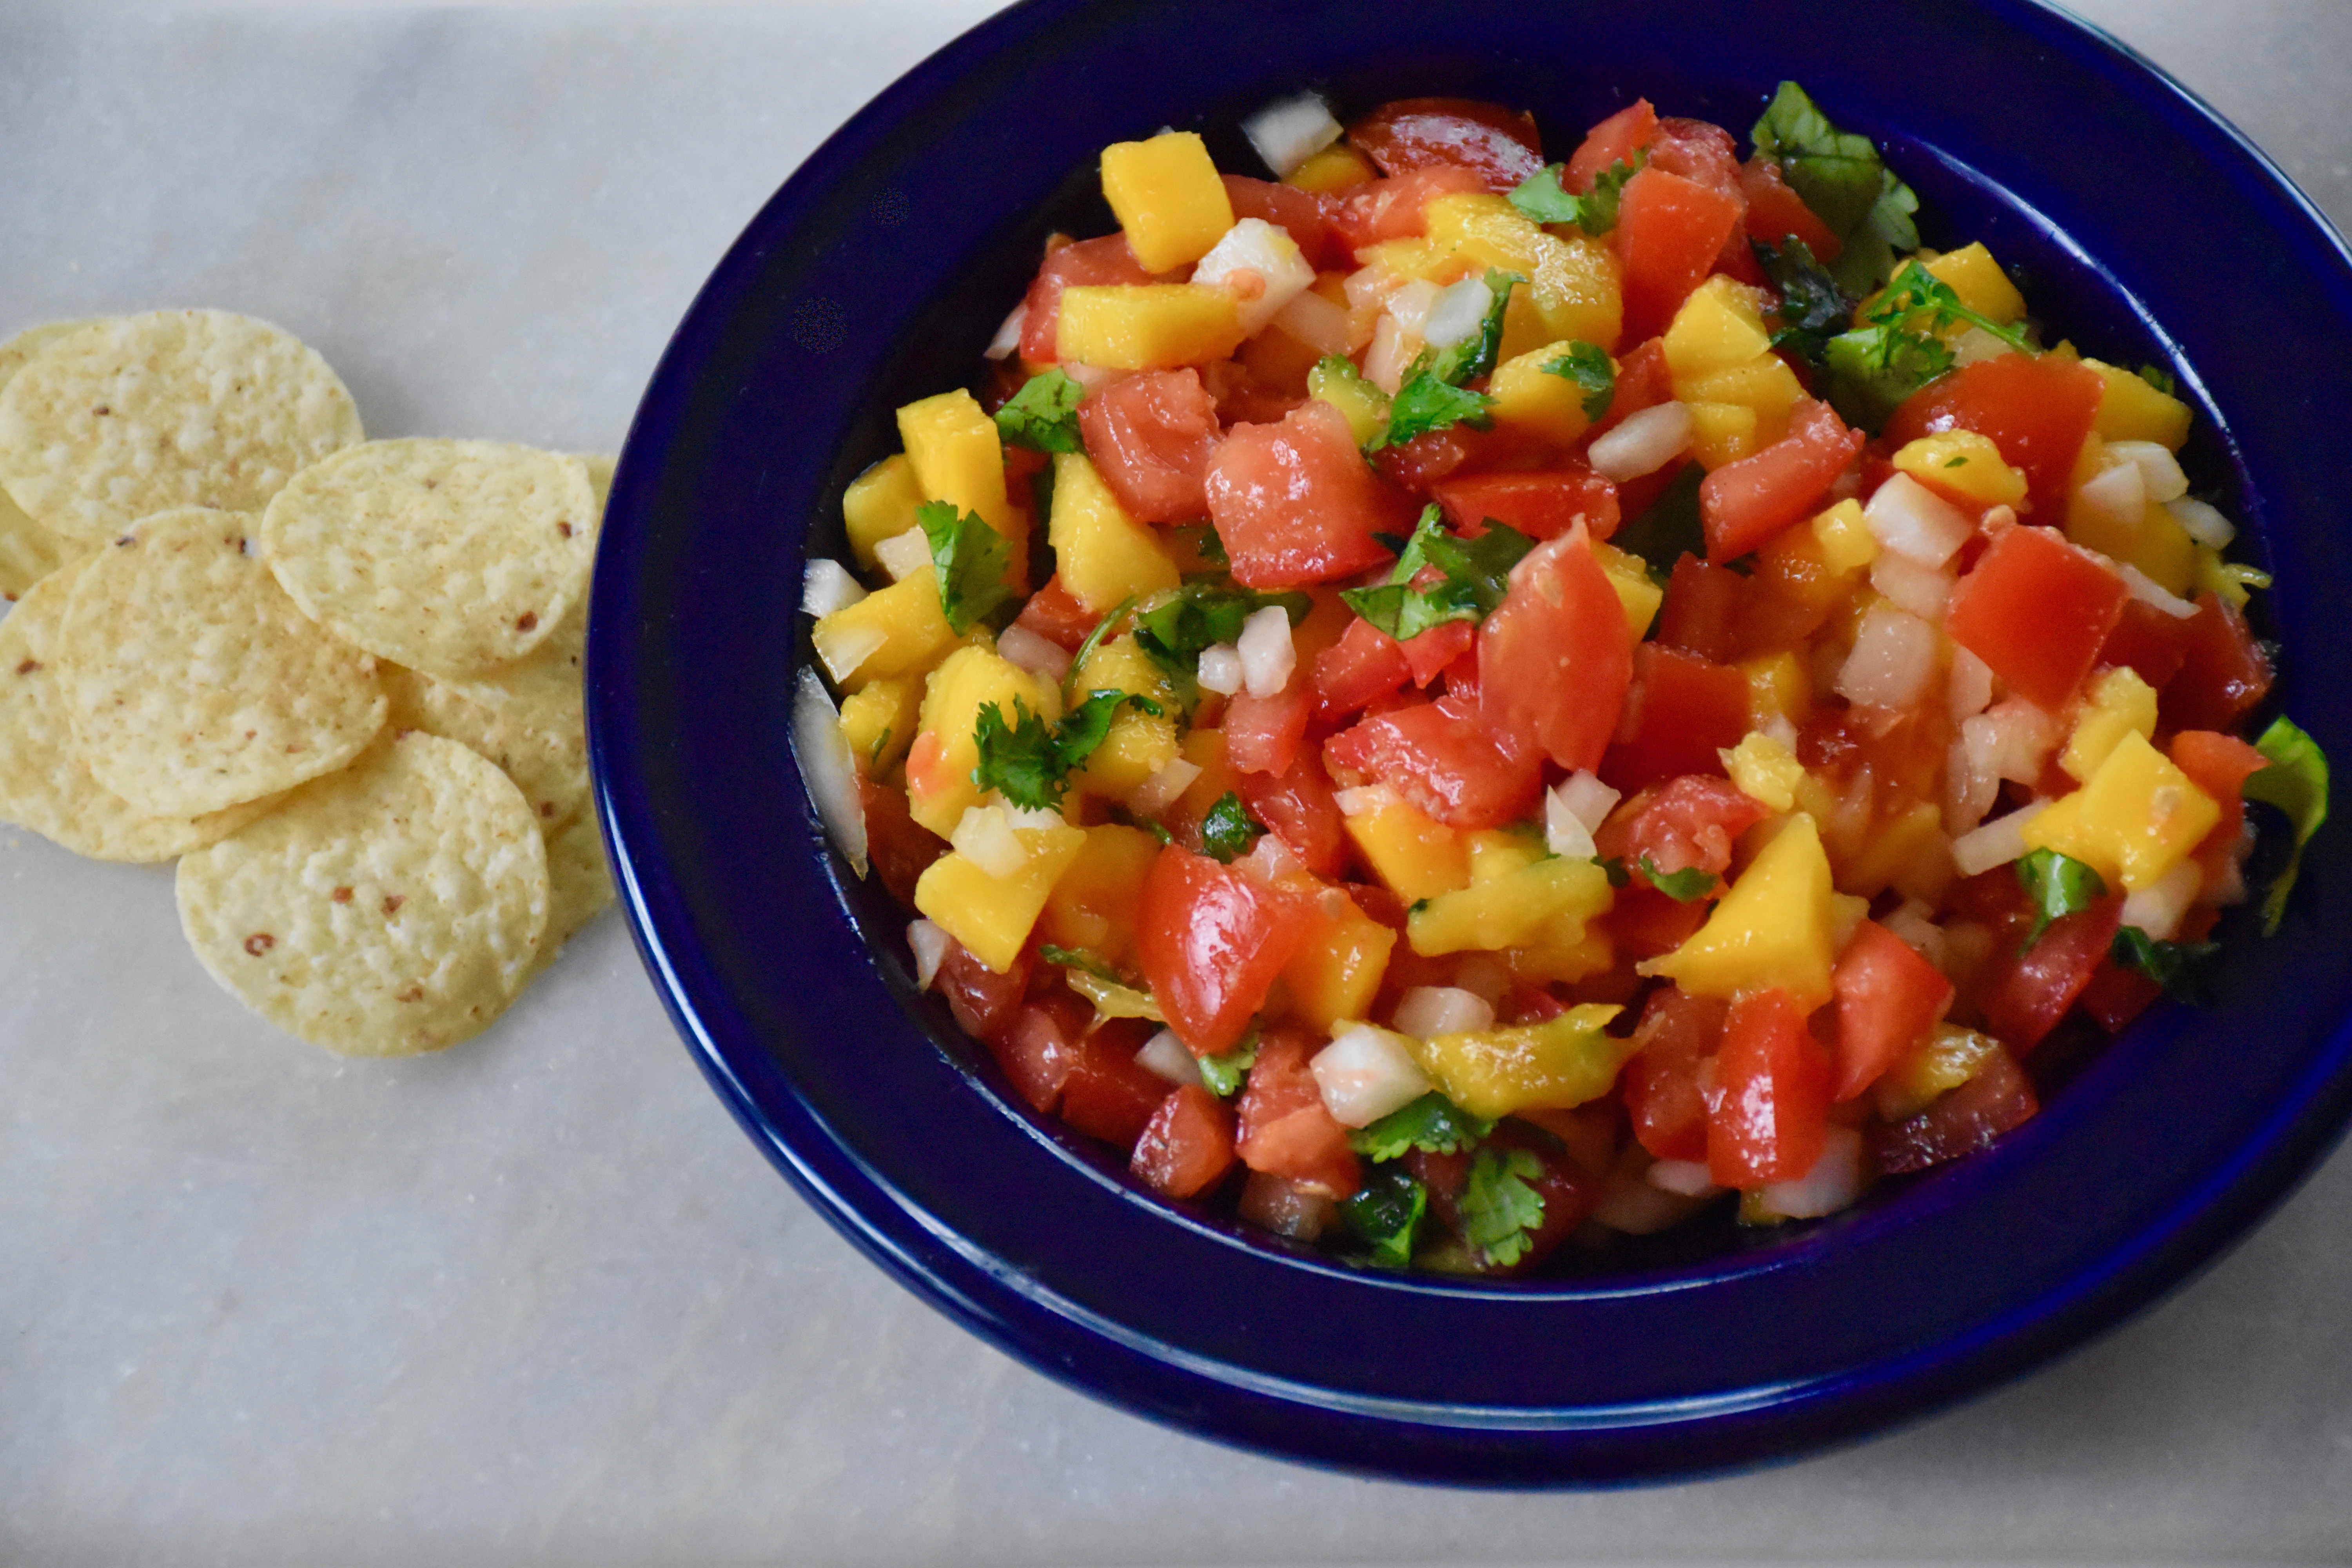
Brisket is a Texas favorite, that I sometimes have to order from the butcher’s counter here in Chicago. However, there is a reason Texans love it. It’s a great cut of meat that lends itself well to lots of dishes including brisket tacos. The slightly salty brisket with the sweetness of the mangos and just a touch of acidity from the lime juice and tomatoes definitely makes this one incredible bite. So here is one of my all time favorite dinners: brisket tacos with mango salsa.
Crockpot Brisket Tacos – Serves 4 to 6
1 2 1/2 pound brisket
2 Tablespoons brown sugar
1 Teaspoon kosher salt
1 Teaspoon of garlic powder
1 Teaspoon cumin
1/2 Teaspoon pepper
1 Teaspoon chili powder
1 large sweet yellow onion sliced into long strips (about 2 cups)
2 tablespoons canola oil
2 (12 oz) bottles of beer (I like to use Shiner Bock or Samuel Adams)
2 (20 oz) bottles of your favorite BBQ sauce (With these Tacos my favorite sauce to use is Head Country)
2 Tablespoons worcestershire sauce
12 flour tortillas
Sour Cream (optional)
Shredded Cheese (optional)
First in a small bowl mix together your brown sugar, salt, garlic powder, cumin pepper and chili powder. Then rub the sides of your brisket with this spice rub. Then in a large skillet heat 2 tablespoons of oil on medium high heat. When the oil is hot add the brisket and sear it until each side gets golden brown about 2 to 3 minutes a side.
Then get your cock pot ready and pour in your beer, 1 bottle of your BBQ sauce and the Worcestershire. Next add in your seared brisket making sure it is fully covered by the liquid. Then finally add in your sliced onions. Place your crock pot in a safe area. Put the lid on it and turn it on to the low setting. Let it cook on low for eight hours.
Then once your brisket has cooked carefully move it to a large cutting board and discard the onions and cooking liquid. Then slice your brisket on the diagonal against the grain removing any extra fat. Then chop those slices into small bite sized pieces. Pour about 1/2 of a cup of your extra barbecue sauce and mix it together with your chopped brisket.
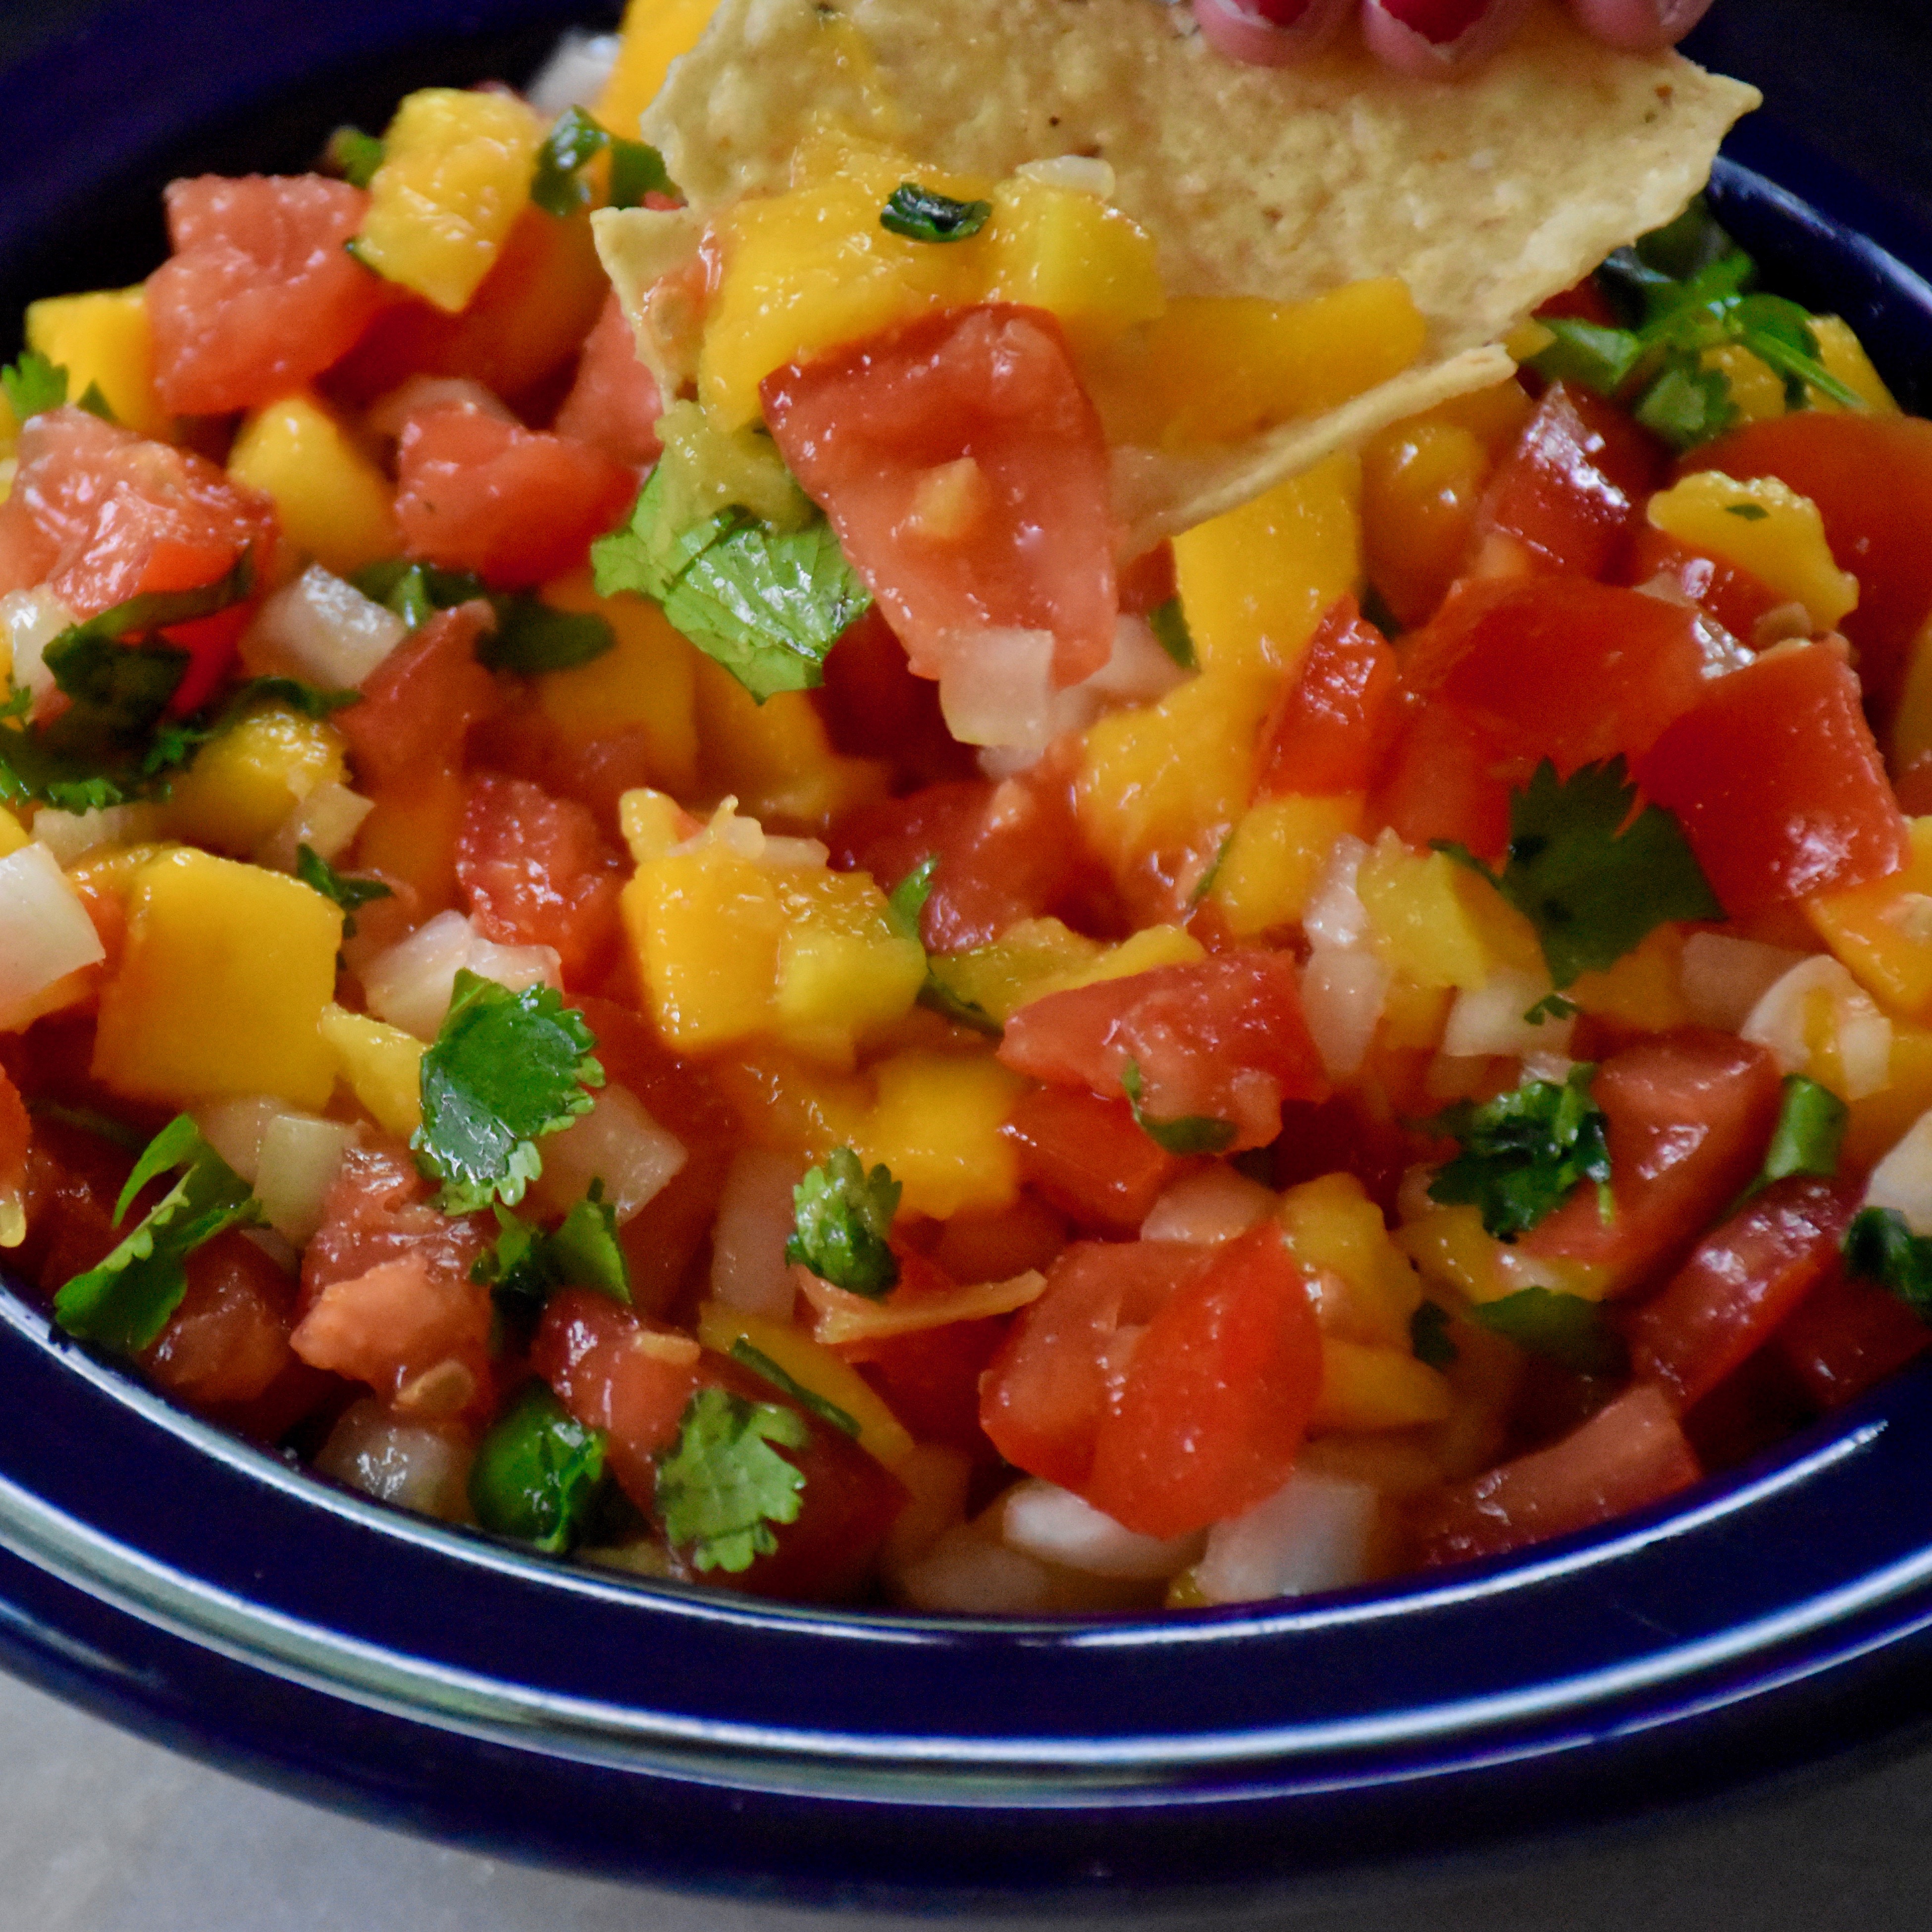
Then take your tortillas and add in a couple of spoonfuls of the chopped brisket top it with the mango salsa and if you want add some shredded cheese or sour cream.
Mango Salsa
1 mango peeled and diced
3 medium vine tomatoes diced
1/2 cup of finely diced sweet yellow onion (I like Vidalia onions or Texas 1015s)
1/4 cup of cilantro finely chopped
1 lime, juiced
1 teaspoon kosher salt
1/2 teaspoon garlic powder
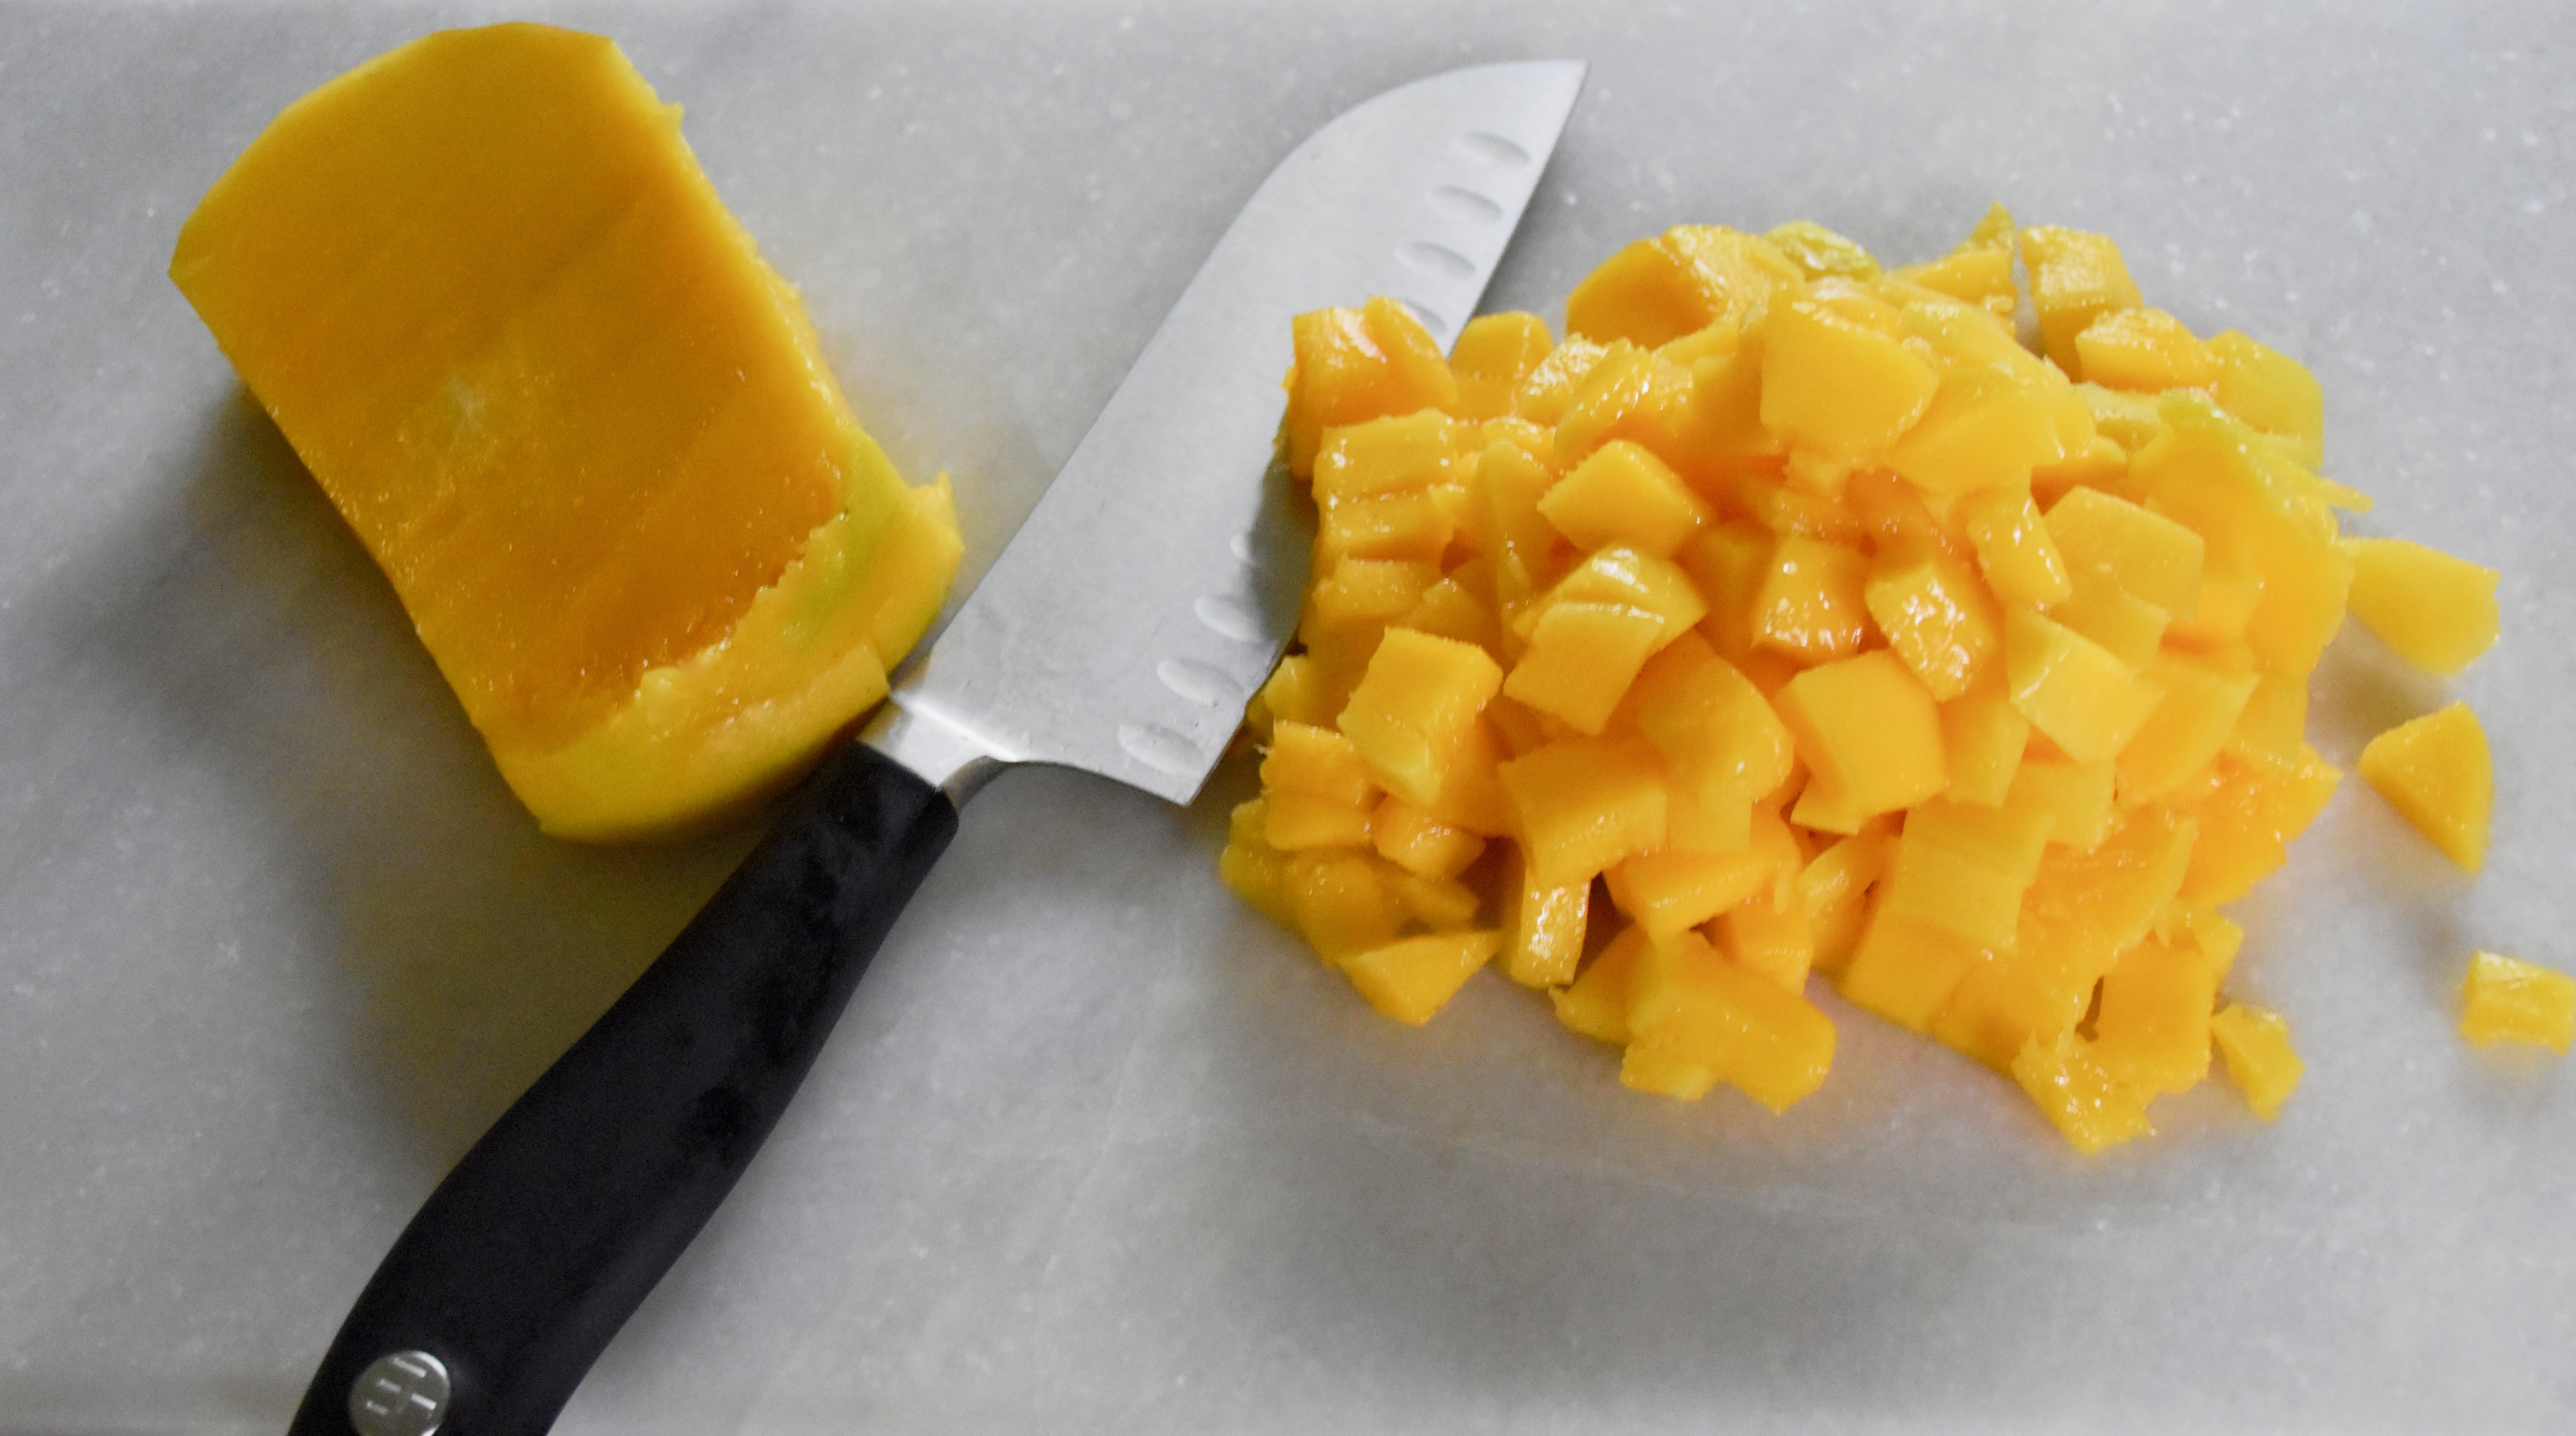
First dice your mangos. If you haven’t cooked with mangos before then there are a few tips that you should know. You want to pick a mango that is ripe. You will know it’s a good one by its color. You want to find one that is red and yellow and you want it to be soft to the touch, but not overly mushy. The main thing is stay away from the hard green ones; they aren’t ripe yet. Then you need to peel them before you slice them. The other thing you need to know is that mangos have a hard pith or core that you will not be able to eat or cut through, so I slice around it on all four sides and then dice those large pieces.
Here you can see the hard pith center that I cut around and my diced mangos that are ready for the salsa. As long as you know these tips mangos are easy to cook with.
Next chop your tomatoes, onions and cilantro and mix them together in a medium sized bowl.
Then stir in your lime juice, salt and garlic powder. You can make your salsa ahead if you like and then store it in your fridge until you are ready to serve.
This salsa is so good that I make it as a stand alone dip or I also love eating it as a topping on my Black Bean Soup.
So dive into the fresh flavors of summer with this recipe for brisket tacos and add a quick side of black beans or if you want something more then try my Avocado and Black Bean Salad. Add some tortilla chips and some Mexican beer or margaritas and you have all you need for an easy summer party.
The creamy sweet taste of homemade frosting is simply the best. It’s what has my girls hovering in the kitchen waiting and begging to get a spoonful or two. But, if you have ever set out to decorate a traditional round birthday cake that sweet delicious frosting can begin to feel like its suddenly not your friend once it comes time to frost those sides of your cake.
Even celebrated pastry chef Christina Tosi stopped frosting the sides of her cakes. After spending hours in culinary school trying to achieve the perfect cake, she said it felt more like “pottery class” than cake decorating. I have certainly had my own moments trying to get those darn sides just right, but I still love frosting. Although I do like making “naked” cakes without frosting the sides, there is still something so pretty and delicious about a frosted cake. So over the years I have learned a few tips and tricks that make decorating those sides much easier.
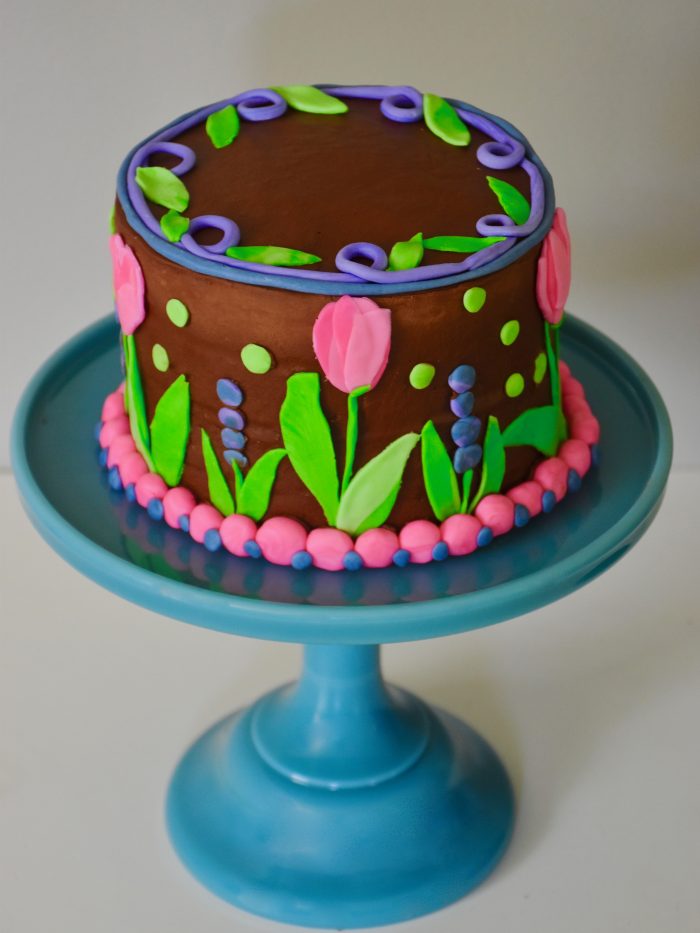
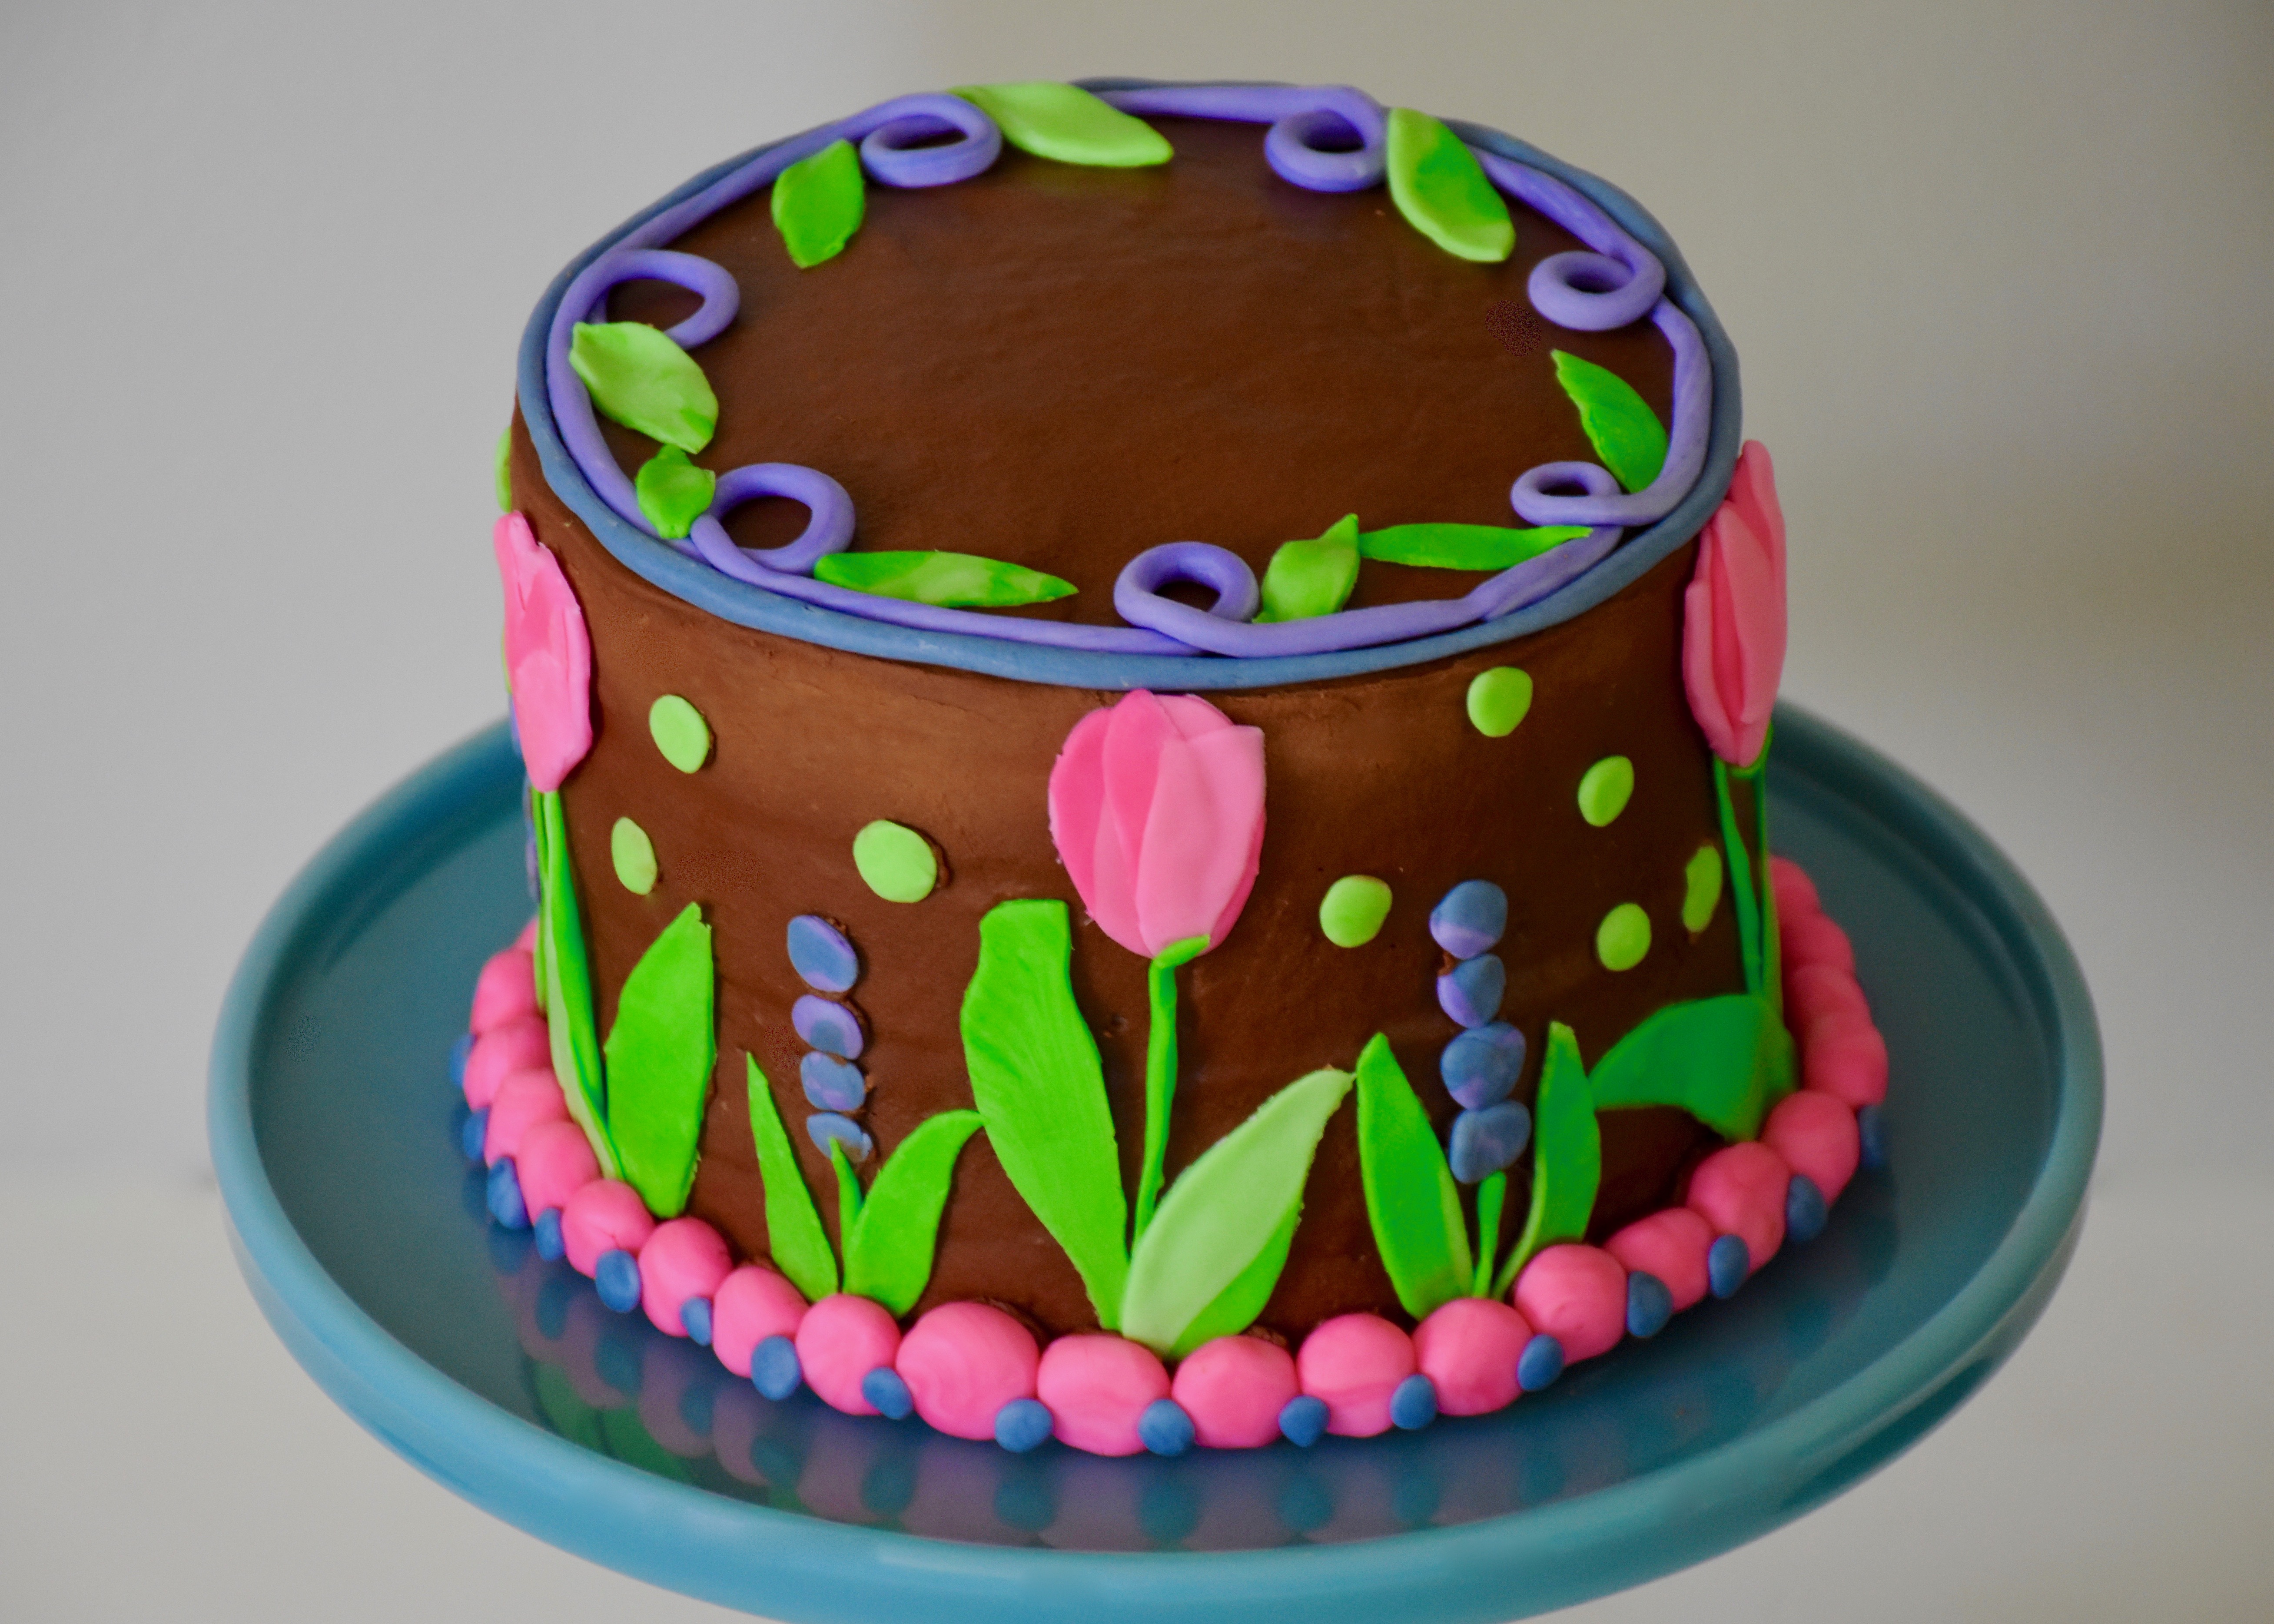
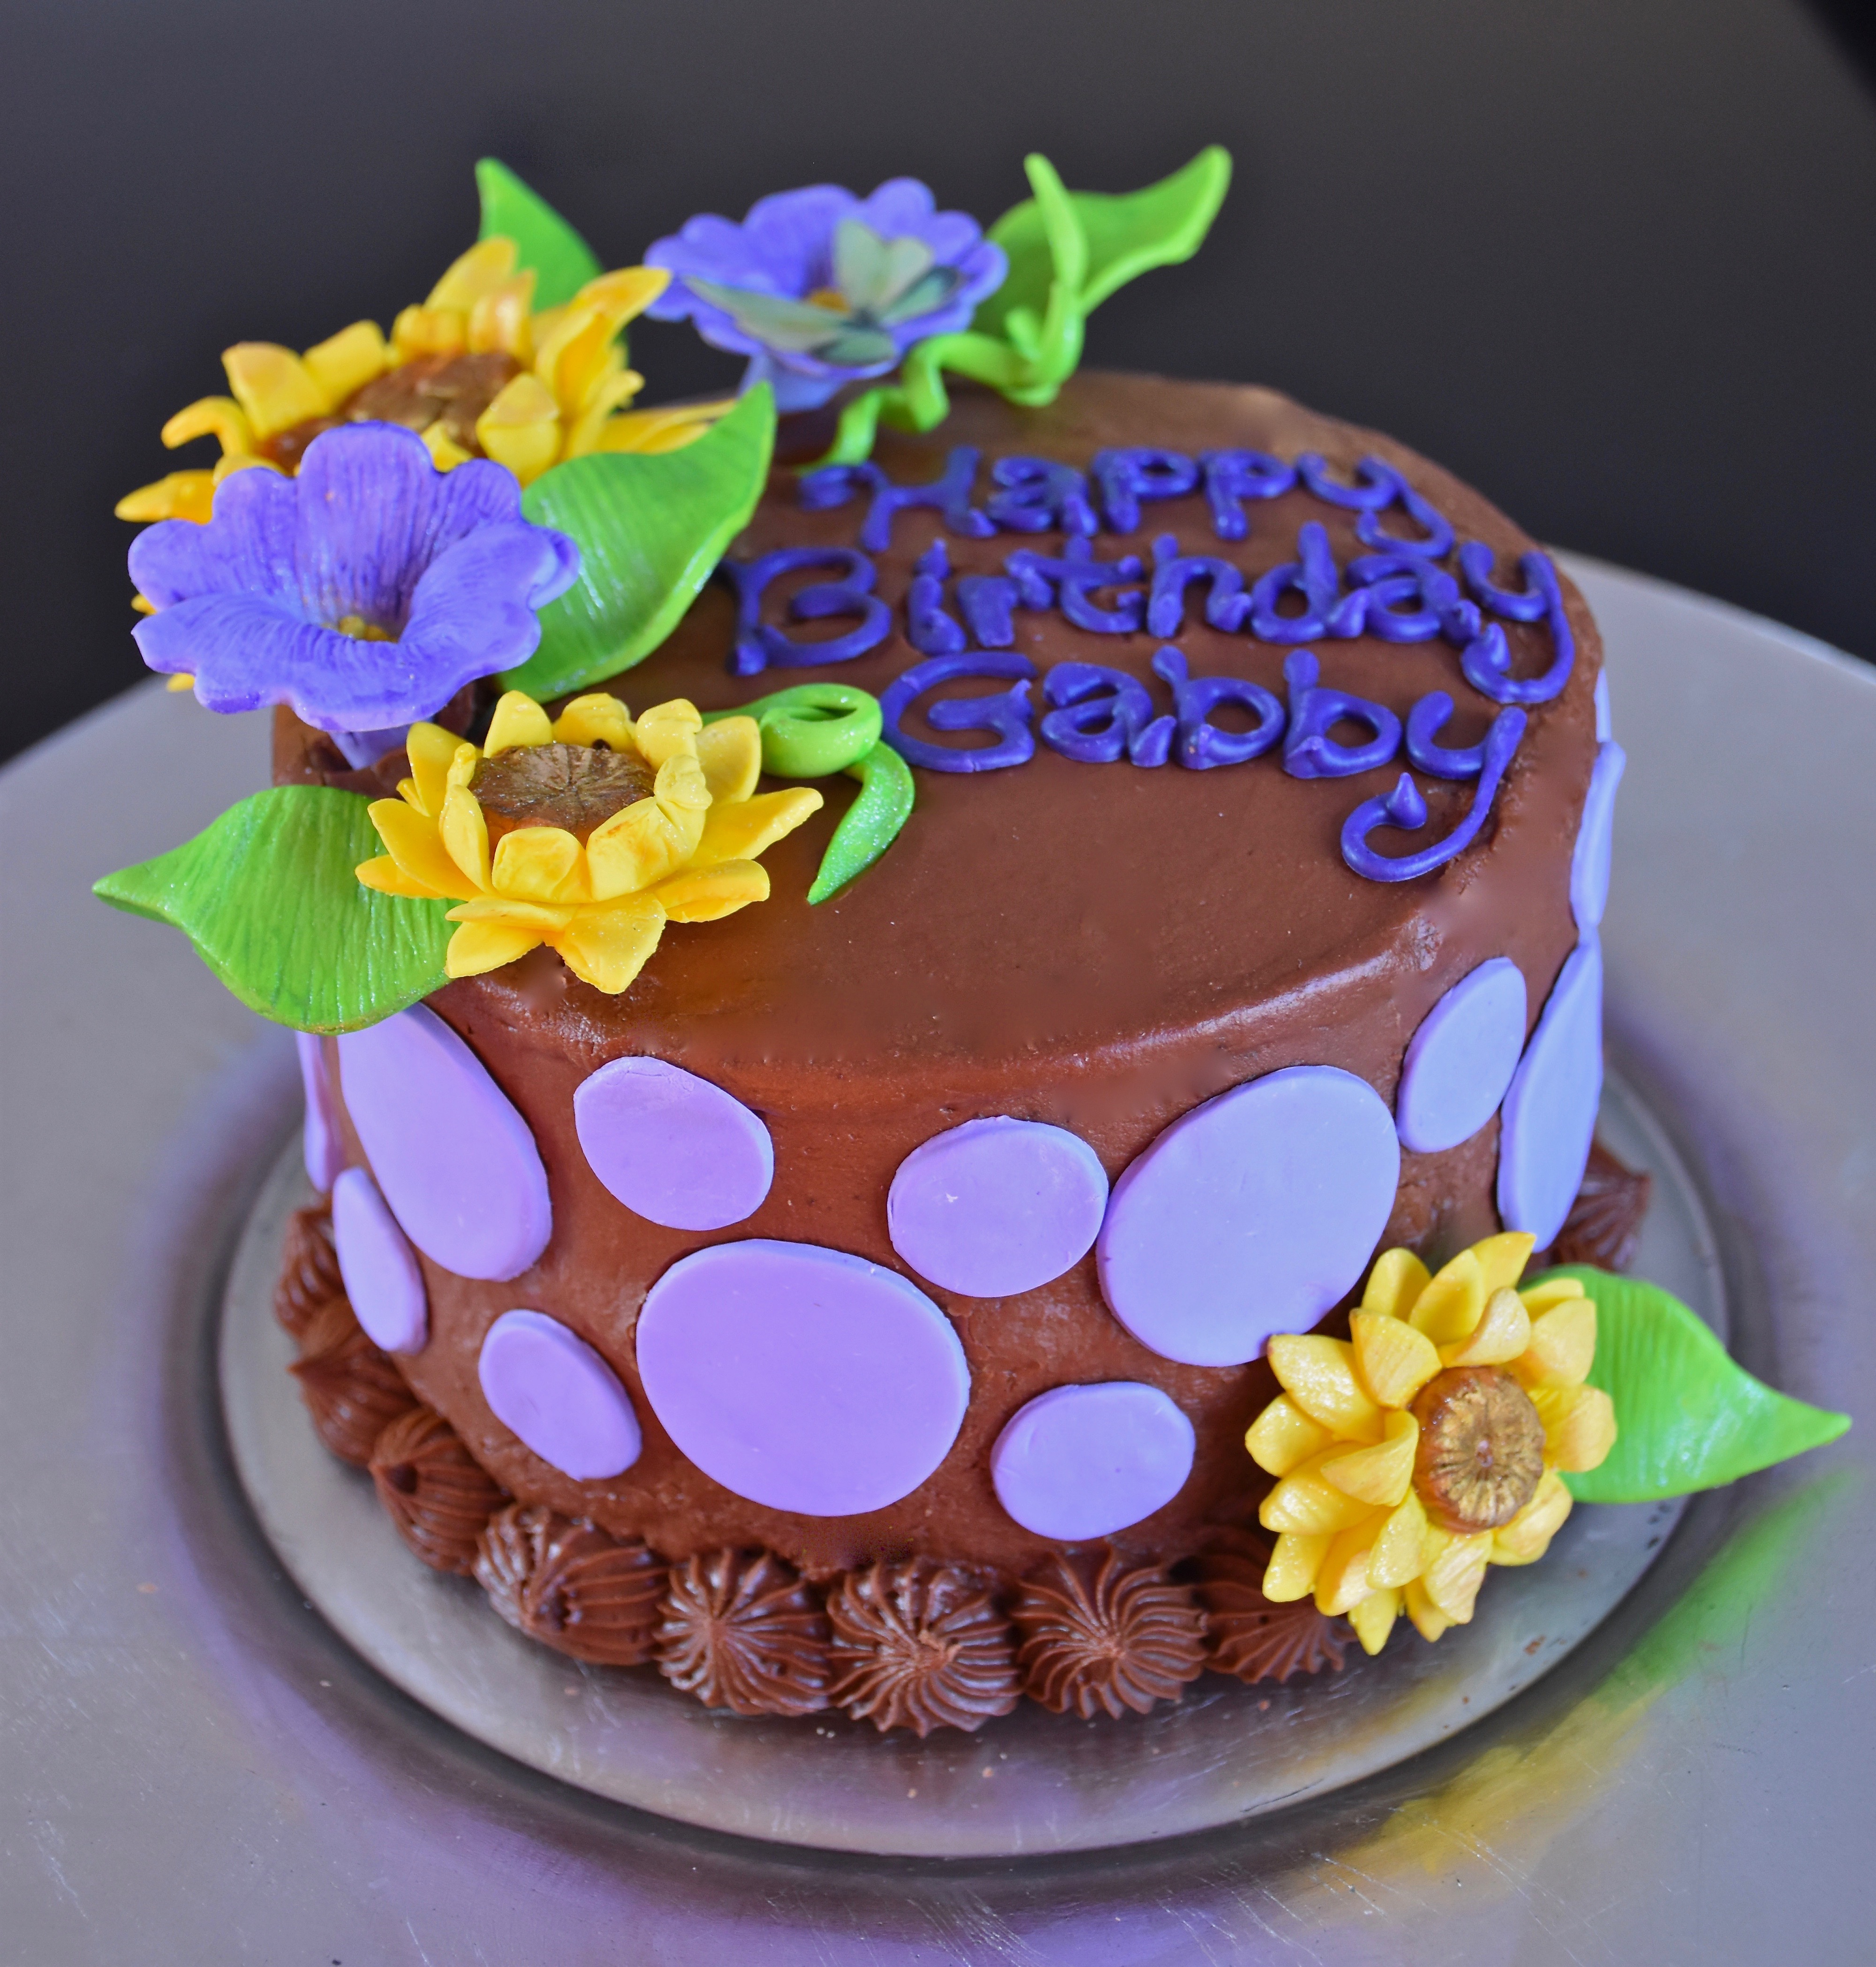
This tulip cake was something I baked recently for my birthday. Instead of letting the sides of this four layer cake feel like an afterthought I made them the feature of the cake. Why should the top of the cake be the only part that gets decorated? I added fondant cutouts that were inspired by mosaic art and my garden.
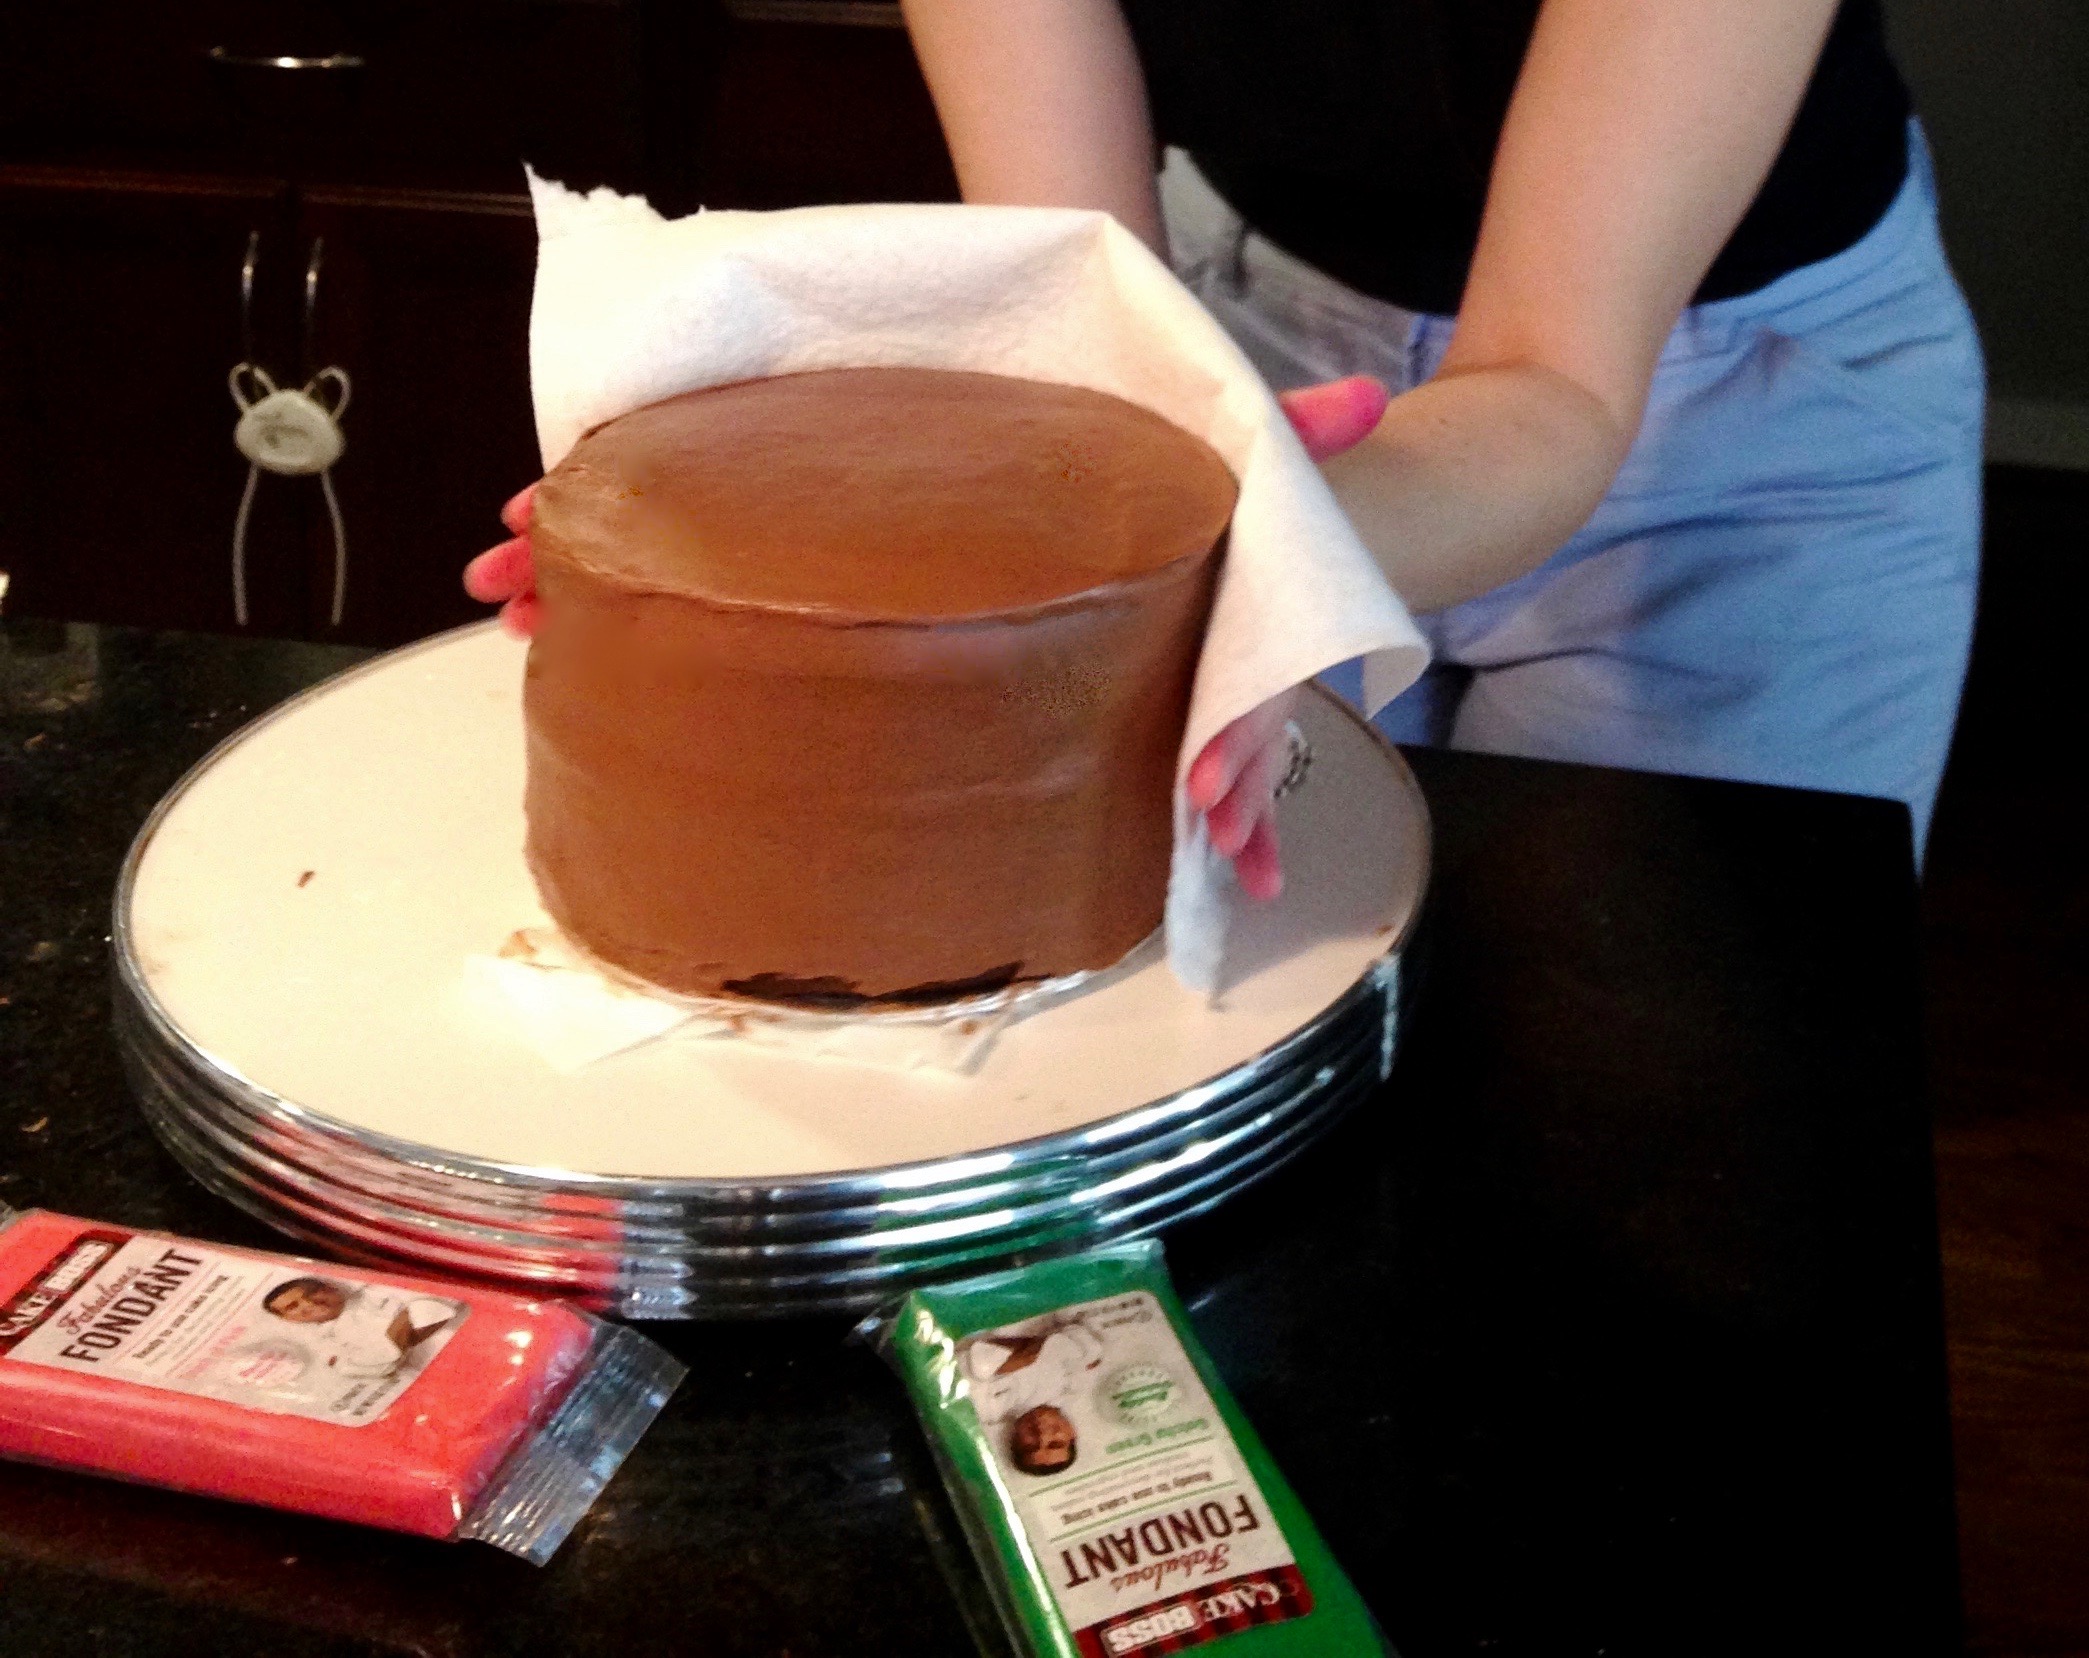
So what’s the secret to smooth cake sides? The answer is Viva paper towels and making sure you get your cake layers evenly stacked.
Once my cake has cooled I trim off any unevenness on the top of each layer using a serrated knife. Then I stack them with frosting in-between ending with the flat bottom side of the cake as my top layer. If it’s a tall cake then I make sure it stays stable by using paper lollypop sticks as dowels. You can find these thick paper like dowels at any craft store in the cake or candy aisle. They are easy to cut, food safe and they will keep you layers from shifting on you. The key is to cut them at least a quarter inch shorter than your cake so you can frost over them easily.
Then once you get a final thick layer of frosting as even as you can manage let your cake chill in your fridge for about 10 minutes. Then you can take it out and press the sides of your frosting smooth using a Viva paper towel. Viva’s have a smooth cloth like finish unlike other brands, so when it comes to cakes only Vivas will do.
Here is a picture of me using this trick on a birthday cake I made for my daughter. If you have any stubborn spots especially on the top you can also heat your knife or separated spatula with hot water. Once the metal is hot quickly wipe it dry and the watch as the heat helps smooth your frosting.
Then any other imperfections can be covered with fun fondant cut outs. Pre-made and even pre-colored fondant is easy to find so add your own artistic touch to the sides of your cake. I happen to be a fan of polka dots. I used different sized spice bottle tops to cut these dots above.
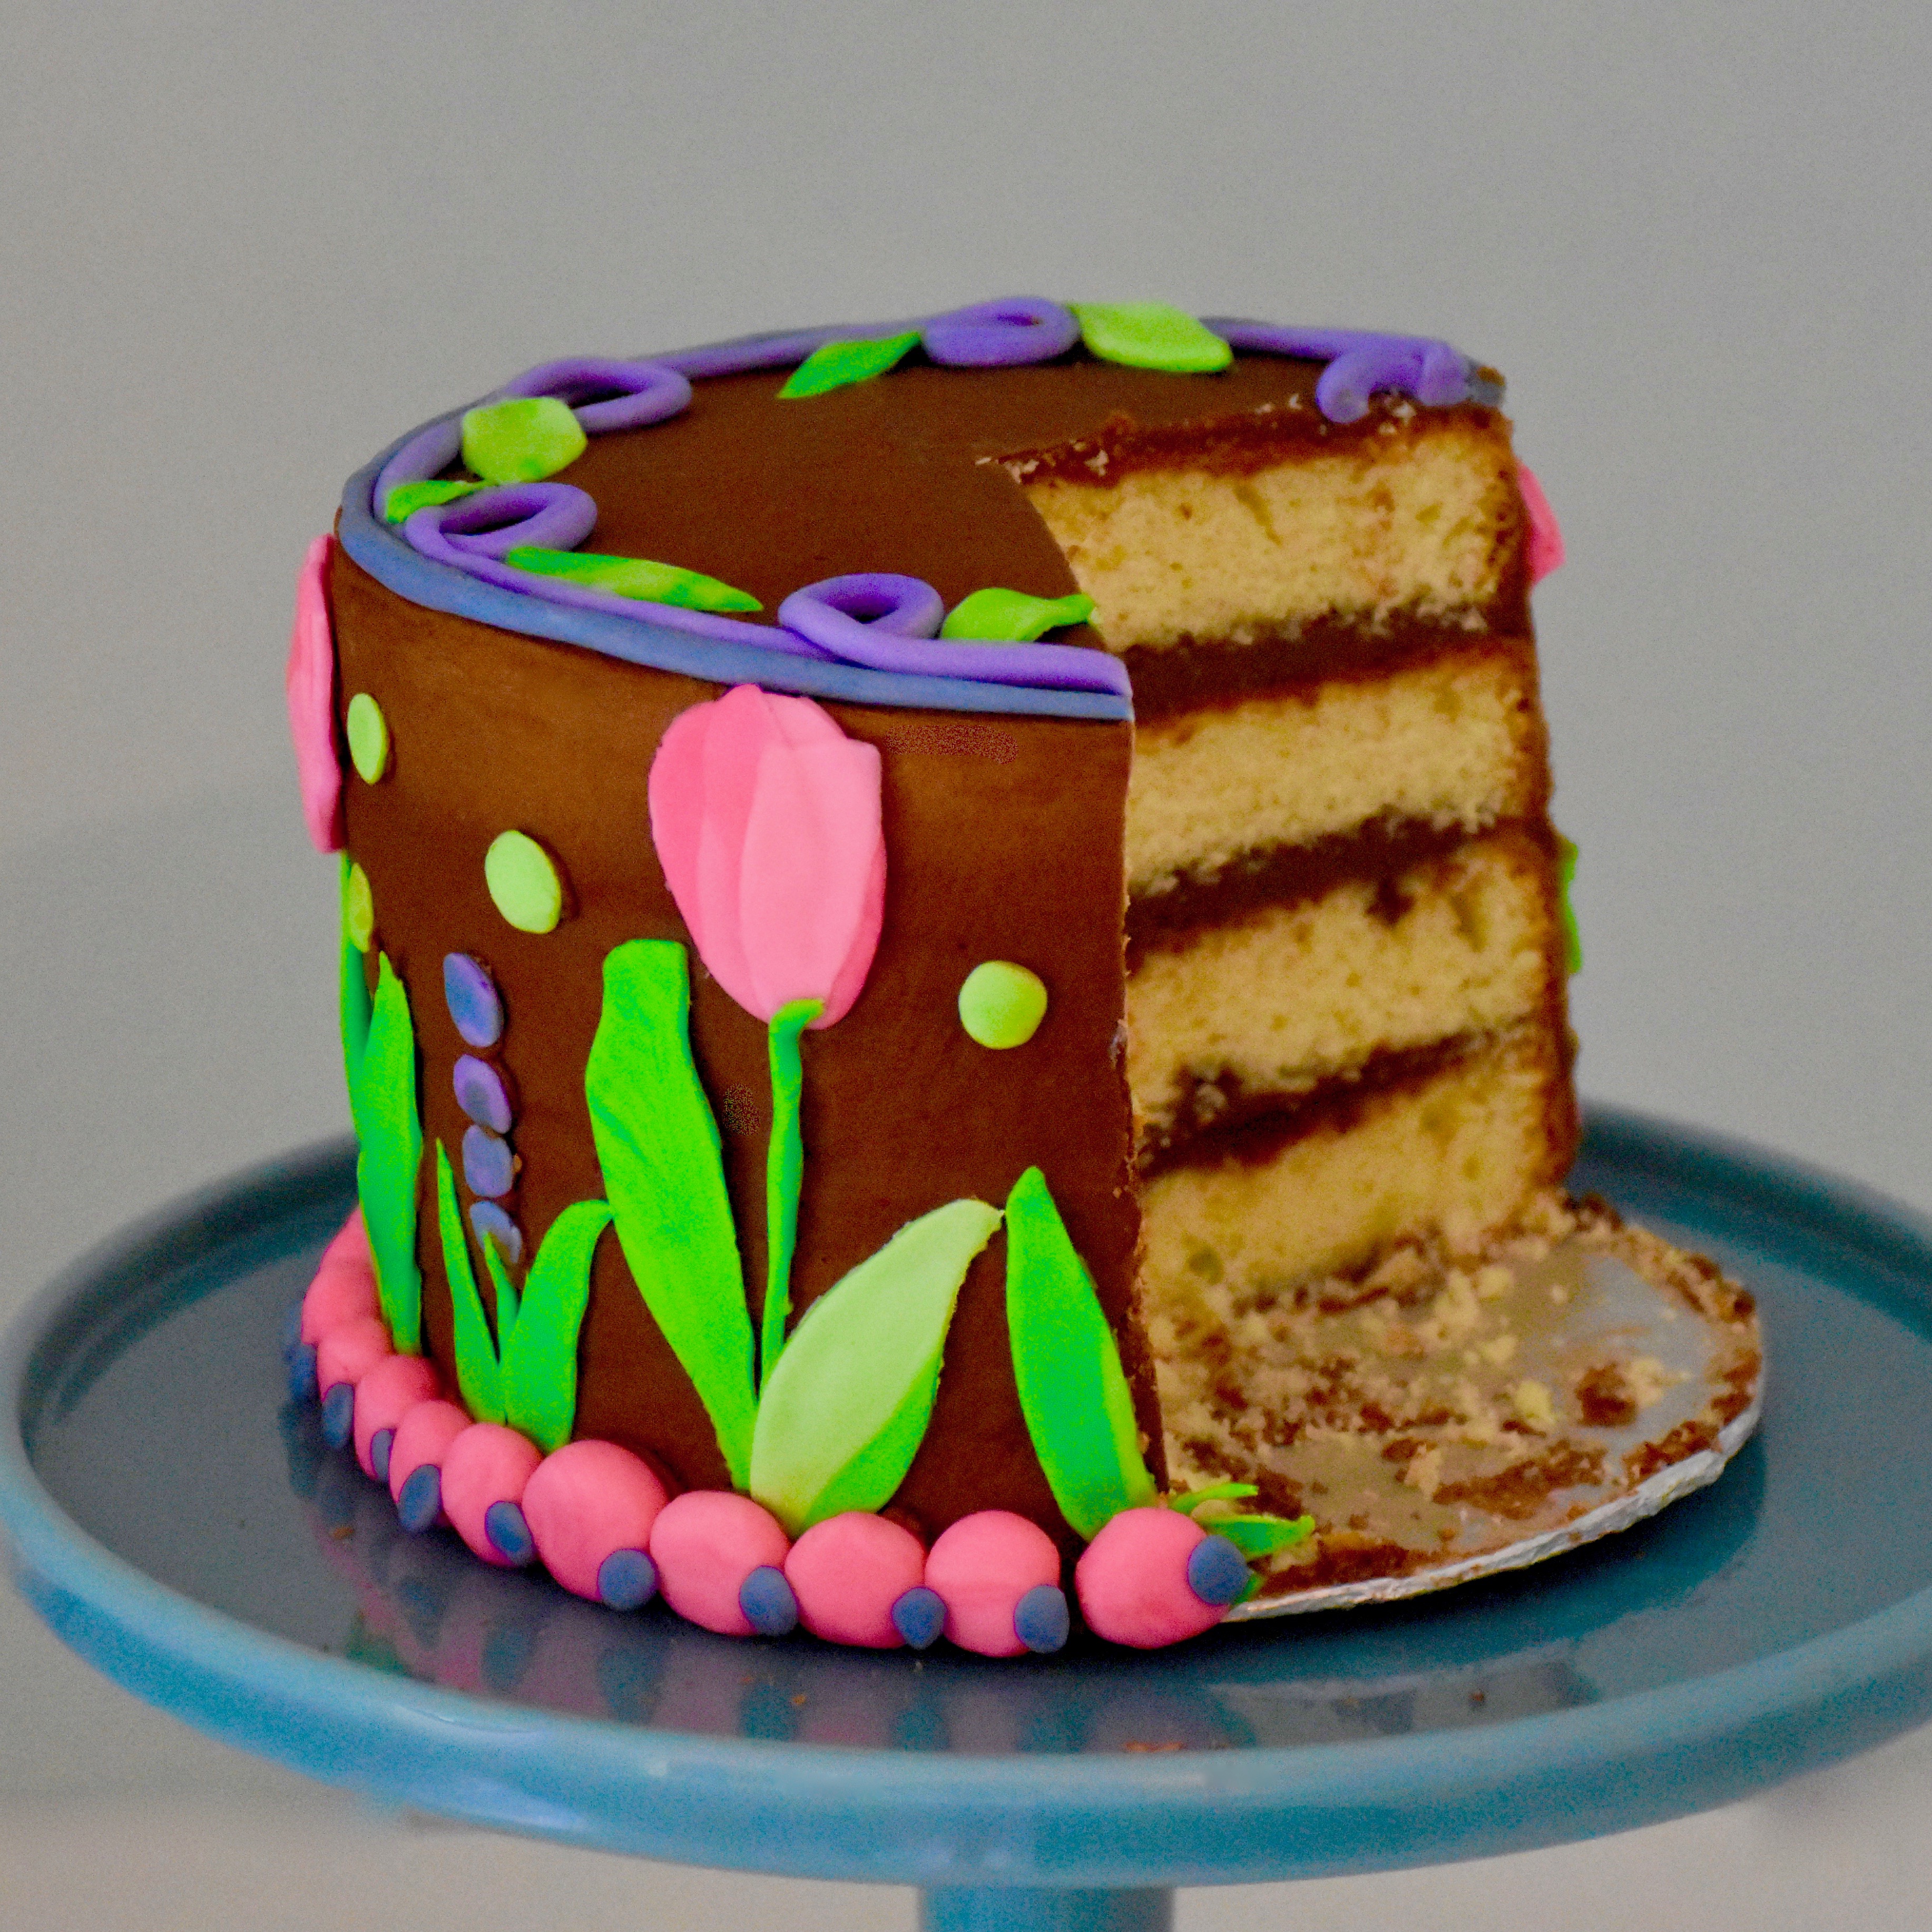
Another pattern I love is squares cut and placed on an angle to look like a harlequin or argyle pattern.
An early cake I made before I knew much about food photography.
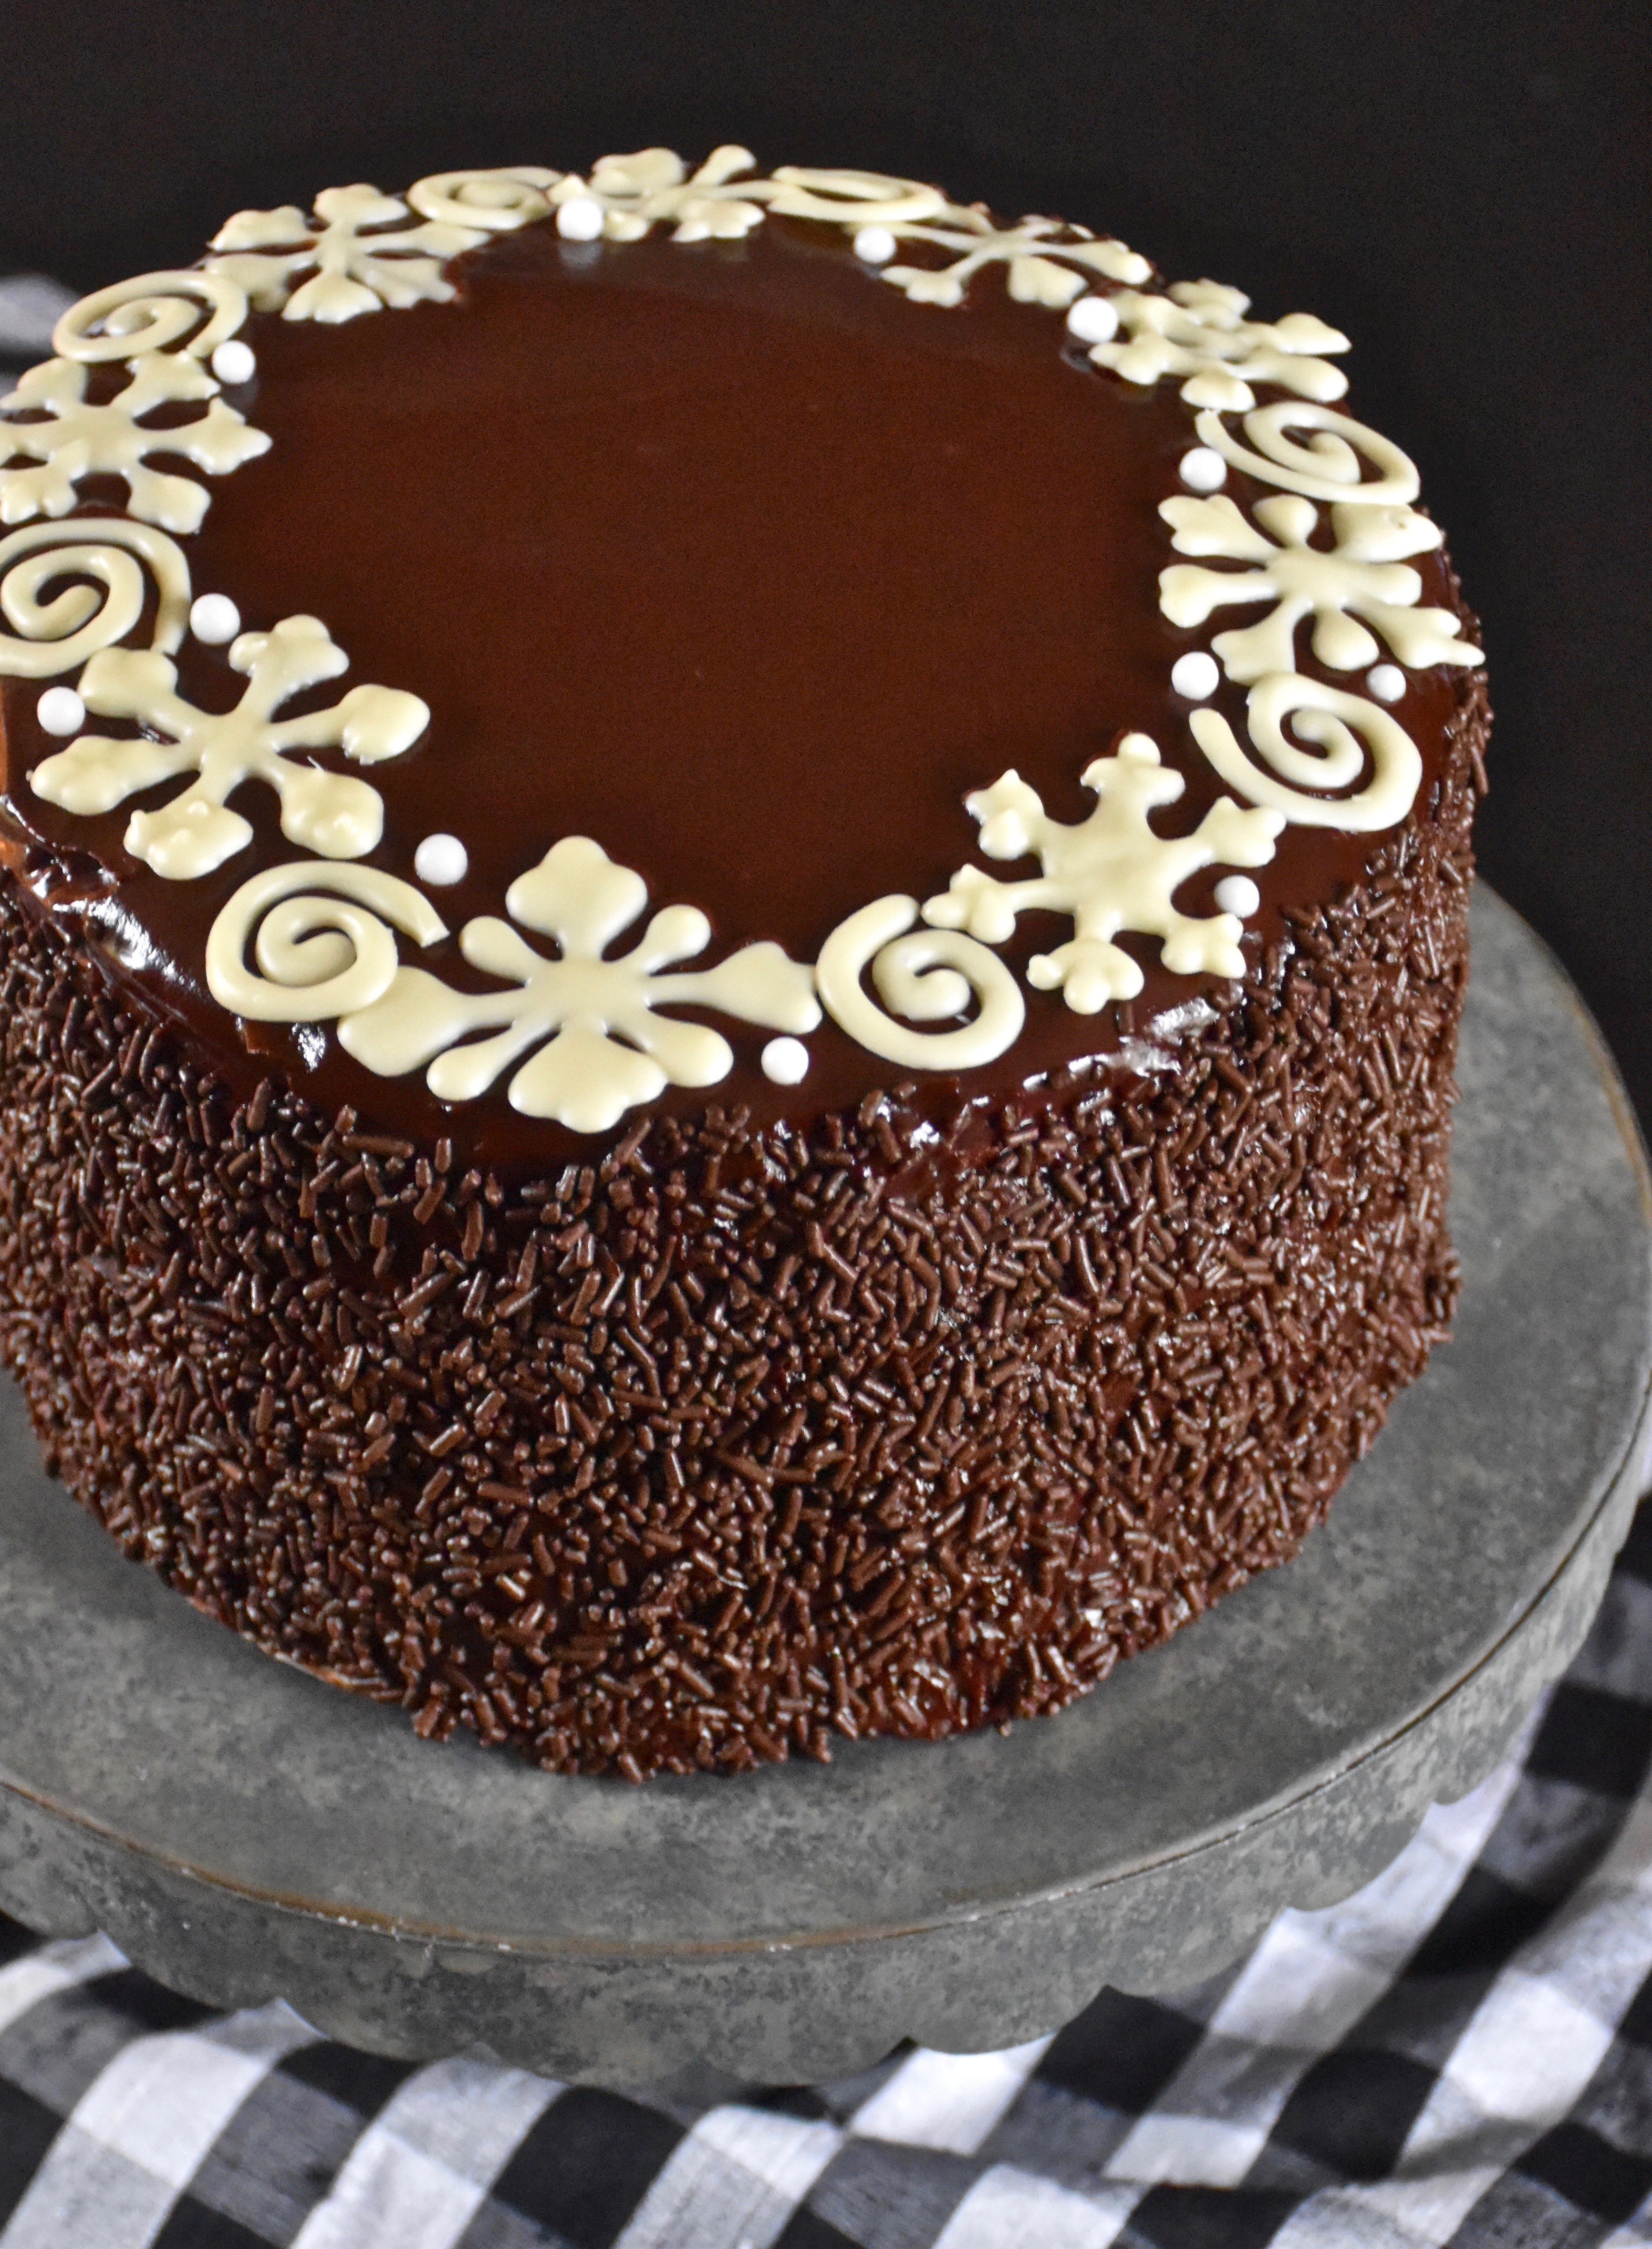
If fondant is more effort than you have time for then use sprinkles, shaved chocolate, finely chopped nuts or crushed candy.
They add a layer of flavor and texture, while dressing up those tricky cake sides. Because the best part of any homemade cake is eating it. Buttercream is too delicious to let a little thing like those sides of the cake get in the way.
So bring on the buttercream because your frosting skills don’t have to be perfect to make a pretty cake.
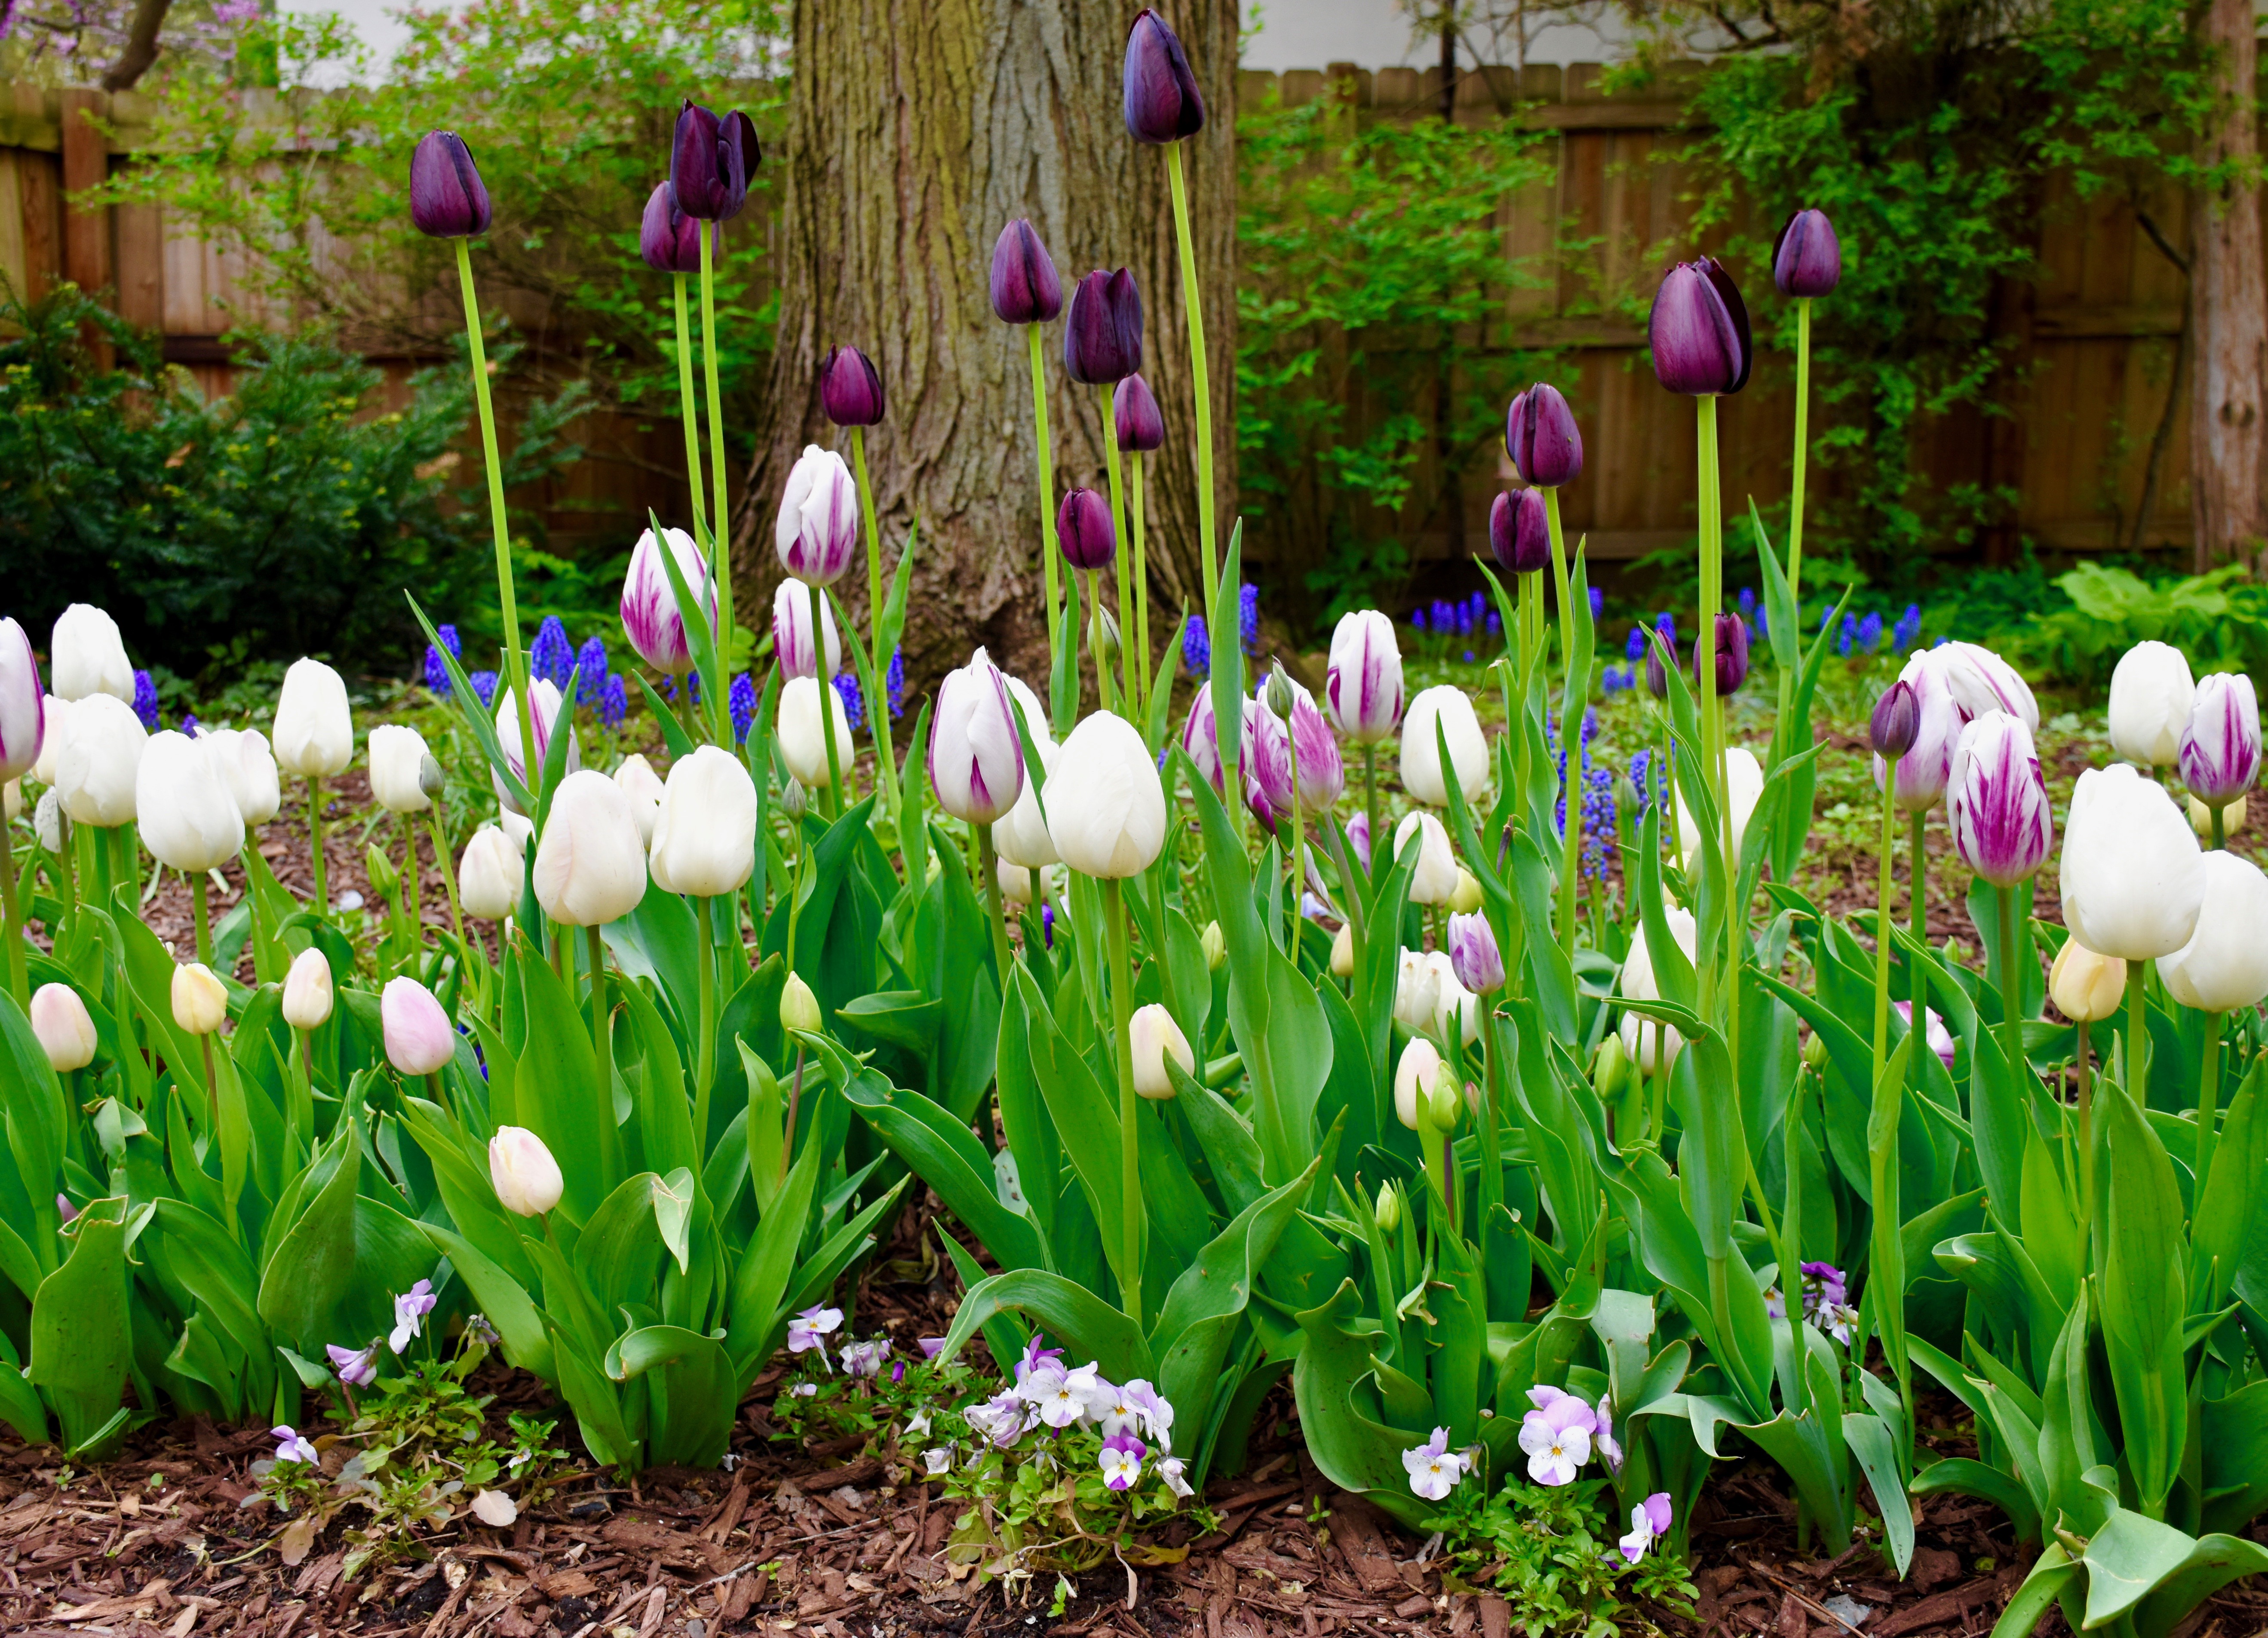
Tulips have become one of my favorite flowers because they are so hopeful. You plant them right before the ground freezes and then when you think you can’t take a day more of the biting cold temperatures they begin to appear. Their bright green shoots herald the beginning of spring. They pop up and suddenly the garden feels alive again. Their beauty is too great not to share, so here are a few of my photographs from the Chicago tulip season.
Their glorious colors are stunning. I love the combination of the red, orange and pink.
Add in some blue muscari bulbs for a little contrast in color and you have a pretty garden that can withstand even record breaking late spring snow.
Tulips are such social flowers. I love how the look bunched together in small groups or large tightly spaced displays.
The details of each petal’s color and shape are amazing. I love these bright purple blooms with the orange and yellow.
Mixed together with daffodils and hyacinths they create a happy and colorful border. I love this planter that is overflowing with ivy and spring bulbs.
This vivid and almost regal color combination of deep purple and red made me stop a moment to just take in the beauty as they swayed in the breeze.
These parrot tulips almost look like they have been painted with their soft tangerine and pink details.
Finally, this garden bed in shades of purple and white belongs to me. I plant some bulbs in my front yard, but my largest planting is off my back patio where I can enjoy it most. Usually a shady summer spot because of the large trees above it, spring is when this little bed in my garden shines. Before the leaves return to the trees the sunlight allows me to plant a more colorful display. This year I decided to plant a mix of purple and white tulips. I planted some white Fremont tulips that have a pretty light pink color on the tips of their petals. I also planted some purple striped Flaming Flags. Then on a last minute whim right before the first snow of the season, I sprinkled in a few of these taller deep purple tulips called Queen Of The Night.
The view outside always makes me smile. I love looking out of my kitchen to see these blooms. I planted purple pansies and violas to add in some addition color before my tulips bloomed.
The periwinkle colored muscari flowers dot the back of flower beds with more color. Spring may arrive a little later here in Chicago, but these these blooms make it worth the wait.
It had been a long week and by Wednesday night I was tired. As it goes with parenting, sometimes more worry fills my mind than should. My daughters have had some recent vision issues and challenges with reading. It’s easy to loose perspective from time to time when things are hard. Mothering is absolutely wonderful, but it can at certain times feel like an all consuming role. As I was getting ready for bed all I could think was: is there anything I am really good at these days? I tried to shake off that nagging question and get some sleep.
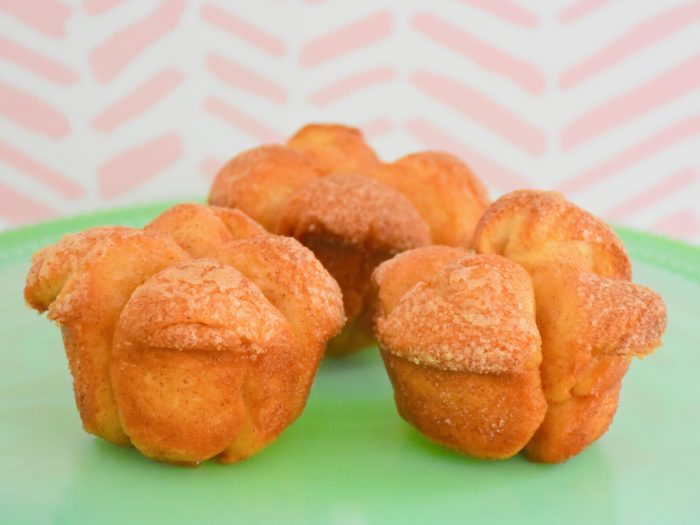
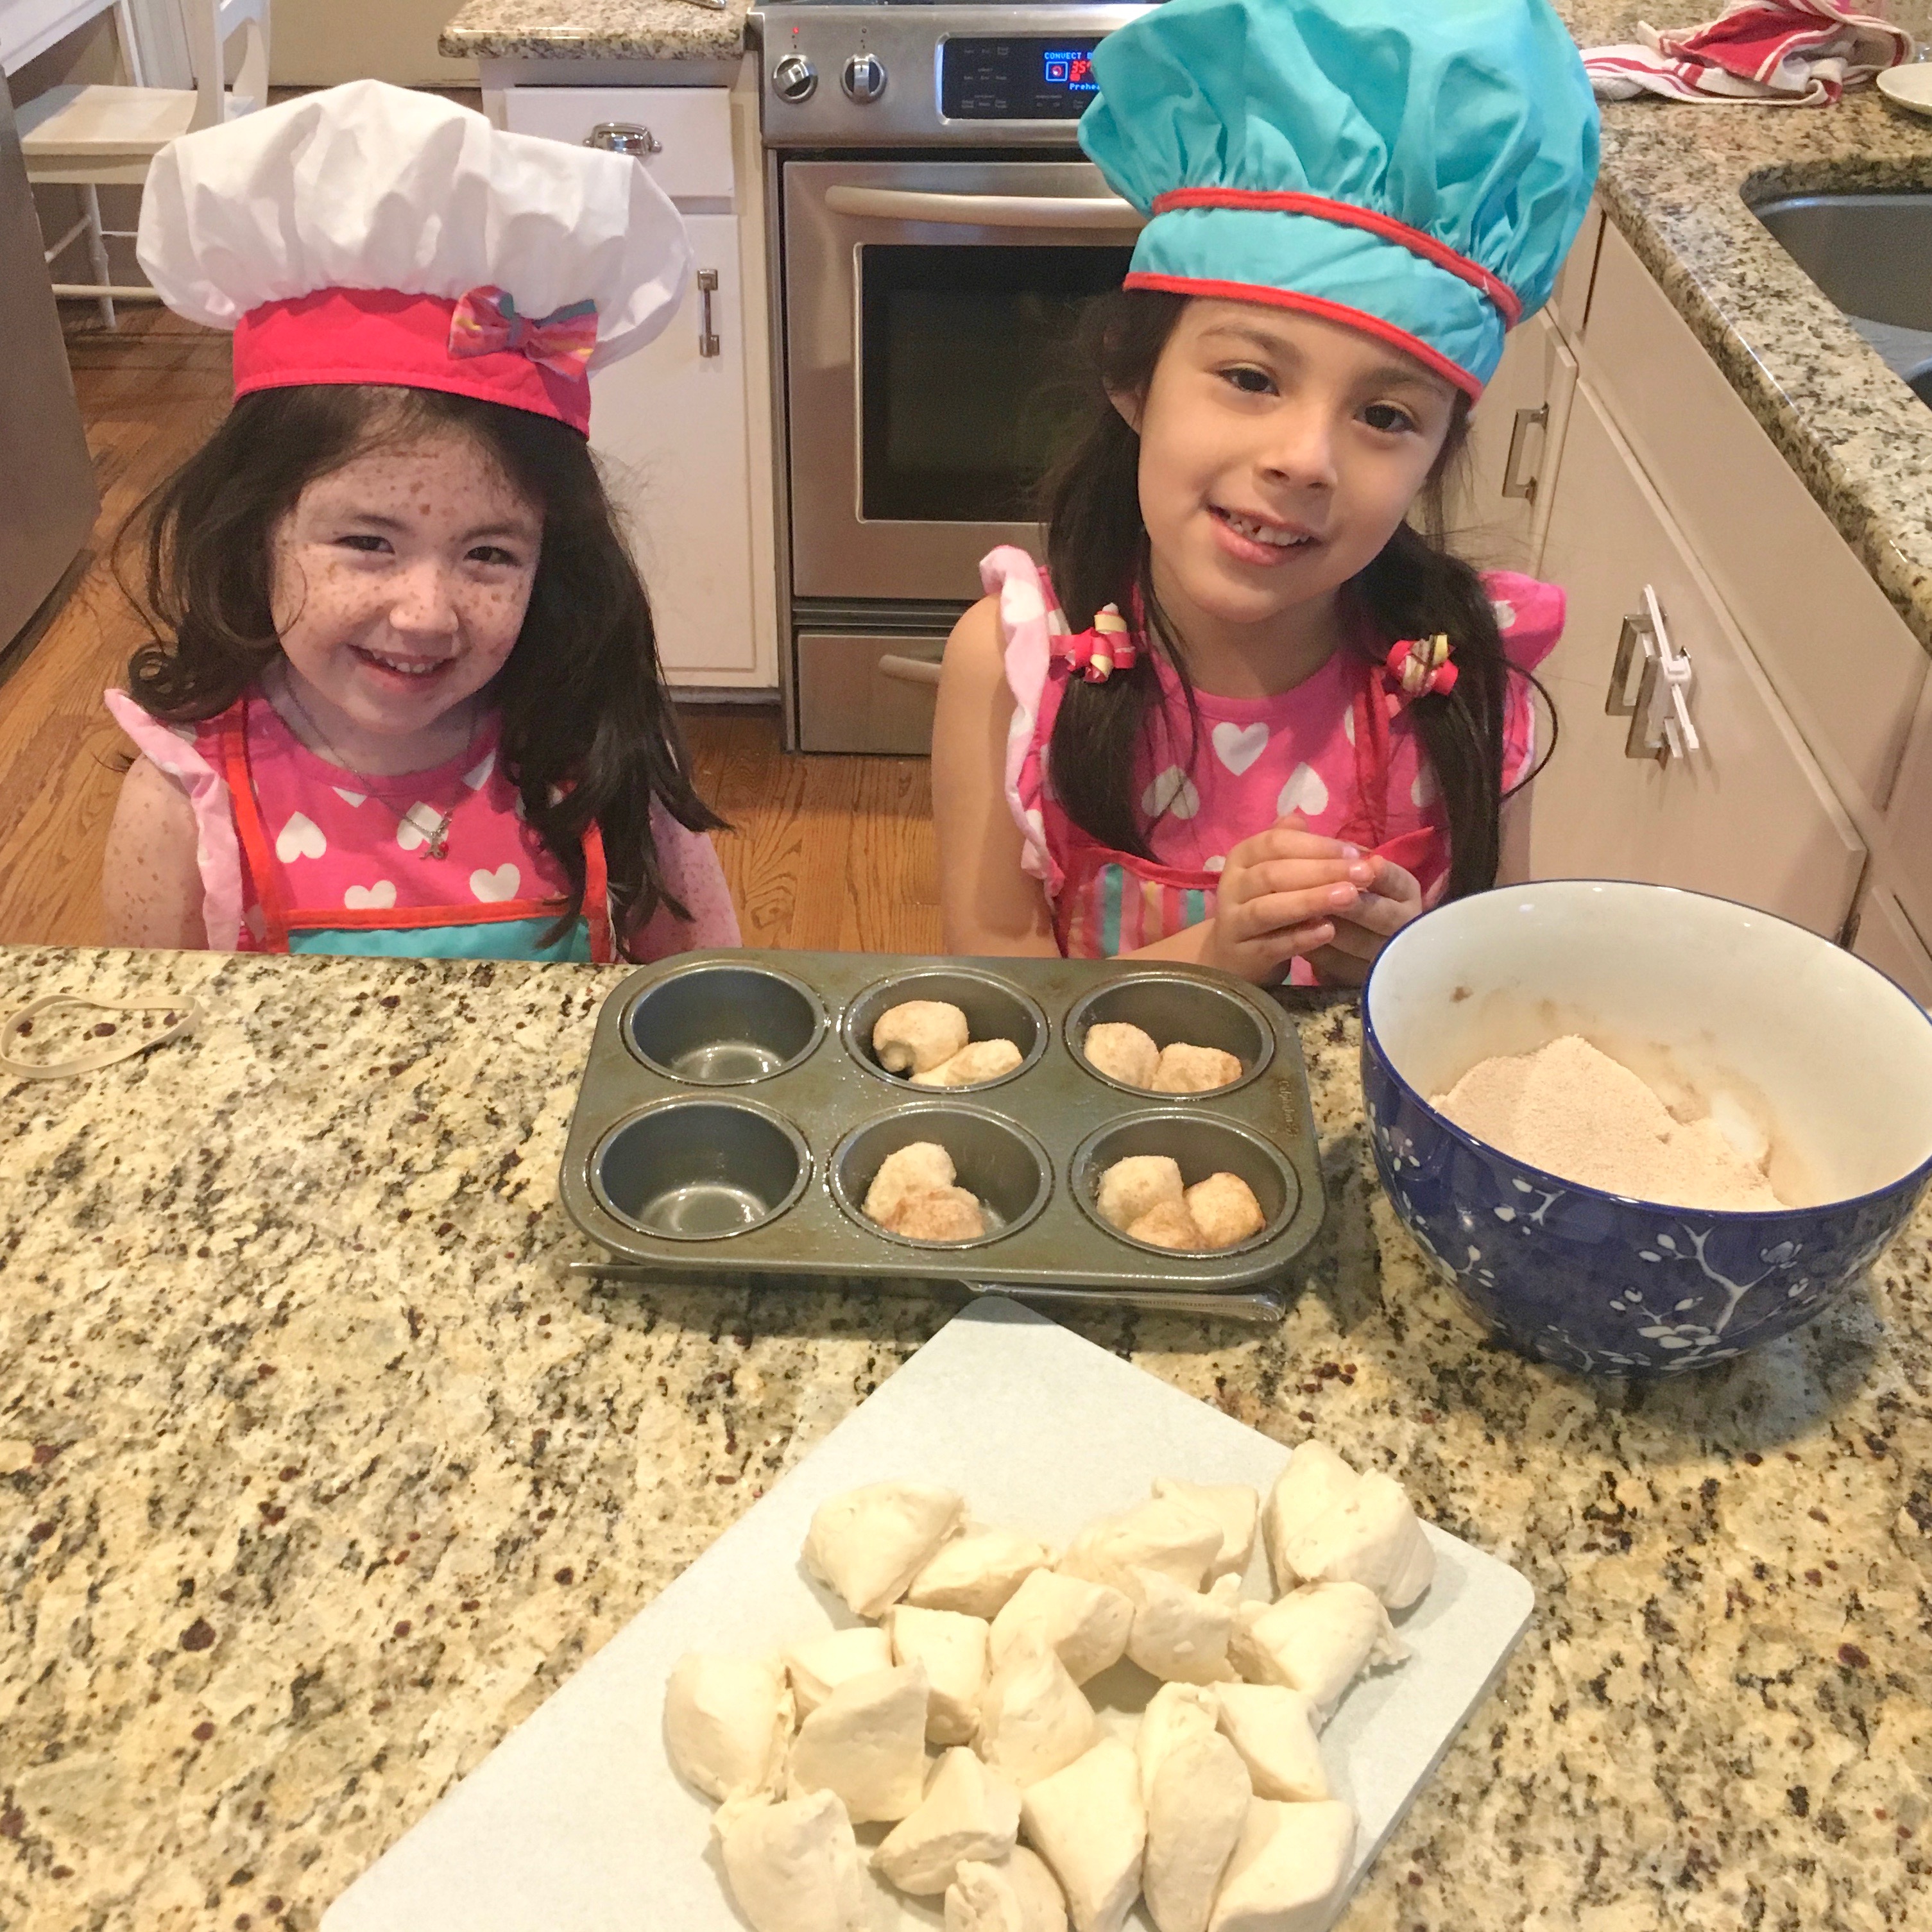
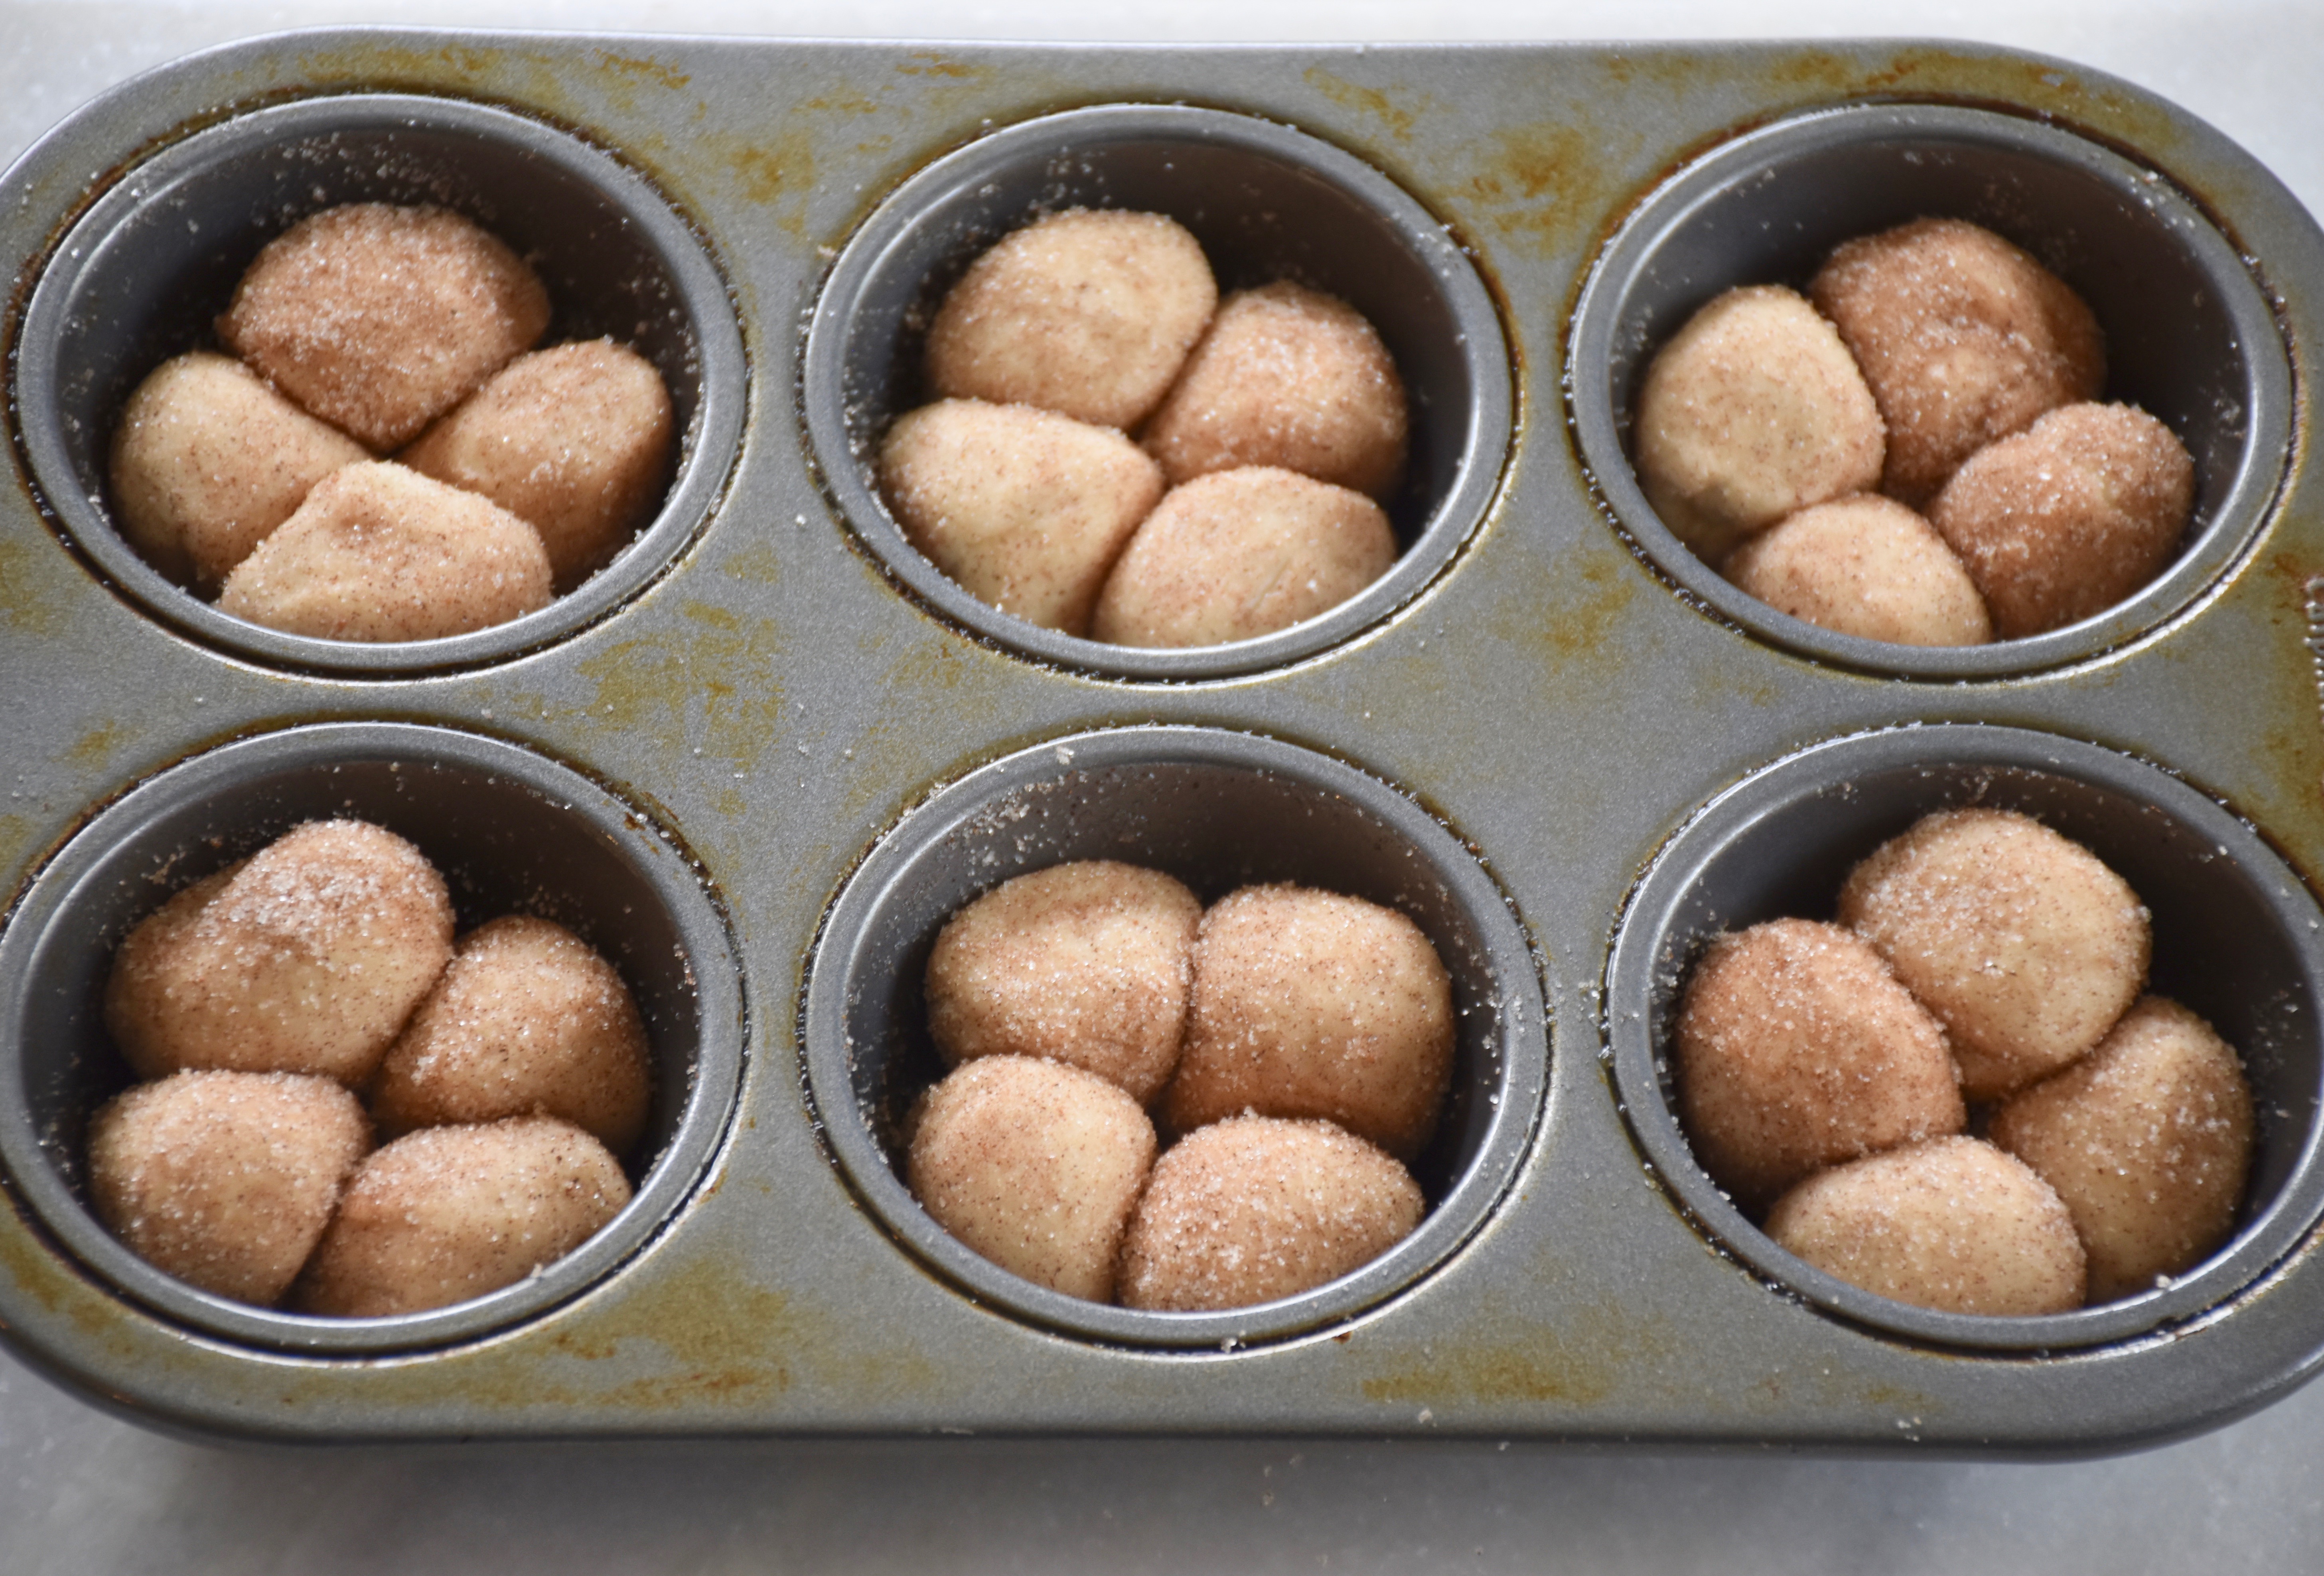
Thankfully the next morning we didn’t have a class or appointment we had to rush off to before afternoon school. My oldest daughter came downstairs and on her own she began clearing the breakfast table. She took her favorite pink floral quilt and set the table with forks and spoons. Next, she began digging through the dress up box looking for something, her chef’s hat and apron. “We are having a tea party,” she announced. Now my youngest wanted to join in the fun and find her apron too. “Let’s make teacakes!” The dresses and shoes were now thrown all over the room and it was getting late since it was now 10 o’clock. I hadn’t planned on baking, but I had can of refrigerator biscuits. So I made my own smaller version of the Pillsbury monkey bread coffee cake that my mom used to make for Christmas when I was little. My girls put on their own cooking show as they rolled the pieces of dough in the cinnamon and sugar. I helped make a glaze and then the little teacakes were in the oven. We pulled out my grandmother’s white teacups and saucers and we made some tea and my girls played like we were all princesses.
The smell of cinnamon and sugar began to fill the kitchen and the sweetness of those rolls baking in the oven and the giggles at that table caused the worries of the night before to begin to fade. Then as we were eating our teacakes, like a wink from above the thought came: I am divinely good at Thursday morning tea parties. That’s the thing I have learned about motherhood, sometimes it isn’t about having all the answers or being able to fix everything. It’s finding a way to encourage and celebrate the small things that counts. This tea party was an important reminder to me that my girls won’t remember all the things I worry about. Instead, I hope they learn how to find joy in the everyday from impromptu dance parties, to lego castles, to sidewalk chalk murals and bake offs. Because it’s the loving, laughing and baking your way through it all that matters.
So in honor of Mother’s Day I am sharing our recipe for Thursday Morning Teacakes. They are simple because they start with canned biscuits and their small size bakes quickly. It’s something my young daughters can bake and they love eating these mini coffee cakes or as they call them teacakes.
Thursday Morning Teacakes– Makes 12 mini cakes
2 (12 biscuit) cans or refrigerator buttermilk biscuits OR 2 (8 biscuit) cans of grands southern style biscuits THE KEY IS DO NOT GET THE KIND WITH “FLAKEY LAYERS”
1/2 cup granulated sugar
1 teaspoon cinnamon
1/4 teaspoon nutmeg
1 stick (1/2 cup) butter
3/4 cup brown sugar
1 teaspoon vanilla extract
NOTE: I made these rolls with the smaller buttermilk biscuits, but they can be harder to find so if you can only find the grands then cut each biscuit in quarters instead of halves
Preheat your oven to 350 degrees and spray two muffin tins with cooking spray
Then cut your biscuits in half if using the smaller buttermilk kind (see note above for grands)
Roll those halves into small balls like you would make for clover leaf rolls
Then in a small mixing bowl combine your granulated sugar, cinnamon and nutmeg. Roll the dough balls in the cinnamon sugar mixture until they are well coated.
Then place four dough balls in your muffin tins.
Next in a small sauce pan melt your butter and brown sugar over medium heat and add in your vanilla extract. Stir until the brown sugar has melted and the mixture is well combined. Then remove your brown sugar glaze from the heat. Then place a tablespoon of the brown sugar glaze on the top of each roll using the back of your spoon the spread it out evenly.
Bake for 15 minutes until the tops are golden brown. I like to bake mine with a baking pan underneath just in case a little glaze runs over the side while baking.
Baking with kids can be so much fun! I have found that my girls want to help with everything so these rolls are great because they can cut the biscuits with kitchen scissors and then roll them in the cinnamon sugar without too much help. This recipe is one of their favorites. Perfect for Thursdays or any day where you want to bake something, but you don’t have lots of time.
The warm sunlight filters through the tree branches cutting the cool spring breeze. There is still a chance for late spring snow, but that doesn’t stop the optimistic green shoots from popping up to greet the sun. Their colorful blooms a welcome sight after the long brown winter days.
The daffodils come first with their cheery yellow blooms.
Then the tulips follow, reaching up with their long stems and leaves. As they flower a dazzling display of color fills the garden beds. Like precious gems they sparkle in yellow, pink, purple, orange and red.
They stand with a watchful eye as the vibrant pansies and violas play hide and seek below.
The stately foxgloves tower above and the sweet smell of hyacinths fills the air.
Everyday new blooms as their colors join together to tell the hopeful story of spring.
New visitors appear to revel in the beauty. The butterflies, bees and birds have all returned.
The sunlight beckons me to come and see: how glorious is the creator and all the brushstrokes of his spring.
Ruth Reichl’s latest memoir, Save Me The Plumbs, is filled with all the delicious details that readers have come to expect from her writing. It tells the story of her time as the editor of Gourmet magazine; from the first moment she was mesmerized by its tales of exotic dishes at the age of eight to the unexpected twist of fate that years later lead her to become its editor. It’s a story about how she and her staff shaped the food writing world, but most importantly it’s a tale of creativity, courage and resilience in the face of change. Reichl’s humorous and honest reflections will have you feeling like you are right there living it all with her and it will have you savoring every page.
As always Reichl, ever the foodie, shares recipes for memorable meals along the journey. My favorite was a late night dinner that she shared with her son, Nick. The worry and stress of her new job fades as she steps into her apartment to cook Spicy Chinese Noodles. This recipe is delicious, full of flavor and simple to make. It’s the kind of meal that will have you slurping and loving every bite. After making this recipe several times I have made a few adaptations so it can feed a family of four. I also decided to added some Asian pear. I find the crisp texture and slightly sweet flavor adds a nice balance to the spicy noodles.
Spicy Chinese Noodles-Serves 4
1 (10 oz) package of Lo Mein noodles or spaghetti
2 tablespoons finely grated or minced fresh ginger
3 scallions, sliced thinly
1/2 cup of finely diced Asian pear (Optional)
1 teaspoon sugar
3 tablespoons Chinese black bean paste with garlic
1 tablespoons Chinese black bean paste with chili (Note: if you have young children or someone who is sensitive to spicy foods then just use 4 tablespoons of the garlic bean paste instead)
1 pound ground pork
1 tablespoon of peanut oil or canola oil
1 teaspoon sesame oil
Cook the noodles in boiling water until al dente (every noodle brand is slightly different so check your package for the cooking time) and drain and set aside
Meanwhile as your noodles are cooking, peel and then mince or grate your ginger and chop your scallions and pear.
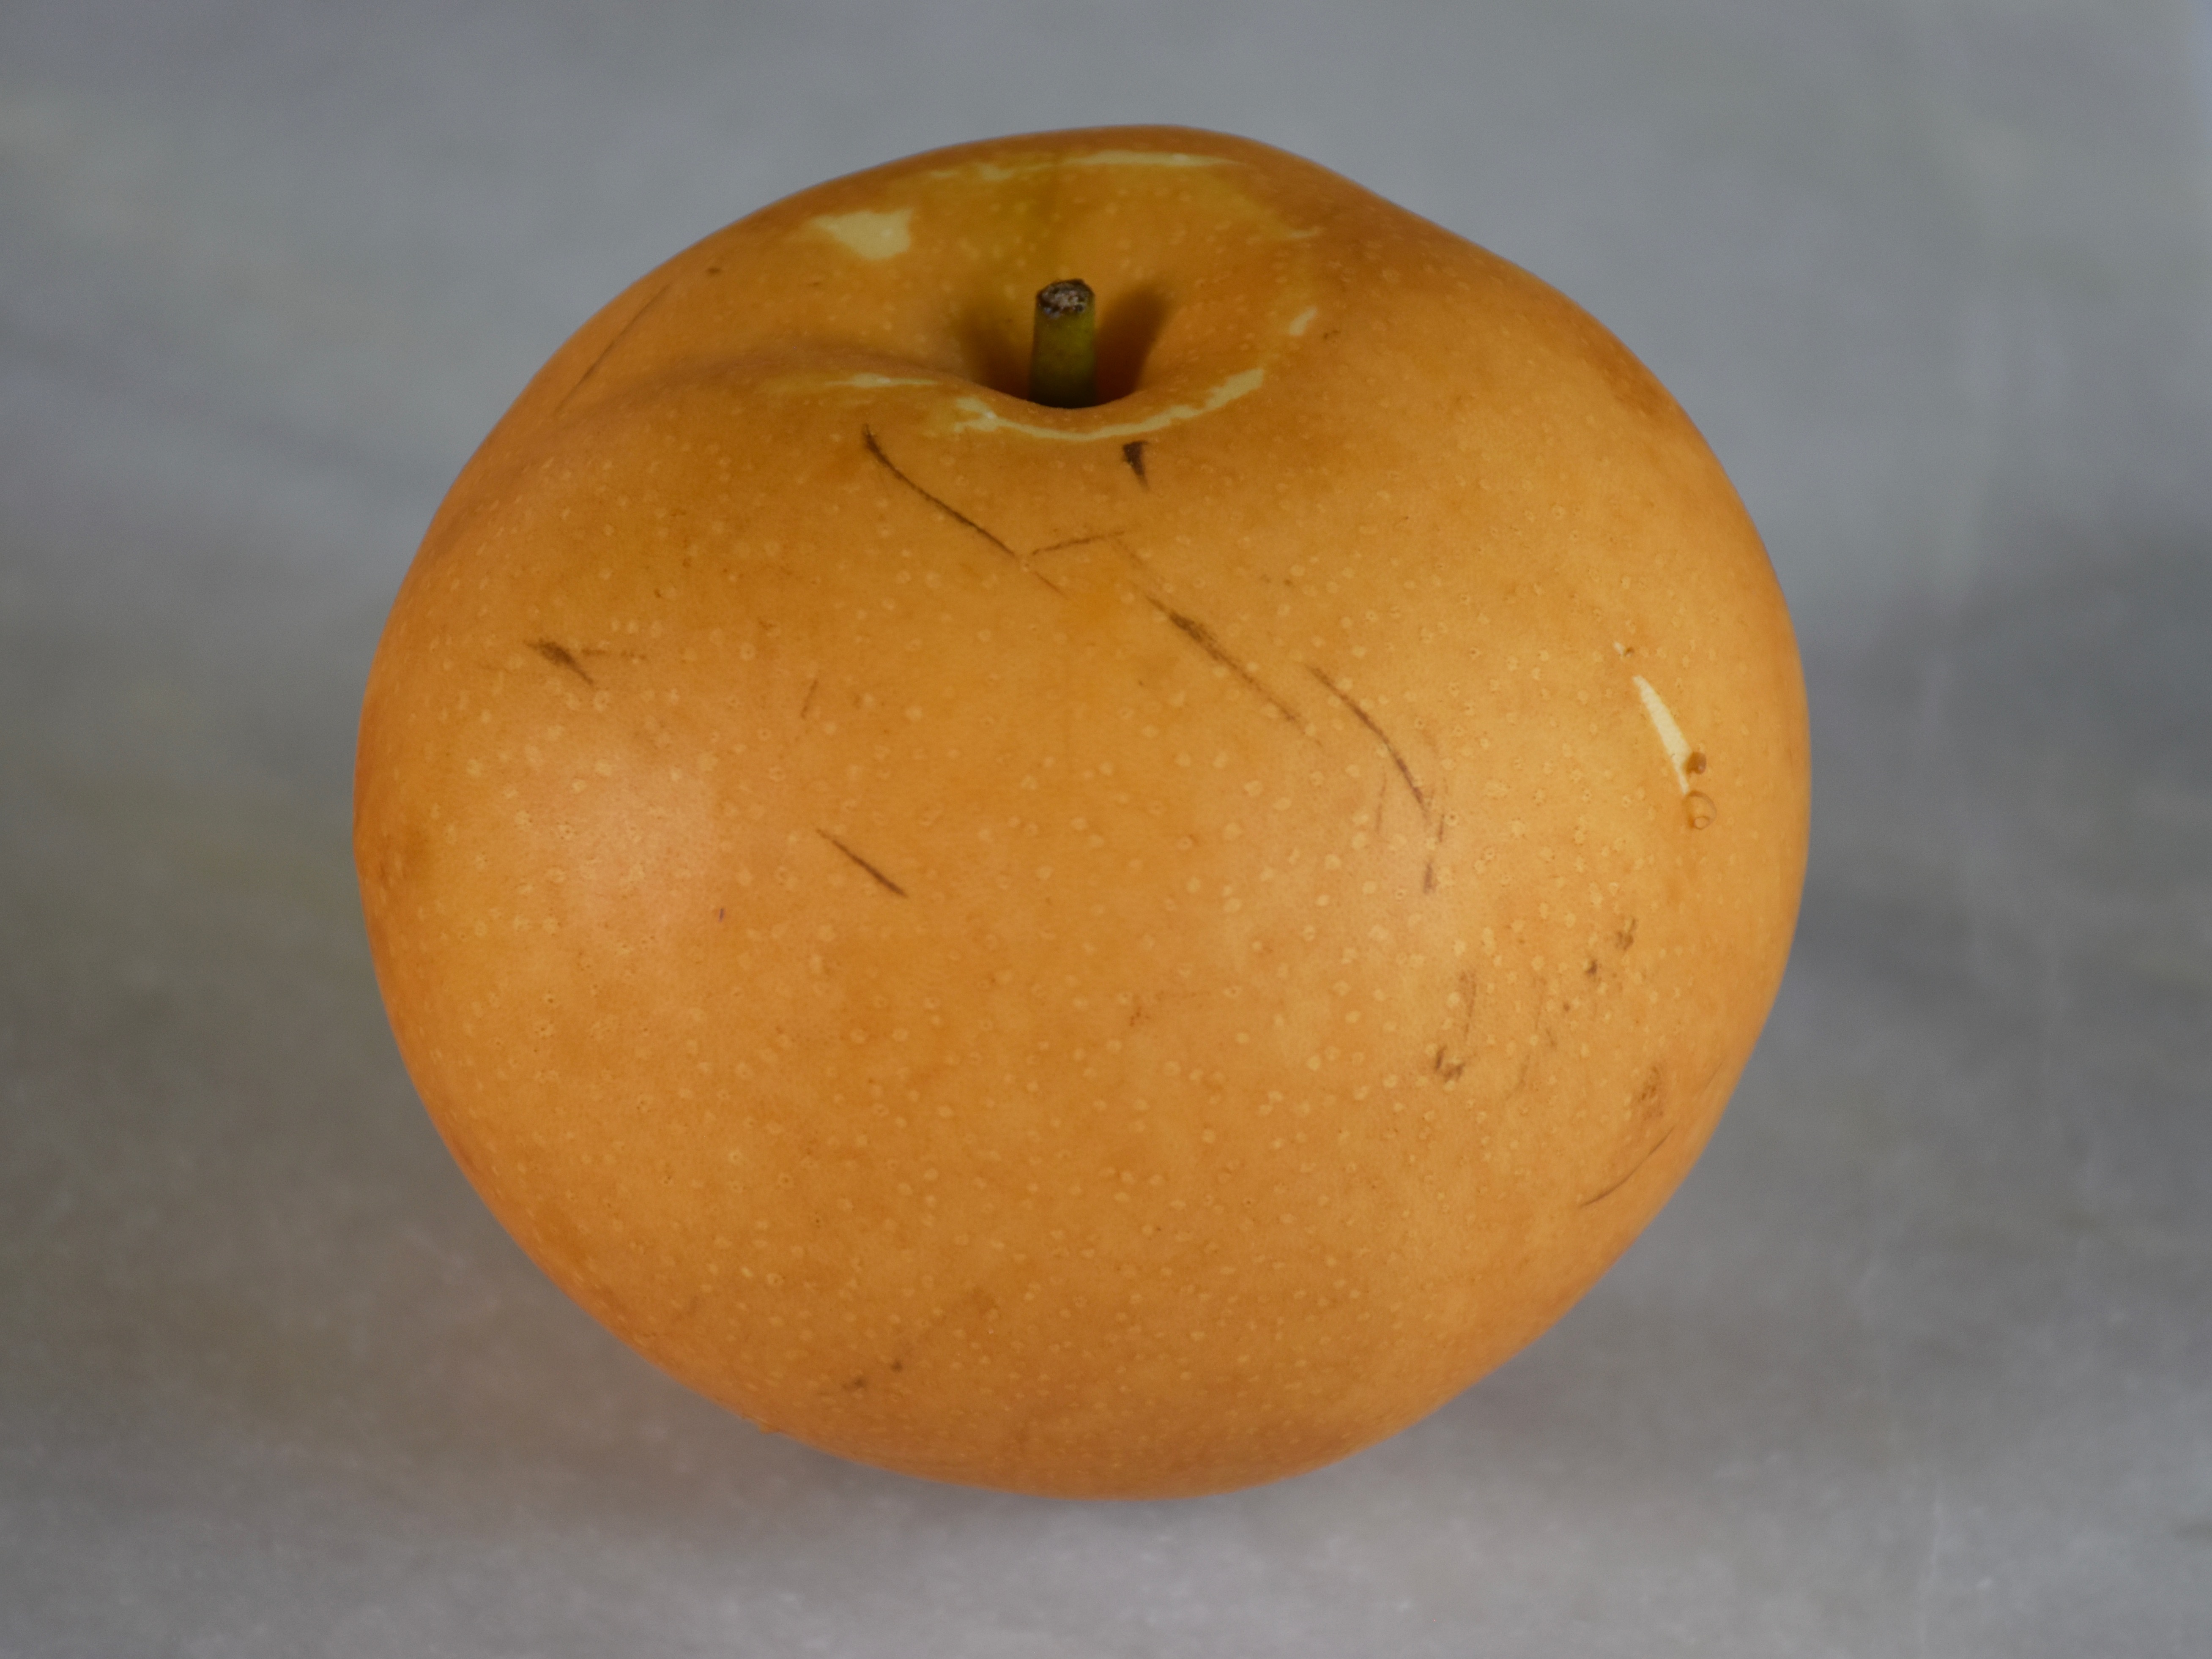
This is an Asian pear. It looks a bit like a cross between an apple and a pear, but it has a distinct flavor that goes well with pork and beef dishes.
Then in a small bowl mix together your bean pastes and sugar.
Heat your wok making sure it is hot. I use an electric wok since I have an electric stove that doesn’t get as hot as I would like, so I set my wok to 375 degrees. If you have a gas range you can heat your wok or skillet until water skitters across the surface. Add a tablespoon of peanut oil or canola oil if you prefer. Peanut oil is often used often in high heat cooking because of its high smoke point at 440 degrees, but canola oil still has a fairly high smoke point of 400 degrees so it is still a good choice. Especially if you have any concerns about allergies.
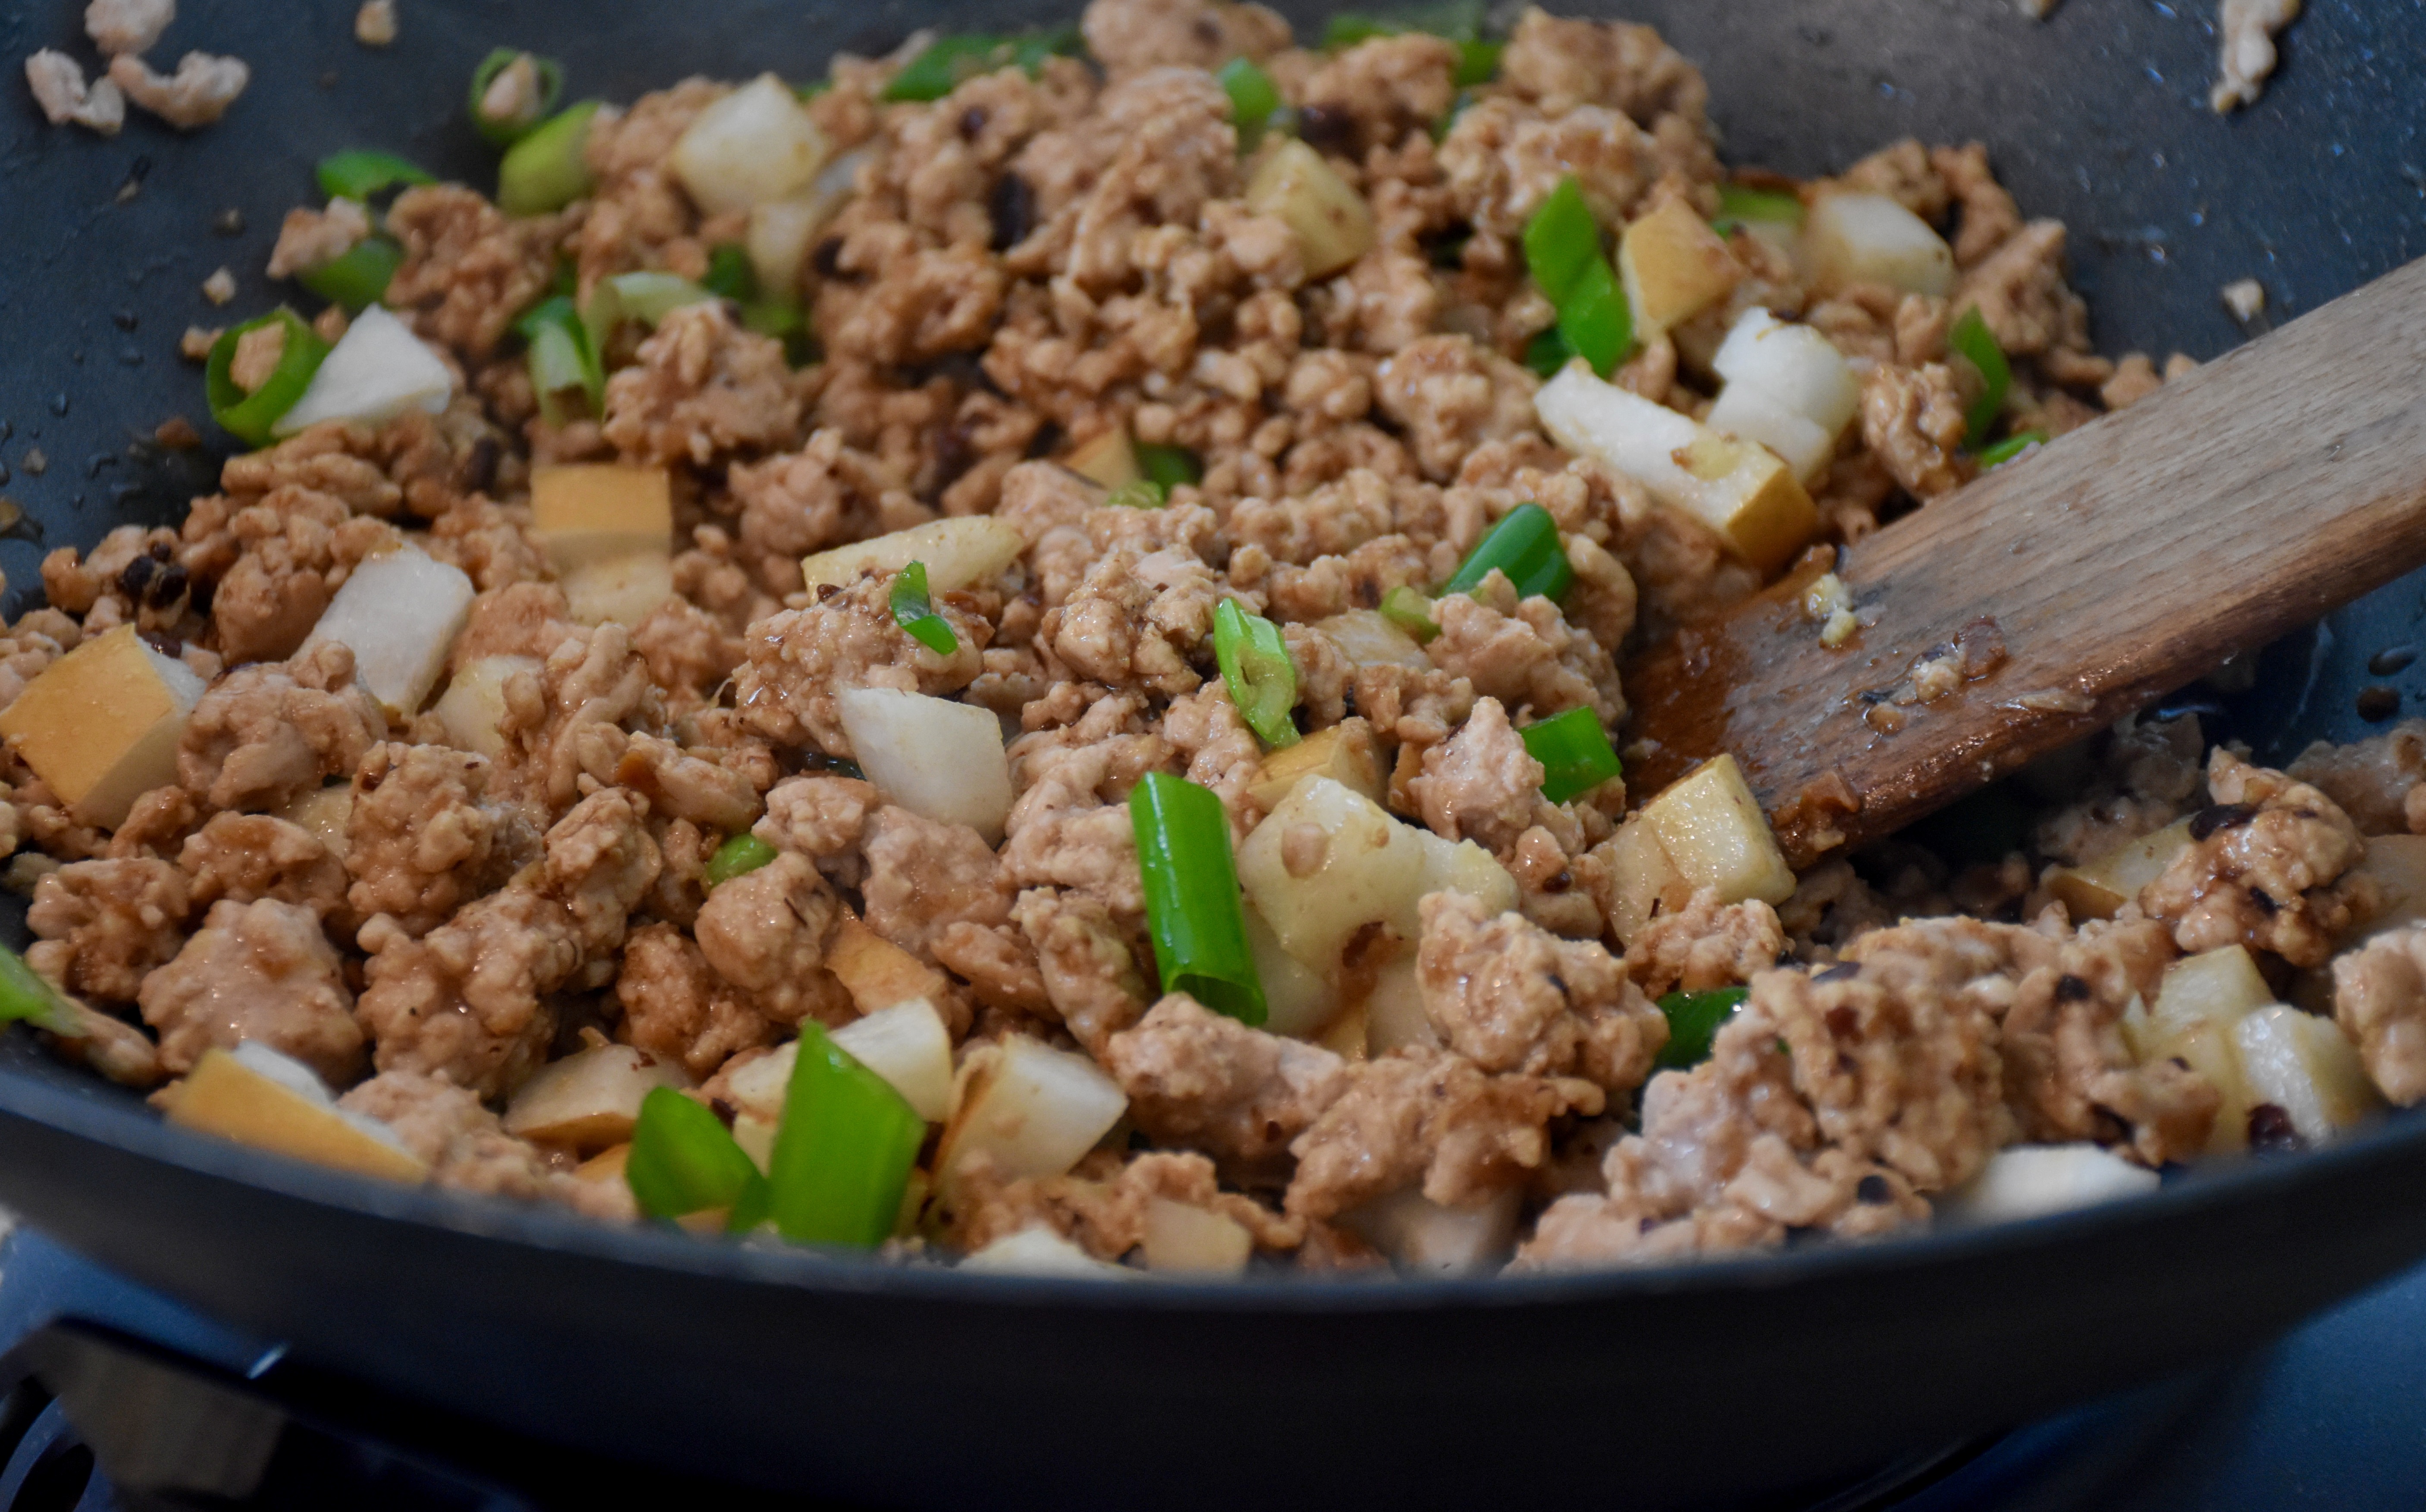
Add the ginger to the wok for about 30 seconds. Then add in your pork and cook while stirring until your pork is no longer pink. Add the bean sauce and cook and stir for about two minutes.
Finally, add in your noodles, green scallions, pears and 1 teaspoon of sesame oil and quickly toss them and serve.
Quicker than takeout, this recipe is unbelievably good and quick. A one bowl meal for any busy night that will have you savoring each bite. Reichl knows food and this recipe and every tale in her book will leave you hungry for more.